Soracom IoT Starter Kit with Arduino MKR
Welcome!
Cellular connectivity opens up a world of possibilities for IoT development, letting you build devices that can connect to the cloud from almost anywhere — and we're excited to help you get started!
This Starter Kit includes an Arduino MKR board, which provides a familiar Arduino programming environment to capture data from sensors, and a Soracom IoT SIM card, which will let you send the data to the Soracom cloud and beyond over a cellular connection.
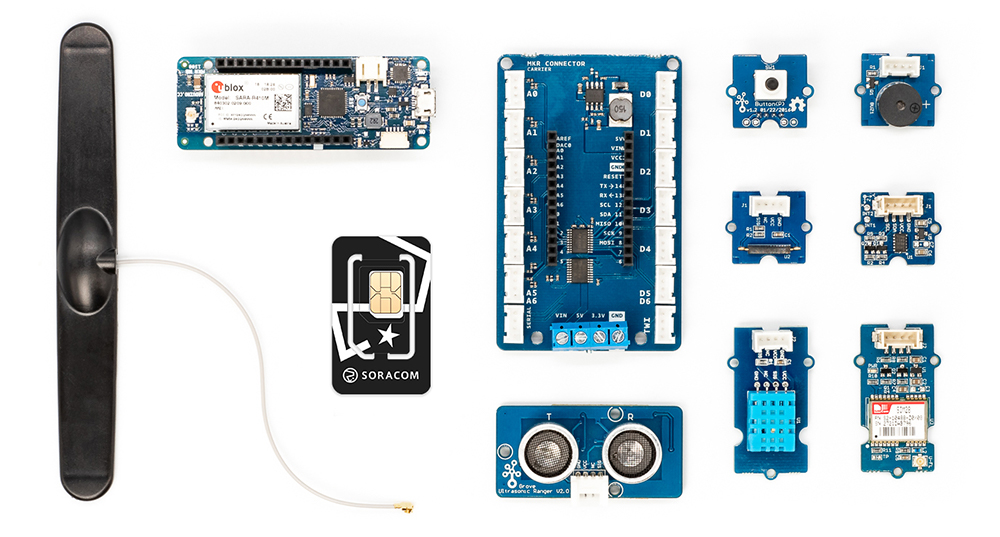
Starter Kit Contents
-
Soracom IoT SIM Card - The Soracom IoT SIM provides cellular data connectivity and SMS functionality on 2G, 3G, and 4G/LTE networks in over 170 countries around the world, fully managed right from your browser on the Soracom User Console.
-
Arduino MKR NB 1500 or Arduino MKR GSM 1400 [End of Life] (by Arduino) - The MKR series boards feature a low-power ARM processor suitable for a wide variety of IoT applications, and provides built-in LTE-M or GSM cellular connectivity with an easy-to-use Arduino development experience.
-
Dipole 2G/3G/LTE Antenna - A high performance antenna with a built-in connector that attaches directly to the MKR board, and includes adhesive to let you secure the antenna to your device.
-
Arduino MKR Connector Carrier (by Arduino, not included in certain kits) - A breakout board that allows you to easily connect Seeed Studio Grove sensors and modules to your Arduino MKR.
-
Grove Starter Kit (by Seeed Studio, not included in certain kits) - This kit includes seven of Grove’s most popular sensors and interfaces, as well as a series of cables (not pictured), to make rapid prototyping easy:
- Temperature and humidity sensor
- Ultrasonic Range sensor
- 3-axis accelerometer
- Magnetic switch
- GPS receiver
- Button
- Buzzer
Set up Your Soracom Account
Before we dive in, let's make sure your Soracom account is all set up.
Create a Soracom Account
-
Access the Soracom User Console by visiting: console.soracom.io
-
Click Sign up.
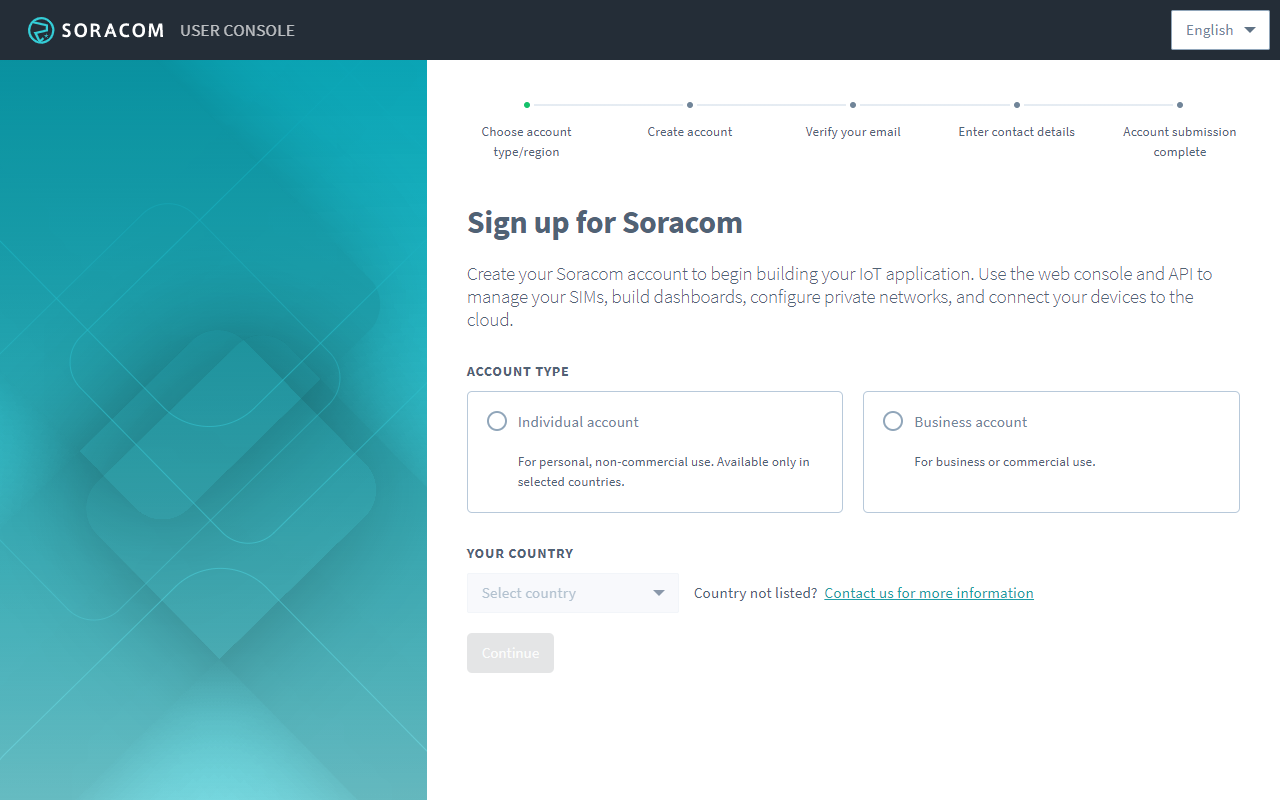
- Select the type of account you would like to create and the country where you are located. If you are located in the European Union or the United Kingdom, you will also be able to choose whether you would like to be billed in USD (US Dollars) or EUR (Euros). Then follow the instructions to register a new account, confirm your email address, and enter your contact information.
Register Your Payment Information
As Soracom services are post-paid, a credit card is required in order to begin using services. While any fees from Soracom services will be billed to your credit card, the Soracom IoT SIM card included in your Starter Kit also includes a USD $10.00 or USD $20.00 coupon credit (depending on which kit you purchased), enough to cover basic service and data fees for a few months. First, let's get our payment information set up.
-
Access the Soracom User Console by visiting: console.soracom.io
-
Sign in using your email address and password.

-
Click your email address at the top right corner, and select Payment settings:

-
Click New payment method, and enter your credit card information.

If you have trouble adding your credit card, try another card, or refer to the Additional Resources and Support section at the end of this guide in order to contact Soracom Support.
Register Your Soracom IoT SIM Card
Now that your Soracom account is set up, let's register the Soracom IoT SIM card that was included in your Starter Kit.
Normally, registering a Soracom IoT SIM card requires entering the ICCID and PUK numbers printed on the SIM card itself. However, when you purchased your starter kit from Soracom, the SIM card included in the kit was pre-registered to your account, which allows you to easily complete SIM registration without typing any numbers.
While manually registering a SIM using its ICCID and PUK is simple, pre-registration will allow you to automatically register a large number of SIMs with a single click, if you plan on purchasing additional SIMs in the future.
-
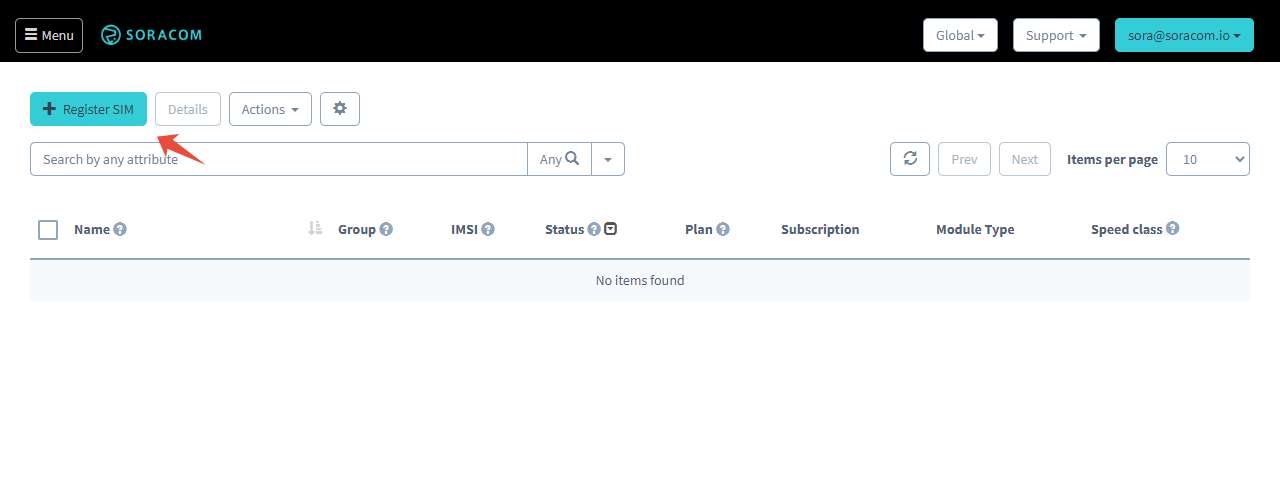
Click the Menu button at the top left corner, and select SIM Management.
-
Click Register SIM.
-
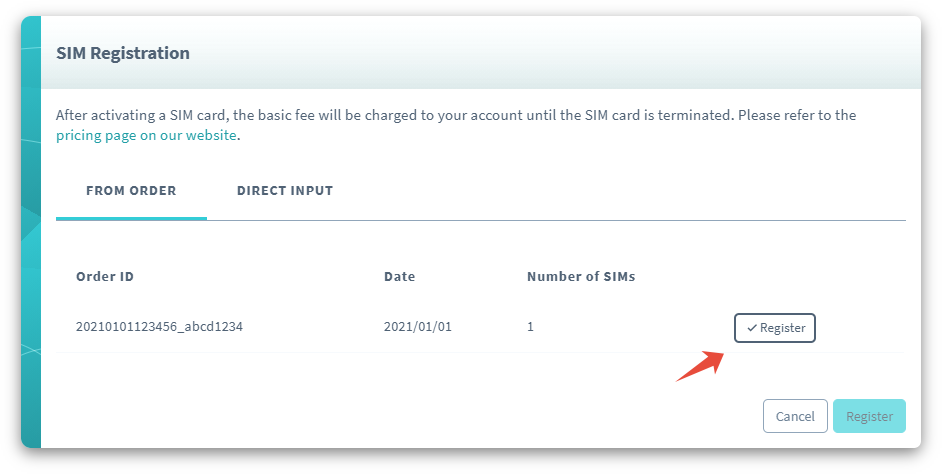
A dialog will appear asking how you would like to register your SIM. Within the From Order tab, the order that includes your Arduino MKR starter kit should be listed. Simply click the Register button next to your order:
Your SIM card will now appear in the list, and you can confirm it is Ready for cellular connections and currently Offline:

Once your SIM is registered, the USD $10.00 or USD $20.00 coupon will be added to your account, and at the end of each monthly billing cycle, this credit will automatically be applied to your balance. You can check the balance of your coupon at any time by clicking your email address at the top right corner, and selecting Manage coupons.
Your SIM card is now ready for use! In addition to registering and managing Soracom IoT SIM cards, the Soracom User Console gives you access to additional Soracom services, such as Soracom Beam and Soracom Lagoon. From the User Console, you can suspend or terminate your Soracom IoT SIM card, and disable other Soracom services at any time to stop fees.
For more information on using the User Console, refer to the Additional Resources and Support section.
Set up Your Arduino MKR
Insert the Soracom IoT SIM Card
-
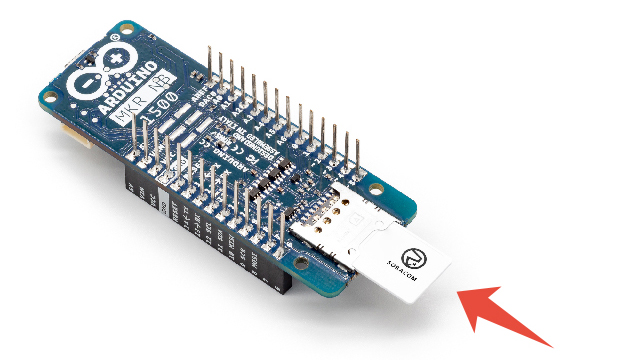
Carefully remove the Soracom IoT SIM card from its packaging.

The plan01s SIM included in the starter kit is a 3-in-1 design that allows you to conveniently break out the SIM card into standard/mini (2FF), micro (3FF), and nano (4FF) form factors. As the Arduino MKR uses the micro (3FF) size, take care to remove the micro SIM card size when removing it from its packaging.
-
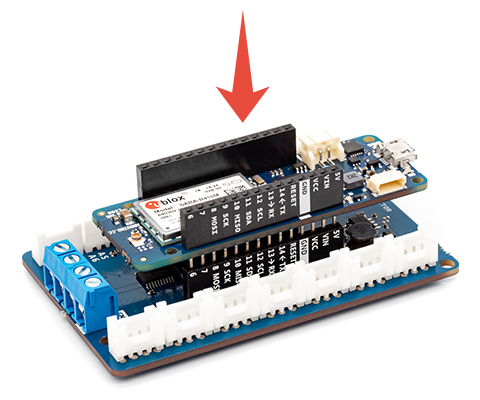
Insert Soracom IoT SIM card into the Arduino MKR, ensuring the SIM card is oriented correctly:

-
Attach the included antenna to the Arduino MKR.

Now with the SIM card inserted and antenna attached, let's set up your computer to program the Arduino MKR.
Set up Arduino IDE
Arduino provides several methods for programming the Arduino MKR boards. For simplicity, we'll use the Arduino Desktop IDE app (also known as Arduino IDE) in this guide.
If you're interested in exploring other ways to program your Arduino MKR, take a look at Arduino's getting started guides:
If you haven't installed the Arduino Desktop IDE app to your computer yet, take a moment to download and install it from the official Arduino Downloads site.
Together with Arduino IDE, we also need to install:
- Arduino MKR board definitions
- Arduino MKR libraries
Finally, once everything is installed we will configure Arduino IDE for our Arduino MKR device.
Install Arduino MKR Board Definitions
In order for Arduino IDE to compile your code, you need to install the Arduino MKR board definitions.
-
Start Arduino IDE.
-
From Arduino IDE, click Tools Board Boards Manager....

-
In the Boards Manager, search for
Arduino SAMD. Find the Arduino SAMD Boards (32-bits ARM Cortex-M0+) board definition and click Install.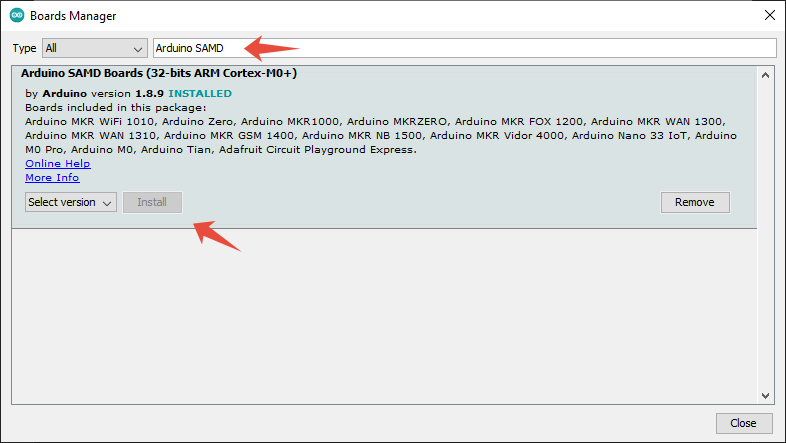
Install Arduino MKR Libraries
Next, let's install an Arduino MKR library. These libraries contain useful example sketches specific for the Arduino MKR boards, which will help you quickly add functionality to your board.
-
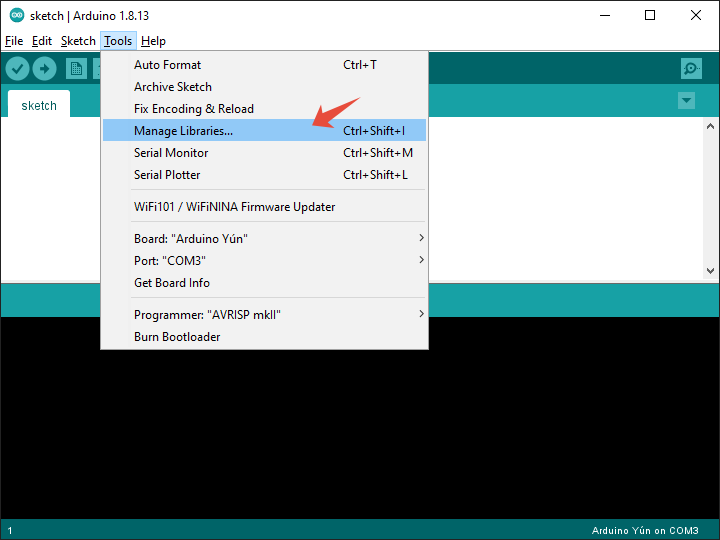
From Arduino IDE, click Tools Manage Libraries....
-
If you are using the MKR NB 1500 board, search for
MKRNB. If you are using the MKR GSM 1400 board, search forMKRGSM. Then install the library for your corresponding board.
Select Arduino MKR Board and Port
Last, let's tell Arduino IDE that our program should be compiled for our Arduino MKR board, and select the port where our MKR board is attached.
-
First, connect the Arduino MKR to your computer using an appropriate micro-USB cable (not included in the kit).
Note that some USB cables may only provide charging capabilities. You will need to use a USB cable that also supports data transfer in order for your computer to detect the Arduino MKR. If you have any trouble with the next steps, try using a different USB cable.
-
From Arduino IDE, click Tools Boards Arduino SAMD Boards (32-bits ARM Cortex-M0+). If you are developing for the MKR NB 1500, select Arduino MKR NB 1500. If you are developing for the MKR GSM 1400, select Arduino MKR GSM 1400.

-
Next, with your Arduino MKR connected to your computer, click Tools Port, then select the port that corresponds to your Arduino MKR.

Great! Everything is now set up, and we're ready to flash our first Arduino MKR program.
Test the Modem
The Arduino MKR library we installed earlier includes a simple program that tests that the u-blox modem on our MKR board is functioning correctly. We can use this as a quick test to check that we can successfully write a program to our MKR board.
-
Start Arduino IDE.
-
From Arduino IDE, click File Examples MKRNB or MKRGSM Tools TestModem. A new Arduino IDE window will open with the example code.
-
Check that your MKR is connected to your computer. Then click the Upload button.
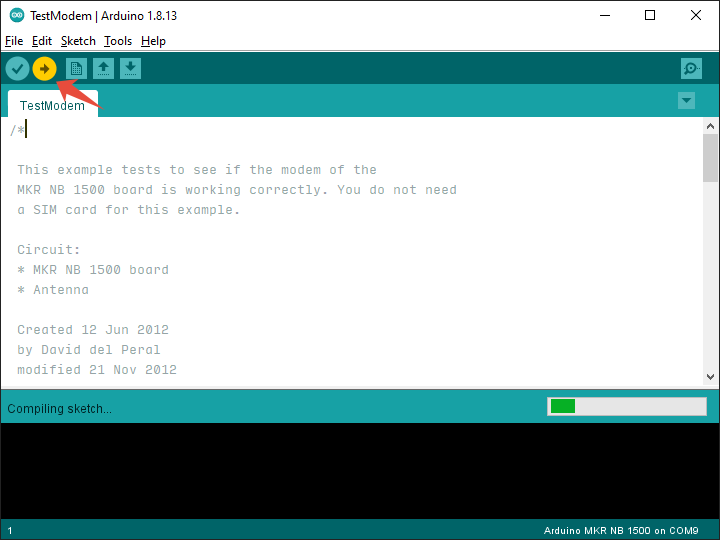
Arduino IDE will compile the sketch for your MKR, and once complete it will automatically upload it to your MKR.
-
Once the upload is complete, we can open the Serial Monitor to check the output of the program. Click Tools Serial Monitor.

If everything went well, you should be able to see the output of the program:
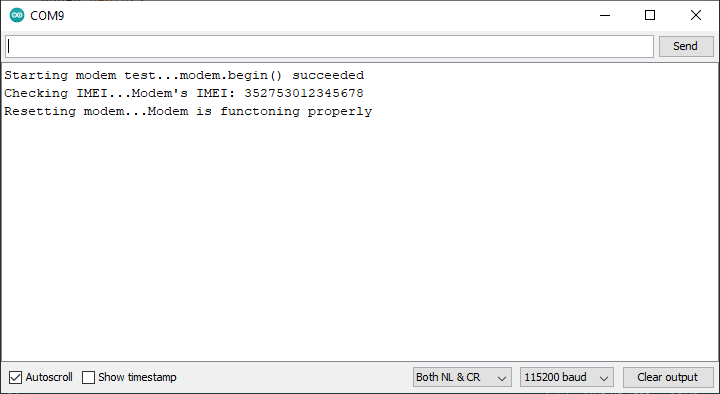
If part of the output is cut off, or you want to run the program again, you can close the Serial Monitor, press the RST button on your Arduino MKR, and then open the Serial Monitor again.
Congratulations! You've flashed your first Arduino MKR program! Although it's just a simple program to test the modem, you are now well prepared to connect your MKR to a cellular network and begin sending/receiving data!
Next, you can also take a look at the other example sketches included in the MKRNB or MKRGSM library:
- File Examples MKRNB
- NBWebClient - Connect to a cellular network and send a GET request to a website or server.
- Tools SerialSARAPassthrough - Connect directly to the u-blox SARA-R410M modem from the Serial Monitor in order to run AT commands.
- File Examples MKRGSM
- GsmWebClient - Connect to a cellular network and send a GET request to a website or server.
- Tools SerialGSMPassthrough - Connect directly to the u-blox SARA-U201 modem from the Serial Monitor in order to run AT commands.
Note that the TestModem example does not actually connect to a cellular network, but rather simply checks that the MKR board can access the u-blox modem correctly.
Additionally, if you are using the MKRNB, the u-blox SARA-R410M modem built into the board may come with a feature called Power Saving Mode (PSM) enabled by default. Depending on which cellular network you connect to, PSM may not be available, which may cause your modem to become unresponsive. If you have trouble connecting to a cellular network and sending data with your MKRNB, you can use the program from the Grove Sensor Data example below to reset your modem.
Send Grove Sensor Data to Soracom Harvest Data
If the Arduino MKR kit that you purchased included the Grove Sensor kit, you can follow these instructions to attach each sensor to your Arduino MKR and quickly begin sending sensor data to the cloud. In this example, we will enable the Soracom Harvest Data service for our SIM, which provides a simple way for us to collect sensor data and view it on the User Console.
Many services, including Harvest Data, are linked to groups. Groups let us manage multiple SIM cards together. When we enable Harvest Data for a particular group, all of the devices (SIM cards) that belong to that group will automatically be able to use Harvest Data. That way we can easily add more devices to the group without having to enable Harvest Data for each individual device.
To set everything up, we will need to perform the following steps:
- Create a group and assign our SIM to the group
- Enable Soracom Harvest Data for the group
- Upload a new program to our Arduino MKR, which will send sensor data to Soracom Harvest Data
Create a Group
Let’s first create a group for our SIM card.
-
If you're not already signed in, open https://console.soracom.io again and sign in using your email address and password.
-
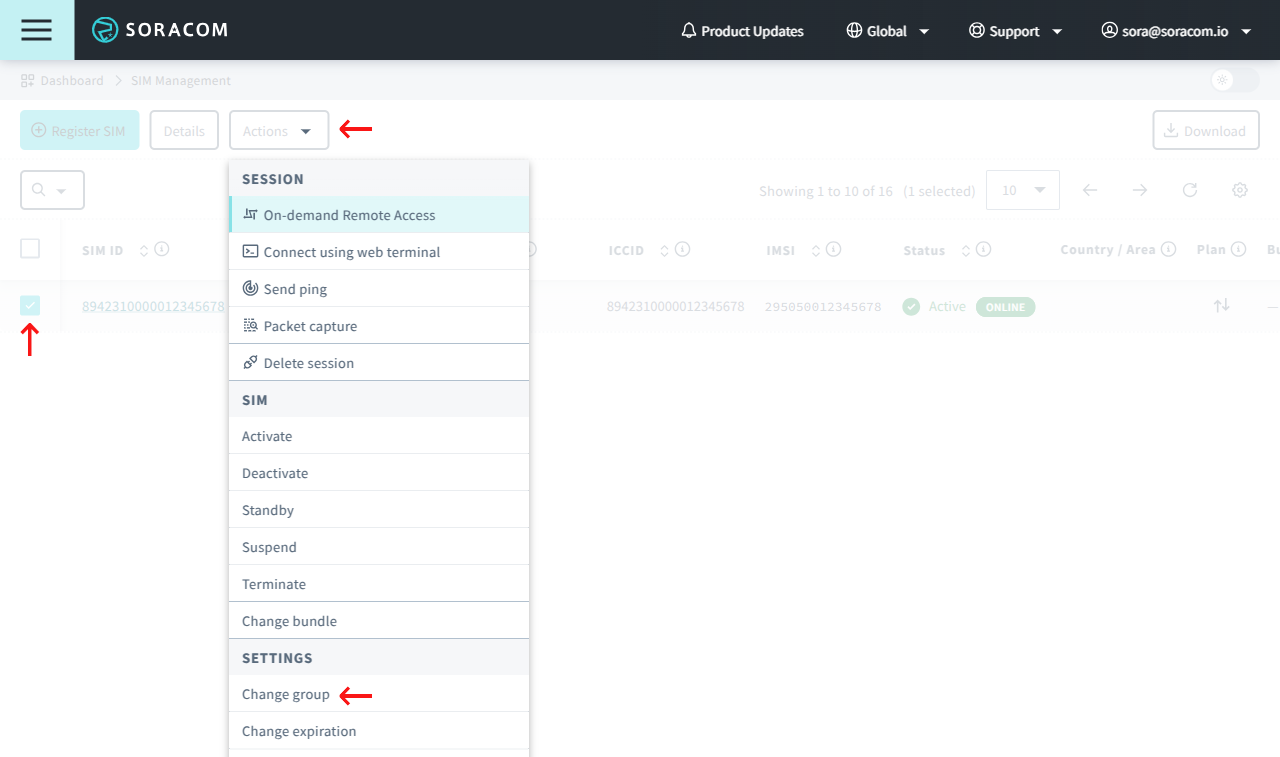
From the list of SIM cards in your account, click the checkbox next to your SIM card.
-
Then click the Actions menu, and select Change group.
-
We don’t have any groups yet, so let’s create one. Click the dropdown menu, and select Create group….

-
In the popup, give the group a name, such as Harvest Group, then click Create.

-
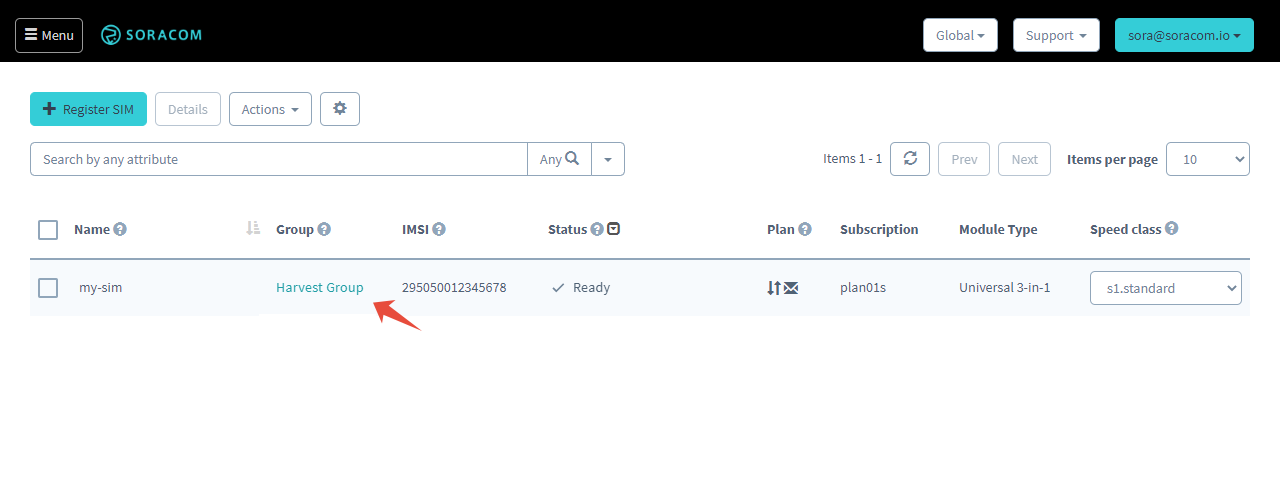
Our group has been created. Now let’s click Update to set our new group for our SIM card.

Enable Soracom Harvest Data
Next, let's enable Soracom Harvest Data for our new group.
-
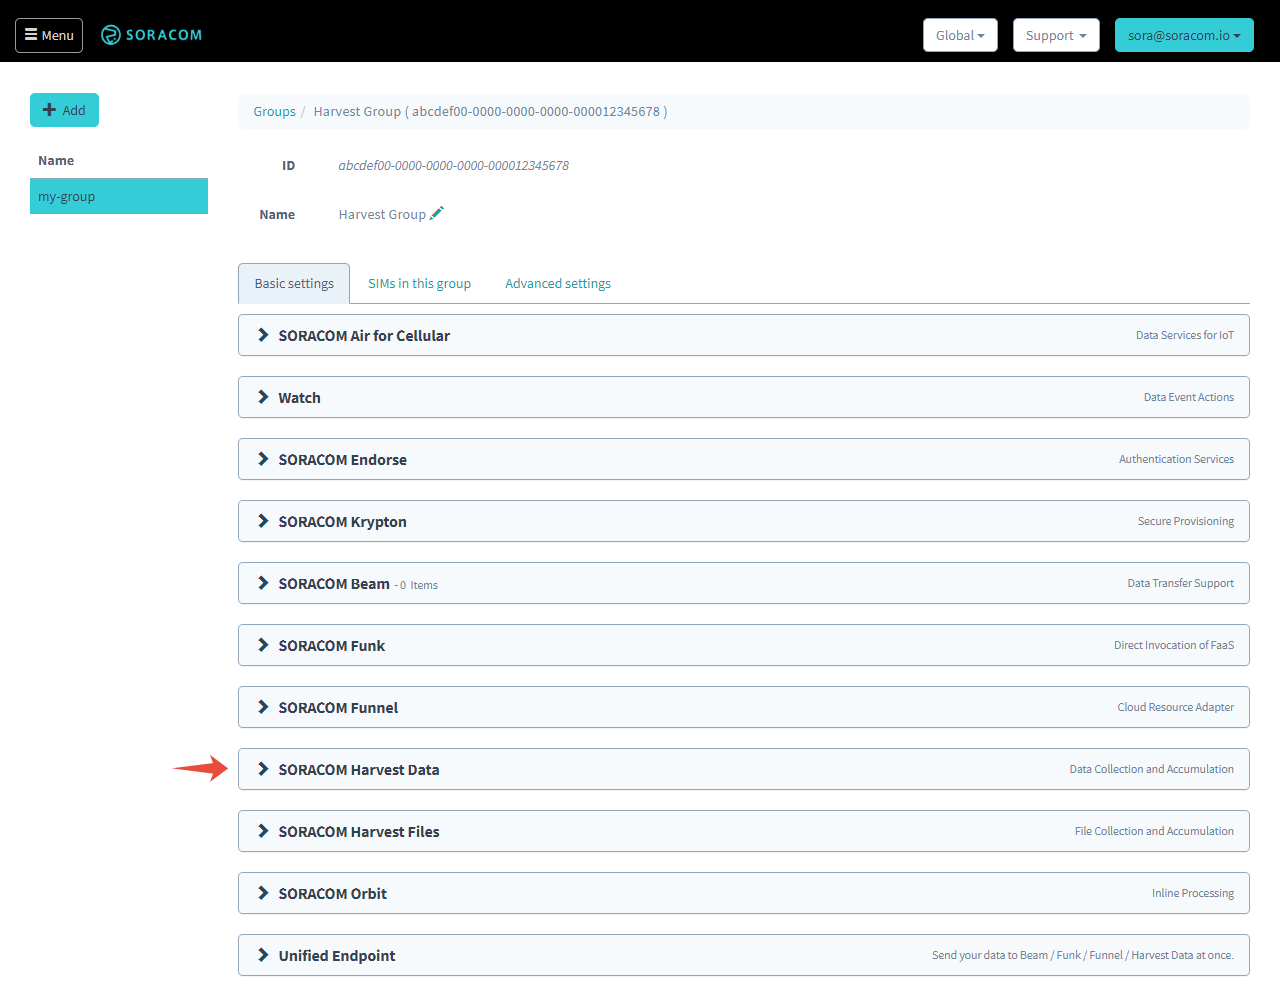
Click the name of the group underneath the Group column. This will open the group configuration page.
-
Click the Soracom Harvest Data panel to expand Harvest Data settings.
-
Click the toggle switch to turn Harvest Data ON, then click Save.
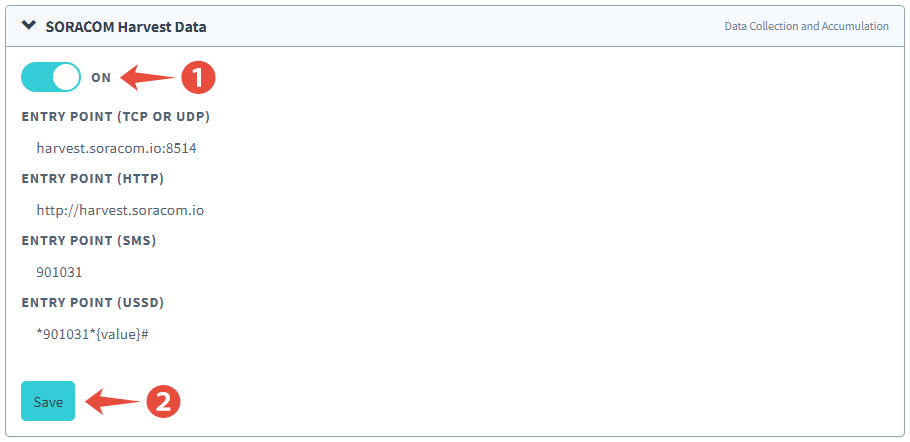
All done!
Send Data to Soracom Harvest Data
Now let's attach our sensors to the Arduino MKR.
-
Carefully insert the Arduino MKR into the Arduino MKR Connector Carrier board, making sure that the pins from the Arduino MKR correspond to the same pins on the Connector Carrier board.
-
Using the 4-pin Grove connector wires included with your Grove sensor kit, connect the sensors to the following ports on the Connector Carrier board:
Sensor Port Temperature and humidity sensor D0Ultrasonic Range sensor D1Magnetic switch D2Buzzer D33-axis accelerometer TWIGPS receiver Serial -
Connect the Arduino MKR to your computer using a micro-USB cable (not included).
-
Download or copy the sample Arduino Sketch for your Arduino MKR and Grove sensor from the Soracom Labs repository:
-
Start Arduino IDE, then open the Arduino sketch or paste the code into a new sketch.
- Click the Upload button.
Once the upload is complete, open the Serial Monitor to check the output of the program. Click Tools Serial Monitor. You should be able to see your Arduino MKR periodically reading the sensor values, and uploading the data to Soracom Harvest Data. If your output looks similar, then you have successfully configured your Arduino MKR to send sensor data to the cloud using a cellular connection!
Finally, let's head back to the User Console to check out the sensor data online.
-
On the User Console, click the Menu button, and select SIM Management.

- Click the checkbox next to your SIM card. Then click the Actions menu, and select View Harvest Data.
You should be able to see the same sensor data, along with a simple time-series chart.
Keep in mind, depending on your location or conditions, not all sensors will have data immediately. For example, the GPS sensor typically will need to acquire a GPS signal outdoors before the Arduino MKR can read any location data.
If you are able to see the data appear in Harvest Data, then congratulations! You've finished building a fully-functional prototype device that you can deploy anywhere within reach of a cellular signal, with sensor data sent to the cloud!
Next Steps
Now you can begin to extend this example application to build your own prototype. For example:
- Disable Soracom Harvest Data and enable Soracom Beam instead, in order to forward the sensor data to your own server.
- Enable Soracom Lagoon to build and customize more graphs, charts, and maps for your sensor data.
- Check out the comments in the Grove Sensor code above to learn how to disable any sensors you don't need, or customize the data that gets sent.
- Browse Seeed's extensive catalog of Grove sensors and modules to add different functionality to your device.
There's also a vast number of resources for advanced functionality built into your Arduino MKR. To get started, you can check out the additional cellular functions provided directly in the MKRNB and MKRGSM Arduino libraries:
If you'd like to learn what else the SAMD processor on your Arduino MKR board is capable of, you can take a look at Seeed's getting started guide:
And don't forget to check out Arduino's forums if you want to see what other people are building, or if you run into any issues writing your programs:
Additional Resources and Support
For complete information on Soracom User Console tools and capabilities, full documentation is available on the Soracom Developer Site.
If you run into any trouble, feel free to submit a support ticket:
- Sign in to your Soracom account.
- Click the Support menu and select Contact us. You will be taken to the Soracom Support portal.
- At the top of the portal, click the Create a ticket link.