Soracom IoT Starter Kit with Raspberry Pi
Some starter kits may ship with an older version of Raspbian OS. We recommend using the included Micro-SD card reader to flash the latest version of Raspbian to the Micro-SD card. Refer to the section How do I restore/reset my Raspberry Pi? below for instructions.
Welcome!
Cellular connectivity opens up a world of possibilities for IoT development, letting you build devices that can connect to the cloud from almost anywhere — and we're excited to help you get started!
This Starter Kit includes everything you need to quickly get up and running. We'll guide you through building a simple application that records data from an ultrasonic range finder (distance) sensor and sends it to the cloud for real-time visualization.
Afterwards, we'll give you some tips and ideas on how you can start customizing your application, and introduce additional Soracom services, like Soracom Beam for encrypting and forwarding data, and Soracom Lagoon for building powerful IoT dashboards, to help you leverage the power of the cloud.
Starter Kit Contents
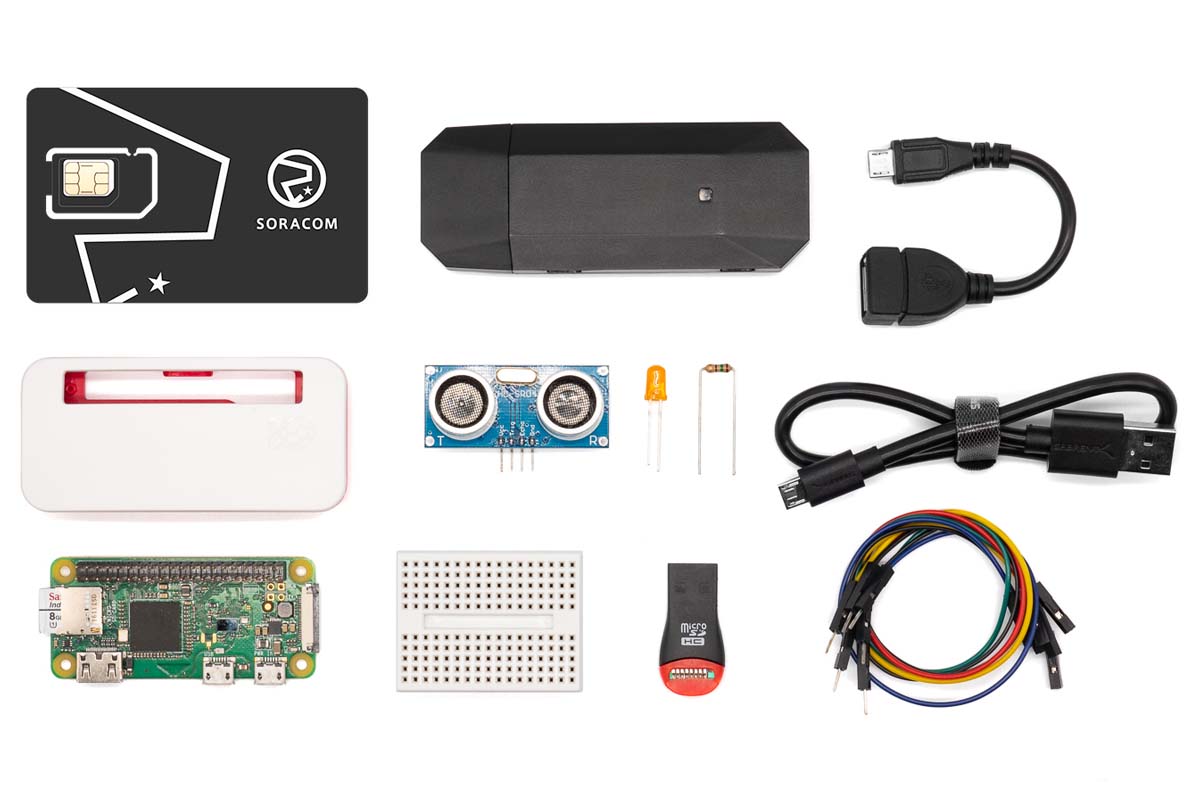
-
Soracom IoT SIM Card - The Soracom IoT SIM provides cellular data connectivity and SMS functionality on 2G, 3G, and 4G/LTE networks in over 170 countries around the world, fully managed right from your browser on the Soracom User Console.
-
Raspberry Pi Zero W and Official Case - Super-small and easy-to-use, this tiny Linux computer supports a wide variety of programming environments to make developing your project a breeze, with a case to keep everything protected.
For more information, visit: raspberrypi.com
-
Soracom Onyx LTE™ USB Modem (SC-QGLC4-C1) and USB OTG Adapter Cable - Soracom's own USB modem that provides global LTE cellular connectivity with 3G and 2G fallback, designed especially for IoT projects, plus a USB OTG cable to hook it up to the Raspberry Pi.
-
Ultrasonic Range Finder (HC-SR04) - This simple yet reliable sensor measures distance using ultrasonic vibrations, and accurate up to 10 feet. We love this sensor because we can quickly capture data for easy visualization, just by waving our hand in front of it!
-
16GB Micro-SD Card and Micro-SD Card Reader - Storage for your Raspberry Pi, plus a card reader so you can edit its contents on your computer.
-
Perma-Proto Breadboard and Color-coded Wires - For connecting the Ultrasonic Range Finder to your Raspberry Pi, without soldering anything.
-
LED and 15-Ohm resistor - Basic hardware for testing signal output.
-
USB-A to Micro-USB Cable - To power your Raspberry Pi from your computer or other USB power source.
- USD $10 Starter Kit Coupon - Coupon to cover Soracom service fees (such as data usage) as you build your project.
Ultrasonic Range Finder Project Overview
In this project, we will use our Raspberry Pi to capture data from our Ultrasonic Range Finder sensor, and send the data to Soracom Harvest Data using a cellular connection with the Soracom Onyx LTE™ USB Modem and the Soracom IoT SIM card. Harvest Data will take care of saving the data, and also automatically generate graphs so we can visualize the data in real-time.
The first half of this project — creating a Soracom account, setting up the Raspberry Pi, and configuring the Soracom Onyx LTE™ USB Modem — we only need to perform one time.
Once completed, we can easily build our project by:
- Connecting our sensor to the Raspberry Pi,
- Using a Python script to read the sensor data and send it to Harvest Data, and
- Accessing Harvest Data to see our data.
After completing the project, we can easily begin modifying it to add more functionality. Since we have full control over each step of the project, we can add or change sensors and control interfaces, write additional code for more interactivity, and extend cloud integration with other Soracom services, such as Soracom Beam for sending data to custom servers, and Soracom Lagoon for building powerful dashboards.
Before we get ahead of ourselves, let's start the initial setup!
Setup Your Soracom Account
Before we dive in, let's make sure your Soracom account is all set up.
Create a Soracom Account
-
Access the Soracom User Console by visiting: console.soracom.io
-
Click Sign up.

- Select the type of account you would like to create and the country where you are located. If you are located in the European Union or the United Kingdom, you will also be able to choose whether you would like to be billed in USD (US Dollars) or EUR (Euros). Then follow the instructions to register a new account, confirm your email address, and enter your contact information.
Register Your Payment Information
As Soracom services are post-paid, a credit card is required in order to begin using services. While any fees from Soracom services will be billed to your credit card, your Starter Kit also includes USD $10.00, enough to cover service fees for this project for approximately 3 months. First, let's get our payment information set up.
-
Access the Soracom User Console by visiting: console.soracom.io
-
Login using your email address and password.

-
Click your email address at the top right corner, and select Payment settings:

-
Click New payment method, and enter your credit card information.

If you have trouble adding your credit card, try another card, or refer to the Additional Resources and Support section at the end of this guide in order to contact Soracom Support.
Apply Your Starter Kit Coupon
If your starter kit included a coupon code, use the following steps to apply the coupon to your Soracom account.
If your starter kit does not include a coupon code, the coupon has been pre-registered to the SIM card and will be applied to your account once you have registered your SIM card. Proceed to the next section to register your SIM card. You can still check the balance of your coupon using the steps below.
Next, let's add the coupon that was included in the Starter Kit.
-
Click your email address at the top right corner, and select Manage coupons:
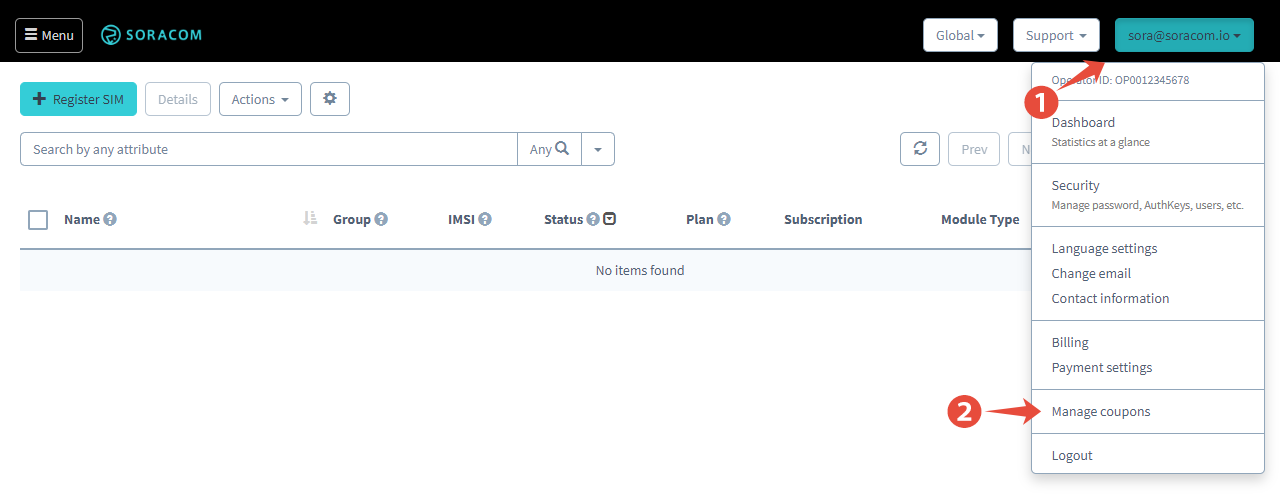
-
Then click Register coupon.
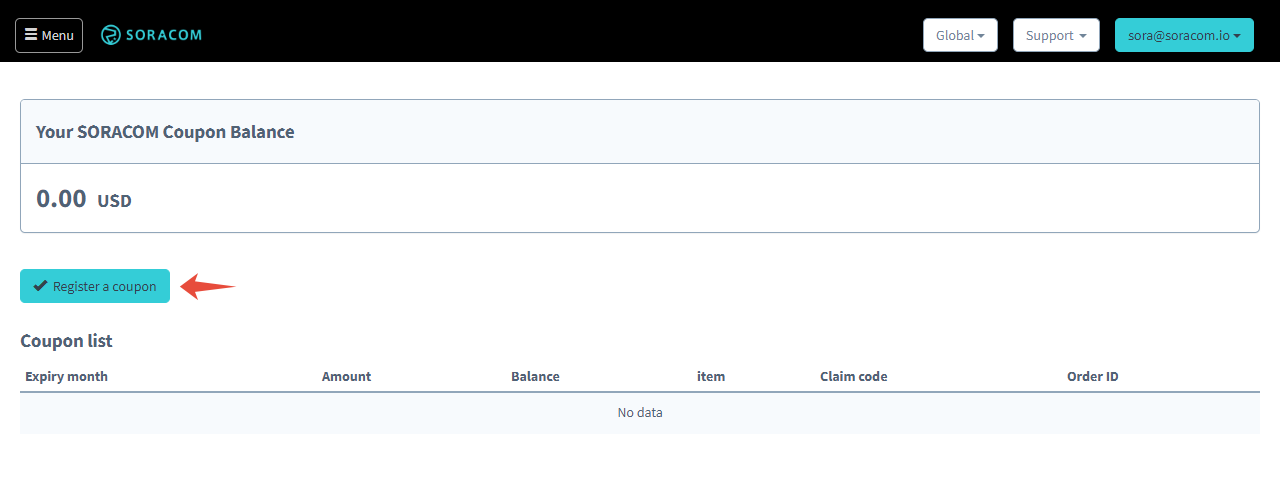
-
In the popup, enter the coupon code you received, and click Register.
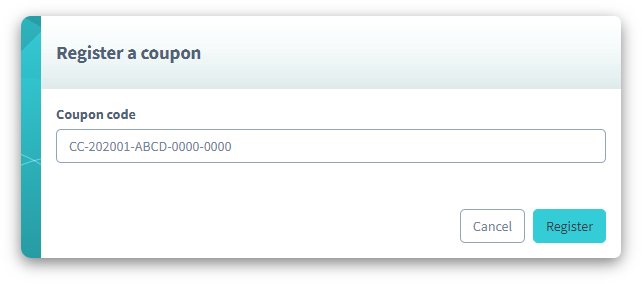
We should now see our coupon balance reflected in our account. At the end of each month, any usage charges will be deducted from our coupon balance (once the balance is used up, charges will be billed to our credit card normally). Now we can continue with building our project — and also try other ideas — without having to worry about initial usage charges.
Your account is now set up!
You can suspend or terminate your Soracom IoT SIM card, and disable Soracom Harvest Data at any time to stop fees associated with this project.
Register Your Soracom IoT SIM Card
Now that your Soracom account is set up, let's register the Soracom IoT SIM card that was included in this Starter Kit.
-
Click the Menu button at the top left corner, and select SIM Management.
-
Click Register SIM.

-
A dialog will appear asking for the ICCID and PUK of the SIM card. Enter the numbers printed on the back of the SIM card, leaving the Name and Group fields blank for now. Then click Register:
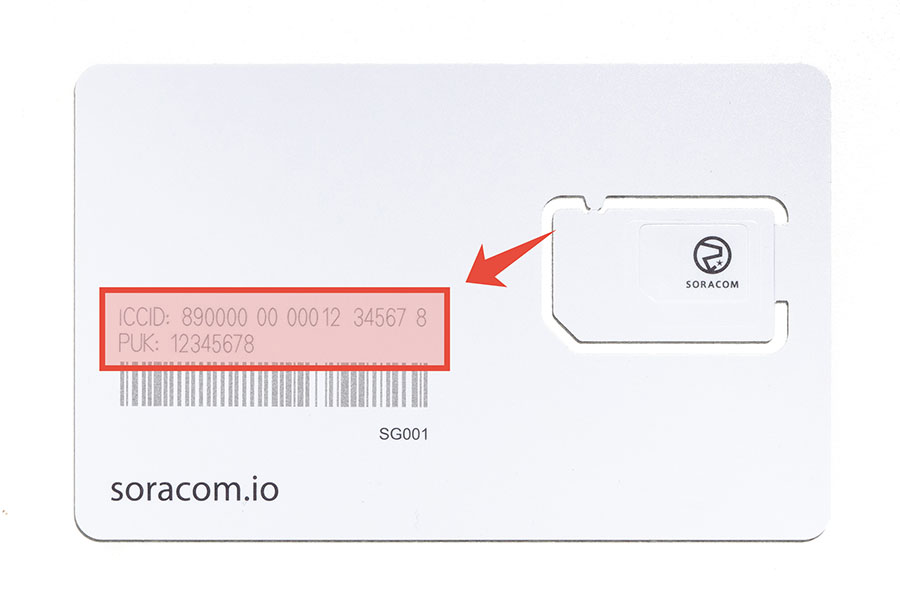
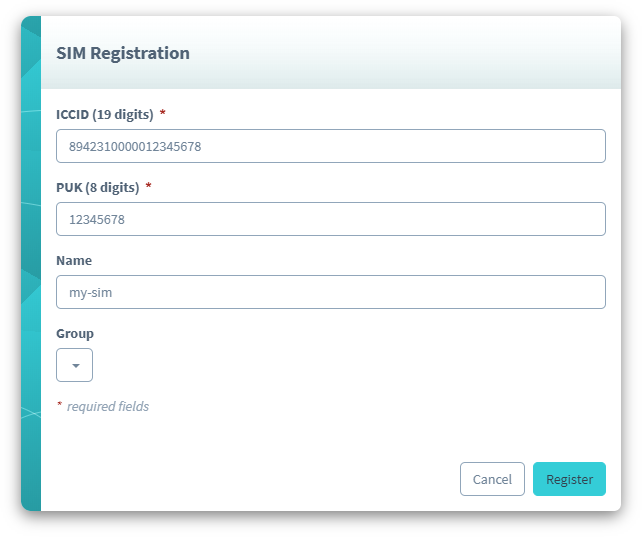
Your SIM card will now appear in the list, and you can confirm it is Ready for cellular connections:

If you have trouble registering your SIM card, refer to the Additional Resources and Support section at the end of this guide in order to contact Soracom Support.
Your SIM card is now ready for use! In addition to registering and managing Soracom IoT SIM cards, the Soracom User Console gives you access to additional Soracom services, such as Soracom Beam and Soracom Lagoon.
Later, we will return to the User Console to configure Soracom Harvest Data for this project.
For more information on using the User Console, refer to the Additional Resources and Support section.
Setup Your Raspberry Pi
This guide requires Raspberry Pi OS Bookworm (or later).
If your SD card ships with an older release (e.g. Stretch), you must reflash it with the latest Raspberry Pi OS before proceeding. Otherwise, the modem setup script will fail. See this section for details.
Although the Raspberry Pi Zero includes a lot of powerful functionality, we need to set up basic connectivity so we can interact with it. While we can connect a monitor and keyboard to our Pi just like a normal computer, let's get it connected to our WiFi network so we can connect to it and control it from our Mac or PC using SSH (Secure Shell).
Enable SSH and WiFi Settings
Raspberry Pi makes it easy to enable SSH and join a WiFi network without even using a monitor or keyboard. All we need to do is create a couple of files on the micro-SD card.
-
Carefully remove the micro-SD card that is installed in the Raspberry Pi Zero.
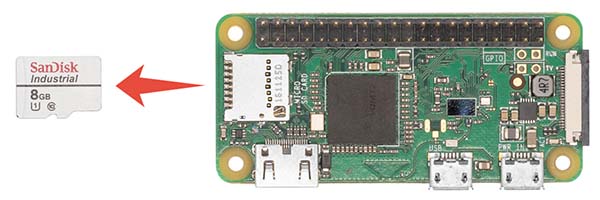
-
Insert the micro-SD card into the micro-SD card reader, then plug the card reader into your computer.

In some cases, your computer may ask if you want to format the micro-SD card. The micro-SD card is preloaded with Raspberry Pi software, so make sure that you do not format it.
-
Using your computer's file explorer, open the micro-SD card drive (labelled BOOT).
-
Create an empty text file named
sshin the root directory. -
Create another text file named
wpa_supplicant.confin the root directory, with the following text:country=US ctrl_interface=DIR=/var/run/wpa_supplicant GROUP=0 update_config=1 network={ ssid="your_wifi_name" psk="your_wifi_password" key_mgmt=WPA-PSK scan_ssid=1 }Make sure to edit the
ssid=andpsk=lines with the name and password of your WiFi network, making sure that you keep the double quotes" "surrounding the WiFi name and password. -
Eject the micro-SD card drive from your computer, and re-insert the card into the Raspberry Pi.
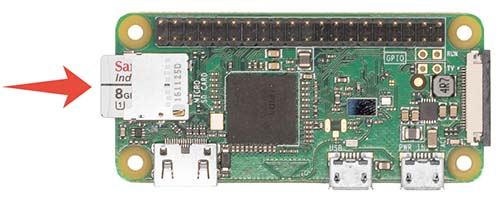
By creating these two files, the Raspberry Pi will detect them when it boots up, and automatically connect to our WiFi network and enable SSH access.
Assemble the Case and Power On
-
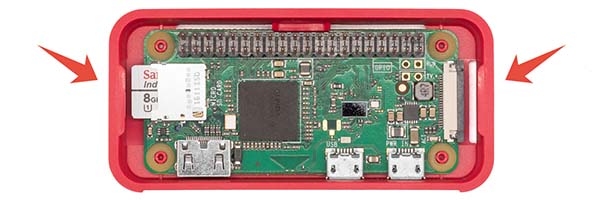
Place the Raspberry Pi in the case, making sure the connectors line up with the precut holes. Press firmly until the Raspberry Pi clicks into the case.
-
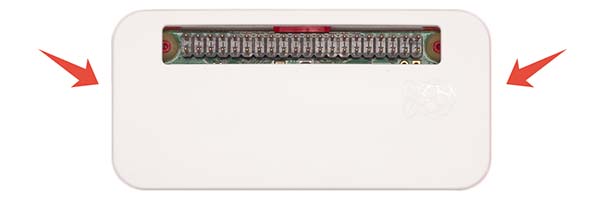
Place the cover on top, making sure the cut-out lines up with the Raspberry Pi's GPIO pins, and press the two halves together until you hear and feel a light click.
-
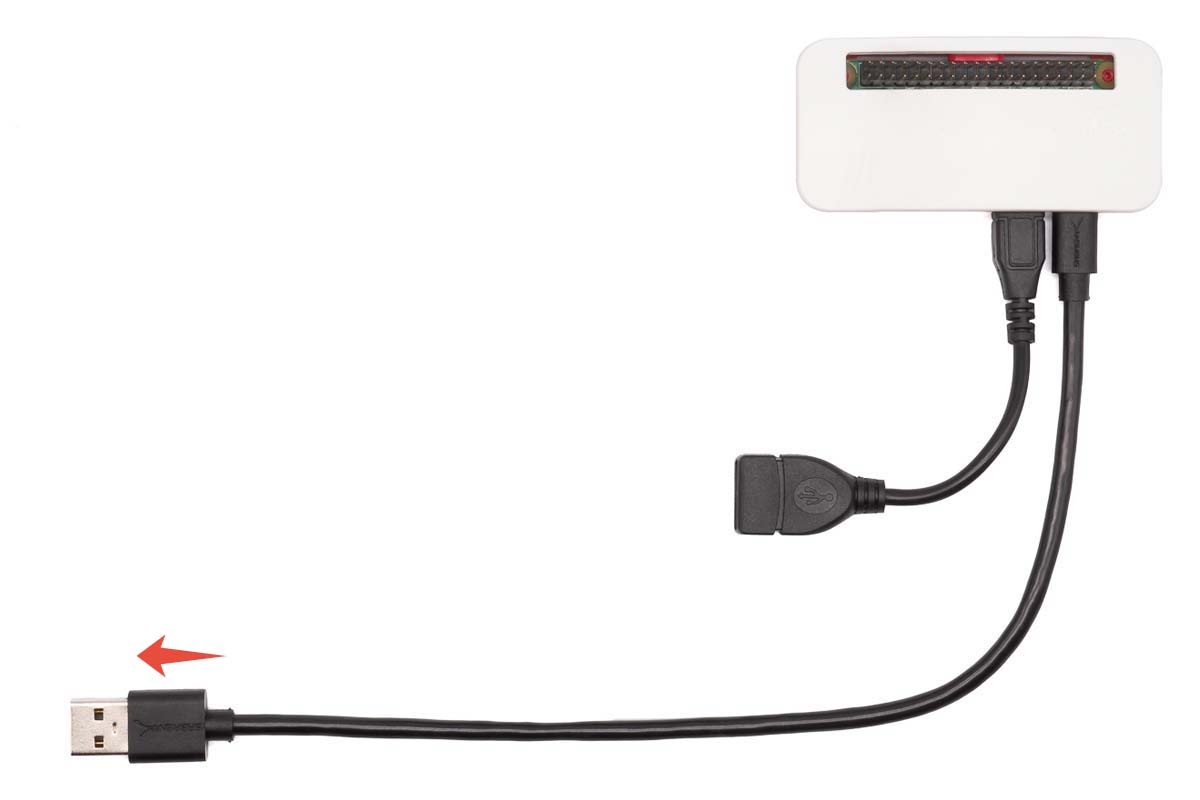
Connect the Raspberry Pi to your computer or other USB power source using the included USB-A to Micro-USB cable. The Raspberry Pi will automatically turn on as soon as the cable is connected.
Setup the Onyx LTE™ USB Modem
Now that our Raspberry Pi is all set up, let's get it connected to a cellular network using the Soracom Onyx LTE™ USB Modem. We need to insert the Soracom IoT SIM card into the modem, then configure the connection settings on the Raspberry Pi.
Insert the Soracom IoT SIM Card
-
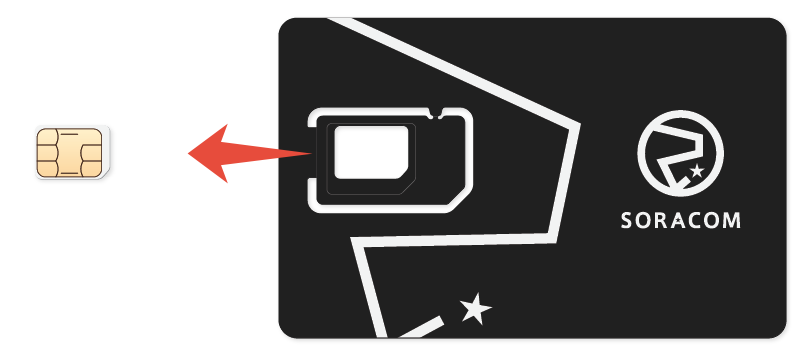
Gently detach the SIM card from the card package as shown below. Note that the card package allows you to detach the SIM card into three different sizes, to fit a variety of devices. As the Soracom Onyx LTE™ USB Modem uses the smallest size, make sure to detach the smallest size accordingly.
-
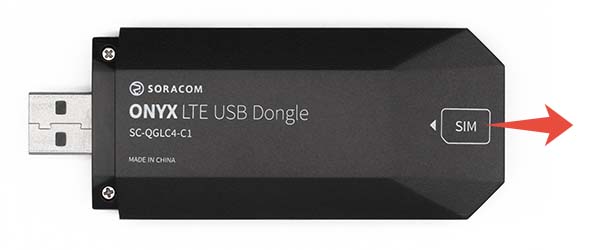
Next, firmly press and slide the rear cover of the modem to open the SIM card slot.
-
Insert your SIM card into the slot as shown below, making sure the angled corner of the SIM card is oriented correctly. When fully inserted, the Soracom logo should be just barely visible.
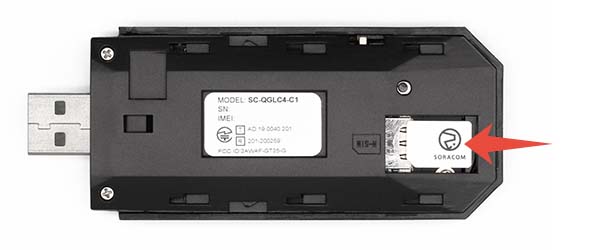
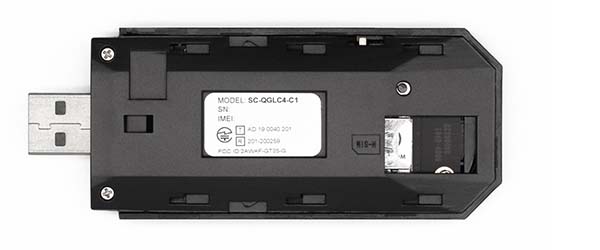
- Slide the cover back into place.
Our modem is now ready, but before we plug it in, let's connect to our Raspberry Pi first to set it up.
Install the USB Modem
In order to configure the cellular connection, we need to connect to the Raspberry Pi. As we mentioned before, we're going to connect using SSH (Secure Shell).
SSH is a command line application. That means rather than using a graphical interface, we will enter some text commands to connect to and then control our Raspberry Pi.
In order to run SSH, we need to open a command line or terminal application. Each operating system's command line is different, so let's first check which one we will use:
- For Mac users, search Spotlight for the Terminal app, then click to open it.
- For Linux users, open your application drawer and open the Terminal app.
- For Windows users, click the Start Menu and search for Windows PowerShell, then click to open it.
For Windows 7 (and earlier) users, the default command line application does not support SSH. Refer to the Additional Resources and Support section for more information.
With the command line application open, we just need to find our Raspberry Pi's network address. Luckily, most modern operating systems allow us to use mDNS (multicast DNS) in order to automatically detect devices connected to our local network. Since we set up our Raspberry Pi to connected to our WiFi network, we can use raspberrypi.local as the network address, and our computer will automatically search for devices that match that address.
mDNS is built into Mac OS, many Linux distributions, later versions of Windows 10, and Windows 11. Additionally, the raspberrypi.local address may not work if you have more than one Raspberry Pi device connected to your WiFi network. If you are using an older operating system without mDNS, or are unable to connect to your Raspberry Pi using the raspberrypi.local network address, refer to the Additional Resources and Support section for alternative methods.
Now, let's connect to our Raspberry Pi!
-
In your command line window, type the following command and press Enter:
ssh pi@raspberrypi.local -
Since this is the first time we're connecting to the Raspberry Pi, we'll get a message asking us to confirm the connection. Type yes and press Enter.
The authenticity of host 'raspberrypi.local' can't be established. Are you sure you want to continue connecting (yes/no)? yes -
A message should appear asking for the Raspberry Pi's password. Login using password:
raspberry:pi@raspberrypi.local's password: _Note: As you type the password, no characters will be displayed. However, the password will still be entered, so just press Enter after you finish typing the password.
If everything went well, you should see a welcome message, with the following line at the bottom of your command window:
_This is the Raspberry Pi's command line input, and it means that you can now run commands directly on the Pi!
If you receive an error, or don't see the command line input, refer to the Additional Resources and Support section and contact Soracom Support for help connecting to your Raspberry Pi.
Any time you restart your Raspberry Pi or disconnect its power, the SSH connection will be lost. Once your Raspberry Pi is powered on again, simply follow the steps above again to reconnect.
Now that we're connected to our Raspberry Pi, let's configure the USB modem.
-
Download the Soracom Starter Kit modem setup script:
sudo curl -O https://soracom-files.s3.amazonaws.com/connect/setup_eg25.sh -
Next, modify the file properties so that we can run it:
sudo chmod +x setup_eg25.sh -
Then all we have to do is run it, and the script will take care of everything else:
sudo ./setup_eg25.sh
The setup_eg25.sh script will first install some required packages and get our Raspberry Pi prepared. Once it's ready, it will ask us to plug in our modem:
>---
>Installing required packages (this may take a few minutes)...
>Updating package list... Done!
>Installing network-manager... Done!
>Installing usb-modeswitch... Done!
>
>---
>Setting up modem...
>Please plug in your modem now: _
So, let's plug it in!
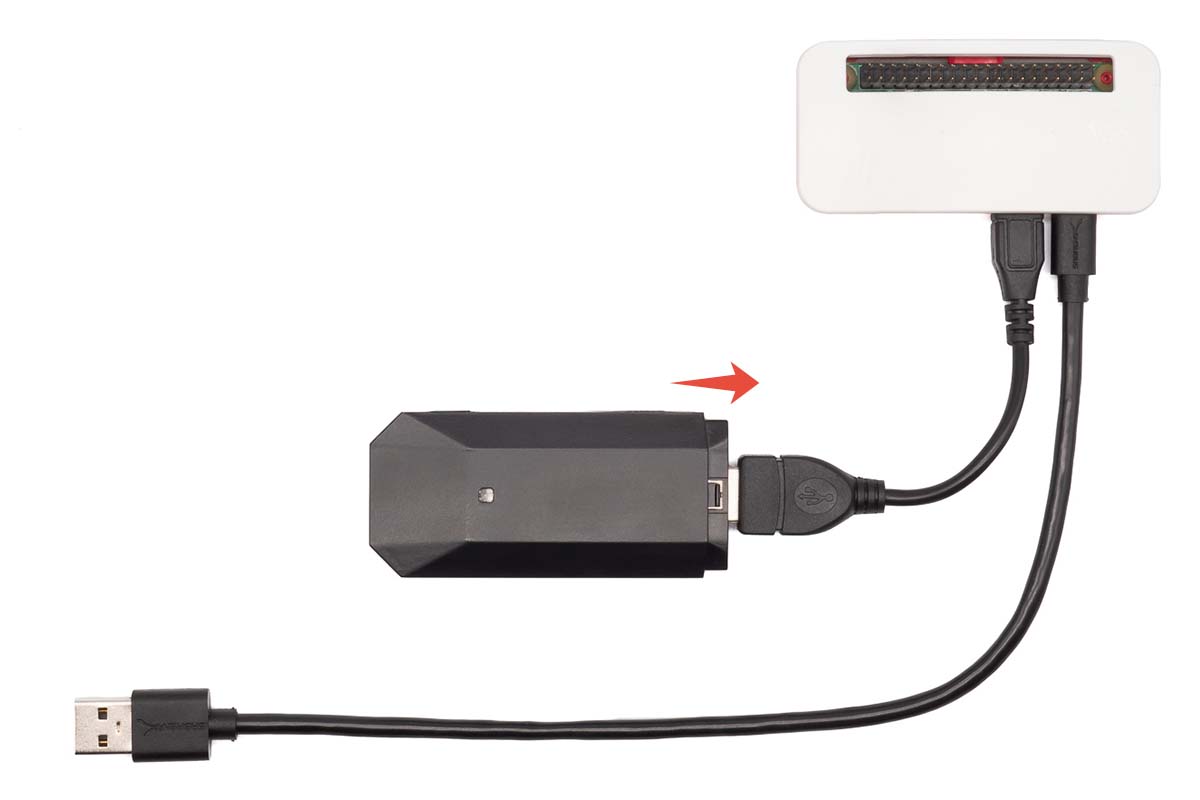
Now, the script will finish configuring the USB modem, adding the Soracom cellular connection profile, and setting up a custom routing rule. We can check the progress of the script in our terminal window:
>---
>Adding Soracom route rule...
>Soracom route rule created: /etc/NetworkManager/dispatcher.d/90.soracom_route
>
>---
>Adding Soracom connection profile...
>Connection profile added: soracom
>
>---
>Setup complete!
>
_
Since our USB modem (and Raspberry Pi!) is now connected to a cellular network, you might be wondering about data usage fees. Not to worry! The setup script has gone ahead and added a custom route, so that only data sent to the Soracom platform (such as to Soracom Harvest Data or Soracom Beam) will be sent using the cellular connection. As long as our Pi is also connected to WiFi, all other data will be sent using the WiFi connection.
If you would like to learn more about what the setup_eg25.sh script does, refer to Appendix section. This may be helpful if you want to modify the connection configuration, such as changing routing rule or customizing connection behavior.
If everything went well, congratulations — you've successfully completed the hard part! Now would be a great time to grab a cup of coffee and have a quick break!
Setup the Ultrasonic Range Finder
The HC-SR04 Ultrasonic Range Finder sensor uses sonar to determine distance to an object, much like a bat or dolphin. It offers excellent non-contact range detection with high accuracy and stable readings in an easy-to-use package.
These types of sensors are often used to measure the level of liquid in a tank, in smart trash cans that detect the level of trash, or even to check the presence of a car in a parking spot or car wash.
For this project, we'll use it just to detect the distance of our hand from the sensor, and capture that data using Soracom Harvest Data.
When connecting sensors and other devices to the Raspberry Pi, there is a risk of creating a short-circuit that may permanently damage your Raspberry Pi. Before continuing, disconnect your Raspberry Pi from its power source by unplugging the USB-A to Micro-USB cable.
Connect the Sensor
-
The Ultrasonic Range Finder has four pins. Carefully insert these pins into the included breadboard, making sure to follow the breadboard orientation indicated below:
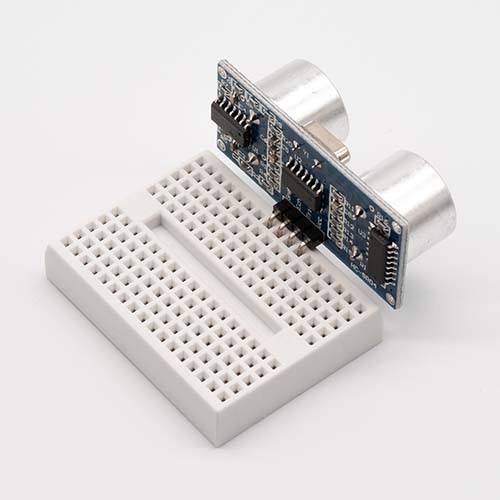
Note that the exact location where the pins are inserted is not important. However, the sensor must be oriented correctly relative to the breadboard.
-
Next, insert the color-coded wires into the breadboard, so that each wire is directly adjacent to one of the sensor pins. If possible, use the following colors for the corresponding pin:
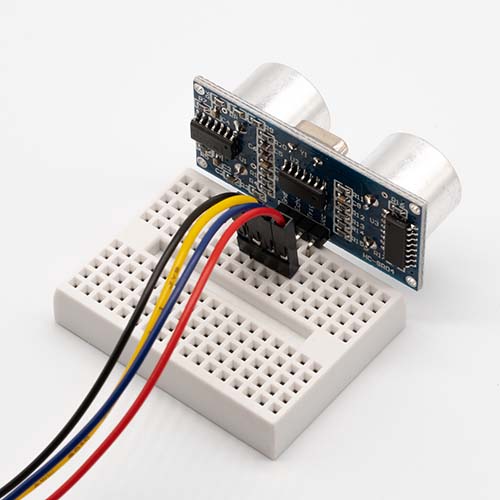
Note that each color-coded wires has a male end and a female end. Use the male end to connect to the breadboard.
-
Last, connect each of the wires to the Raspberry Pi GPIO pins, using the corresponding wire color:
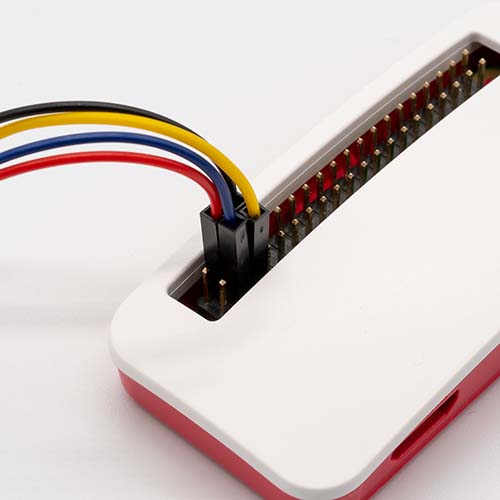

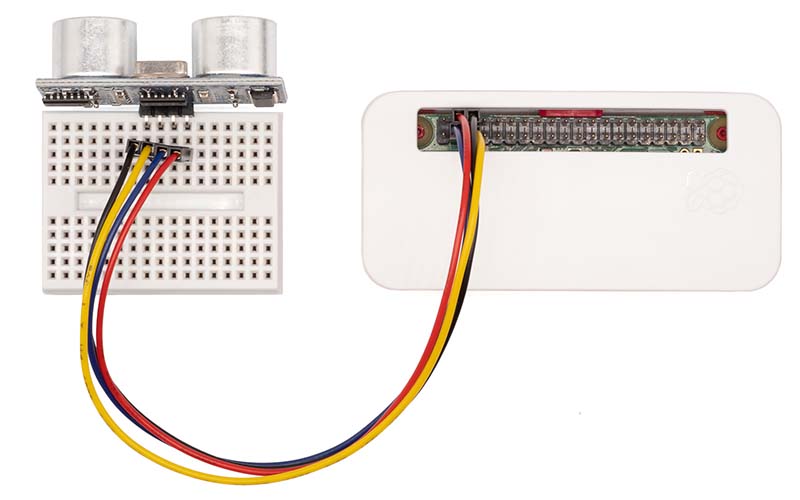
Note that pins 1 and 2 on the Raspberry Pi will be open (unconnected).
Because the Raspberry Pi is disconnected, there is no danger of creating a short-circuit. However, in general, it's always good practice to connect the POWER (red) wire last, so that you have a chance to check all wiring before turning your device on.
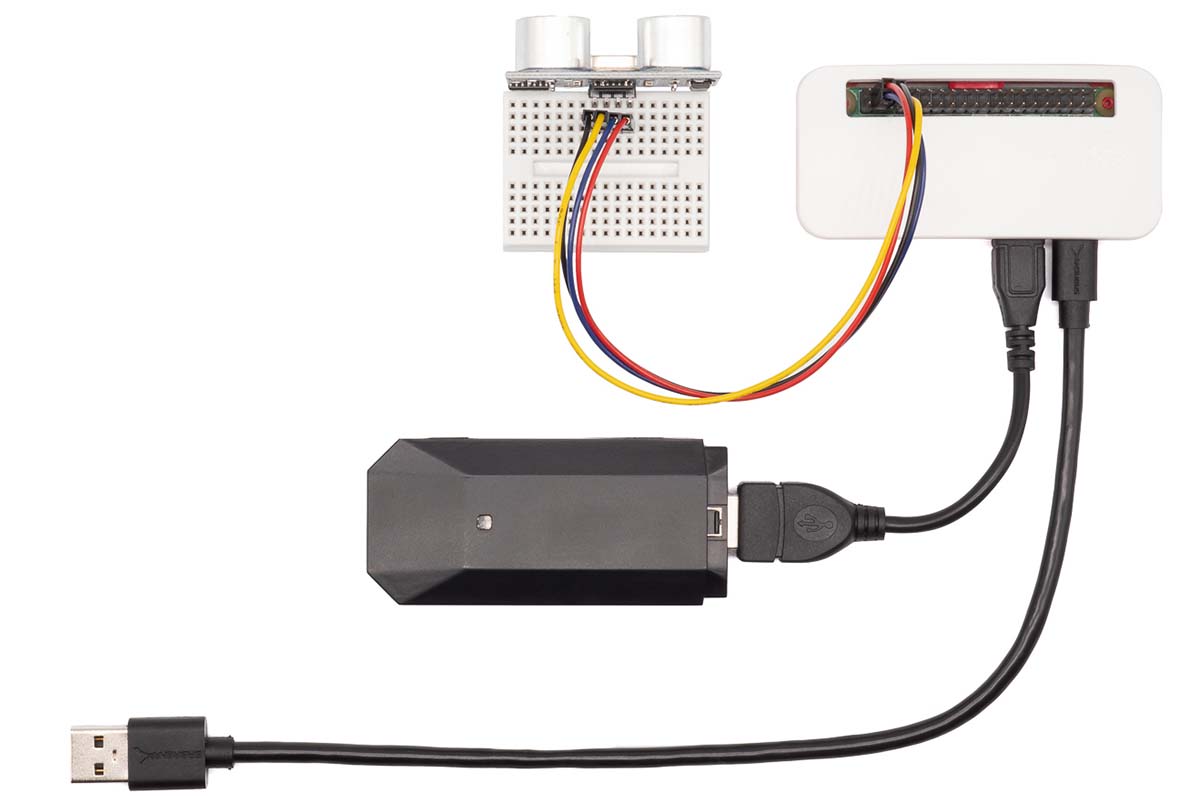
Now that we have everything wired up, let's give it a test!
Test the Sensor
Let's run a quick script to test that the sensor is connected properly, and that we can read data from it.
-
Plug the USB-A to Micro-USB cable back in to your computer or other USB power source to power on your Raspberry Pi again.
Keep a close eye on your Raspberry Pi! If the ultrasonic sensor or Raspberry Pi feels hot, or if you smell smoke, disconnect the Raspberry Pi from the power source immediately. Then double-check your wiring before trying again.
-
Give the Pi a minute or so to complete its boot up procedure. Then, open your command line application and connect to the Pi using SSH just as before:
ssh pi@raspberrypi.local -
Once we're logged in, let's download the following Python script:
curl -O https://soracom-files.s3.amazonaws.com/starterkit/hcsr04.py -
And then let's run the script using Python:
python hcsr04.py
If everything goes well, we should see some output similar to this:
Distance: 46.0 cm
Distance: 46.4 cm
Distance: 46.0 cm
Distance: 47.2 cm
We can wave our hand in front of the sensor to see the value change. Cool!
All that's left is to modify this script to send the distance data to Soracom Harvest Data.
For now, let's press Ctrl+C to stop the script.
Send Sensor Data to Soracom Harvest Data
While seeing the live sensor data with the test script is fun, it requires us to connect to our Raspberry Pi using SSH and manually running the script in order to see the data.
We can modify our script so that rather than outputting the distance data directly on the command line output, the data is sent to a server online. That way we can view the data, the same way we would view a typical website.
To accomplish this, we would normally have to set up our own server and configure it both to accept our data, and display the results on a webpage. While not uncommon, this is a relatively complicated process, involving services, firewalls, authentication, and more!
Fear not—Soracom Harvest Data to the rescue!

Harvest Data is a simple service that lets you capture data from your device and quickly visualize the data directly from the Soracom User Console, all without needing to set up any servers!
Harvest Data accepts data using a variety of common protocols (HTTP, TCP, UDP, and more!), which allows developers to quickly build proof-of-concepts in order to capture device data right away and confirm that their projects are working as intended.
Let's enable Harvest Data for our project, then update our script to start sending data!
Enable Soracom Harvest Data
We'll head back to the Soracom User Console in order to enable Soracom Harvest Data.
Many services, including Harvest Data, are linked to groups. Groups let us manage multiple SIM cards together. When we enable Harvest Data for a particular group, all of the devices (SIM cards) that belong to that group will automatically be able to use Harvest Data. That way we can easily add more devices to the group without having to enable Harvest Data for each individual device. Neat!
Let's first create a group for our SIM card:
- If you're not already logged in, open https://console.soracom.io again and login using your email address and password.
- From the list of SIM cards in your account, click the checkbox next to your SIM card.
- Then click the Actions menu, and select Change group.
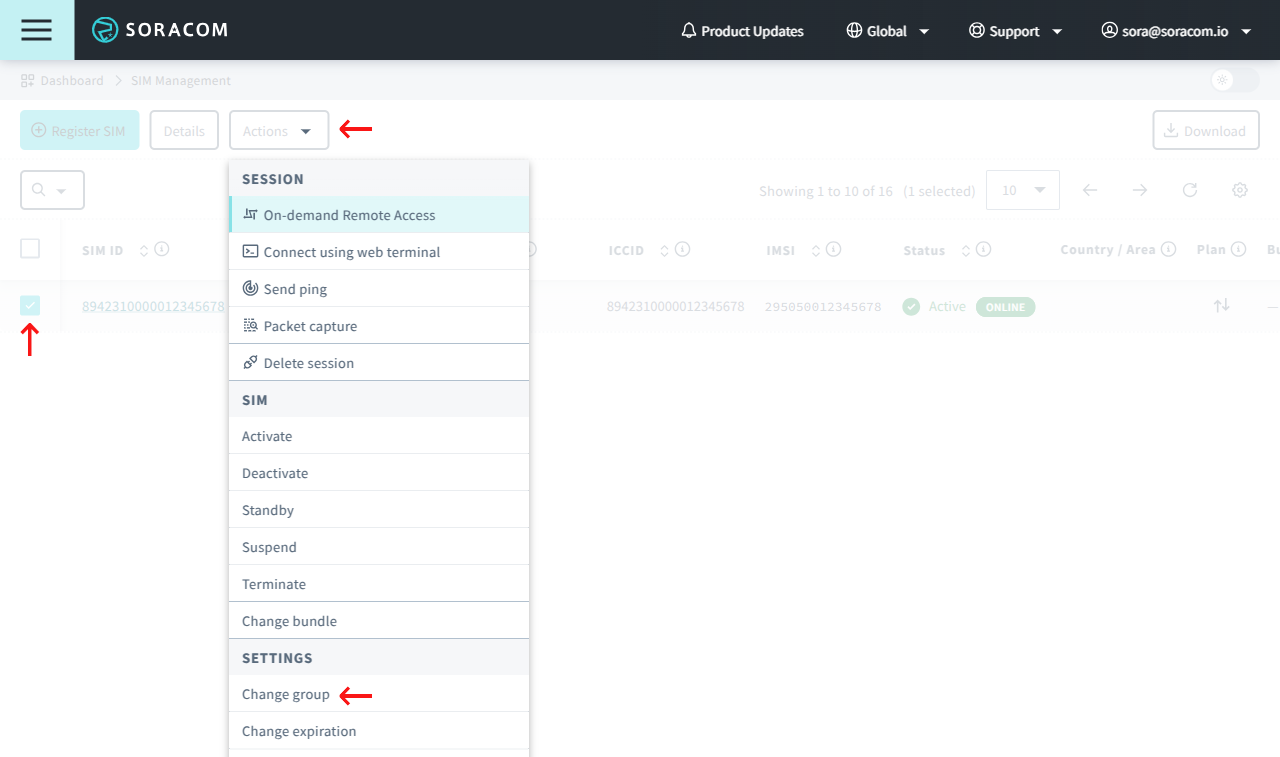
- We don't have any groups yet, so let's create one. Click the dropdown menu, and select Create….
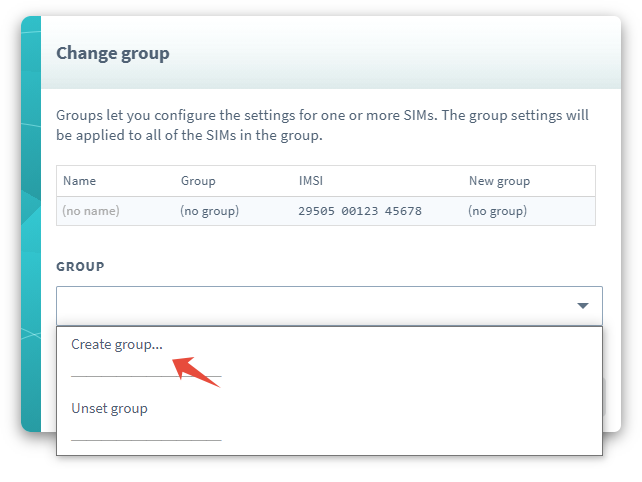
- In the popup, give the group a name, such as Harvest Group, then click Create.

- Our group has been created. Now let's click Update to set our new group for our SIM card.

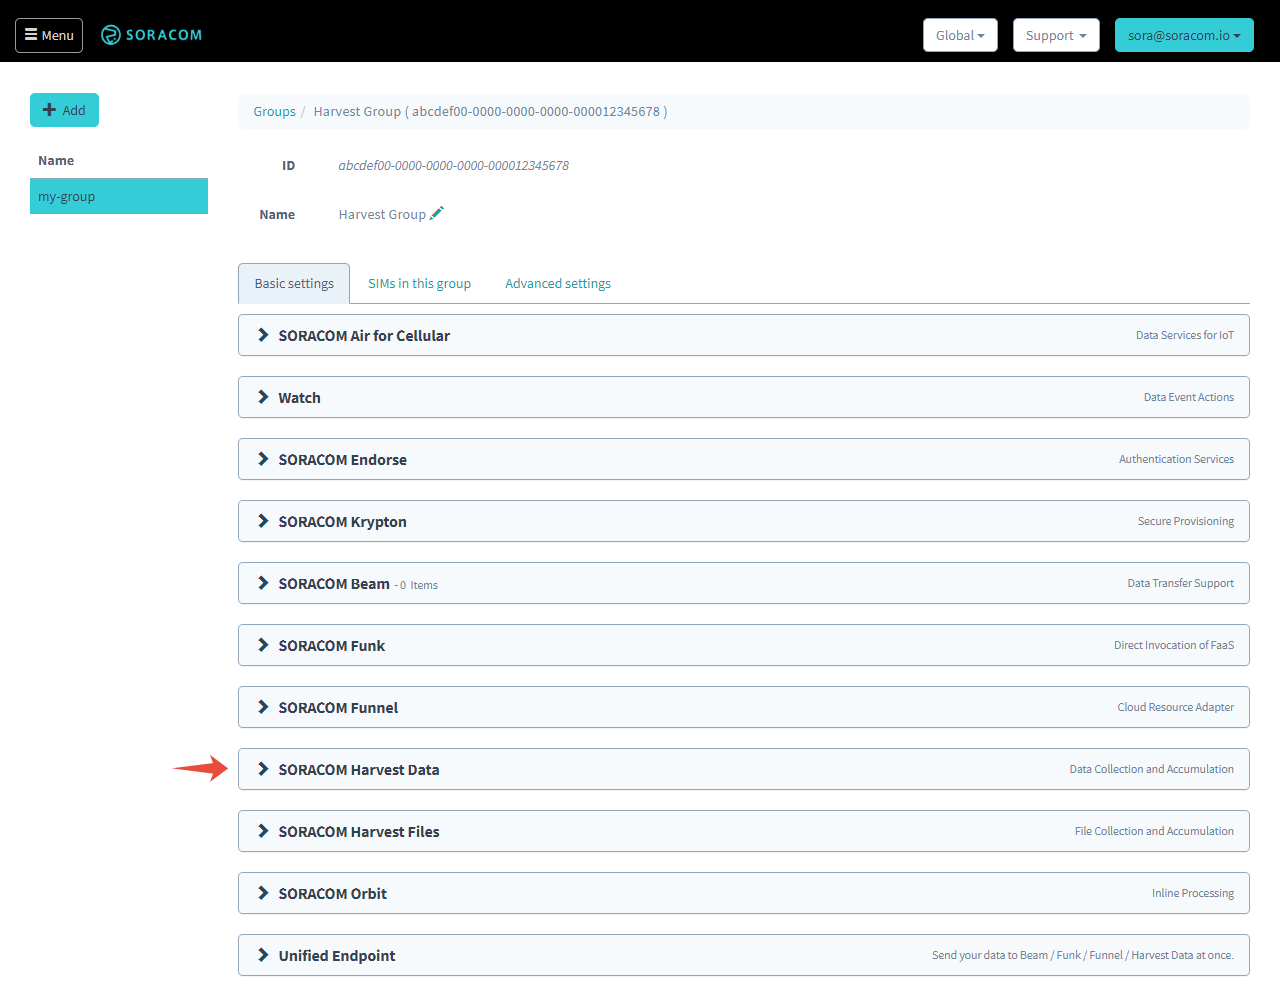
- Next, let's enable Harvest Data for our new group. Click the name of the group underneath the Group column. This will open the group configuration page.
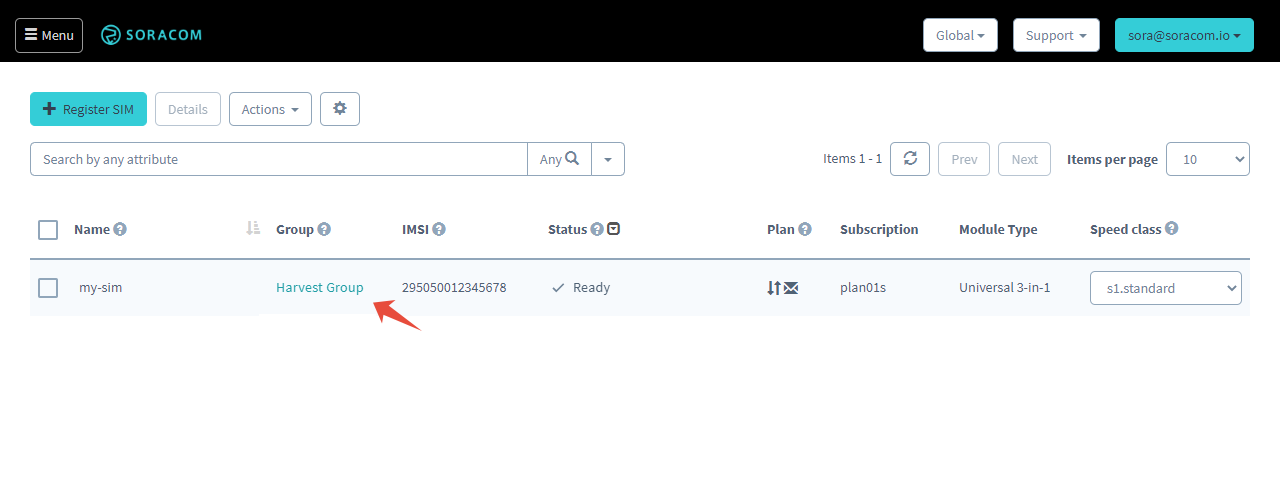
- Click the Soracom Harvest Data panel to expand Harvest Data settings.
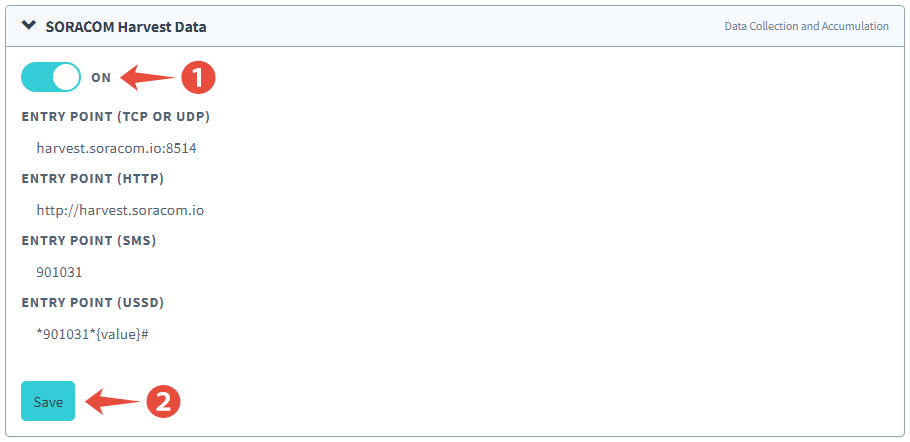
- Click the toggle switch to turn Harvest Data ON, then click Save.
All done!
Send Test Data to Harvest Data
Before we start sending our sensor data, let's quickly check that Soracom Harvest Data will receive data from our Raspberry Pi.
-
Back in our command line window (connected to our Raspberry Pi using SSH), run:
curl -v -d "Hello Harvest!" http://harvest.soracom.ioWhen we run the command, we should see some output that looks like this:
* Hostname was NOT found in DNS cache
*   Trying 100.127.111.111...
* Connected to harvest.soracom.io (100.127.111.111) port 80 (#0)
> POST / HTTP/1.1
> User-Agent: curl/7.38.0
> Host: harvest.soracom.io
> Accept: */*
> Content-Length: 14
> Content-Type: application/x-www-form-urlencoded
>
* upload completely sent off: 14 out of 14 bytes
< HTTP/1.1 201 Created
< Date: Tue, 09 May 2017 15:55:55 GMT
< Server: nginx/1.6.2
< Content-Length: 0
< Connection: Close
<
* Closing connection 0
What we want to check is the line
< HTTP/1.1 201 Created. The 201 code is sent back from Harvest Data, and tells us that our data was successfully sent!
Let's head back to the User Console and open up Harvest Data to see our data:
-
Click the Menu button, and select SIM Management.
-
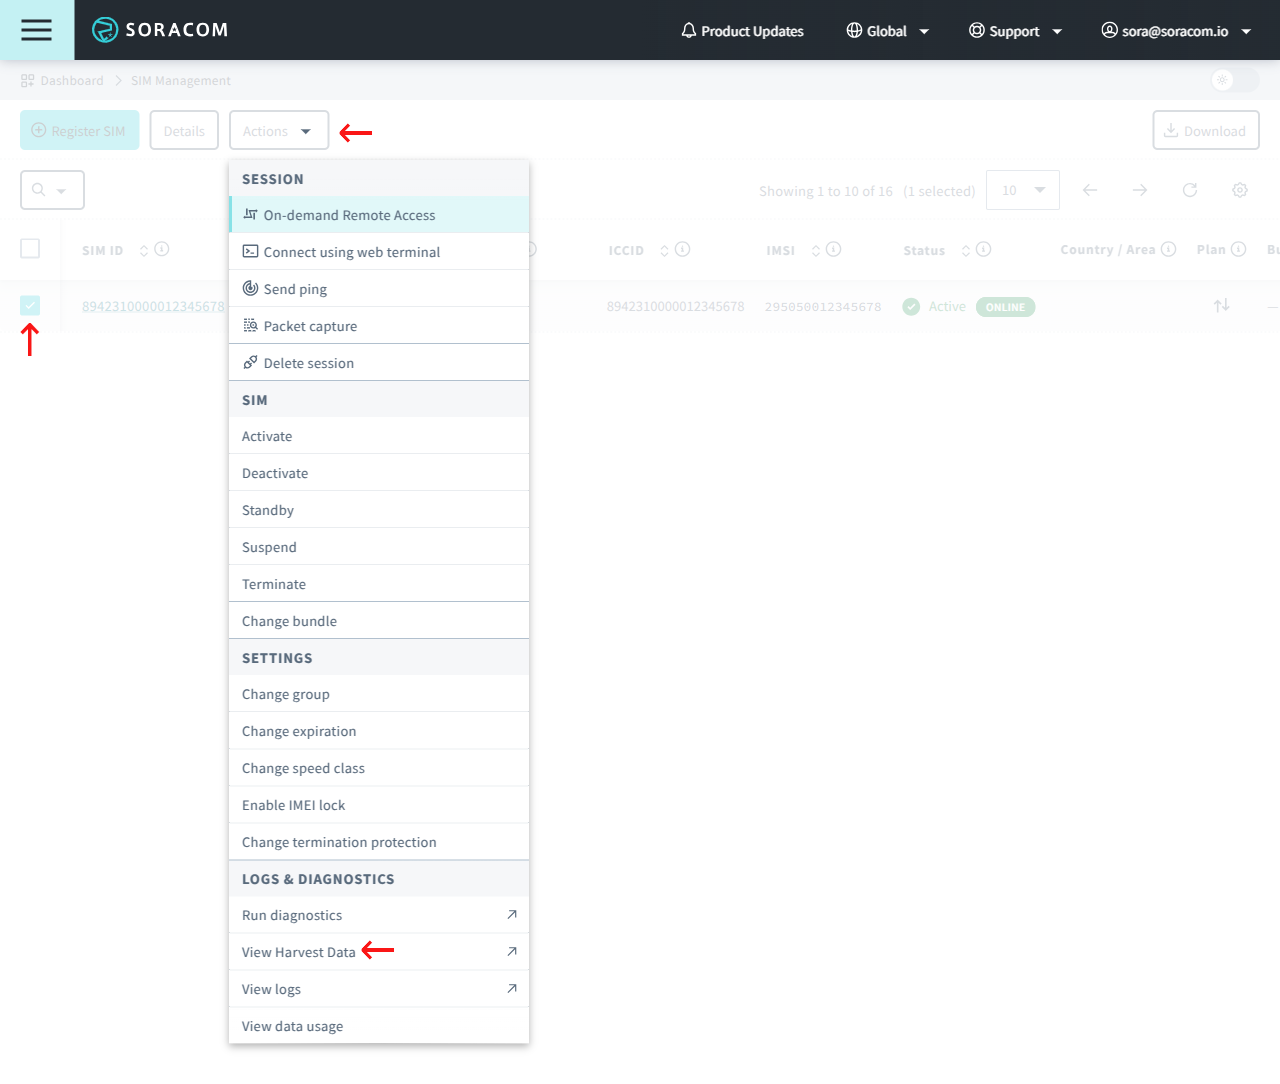
Click the checkbox next to your SIM card. Then click the Actions menu, and select View Harvest Data.
Scroll down to the bottom of the page to see the raw data. Our test message should be there!

Send Sensor Data to Harvest Data
Now that we've confirmed that we can send data from our Raspberry Pi to Soracom Harvest Data, we can update our script to send data to the cloud.
In the last step, we used the curl command, which sent our test message to Harvest Data in the form of an HTTP request directly from the command line. We want to keep the HTTP request format (just replacing the test message with sensor data), but since our script is a Python script, we need to install a package that lets us make HTTP requests from within Python.
- Run the following command to install the python-requests package:
sudo apt-get install python-requests
Then, let's download a modified version of our sensor script, which also sends the sensor data to Harvest Data.
-
Run the following command to download the modified sensor script:
curl -O https://soracom-files.s3.amazonaws.com/starterkit/ultrasonic_harvest.py -
And then start the script:
python ultrasonic_harvest.py
While the script runs, we should see some output that looks like this:
Distance: 45.8 cm
Sending data {"distance":45.8} to Harvest...
Response 201: Success!

Distance: 46.2 cm
Sending data {"distance":46.2} to Harvest...
Response 201: Success!
From the output, we can see that the sensor is functioning correctly, and that our data is being sent to Harvest Data successfully!
Visualize Sensor Data from the User Console
Our modified script is sending the numerical sensor data to Soracom Harvest Data using a simple format that allows Harvest Data to generate real-time graphs. As soon as Harvest Data sees the numerical data, it will automatically generate a graph for us!
Let's turn on the Auto refresh option, which will tell Harvest Data to check for new data every 5 seconds and update the graph.
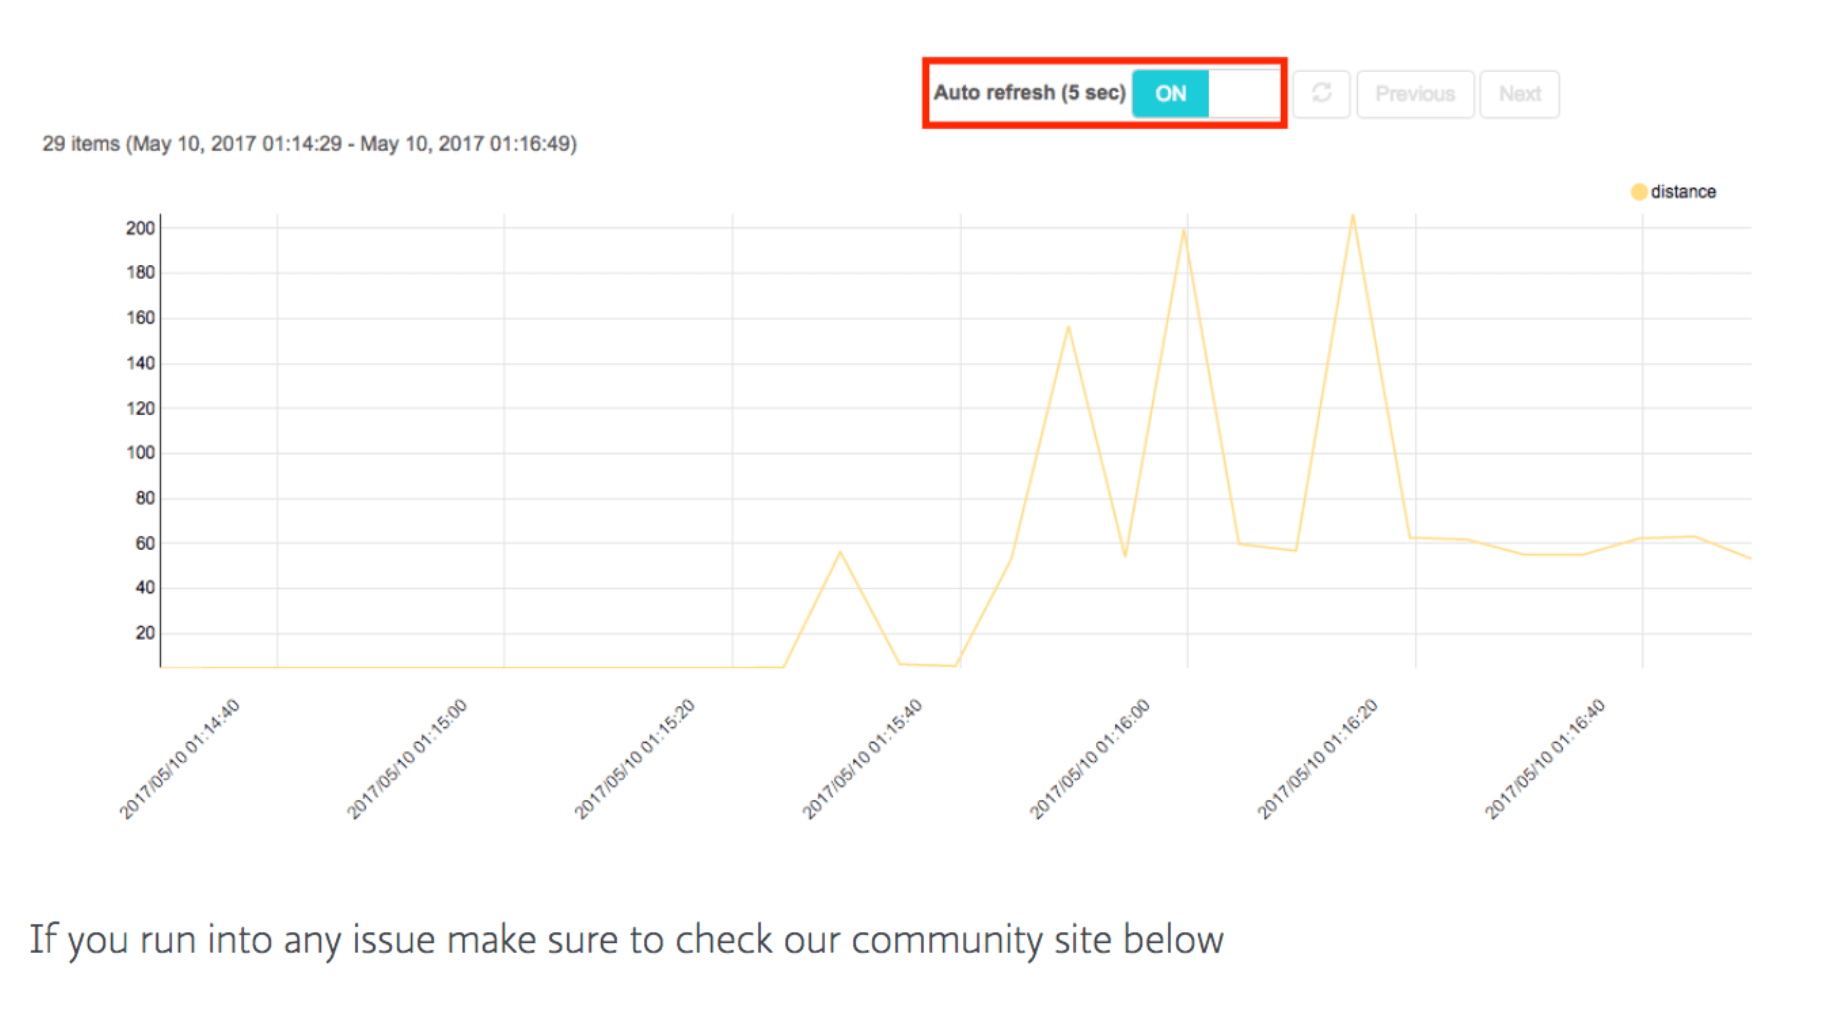
Now we can wave our hand in front of the sensor to generate new data points, and our Harvest Data chart will automatically update with the latest data! Awesome!
Now that you've made it here, congratulations! You've completed the Ultrasonic Range Finder project!
Since our Raspberry Pi is sending data to Harvest Data using the USB modem, we can now set up our distance-detecting device just about anywhere (as long as there's a USB power source and a cellular signal) and see the data from the comfort of the Soracom User Console.
With a few tweaks and some clever modifications, we can easily start expanding our device's capabilities to build another project!
Extra Project Recipes
Editing Scripts on the Raspberry Pi
If you haven't edited scripts on a command line interface before, not to worry! After learning a few commands and shortcuts, you'll be on your way to coding in no time.
Since we can easily connect to the Raspberry Pi using SSH, we can use a command line text editor to edit files directly on the Raspberry Pi without having to disconnect and remove the micro-SD card each time.
There are lots of command line text editors available for the Raspberry Pi, but for beginners, one of the most popular is nano, which comes pre-installed. Here are a few quick tips:
- To open a file, simply type
nano path/to/myfile.py. - If you are in the same directory as the file, you can just type
nano myfile.py. - After you're done editing your file, save it by pressing Ctrl+X to exit nano, Y to save changes to your file, and Enter to keep the same filename.
- Some files are protected by the operating system, and require root privileges to edit, such as files within the
/etcdirectory. To edit them, simply addsudowhen opening the file:sudo nano /etc/path/to/myfile.py.
There are plenty of great tutorials and articles on how to use nano, be sure to search online for additional tips and tricks.
Running a Script When the Raspberry Pi Boots Up
Since the Raspberry Pi operating system is based on Linux, we get access to many different ways to configure the device behavior. One of the easiest ways to start a script is to edit the /etc/rc.local file to include our script file. For our ultrasonic_harvest.py script, the process looks like this:
-
Open
/etc/rc.local. Since it's a protected file, we need to use sudo:sudo nano /etc/rc.local -
Add the following line to the end of the file:
python /home/pi/ultrasonic_harvest.py &
Previously, we could just run our script with python ultrasonic_harvest.py because we were already in the same directory as our script file. Since the Raspberry Pi won't be in any folder when it boots up, we need to specify the /home/pi/ path here. Additionally, the & tells the Pi to run the script in its own process, since the script will loop continuously. That way, the script can continue to run without blocking anything else.
Then, just Ctrl+X, Y, and Enter to save the file and close nano. The next time you reboot your Pi, the script will start up automatically.
If you want to run a shell script, or a script using another language besides Python, you'll need to modify the line appropriately. Be sure to check online for examples of how to configure /etc/rc.local for other scripts.
Running a Script at Regular Intervals
Sometimes, we might want an extended interval in between telling our Raspberry Pi to do something. We could always add a delay to our script to have it pause for an hour (or any other interval) before looping again, but this would cause our script to idle in the background, and in some cases might use more power.
Instead, it would be more efficient to run the script only once. Then later, after a given duration, run the script again.
In Linux, this type of behavior is easily handled using cronjobs. With cronjobs, we can tell the Raspberry Pi to run a script at specific intervals, which can be defined by minute or hour intervals, on specific days of the week or days of the month, and on specific months.
For information on how to create a cronjob, take a look at the documents such as CronHowto - Community Help Wiki.
If we had a Python script that we wanted to run once every 30 minutes, we would create a cronjob that looked something like this:
*/30 * * * * python /home/pi/my_30min_script.pyJust as with rc.local, be sure to check online for additional examples if you want to schedule other types of scripts using cronjobs.
Also, be sure to check Crontab Guru to check how your cronjob should be written for other intervals.
Running Scripts When the USB Modem Connects/Disconnects
In some cases, we only want our scripts to run when our cellular connection is connected (or disconnected). For example, we might want to set up our device to collect data while it's offline using one script, and then run a second script to send the collected data once the modem has connected to a cellular network.
When we initially configured our USB modem using the setup_eg25.sh script, the script installed a program called NetworkManager which helps us manage our cellular connection. NetworkManager comes with the ability to perform actions whenever a connection status changes (and in fact, many Linux programs offer similar event-driven functionality), so we can hook into it to run an upload script when the USB modem is connected.
In fact, the setup_eg25.sh script we used earlier uses this feature to create and remove a custom data routing rule whenever the USB modem connects/disconnects, to ensure that data sent to the Soracom platform is sent using the USB modem.
Have a look at the custom routing script in nano:
nano /etc/NetworkManager/dispatcher.d/90.soracom_routeOur script simply checks which connection changed (wwan0 for the Soracom Onyx LTE™ USB Modem), and whether the new status is up or down. Then it creates/removes our custom routing rule.
With some simple modifications, we can create another rule in the same folder to run a script whenever the wwan0 connection is connected. First, Ctrl+X to close the custom route rule script. Then, let's create a new script in the same folder:
sudo nano /etc/NetworkManager/dispatcher.d/99.my_custom_ruleThen add this code to check that the wwan0 interface is up before running our script:
#!/bin/bash

if [ "$1" == "wwan0" ] && [ "$2" == "up" ]
then
  python /home/pi/upload.py
fi
Then Ctrl+X, Y, and Enter to save the file. Don't forget to also make it executable:
sudo chmod +x /etc/NetworkManager/dispatcher.d/99.my_custom_ruleOur script is now set up. The next time the wwan0 connection changes, NetworkManager will run our rule, and if the wwan0 connection is connected (up), it will in turn run our upload.py script.
Combining this with cronjobs above, we could create a third script or command that enables our cellular connection at regular intervals, which would in turn run our upload.py script. Then we can also add some extra code to our upload.py script to disconnect the cellular connection once the upload is complete. That way our cellular connection is enabled only at the intervals we want. Scripts running scripts!
Run a Script by Sending an SMS to the Raspberry Pi
When our Raspberry Pi is deployed in a remote area, we won't have a WiFi connection to use in order to connect to it using SSH. While auto-starting scripts on boot with rc.local or running scripts at regular intervals with cronjobs work for certain actions, sometimes we just want an easy way to run a script on-demand.
Because our Soracom IoT SIM supports SMS, we can take advantage of the functionality to control the Raspberry Pi by simply sending text messages right from the User Console.
NetworkManager, the program that we're using to manage our cellular connection, includes another program called ModemManager, which gives us some commands to send and receive SMS. All we need to do is run the appropriate command to check for new messages.
Since we probably want ModemManager to automatically check for us, we can either run this command in a loop, or combine it with a cronjob so that the command runs automatically at regular intervals.
We've put together a sample script that you can use to quickly test receiving an SMS:
-
Download the following script:
curl -O https://soracom-files.s3.amazonaws.com/starterkit/checksms.sh -
Make it executable:
chmod +x checksms.sh -
Then add a new cronjob:
sudo crontab -e* * * * * /home/pi/checksms.shBy using
* * * * *, this cronjob will run once every minute. Save and exit. - Last, reload the cron service:
sudo service cron reload
Each time this script runs, it does a few things. First, it gets the ID number of our modem, and uses it to check if there are any messages. If it finds a message, it extracts the text message content and logs it to a soracom_status.log file in our home directory.
We can monitor this log file by running the command tail -f soracom_status.log. To send the actual text message, we just need to open the User Console, select the SIM card of our device, and click Actions > Send SMS. Make sure to change the Encoding to GSM7 (plain text). Then type the message, and send! Once the SMS arrives on our device, the message will show up in our log file.
Last, the script checks the text message content. If it matches some sample values, our script will run some additional commands:
Texting up will connect our modem
Texting down will disconnect our modem
Texting shutdown will turn off our Raspberry Pi
Now we can customize the checksms.sh script to add more commands which we can then execute just by sending an SMS to our device!
Want More Ideas?
We've only touched the tip of the iceberg with these quick recipes. Be sure to check out the Soracom developer community for more project ideas and sample code. And remember, the Raspberry Pi is quite a powerful little device, so be sure to look around online for all the different things you can do in Linux!
Appendix
I Can't Connect Using raspberrypi.local. What Should I Do?
The raspberrypi.local network address uses mDNS (multicast DNS) feature found on most modern operating systems, and works by scanning your local network for devices that match the raspberrypi hostname. If your computer has trouble detecting your Raspberry Pi, SSH will give you an error saying that it was unable to resolve the hostname.
This typically occurs because mDNS has not been installed or enabled on your computer. On Mac OS, modern Linux distributions, the later versions of Windows 10, and Windows 11, mDNS should be pre-installed on your computer. However, if you are using an older operating system, you can install mDNS to allow your computer to detect your Raspbery Pi:
- On Mac: mDNS is included by default.
- On Linux: Use your package manager to search for and install the avahi package, then restart your computer.
- On Windows: There are several mDNS installation options available. The easiest is to install the Apple Print Services, which includes mDNS: https://support.apple.com/kb/DL999
In some cases, your computer may not be able to detect your Raspberry Pi due to certain network configurations. You can use your Raspberry Pi's IP address instead, however finding the IP address takes a few extra steps.
Usually, the most straightforward way to find the IP address is to use your WiFi router's management page. The management page is typically access by opening http://192.168.1.1 or a similar address in your browser, and logging in using the WiFi router's login information. From there, you should be able to view a list of connected devices, one of which will be the Raspberry Pi. Make a note of the IP address.
You can also install an IP scanner program which will automatically scan your network for all connected devices. Angry IP Scanner is a popular option and is available on all platforms, however there are many other good options as well.
If you are still having trouble finding the IP address, you can also connect your Raspberry Pi to an external monitor by using a mini-HDMI to HDMI adapter or cable. As the Raspberry Pi boots, it will display information about the startup process. Once it completes booting, it should display a message saying, My IP address is: ….
Once you have found your Raspberry Pi's IP address, you can connect using SSH by using the IP address (replacing the numbers below with the IP address of your Raspberry Pi):
ssh pi@192.168.1.123Once connected, you can continue your project as normal.
Keep in mind, while most WiFi routers will try to use the same IP address each time your Raspberry Pi is restarted, there may be times when the IP address changes. If you are unable to connect, repeat the steps above to check if your Raspberry Pi's IP address has changed.
My Computer Doesn't Have SSH. What Should I Do?
While Mac OS and Linux include the SSH command line tool, certain versions of Windows do not include SSH.
There are many great (and free!) SSH tools, and one of the most widely used is PuTTY, which you can find at: putty.org . Click the download link, and download the putty.exe file (in most cases, the 32-bit version works just fine). Then just run the putty.exe application.
When using PuTTY, the initial connection step is a little different. Unlike running the ssh pi@raspberrypi.local command from your command line program, you will need to enter the following connection settings in the PuTTY window:
- Hostname or IP address -
raspberrypi.localor your Raspberry Pi's IP address - Port -
22 - Connection type - SSH
When you click Open, a new window will open. Once PuTTY connects to your Raspberry Pi, you will be asked to enter your username. Use pi as your username. Then continue logging in using the password raspberry from the instructions in this guide.
How Do I Restore/Reset My Raspberry Pi?
If you want to give your Raspberry Pi a fresh start, or if you want to use an extra micro-SD card to test a different project, you can format and reinstall the Raspberry Pi operating system.
First, head over to the Raspberry Pi official website, and download the latest version of the Raspberry Pi OS
You can also download the Desktop version, if you would like to have a traditional desktop interface when working on the Pi. As our Raspberry Pi projects will be headless when deployed (no monitor or keyboard), we generally opt for the lighter Lite version.
Once the file finishes downloading, unzip it. You should have a .img file which is approximately 1.7GB in size.
To install Raspbian to your micro-SD card, you will need to use an image flashing program. There are multiple programs available, and the program we recommend is Etcher. Download and install the latest version from here: balena.io
Then, insert your micro-SD card into your computer using the included micro-SD card reader, start the Etcher application, and select the Raspbian .img file. Make sure that you have selected the drive that that corresponds to the micro-SD card, as the flashing process will delete all data on the drive. Then click Flash.
After a few minutes, your micro-SD card will have a fresh copy of Raspbian.
Because this new copy will not have any software installed, you will also need to add the ssh and wpa_supplicant.conf files to get connected, and re-download and re-run the setup_eg25.sh script to get your Soracom Onyx LTE™ USB Modem set up again.
What Does the setup_eg25.sh Script Do?
In order to simplify the Soracom Onyx LTE™ USB Modem setup process, we've created a simple Linux script that automatically installs the required packages and configures the modem, cellular connection, and routing to Soracom platform services.
When you run the setup_eg25.sh script, it performs the following actions:
-
Install required packages:
- network-manager - This program helps with managing various network connections, including the cellular connection to Soracom.
- usb-modeswitch - Some USB modems will connect to a computer by default as a storage device in order to install device drivers, rather than as a modem. Since modem device drivers are already supported by the Linux kernel, this program switches the mode back to modem mode. It's not necessary for the Soracom Onyx LTE™ USB Modem, but a handy tool to keep if you want to test other modems.
To install this packages manually, simply run:
sudo apt-get update sudo apt-get install network-manager usb-modeswitch -
Configure the modem:
After you plug in the modem, check that the USB modem is detected by the Raspberry Pi by running the following command:
lsusbThis command will list the USB devices that are attached to the Raspberry Pi, and for the Soracom Onyx LTE™ USB Modem, you should see the device listed as something like this:
>Bus 001 Device 004: ID 2c7c:0125 Quectel Wireless Solutions Co., Ltd. EC25 LTE modem -
Configure Soracom routing:
By default, the Network Manager program will use the Raspberry Pi's WiFi connection for all network traffic. However, in order to connect with Soracom services, the traffic we want to send to the Soracom platform must be sent using the USB modem connection.
Rather than routing all traffic through the USB modem, this script creates a custom rule to only reroute Soracom traffic. This rule is saved in
/etc/NetworkManager/dispatcher.d/90.soracom_route, and looks like this:#!/bin/bash if [ "\$1" == "wwan0" ] then case "\$2" in up) gateway=\$( route -n | grep '^0.0.0.0 .* wwan0\$' | head -1 | awk '{print \$2}' ) /sbin/route add -net 100.127.0.0/16 gw \$gateway dev wwan0 metric 0 logger -s "Added Soracom route 100.127.0.0/16 for wwan0 with metric 0" ;; down) /sbin/route del -net 100.127.0.0/16 logger -s "Deleted Soracom route 100.127.0.0/16" ;; *) ;; esac fiNetworkManager will run the rules in this folder each time a network connection changes. This rule will check if the updated network interface matches wwan0 (our USB modem's network interface), and whether it was connected up or disconnected down, then add or remove the custom route to Soracom
100.127.0.0/16accordingly. -
Configure Soracom connection profile
Last, the setup script adds the Soracom cellular connection profile to Network Manager using the following command:
nmcli con add type gsm ifname "*" con-name soracom apn soracom.io user sora password soraThe parameters used in this command are:
con add- add a new connection profiletype gsm- set the profile type as a cellular network connectionifname "*"- use any modem for the connectioncon-name soracom- save this profile using the name “soracom”apn soracom.io user sora password sora- specify the APN, username, and password required for the connection
How Does the hcsr04.py Script Work?
When adding a sensor to our Raspberry Pi, the first step is to take a look at the sensor documentation to understand how it should be controlled and how the sensor data should be interpreted.
First, we'll take a look at the HC-SR04 sensor user guide here (PDF).
By studying the user guide, we learn a few things:
- The sensor works by sending a pulse of ultrasonic waves from the transmitter, and detecting the same pulse in the receiver after the waves have bounced off on an object.
- To trigger the pulse, we need to apply a HIGH signal to the TRIG pin for at least 10 microseconds.
- Once the pulse is triggered, the sensor will set the ECHO pin signal to HIGH, and as soon as the receiver detects the reflected pulse, it resets the ECHO pin signal to LOW.
By understanding this behavior, we know that the total duration that the ECHO pin signal is HIGH corresponds to the time it takes for a pulse to leave the transmitter, travel to the object, and bounce and travel back to the receiver. So in our script, we simply need to record the time that the ECHO pin HIGH signal started, then record the time that the ECHO pin returned to LOW, and find the difference.
From there, we just apply distance = velocity × time, where velocity is a constant of 343m/s (the speed of sound through air), and time is our measured ECHO HIGH to LOW time.
Of course, since the pulse made a round-trip between the transmitter and the receiver, we also need to divide our result by 2 in order to get just the distance to the object.
When working with other sensors, using a similar approach will help ensure that your sensors provide accurate measurements, so that your projects behave as intended!
Additional Resources and Support
For complete information on Soracom User Console tools and capabilities, full documentation is available on the Soracom Developer Site.
If you run into any trouble, feel free to submit a support ticket:
- Login to your Soracom account.
- Click the Support menu and select Contact us. You will be taken to the Soracom Support portal.
- At the top of the portal, click the Create a ticket link.