Soracom CLI Getting Started Guide
Overview
Soracom CLI is a command line interface tool that allows you to control all aspects of your Soracom account, such as registering and managing SIMs, and configuring various Soracom platform services, from your terminal application rather than from the Soracom User Console.
While the Soracom User Console provides most users with an easy-to-use web-based interface, power users may prefer the simplicity of the command line. In addition, accessing your Soracom account from the command line allows you to control it programmatically, such as integrating SIM configuration commands into your own device management scripts, or using batch files to automate bulk operations.
Compared to Soracom API
Soracom CLI provides the same functionality as Soracom API. In fact, Soracom CLI is essentially a simple command-line HTTP client that is built on top of the Soracom API. This means that you can use the Soracom CLI to perform all of the same actions that you can perform using Soracom API.
However, whereas Soracom API simply provides a REST API which can be implemented into any type of application or programming environment that is capable of making HTTP requests (such as NodeJS, Python, PHP, and so on), Soracom CLI provides a pre-compiled binary executable that you can run directly from your terminal without any dependencies.
Compared to Soracom API, Soracom CLI provides two additional features:
-
Authentication - When working with the Soracom API, you must first generate an API Key and Token by submitting authentication credentials to the Authentication API. Once you have generated an API Key and Token, you can submit it in subsequent Soracom API requests. This two-step process helps ensure that your Soracom account is kept secure, however it requires additional effort to generate the API Key and Token before calling other Soracom API endpoints.
Soracom CLI will perform the API Key and Token generation automatically, so that you can use a specific command directly without worrying about first generating the API Key and Token and specifying it in subsequent commands.
In order for Soracom CLI to automatically generate an API Key and Token, it will use authentication credentials stored on your local machine. For more information, refer to the Configuration section below.
-
Automatic Pagination - Certain Soracom APIs will return data in the form of an array, such as getting a list of SIMs using the listSims API, or getting a list of groups using the listGroups API. By default, the Soracom API will return a maximum of 100 items in the array per request. In order to retrieve the next set of items, you must send another request to the API while specifying the ID of the last item in the previous request in order to perform pagination.
Soracom CLI provides a
--fetch-allflag for these commands which will repeat the requests in order perform pagination automatically. This gives you the ability to retrieve all items in the array without having to worry about how to handle pagination.
As Soracom CLI runs as a command line executable, you may find it more suitable than the Soracom API for implementing into shell scripts or batch files, as you can trivially run the command and capture the output without manually creating and handling HTTP requests.
Installation
To use Soracom CLI on your machine, you must install the soracom executable file.
macOS
Soracom CLI can be installed on macOS directly using Homebrew from the terminal.
-
Open the Terminal application.
-
Use the
brew tapcommand to add Soracom CLI as a third-party repository:brew tap soracom/soracom-cliThis step may take a few minutes if you have not updated Homebrew recently.
-
Install Soracom CLI:
brew install soracom-cli -
Install the needed Bash shell command line completions:
brew install bash-completion -
Confirm that Soracom CLI has been successfully installed:
soracom versionIf Soracom CLI was installed successfully, it will return the version of the installed CLI tool.
Windows
-
Visit the soracom/soracom-cli repository and download the latest release. For Windows, download one of the following files:
- For 64-bit versions of Windows - Download the
soracom_x.xx.x_windows_amd64.zipfile - For 32-bit versions of Windows - Download the
soracom_x.xx.x_windows_386.zipfile
Depending on your Windows or anti-virus security settings, you may receive a warning when downloading the file. Follow your browser's prompt to bypass the warning and download or keep the file.
- For 64-bit versions of Windows - Download the
-
Extract the contents of the zip file to your computer. You should have a
soracom.exeexecutable file. Depending on your Windows settings, the.exefile extension may be hidden. -
Move the executable file to a directory on your computer, such as
C:\Soracom, so that the path to the executable file becomesC:\Soracom\soracom.exe.While you can use any path that you prefer, in some cases a long path or a path that contains spaces may result in errors.
At this point, you will be able to run the Soracom CLI from within the directory where the executable file is located. However, you may prefer to make the Soracom CLI accessible from any directory. To do so, simply follow the steps below to add the location to your Windows environment variables:
-
Open the Start Menu, then type
environment. Click the Edit the system environment variables shortcut:
-
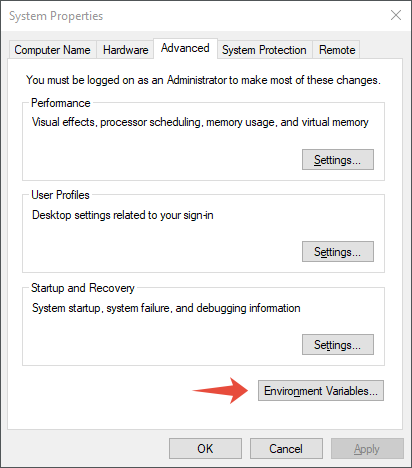
From the System Properties dialog, click Environment Variables...:
-
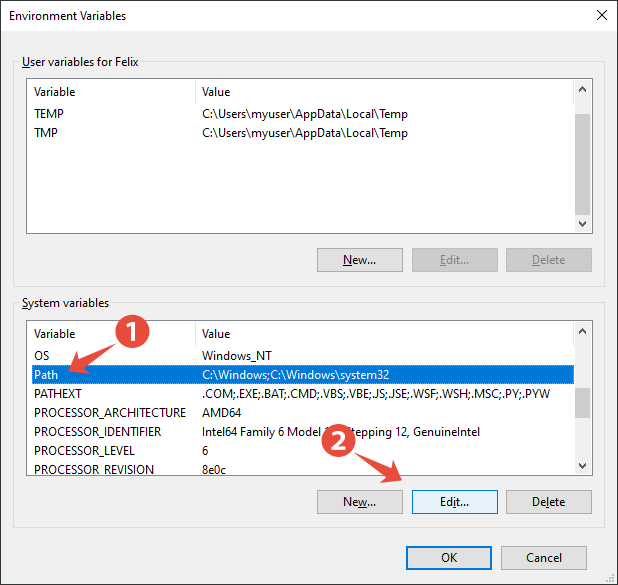
From the Environment Variables dialog, find the System variables section. From the list of system variables, click the Path item, then click the Edit... button:
-
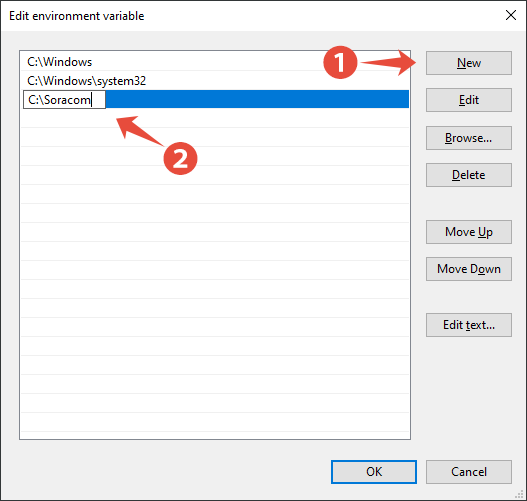
From the Edit environment variable dialog, click New, then enter the path to the directory where you saved the Soracom CLI executable file:
Then click the OK button for each of the Edit environment variable, Environment Variables, and System Properties dialogs.
-
To ensure that the new environment variable is loaded correctly, reboot your computer.
-
Once Windows has rebooted, you can open Command Prompt or PowerShell, then type the following command to confirm that Soracom CLI has been successfully installed:
soracom versionIf Soracom CLI was installed successfully, it will return the version of the installed CLI tool.
Linux
The steps for installing Soracom CLI on Linux may differ based on your Linux distribution. The following instructions use Ubuntu as an example.
-
Visit the soracom/soracom-cli repository and copy the download link for the latest release for your platform. For most Linux computers, copy the download link for one of the following files:
- For 64-bit versions of Linux - Copy the
soracom_x.xx.x_linux_amd64.tar.gzlink - For 32-bit versions of Linux - Copy the
soracom_x.xx.x_linux_386.tar.gzlink
- For 64-bit versions of Linux - Copy the
-
Open your Terminal application, then download the file:
wget https://github.com/soracom/soracom-cli/releases/download/vx.xx.x/soracom_x.xx.x_linux_amd64.tar.gz -
Extract the archive:
tar xvf soracom_x.xx.x_linux_amd64.tar.gz -
Open the directory created in step 3:
cd soracom_x.xx.x_linux_amd64/ -
Copy the executable to the
/usr/local/bindirectory:sudo cp soracom /usr/local/bin -
Confirm that Soracom CLI has been successfully installed:
soracom versionIf Soracom CLI was installed successfully, it will return the version of the installed CLI tool.
Upgrading
From time to time, a new version of Soracom CLI will be released to support new Soracom features and address bugs. If you are using an older version of Soracom CLI and a newer version is available, Soracom CLI will let you know that you can upgrade to the new version.
macOS
To install a new version of Soracom CLI on macOS, run the following command:
brew upgrade soracom-cliWindows
To install a new version of Soracom CLI on Windows, follow steps 1-3 from the Windows installation instructions above, overwriting the older Soracom CLI executable file.
Linux
To install a new version of Soracom CLI on Linux, follow steps 1-5 from the Linux installation instructions above, overwriting the older Soracom CLI executable file.
Configuration
Before using Soracom CLI, you must configure your authentication method. The authentication method allows Soracom CLI to automatically perform authentication each time you run a Soracom CLI command.
You can configure Soracom CLI for any of the following authentication methods:
- Authenticate using an AuthKey (AuthKey ID and AuthKey Secret). For more information on how to create an AuthKey, refer to the AuthKeys documentation.
- Authenticate using your Operator credentials (root account email address and password).
- Authenticate using SAM credentials (Operator ID, username, and password). For more information on how to create a SAM user, refer to the Users & Roles documentation.
Before configuring Soracom CLI, check that you have prepared one of the above authentication methods.
Soracom recommends configuring and using the AuthKey authentication method. An AuthKey may be generated for the root account (which will provide full administrative permissions), or may be generated for a SAM user (which itself can either be granted full permissions, or may be granted selective permissions).
By using an AuthKey, you can regularly update your root account or SAM user password without affecting your AuthKey usage, as well as separately revoke the AuthKey without affecting your ability to sign into the Soracom User Console.
-
Start the Soracom CLI configure command:
soracom configure -
When prompted, enter the Coverage Type you want to use. This will let Soracom CLI know to automatically use the specified coverage type when running commands.
You can always override the default coverage type by adding a
--coverage-typeflag to any command.>Please select which coverage type to use. > >1. Global >2. Japan > >select (1-2) > -
Next, enter the authentication method you want to use. Follow the prompts to enter the authentication credentials according to the authentication method you selected:
>Please select which authentication method to use.
>
>1. Input AuthKeyId and AuthKey * Recommended *
>2. Input Operator credentials (Operator Email and Password)
>3. Input SAM credentials (OperatorId, User name and Password)
>
>select (1-3) >
Once the soracom configure command is complete, the authentication and default coverage type to a configuration file located in your user directory:
- On macOS and Linux, the Soracom CLI configuration file will be stored in
~/.soracom/default.json - On Windows, the Soracom CLI configuration file will be stored in
C:\Users\<username>\.soracom\default.json
The authentication credentials stored in the Soracom CLI configuration file are not encrypted. This means that anyone that gains access to your machine may be able to find your Soracom account credentials and access your Soracom account.
Profiles
If you are working with multiple Soracom accounts, or if you need to regularly switch between different SAM users each with different permission levels, you can create separate configuration profiles for Soracom CLI. Simply repeat the configuration steps above while using the --profile flag to specify a profile name:
soracom configure --profile myprofileThe Soracom CLI configuration file will be stored in ~/.soracom/myprofile.json on macOS/Linux or C:\Users\<username>\.soracom\myprofile.json on Windows.
Then to run the CLI for that profile, use the --profile flag on other commands accordingly:
soracom sims list --profile myprofileBasic Usage
The help command can be appended to most Soracom CLI commands in order to output more information. For example, to list all available commands:
soracom help
>A command line tool to invoke SORACOM API
>
>Usage:
>  soracom [command]
>
>Available Commands:
>  audit-logs           Retrieve audit logs.
>  auth                 Performs authentication to access to the SORACOM API.
>  bills                Show or export billing info.
>  cell-locations       Retrieves cell tower location information.
>  completion           Generate script for bash or zsh completion.
>  configure            Show, create or update configurations (profiles).
>  configure-sandbox    Create configurations (profiles) for API Sandbox.
>  coupons              List or register coupons.
>  credentials          List, create, update or delete credential sets.
>  data                 Get stored data from subscribers.
>  devices              Manage devices.
>  diagnostics          Do diagnostics and get the reports.
>  emails               Manage email addresses.
>  event-handlers       List, create, update or delete event handlers.
>  files                Manage files on Harvest Files.
>  gadgets              Manage gadgets.
>  groups               List, create, update or delete groups.
>  help                 Help about any command
>  lagoon               Manage Lagoon settings.
>  logs                 List logs.
>  lora-devices         Manage LoRa devices.
>  lora-gateways        Manage LoRa gateways.
>  lora-network-sets    Manage LoRa network sets.
>  operator             Manage operators.
>  orders               List, create or cancel orders.
>  payer-information    Get or edit payer information.
>  payment-history      List payment history.
>  payment-methods      Create or update payment methods.
>  payment-statements   List or export payment statements.
>  port-mappings        Manage port mappings for on-demand remote access.
>  products             List products.
>  query                Search resources such as subscribers or sigfox devices.
>  roles                List, create, update or delete roles.
>  sandbox              Sandbox related operations.
>  shipping-addresses   List, create, update or delete shipping addresses.
>  sigfox-devices       Manage Sigfox devices.
>  sims                 Manage SIMs.
>  soralets             Manage Soralets for Orbit.
>  stats                Show or export statistics.
>  subscribers          Manage subscribers.
>  system-notifications Manage system notifications.
>  unconfigure          Remove configurations.
>  users                Manage SAM users.
>  version              Show version info.
>  volume-discounts     Manage volume discounts (long-term discounts).
>  vpg                  List, create, update or delete VPGs.
Then to learn about what commands are available for sims:
soracom sims help
>Manage SIMs.
>
>Usage:
>  soracom sims [command]
>
>Available Commands:
>  activate                         Activate SIM.
>  add-subscription                 Adds a new subscription container to a SIM profile
>  attach-arc-credentials           Attach the credentials for Arc to a SIM.
>  create                           Create a SIM.
>  create-arc-session               Re-create an Arc session.
>  create-packet-capture-session    Create Packet Capture Session
>  deactivate                       Deactivate SIM.
>  delete-country-mapping-entry     Delete subscription container mapping entries
>  delete-packet-capture-session    Delete Packet Capture Session
>  delete-session                   Delete Session
>  delete-tag                       Delete SIM tag.
>  disable-termination              Disable termination of the SIM.
>  downlink-ping                    Send ping requests to a SIM.
>  enable-subscription-container    Enables a subscription container.
>  enable-termination               Enable termination of the SIM.
>  get                              Get a SIM identified by sim_id
>  get-data                         Get data sent from a SIM.
>  get-packet-capture-session       Get Packet Capture Session
>  list                             List SIMs.
>  list-packet-capture-sessions     List Packet Capture Sessions
>  list-subscription-containers     Get subscription container status.
>  put-country-mapping-entries      Updates subscription container country mapping entries.
>  put-tags                         Bulk insert or update SIM tags.
>  register                         Register SIM.
>  remove-arc-credentials           Remove the credentials for Arc from a SIM.
>  report-local-info                Triggers SIM to report SIM local info.
>  send-sms                         Send SMS to SIM
>  session-events                   List Session Events.
>  set-expiry-time                  Update expiry time of SIM.
>  set-group                        Set Group id of a SIM.
>  set-imei-lock                    Set IMEI lock configuration for the SIM.
>  set-to-standby                   Set SIM to standby mode.
>  stop-packet-capture-session      Stop SIM Packet Capture Session
>  suspend                          Suspend SIM.
>  terminate                        Terminate SIM.
>  terminate-subscription-container Terminate subscription container
>  unset-expiry-time                Delete expiry time of the SIM.
>  unset-group                      Unset Group to SIM.
>  unset-imei-lock                  Unset IMEI lock configuration for SIM.
>  update-speed-class               Update SIM speed class.
Once you have found a command you want to use, use the --help flag to show information about how to use the specific command:
soracom sims activate --help
>Change status of specified SIM to active.
>
>Usage:
>  soracom sims activate [flags]
>
>Flags:
>  -h, --help            help for activate
>      --sim-id string   SIM ID of the target SIM.
Examples
Getting a List of SIMs
To output a list of SIMs:
soracom sims listBy default, the sims list command will return the first 100 SIMs in your account. Normally, you will need to repeat the command while specifying the last SIM in the response in order to retrieve the next 100 SIMs. However, you can use the --fetch-all flag to perform this pagination automatically and retrieve all SIMs at once:
soracom sims list --fetch-allThe data will be returned in JSON format. If you have the jq command installed on your system, you can pipe the JSON output in order to process the response. For example, to get a simple list of all SIMs in your account based on their SIM ID:
soracom sims list --fetch-all | jq -r '.[] | .simId'You can also use the jq command to include additional fields from each SIM, and format the output as a CSV list:
soracom sims list --fetch-all | jq -r '.[] | [.simId, .tags.name, .status, .group] | @csv'Modifying a SIM
To deactivate a SIM using its SIM ID:
soracom sims deactivate --sim-id 8942310000012345678Similarly, to suspend a SIM:
soracom sims suspend --sim-id 8942310000012345678To see what other actions can be performed on a SIM:
soracom sims helpModifying Multiple SIMs
If you have a file containing a list of SIMs that you want to deactivate, you can simply loop through the file and repeat the command for each line:
#!/bin/bash

while read iccid; do

  # Remove carriage return character in case the list was
  # formatted using Windows CR+LF instead of Unix LF
  iccid=$( echo $iccid | sed -e 's/\r$//' )

  printf "Deactivating $iccid... "

  # Call the deactivateSim API, suppress the output if the
  # call is successful, and output any errors
  soracom sims deactivate --sim-id "$iccid" > /dev/null

  # If the command did not return an error, output OK
  if [ $? -eq 0 ]; then echo "OK"; fi

done < sims-to-deactivate.txtCreating a Napter Session
The Napter service allows you to create an on-demand remote access session in order to remotely connect to a device. In some cases, the connection may be for a command line service such as SSH. Instead of creating an on-demand remote access session through the Soracom User Console, you can use the Soracom CLI inside of a script to automate the connection.
This example shell script allows you to pass the 15-digit IMSI of the SIM as an argument, and will then create the on-demand remote access session and automatically connect via SSH once the session is ready:
This script makes use of the
jq
command for parsing JSON responses returned by Soracom. Ensure that you are able to run the jq command from your terminal.
#!/bin/bash

# Port: The SSH port of your device
port=22

# User: The SSH login username
user="pi"

# Identity File: If you use SSH keys for authentication, uncomment the next line and
# enter the local path to your SSH private key.
# identity_file="~/.ssh/id_rsa"

# Duration: How long you want the Napter port mapping to last (seconds)
duration=300

# Script starts here ----------
imsi="$1" # Get the IMSI from the first argument

# Create Napter Port Mapping
echo "Creating Napter remote access session..."
body="{\"destination\":{\"imsi\":\"${imsi}\",\"port\":${port}},\"duration\":${duration}}"
port_mapping=$( soracom port-mappings create --body "$body" )
napter_ip=$( echo $port_mapping | jq -r .ipAddress )
napter_port=$( echo $port_mapping | jq -r .port )
echo "Created Napter port mapping: ${napter_ip}:${napter_port}"

# Start SSH
echo "Connecting to SSH (${napter_ip}:${napter_port})..."
sleep 1
echo
if [ -z "$identity_file" ]; then
  ssh -o StrictHostKeyChecking=no -o UserKnownHostsFile=/dev/null -p${napter_port} ${user}@${napter_ip}
else
  ssh -o StrictHostKeyChecking=no -o UserKnownHostsFile=/dev/null -i "${identity_file}" -p${napter_port} ${user}@${napter_ip}
fi

# Delete Napter Port Mapping after SSH connection closed
echo "SSH connection closed, deleting Napter port mapping (${napter_ip}:${napter_port})..."
soracom port-mappings delete --ip-address "${napter_ip}" --port "${napter_port}"
Save the shell script to a file such as napter.sh. Then to use it:
./napter.sh 295050012345678