Using Beam to Connect to Azure IoT Hub
Introduction
Soracom Beam allows you to send data from a device to specific cloud services over cellular. With Beam, you can encrypt data being sent from the device by changing its protocol, and also manage cloud endpoints without having to update any code on the device itself.
By using Beam, you can:
- Perform protocol conversion and encryption between device and cloud, such as:
- TCP → TCPS
- TCP → HTTP
- HTTP → HTTPS
- MQTT → MQTTS
- Switch cloud endpoints without updating the device: Once a device is configured to send data to Beam, any endpoints and credentials are managed from within Soracom. This means that if you rotate credentials, or spin up a new endpoint in the future, you only need to update the settings within Soracom instead of on the device.
In this guide, we'll cover how to use Beam in order to send MQTT data to Azure IoT Hub. Let's get started.
Prerequisites
- A Soracom account
- A Soracom IoT SIM
- A device that can connect to the internet using the Soracom IoT SIM, such as a Raspberry Pi and USB modem
- An Azure account
- Azure CLI installed on your local machine, plus the Azure IoT Extension for Azure CLI
Configure Azure IoT Hub
1. Create an IoT Hub
-
Log into the Microsoft Azure Portal and navigate to IoT Hub.
-
Click the Add button to begin creating a new IoT Hub.

-
Fill in the basic project details, making a note of the IoT Hub Name that you choose. Here, we will use
soracom-beamas the name. If you do not have a Resource Group, you can simply create a new group for testing, giving it a descriptive name.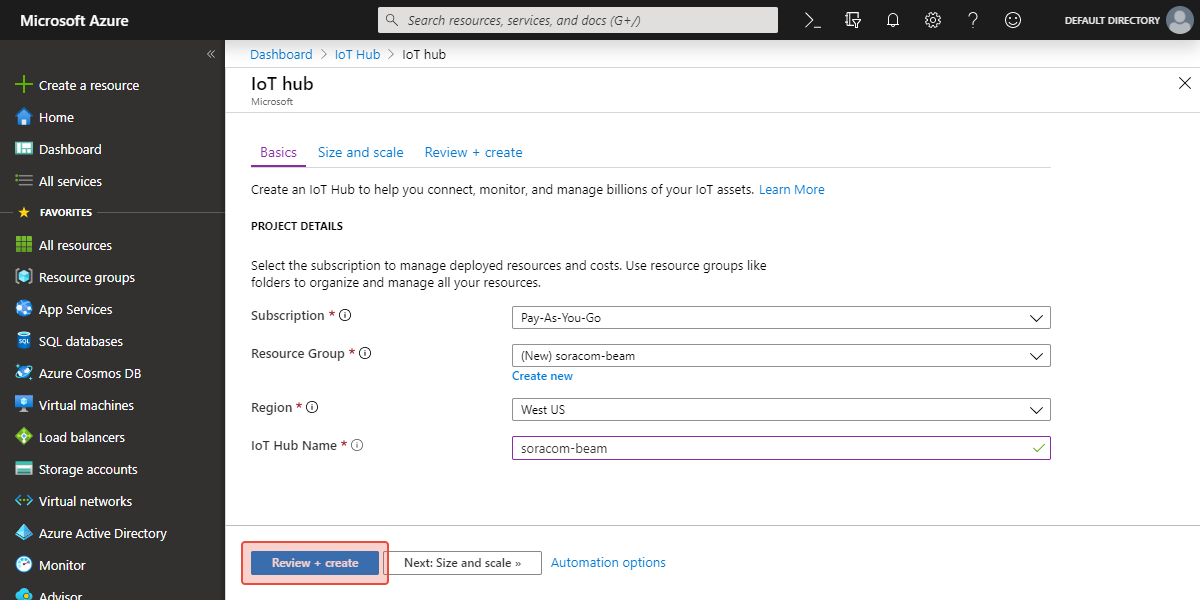
Then click the Review + create button, or optionally select a Size and scale for this project, then continue to create the new IoT Hub.
-
After a minute or two, the resource will be deployed and you’re ready for the next step.
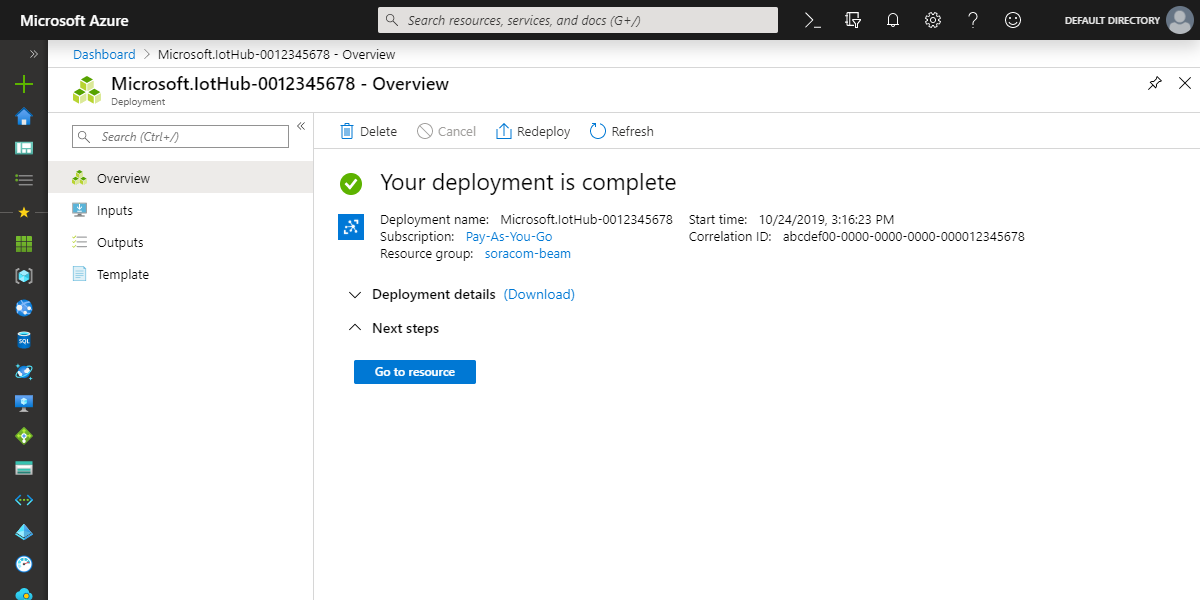
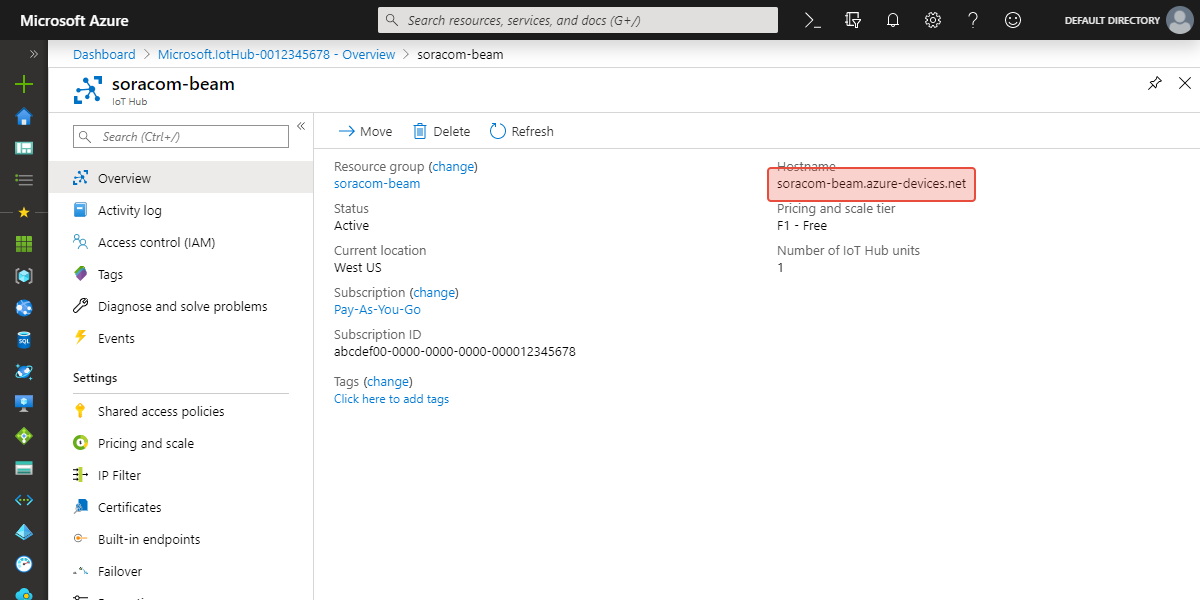
You can click the Go to resource button to see the overview page of your new IoT Hub. Here, you can confirm the Hostname, which uses the IoT Hub Name you selected:
2. Create an IoT Device
-
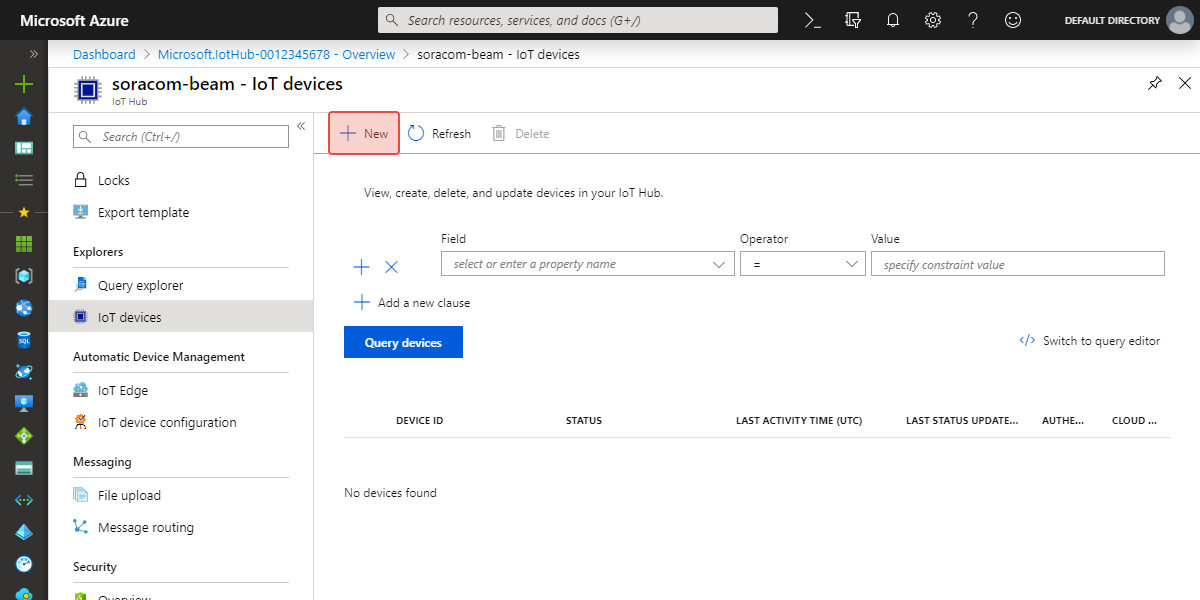
From within your new IoT Hub, click on IoT devices under the Explorers section.
-
Click New to create a new IoT Device.
-
Enter a Device ID. For this test, we will use the ID
my-air-device. Make a note of this ID, as we will use it later to identify the device.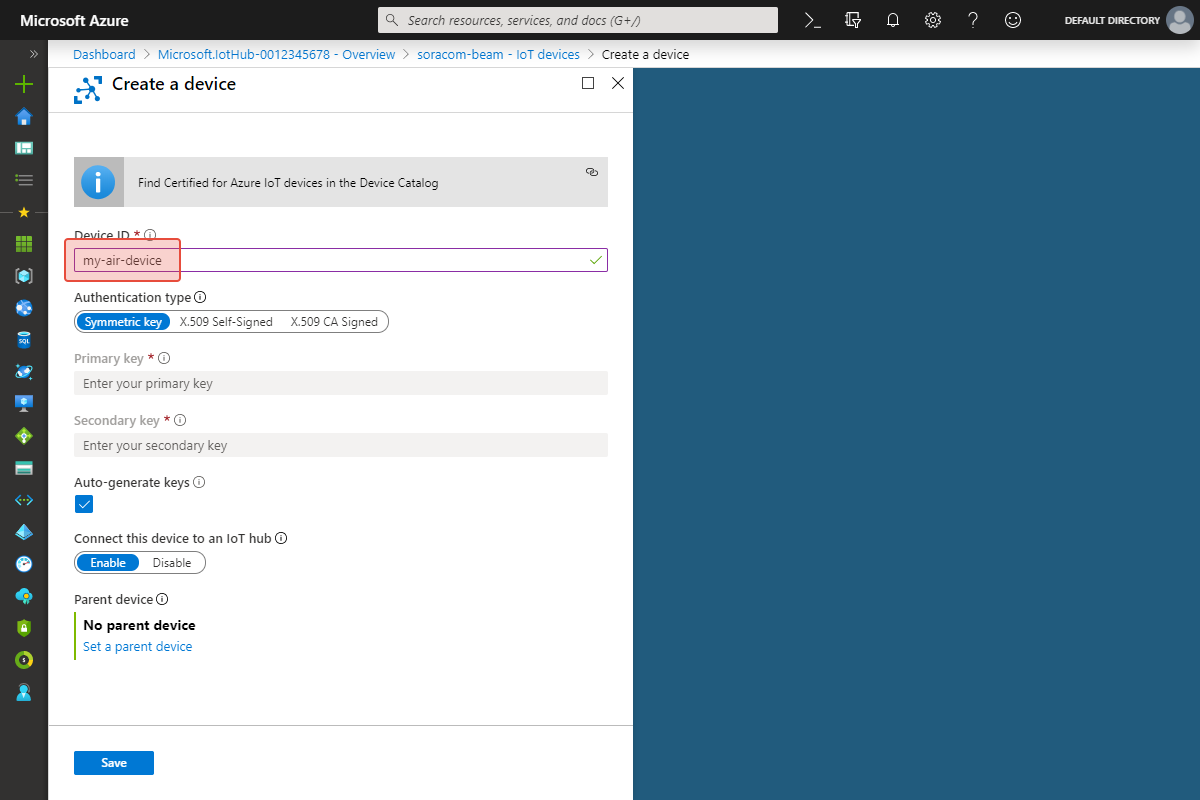
IoT Hub needs a way to authenticate this device. We will use a Shared Access Policy, so for Authentication type, we can leave it on the default Symmetric key.
Then click the Save button.
3. Get a Shared Access Policy
Although IoT Hub generated device-specific authentication keys in the last step, we will use a Shared Access Policy which will let multiple devices authenticate using the same authentication key.
-
From the IoT Hub, click on Shared access policies under the Settings section.
-
For this example, we will use the default
devicepolicy. We will need to use this policy name next, so let's make a note of it. Then click on thedeviceitem.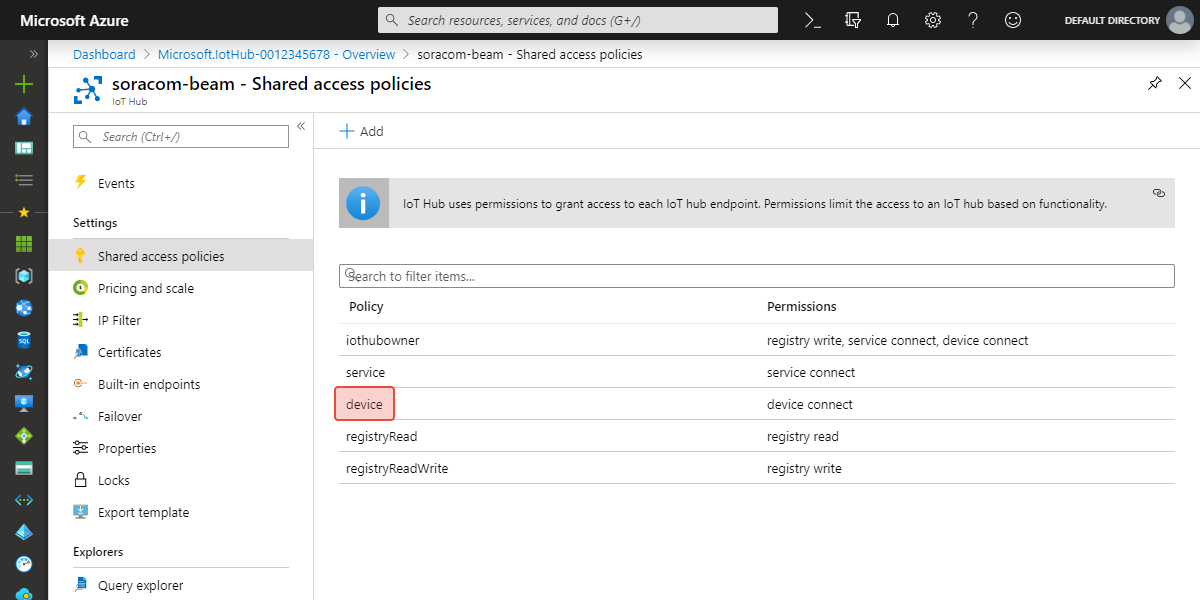
-
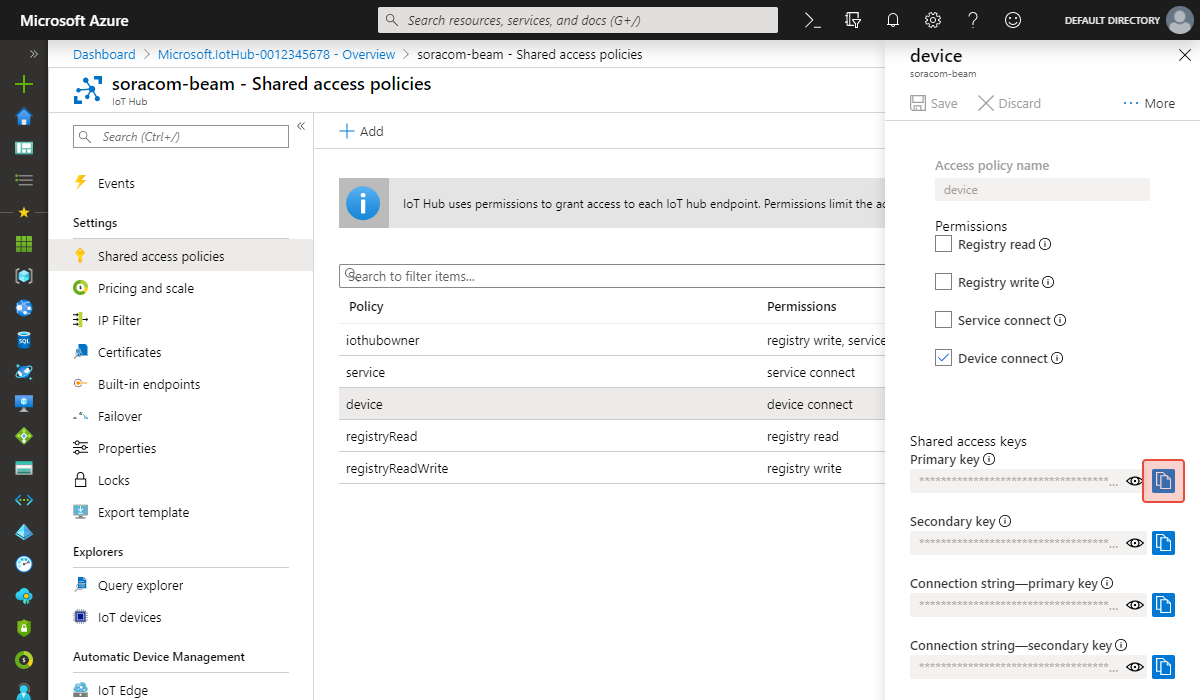
Ensure that Device connect is selected. Then copy either the Primary key or Secondary key.
We are now done setting up Azure IoT Hub. Let's take a second to quickly review the details:
- IoT Hub Name -
soracom-beam - Hostname -
soracom-beam.azure-devices.net - Device ID -
my-air-device - Policy Name -
device - Key - The Primary key or Secondary key above
Configure Soracom Beam
Now we can head over to the Soracom User Console and set up the connection between Beam and IoT Hub.
4. Add a Beam Configuration
Let's open the group which contains our Soracom IoT SIM in order to set up Beam. You can either click the name of the group from the SIM Management page, or from the Groups page.
-
From the group settings page, click the SORACOM Beam panel.
-
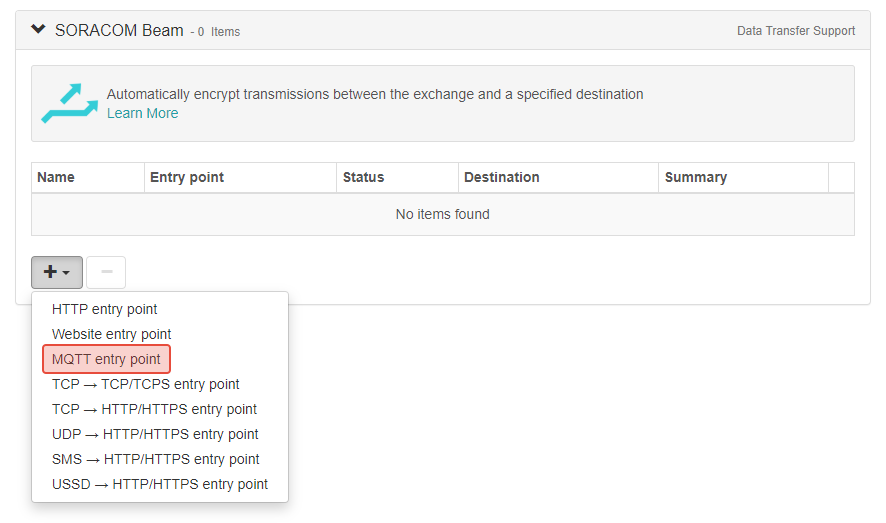
Click the + button to add a new configuration, and select MQTT entry point.
-
Enter the following destination settings:
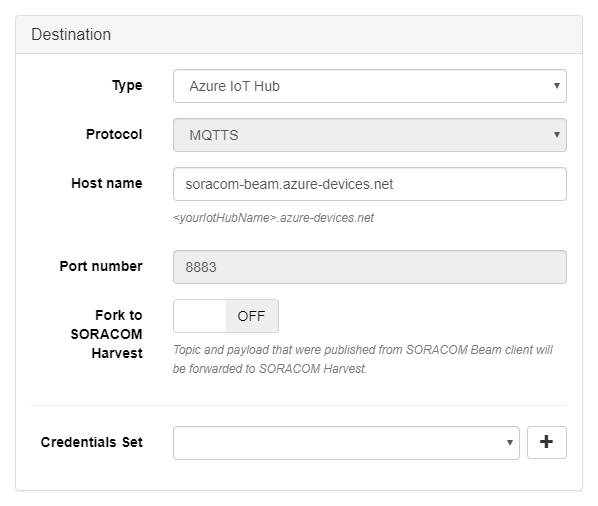
- Type - Azure IoT Hub
- Host name -
soracom-beam.azure-devices.net, using the Hostname or IoT Hub Name from earlier
Make sure to use the Host name that corresponds to your IoT Hub Name.
We can leave the other settings as their default values.
-
Now we need to provide our Azure IoT Hub credentials. In the Credential Set option, click the button.
-
Enter a name for this set of credentials, then enter the Azure IoT Hub credentials from earlier:
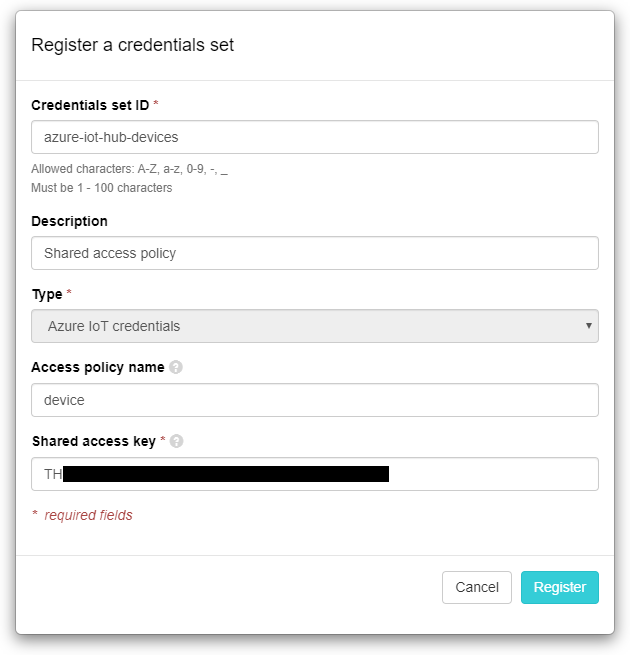
- Type - Azure IoT credentials
- Policy name -
device - Shared access key - The Primary key or Secondary key from earlier
If you prefer to use the device-specific authentication keys that were generated when creating an IoT device, leave Policy name blank and enter the device's Primary key or Seoncdary key as this Credential Set Key.
Click Register to save the credentials.
The credentials will automatically be selected for the Beam configuration.
- Finally, click the Save button to save the configuration.
Test the Connection
5. Monitor the Azure IoT Broker
We will use Azure IoT Extension for Azure CLI to monitor the IoT Hub for published messages.
-
Open a terminal window on your local machine and run the following command:
az iot hub monitor-events -n soracom-beam -d my-air-device
>Starting event monitor, filtering on device: my-air-device, use ctrl-c to stop...
Make sure to replace
soracom-beamandmy-air-devicewith your IoT Hub Name and Device ID, respectively.
6. Send a Test Message
Now that event monitoring is running, it's time to publish a message from our device to Beam. We are using a Raspberry Pi for our test, so we can use the Eclipse Mosquitto MQTT client to publish a message.
-
SSH into the device and install
mosquitto-clients, if it's not already available. On our Raspberry Pi, we can install it using the following command:sudo apt-get install mosquitto-clients -
Next, our device needs to identify itself when publishing an MQTT message, using the Device ID we configured earlier. Let's set a local variable to temporarily store this Device ID on the device, so that we can use it easily:
deviceId=my-air-deviceNow we can reference the Device ID by simply using the
$deviceIdvariable. -
Finally, run the following command to publish a message to Soracom Beam:
mosquitto_pub -d -h beam.soracom.io -i $deviceId -t "devices/$deviceId/messages/events/" -m "Hello from Soracom Beam!"
Once the above message is published, you should see it appear in the event monitor:
az iot hub monitor-events -n soracom-beam -d my-air-device
>Starting event monitor, filtering on device: my-air-device, use ctrl-c to stop...
>{
>    "event": {
>        "origin": "my-air-device",
>        "payload": "Hello from Soracom Beam!"
>    }
>}
Conclusion
Congratulations, you've successfully published an MQTT message to an Azure IoT Hub through Soracom Beam. Notice how we didn't need to store the IoT Hub endpoint or the credentials on the device. Since the connection between the device and Soracom's cloud is encrypted over cellular, we just had to configure the hop between Soracom and Azure. This means that devices can be deployed at scale without having to worry about managing credentials, endpoints, or compute resources needed to manage cryptographic handshakes.