Using Funk to Process Data Using Azure Functions
Introduction
Soracom Funk provides an easy way for devices to send data to cloud functions and then receive the processed results. With Funk, this communication can be accomplished without setting up any custom servers or network environments. In this guide, we'll create a simple HTTP-triggered function in Azure, and then use our device to trigger it using Funk and receive the results. Let's get started!
Prerequisites
- A Soracom account
- A Soracom IoT SIM
- A device that can connect to the internet using the Soracom IoT SIM, such as a Raspberry Pi and USB modem
- An Azure account
Configure Azure Functions
1. Create a Function
Azure provides several methods for creating a function, such as on the Functions App service dashboard in the Azure portal, using Azure CLI directly on your local machine, or even directly in VS Code.
Follow one of Azure's quickstart guides for creating a sample function:
- Develop Azure Functions by using Visual Studio Code | Microsoft Docs (JavaScript)
- Create an HTTP triggered function in Azure | Microsoft Docs (Python)
- Other Azure Functions quickstart guides
If you have not created an Azure Function before, we recommend using the Develop Azure Functions by using Visual Studio Code guide, as it will allow you to quickly deploy a function with minimal setup. For this guide, at a minimum you should complete the following sections:
- Install the Azure Functions extension
- Create an Azure Functions project
- Publish to Azure
- Get the URL of the deployed function
During the guide, Azure will automatically provide the following sample function, which simply checks for a name query parameter or body parameter, and returns a message:
module.exports = async function (context, req) {
    context.log('JavaScript HTTP trigger function processed a request.');

    if (req.query.name || (req.body && req.body.name)) {
        context.res = {
            // status: 200, /* Defaults to 200 */
            body: "Hello " + (req.query.name || req.body.name)
        };
    }
    else {
        context.res = {
            status: 400,
            body: "Please pass a name on the query string or in the request body"
        };
    }
};
Once you have completed the quickstart guide, you should have the following information:
- Function App name - The globally unique name that identifies your function app on Azure
- Function name - The name of the sample function within your function app
- Function key - The secret key used to run the function
You can find this information by getting the URL of the deployed function, which will return a URL in the following format:
https://<function_app_name>.azurewebsites.net/api/<function_name>?code=<function_key>
In some cases, the Function key may include symbols that will be URL-encoded when included in the Function URL. If your Function key includes % characters (indicating that your Function key has been URL-encoded), ensure that you URL decode the Function key before proceeding.
Configure Soracom Funk
Head over to the Soracom User Console and configure Funk with our Azure function.
2. Add a Funk Configuration
Let's open the group which contains our Soracom IoT SIM in order to set up Funk. You can either click the name of the group from the SIM Management page, or from the Groups page.
-
From the group settings page, click the SORACOM Funk panel.
-
Click the ON button to enable Funk.
-
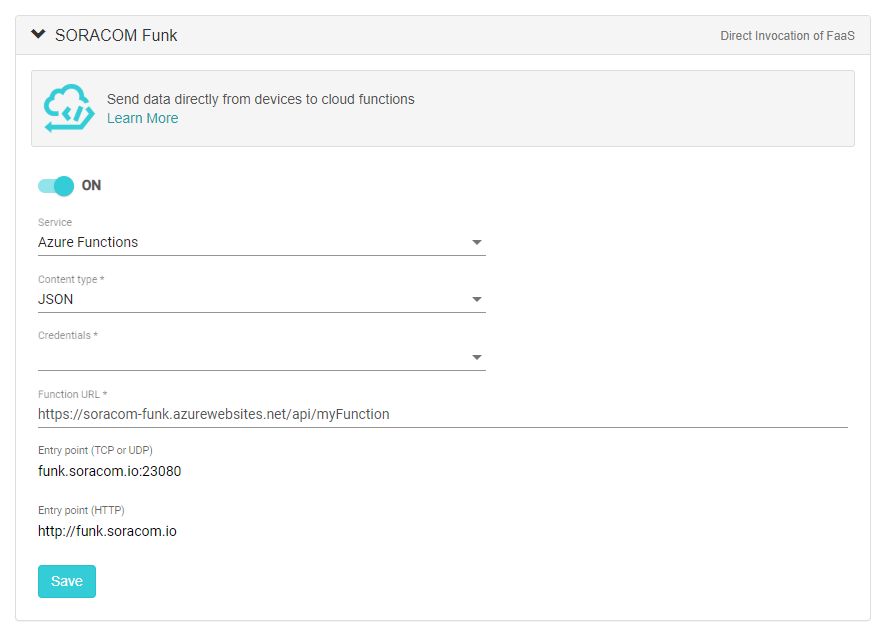
Enter the following settings:

- Service - Azure Functions
- Content type - JSON
- Function URL -
https://soracom-funk.azurewebsites.net/api/myFunction
Make sure to use the Function URL that corresponds to your function, following this format:
https://<function_app_name>.azurewebsites.net/api/<function_name> -
Now we need to provide our Azure Function credentials. In the Credentials option, select the Add new credentials... option.
-
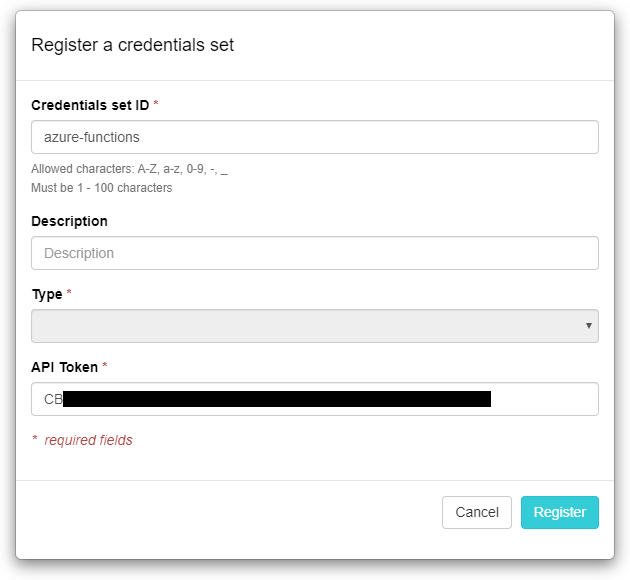
Enter a name for this set of credentials, then enter the Azure function API Token from earlier:

- API Token - The Function key or the value of the
codeparameter from earlier
If your API Token contains any
%characters, ensure that you URL decode it before registering it here.Click Register to save the credentials.
The credentials will automatically be selected in the Funk configuration.
- API Token - The Function key or the value of the
- Finally, click the Save button to save the configuration.
Test the Connection
Now that Funk is configured, any HTTP POST request that is sent from a Soracom IoT SIM device within this group to a Funk endpoint will be sent to our Azure Function, and the response from the function will be returned to our device.
As we configured Funk for JSON data, Funk will expect a JSON payload in the body of an HTTP POST request.
3. Send Test Data
In this example, our device with Soracom IoT SIM is running Linux. In order to test our Azure function, we can use the curl command to send an HTTP POST request:
curl -X POST \
|  -H 'Content-Type: application/json' \
|  -d '{"name": "Soracom"}' \
|  funk.soracom.io
As our sample Azure function will return a simple "Hello" message using the name parameter in our body, we should see the response directly on our device:
>Hello Soracom
>
Conclusion
Congratulations. You just triggered an Azure Function from your cellular device by using Soracom Funk. Now you can modify the data being sent and the Azure Function code to fit your use case. Another important next step would be to implement signature validation in order to ensure that the requests to your cloud function are indeed coming from Soracom.
Since the connection between the device and Soracom's cloud is encrypted over cellular, we just had to configure the hop between Soracom and Azure. This means that devices can be deployed at scale without having to worry about managing credentials, endpoints, or compute resources needed to manage cryptographic handshakes.