Quick Start
Soracom makes it easy to start building IoT solutions. If this is your first project, simply follow these steps to get up and running!

Before proceeding, you will need to prepare a device, such as a USB 3G/LTE modem or a 3G/LTE development board. If you want to get started using a smartphone or tablet, your device must be carrier-unlocked.
Create a Soracom Account
Soracom IoT SIM devices (and other devices) are managed from the Soracom User Console.
Sign Up
Head over to the User Console page and click the Sign up button to create an account.
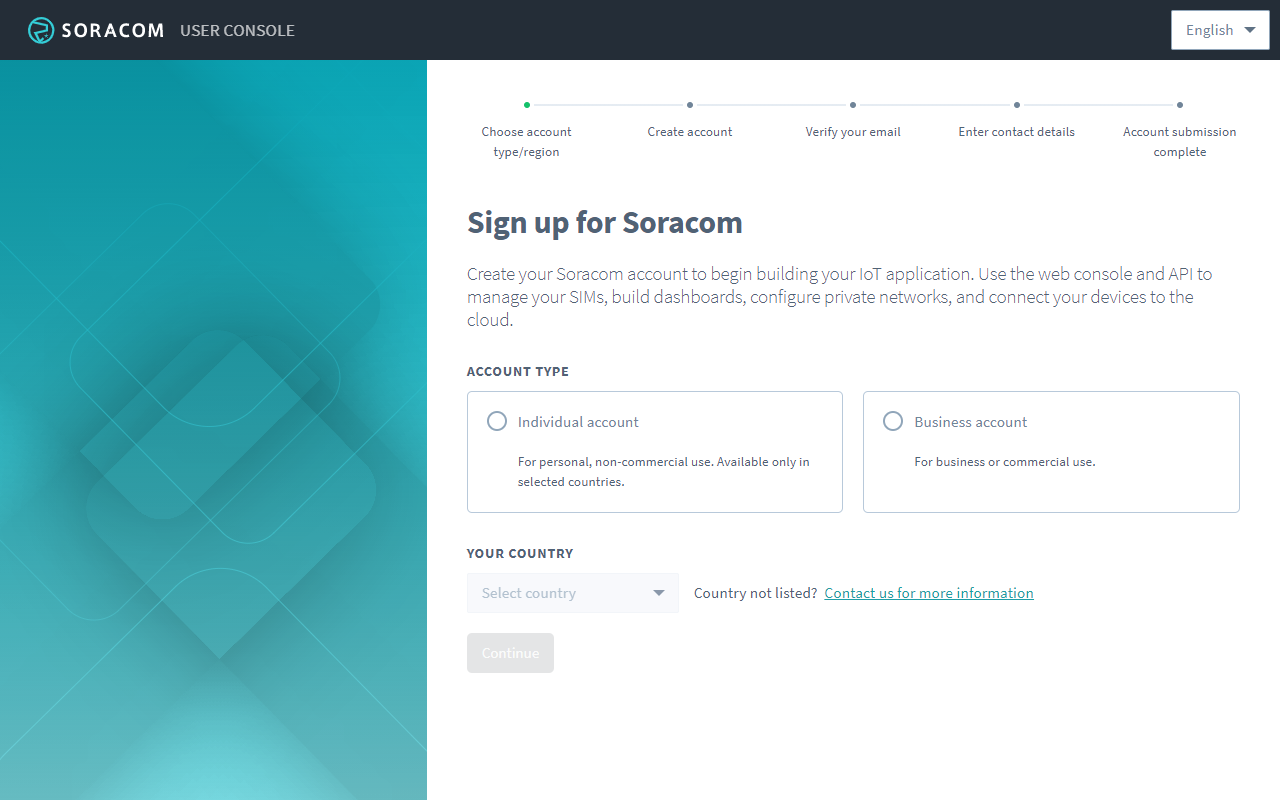
Select the type of account you would like to create and the country where you are located.
At this time, Soracom accounts are available only for individual and business customers located in the following countries:
Individual accounts:
- France
- Germany
- Japan
- United Kingdom
- United States of America
Business accounts:
- Australia
- Austria
- Belgium
- Bulgaria
- Canada
- Czech Republic
- Denmark
- Estonia
- Finland
- France
- Germany
- Greece
- Hong Kong
- Hungary
- Ireland
- Italy
- Japan
- Lithuania
- Macau
- Netherlands
- New Zealand
- Poland
- Romania
- Singapore
- Sweden
- Switzerland
- Taiwan
- United Kingdom
- United States of America
If you are located in the European Union or the United Kingdom, you will also be able to choose whether you would like to be billed in USD (US Dollars) or EUR (Euros).
Follow the instructions to register a new account, confirm your email address, and enter your contact information. Once complete, you will be able to sign in to the User Console.
Register a Payment Method
Once you have created your Soracom account, you will also need to register a payment method, which will be used for monthly usage fees as well as any items purchased from the User Console.
-
Sign in to the User Console.
-
Click your account menu, then select Payment settings.
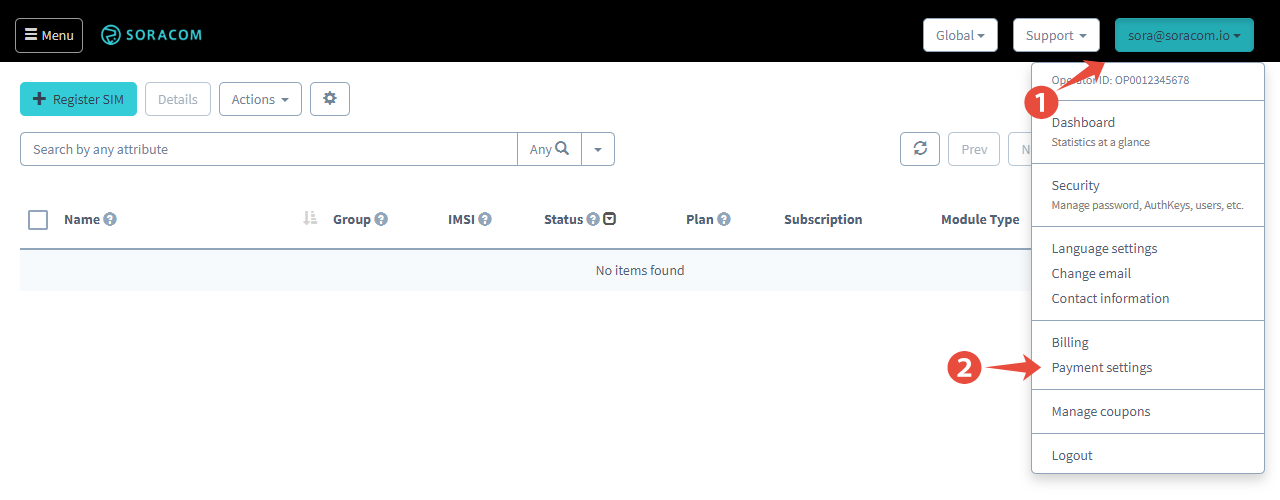
- Follow the instructions on the screen to register your payment method.
When you create your Soracom account, you'll have an opportunity to set up security features to protect your account and create a path for account recovery.
During the initial setup of your account, you will be prompted to set up a recovery email address. We recommend this, as it is the only way that our Soracom Technical Support team can assist you in recovering your account if your primary email account becomes inaccessible.
If you are creating a business account, we also advise that you request that your IT staff create a shared email account for managing your Soracom account login. This will avoid a single point of failure if the person who created the account becomes unavailable.
Soracom Technical Support can not reset the password associated with your account, nor can we convert a personal account into a business account, or vice versa.
Register Your IoT SIM
Registering your Soracom Air IoT SIM card to your Soracom account both activates its service and enables you to access Soracom features.
Soracom SIM cards come in a variety of form factors, such as embedded or pre-inserted in a device, or separately as part of a connectivity kit. If you have not already done so, take a moment to follow the instructions in the SIM Registration documentation to see how to register a variety of Soracom SIM cards to your account.
Insert the SIM
Once you have finished registering your IoT SIM card to your account, the next steps will vary depending on the type of SIM being used.
For eSIMs, which are embedded in the device and do not require physical insertion, you can proceed directly to enabling data roaming.
If you have a traditional SIM card, refer to your device's manual for instructions on how to remove an existing SIM card and insert the new one.
When inserting the Soracom IoT SIM card into your device, be careful not to use a different SIM form-factor size or insert the card in an incorrect orientation. Incorrect insertion may damage the SIM card and result in connectivity trouble or failure.
Enable Data Roaming
Soracom IoT SIM cards require data roaming to be enabled on your device in order to connect to the cellular network. Consult your device's manual to see if it supports data roaming and how to enable this setting.
Set up the Soracom APN
Power on your device, then follow your device's manual to create and enable a new APN (Access Point Name). When prompted, enter the following information:
- Name - any name you choose
- APN -
soracom.io - Username -
sora - Password -
sora - PDP Type -
IPorIPv4 - Authentication Type -
CHAP or PAP
4G/LTE and newer devices are often able to automatically retrieve the soracom.io APN setting directly from the network. However, for 2G and 3G connections, the APN must be configured on the device in advance. In general, you should configure the APN setting whenever possible.
When a device uses a Soracom SIM to connect to a cellular network, Soracom will authenticate the device using credentials that are stored inside the SIM. In turn, the Username and Password settings can be treated as optional and omitted. However, these settings are provided in order to support devices that do not allow these settings to be omitted.
Save your APN configuration, then enable it on your device.
For more detailed instructions on connecting with other devices refer to the Developer Guides section.
Congratulations! Your device is now connected with Soracom, and you can begin using it to develop your IoT solution.
To perform a basic network connectivity test, you can check if your device is able to access the internet by pinging a public server, using wget or curl, or simply opening a webpage in a browser.
As soon as your SIM card connects to a network for the first time, its SIM status will automatically change to Active, and data usage fees will apply.
Troubleshooting
If your device is unable to connect, double check the following:
- Your IoT SIM is registered to your Soracom Account, and appears in the list of SIM cards visible to your account
- Your SIM card is correctly inserted into your device
- Your device is carrier-unlocked (or SIM-free), and does not display any SIM errors
- There are no typos or missing fields in the APN configuration
- Your devices is configured to use IPv4. IPv6 is not supported on the Soracom network.
For further device and advanced troubleshooting steps, see our Troubleshooting guide.
If you continue to have trouble connecting your device, contact Soracom Support for assistance.