Registering Soracom IoT SIMs
When you purchase a Soracom IoT SIM, it must be registered to your Soracom account before use. This is similar to activating a SIM card with a traditional mobile network operator. The SIM registration process is required to confirm your receipt of the SIMs and to associate basic fees and data usage fees from the SIMs to your account.
Once you register an IoT SIM to your account, its status will be Ready indicating that the SIM is ready for use and you will be responsible for all fees associated with the SIM until you decide to terminate it.
Registering SIMs from an Order
If you purchased Soracom IoT SIMs or other products that include Soracom IoT SIMs from the User Console or Soracom Web Store, the SIMs may have been pre-registered to your account, and you can register them by registering the order. If you do not see a Register Order button next to your order, register the SIM using its ICCID and PUK (Personal Unlock Key) numbers as detailed in Manually Registering a SIM.
For security reasons, each SIM in your order is pre-registered to your account. The ICCID and PUK or IMSI and Passcode values of each SIM cannot be used to manually register the SIMs to a different Soracom account.
To register SIMs from an order:
-
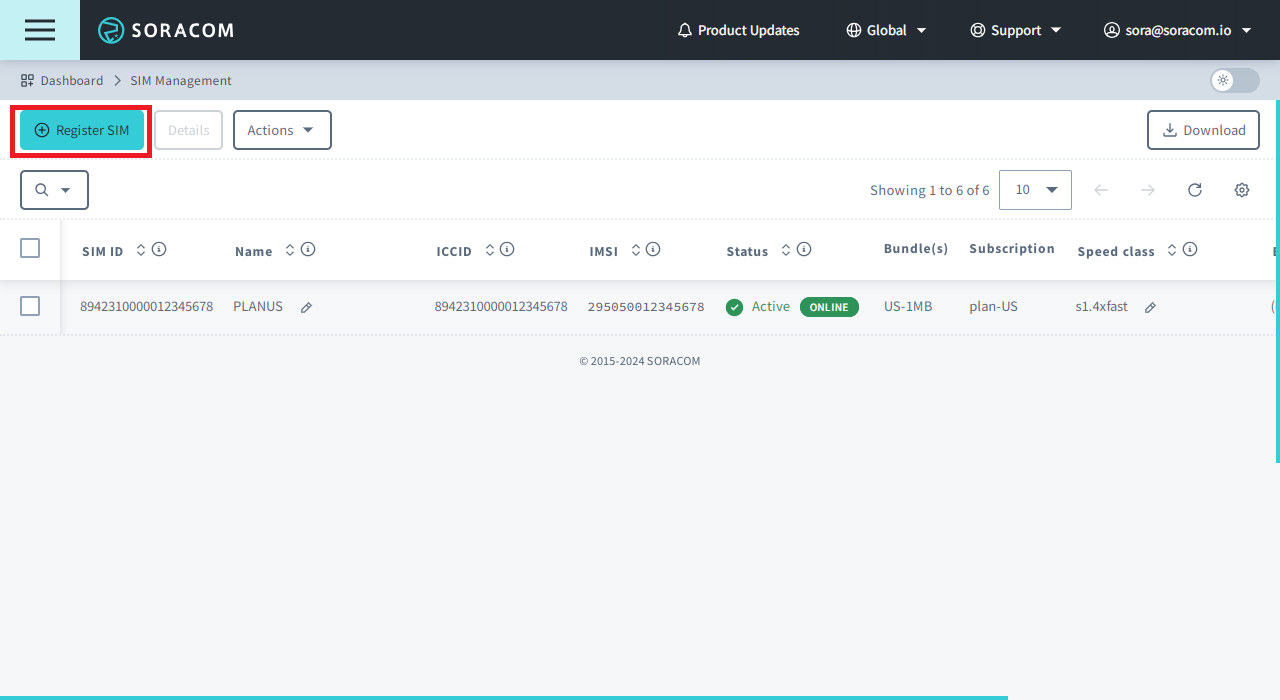
Sign in to the User Console. From the Menu, open the SIM Management screen.
-
Click the Register SIM button.
-
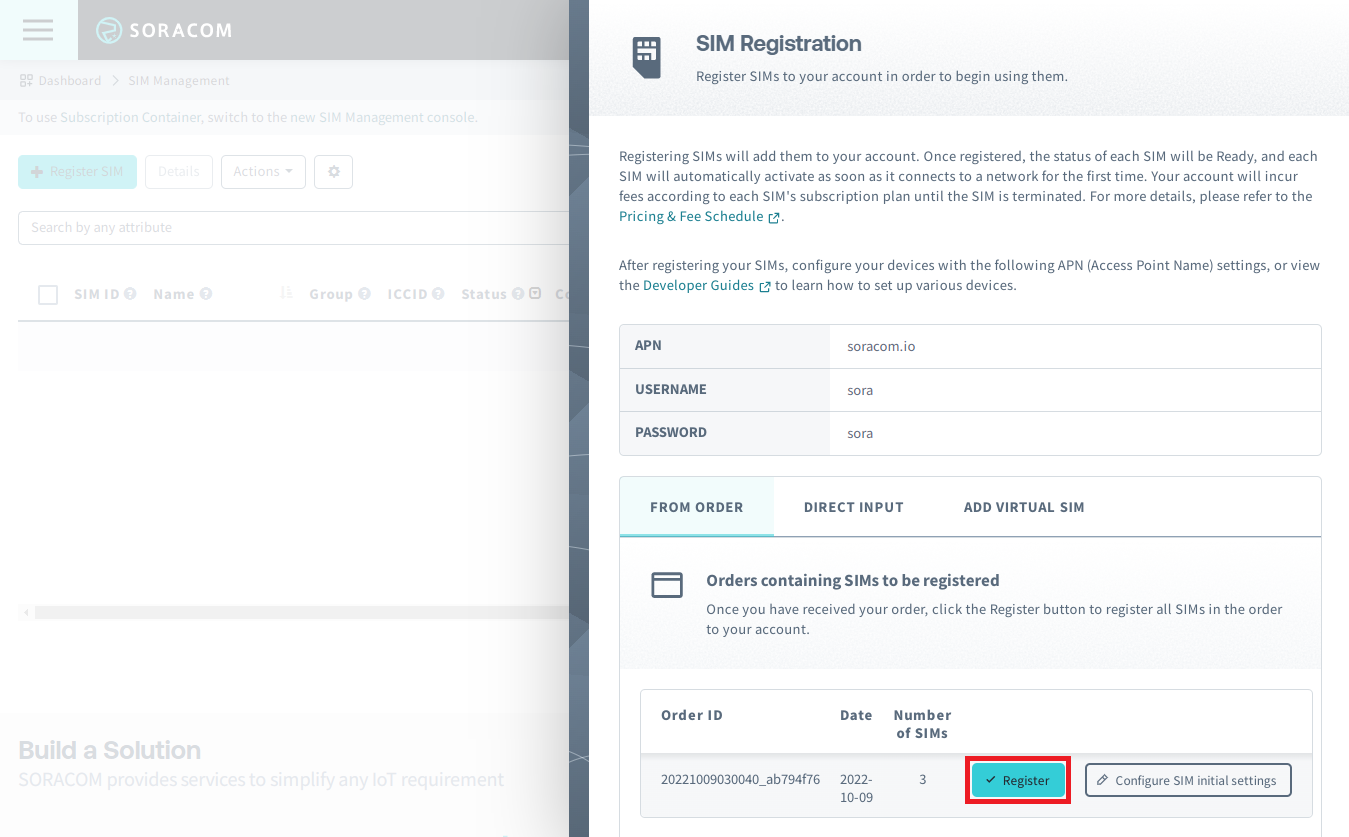
Click the From Order tab.
-
From the list of orders, find the order that you want to register, and click Register.
Automatic Registration Period
If you do not register your order, your order will be automatically registered to your account as follows:
- Orders containing IoT SIMs (under Global coverage) will be automatically registered to your account 14 days after shipment.
- Orders containing IoT SIMs for Japan (Japan coverage) will be automatically registered to your account 4 days after shipment.
If you have not received your order due to a shipping delay, lost package, or other issues and would like to pause the automatic registration of your order, contact Soracom Support as soon as possible.
Configuring Initial SIM Settings
While configuring an IoT SIM's settings from the User Console is simple, doing so for a large number of SIMs can become tedious. When purchasing SIMs directly from Soracom, you can customize the initial settings that will be applied to all of the SIMs in the order upon registration.
Note that initial settings can only be customized before an order is registered. Once an order is registered, manually or automatically during the Automatic Registration Period, the option to customize initial settings will no longer be available. However, you can still modify these settings for each SIM individually after registration.
The following initial settings can be customized for each subscription in your order:
- Group: Assign the SIMs to a Group.
- Speed class: Select a Speed class.
- Tags: Add tag Name and Value pairs (Tags).
Once you register your order, the initial settings you selected will be automatically applied to each SIM in the order.
You can also configure the same settings from the Orders screen.
To open the Orders screen, first click the Menu button, then click Orders.
If you do not specify any initial settings, your SIMs will be registered to your account without any Group setting or Tags, and the Speed Class will be configured according to the subscription's default Speed Class.
When customizing initial settings, the same settings will be applied to all SIMs in the order on a per-subscription basis. For example, if you purchase 100 IoT SIMs, the same initial Group, Speed Class, and Tag settings you choose will be applied to all 100 SIMs upon registration.
In order to apply different initial Group, Speed Class, or Tag settings, you must place separate orders and configure the initial settings for each order separately.
To customize the initial settings you want to apply to the SIMs in your order:
-
Sign in to the User Console. From the Menu, open the SIM Management screen.
-
Click the Register SIM button.
-
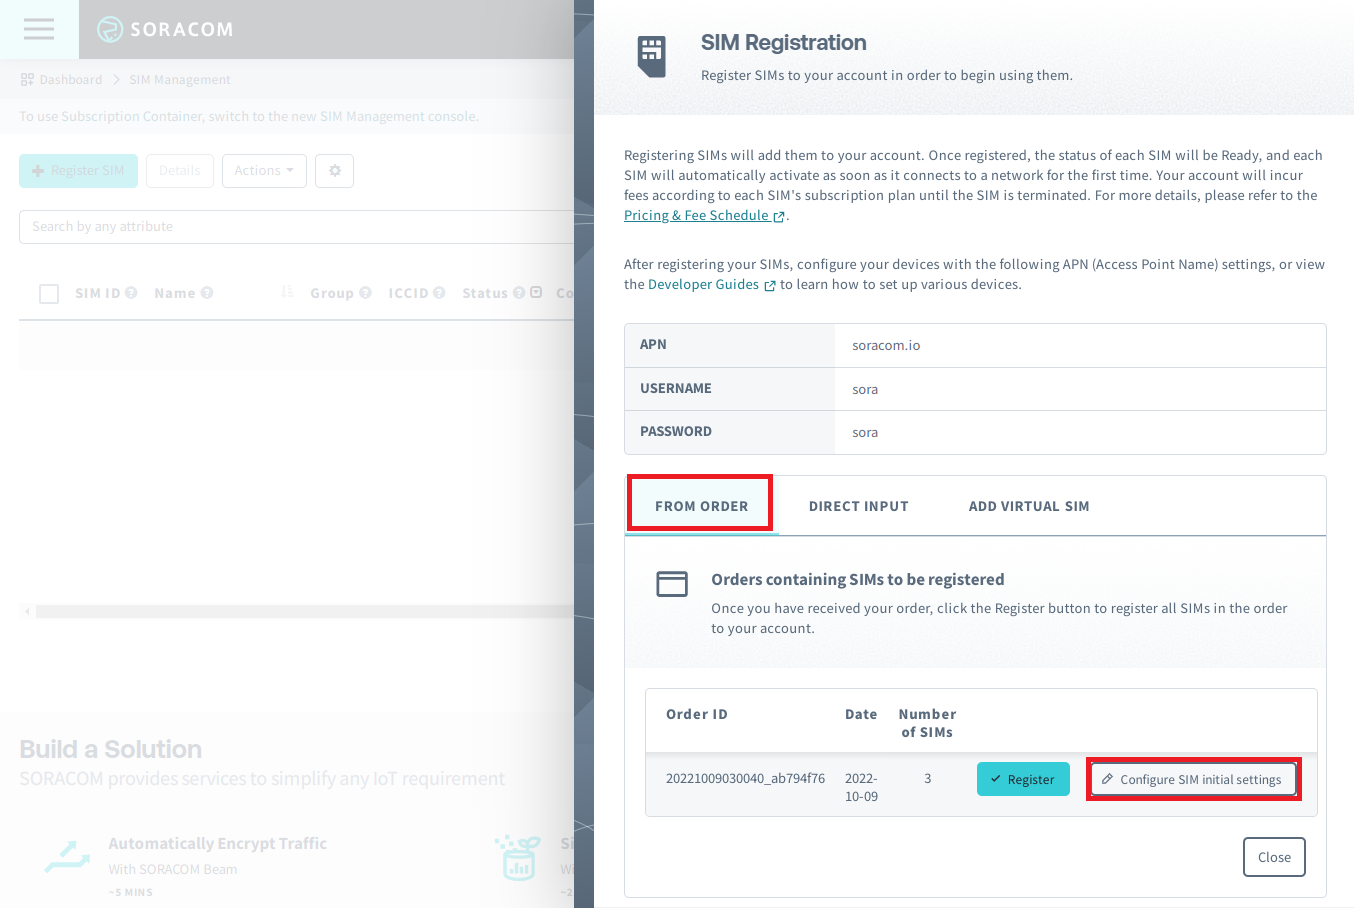
Click the From Order tab.
-
From the list of orders, find the order that you want to customize, and click Configure SIM initial settings.
-
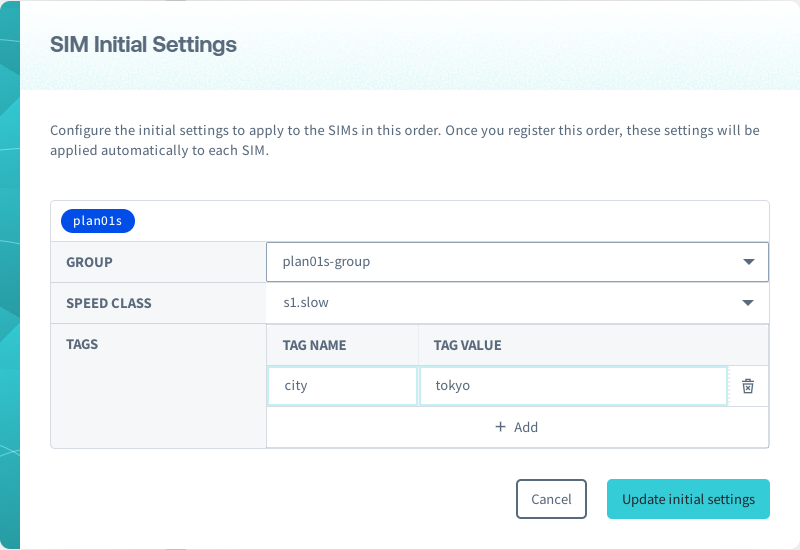
Configure the Group, Speed Class, and Tags that you would like to be applied to each SIM in your order:
-
Group (optional) - Each SIM will be added to the selected group upon registration. If empty, or if the group was deleted prior to registration, the SIMs will be registered without being added to any group.
If you want to add SIMs to a new group, first create a new group by following the Groups: Managing Groups instructions. Then return to this step in order to select your new group.
Note that the Group initial setting will be configured using the selected group's Group ID. Therefore, SIMs will still be registered to the selected group, even if you rename the group or modify group settings.
-
Speed Class (optional) - Each SIM will be configured with the selected speed class upon registration. If empty, the default Speed Class for the subscription will be applied to the SIMs.
-
Tags (optional) - Tags will be added to each SIM upon registration.
The Tag Name
nameis used for giving a SIM a custom name. If specified, each SIM will be named according to the value specified. For example, if you configure Tag Name asnameand its corresponding Tag Value asmy-sim, each SIM in your order will be renamed tomy-simupon registration.
-
- Click Update initial settings.
The initial settings that you specified will be applied to each SIM in the order as soon as you register the order or once the order is automatically registered according to the Automatic Registration Period above.
Manually Registering a SIM
If you purchased or received products that include Soracom IoT SIMs through a non-Soracom shopping site, including eSIMs and other SIM formats included in device bundles, you must register each SIM individually to your Soracom account using its ICCID and PUK numbers.
Manual SIM registration is not possible for orders placed through Soracom directly. IoT SIMs ordered through Soracom must be registered via the process explained in the Registering IoT SIMs from an Order section above.
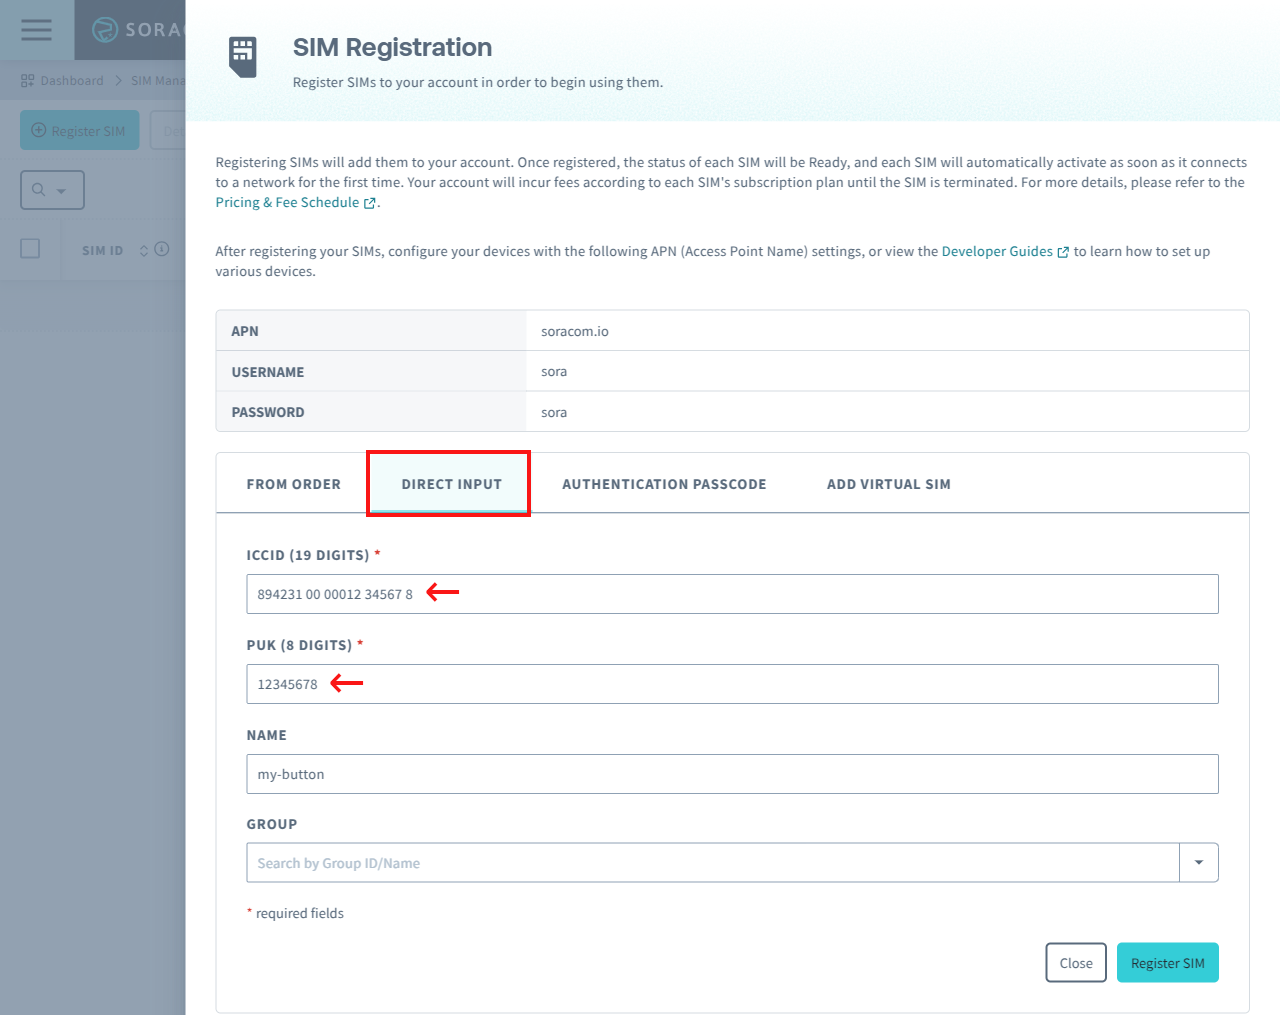
Registering an IoT SIM
When registering a Soracom IoT SIM (under Global coverage, regardless of the plan), you will need to enter the SIM card's ICCID and PUK numbers. See the table below for details on where to find the ICCID and PUK numbers depending on the Soracom product.
| Product | ICCID Location | PUK Location |
|---|---|---|
| Soracom IoT SIM | Printed on the SIM card. | Printed on the SIM card. |
| Soracom Onyx LTE™ USB Modem | • Separate SIM: Printed on the SIM card. • eSIM & Pre-inserted Nano SIM: Printed on the box and the inside of the removable cover. |
• Separate SIM: Printed on the SIM card. • eSIM & Pre-inserted Nano SIM: Printed on the inside of the removable cover. |
| Soracom LTE-M Button *1 | eSIM: Printed on the box and the inside of the device. | eSIM: Printed on the inside of the device. |
| Murata Type 1SC iSIM EVK | Printed on the box. | Printed on the plastic packaging that your EVK arrived in. |
| Other devices | Printed on the SIM card. | Printed on the SIM card. |
*1 - LTE-M Buttons purchased from Soracom directly have the eSIM ICCID and PUK numbers printed in the same location. However, their associated eSIMs are pre-registered to your Soracom account and do not require manual registration.
Once you have obtained the ICCID and PUK information, you can register the SIM to your account.
-
Sign in to the User Console. From the Menu, open the SIM Management screen. Ensure that you have selected the Global coverage type.
-
Click the Register SIM button.
-
From the Direct Input tab, enter the ICCID and PUK numbers of the SIM, then click Register. You can also give the SIM a name and assign it to an existing group.
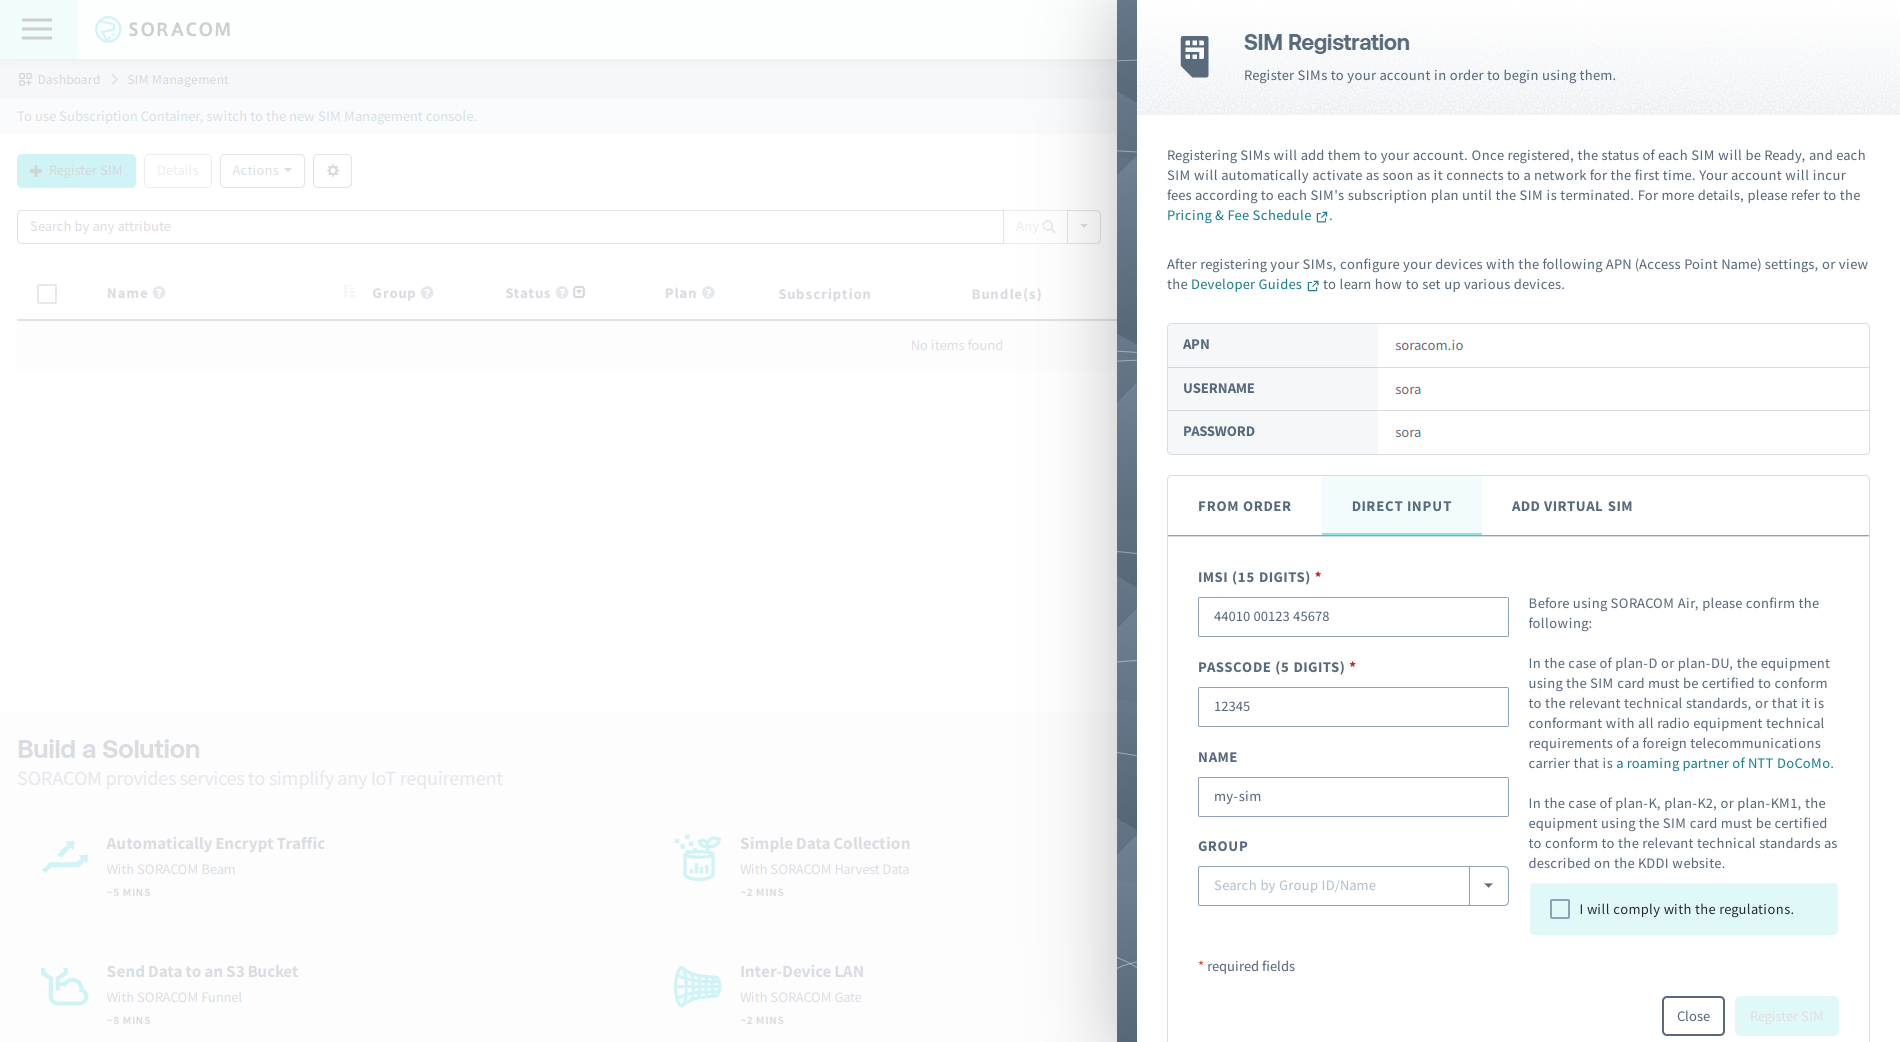
Registering an IoT SIM for Japan
When registering a Soracom IoT SIM for Japan (Japan coverage, regardless of plan), you will be required to enter the IMSI of the SIM card, as well as the SIM card's Passcode. Both the IMSI and Passcode are printed on the reverse side of the SIM card.
-
Sign in to the User Console. From the Menu, open the SIM Management screen. Ensure that you have selected the Japan coverage type.
-
Click the Register SIM button.
-
From the Direct Input tab, enter the IMSI and Passcode for the SIM, then click Register. You can also give the SIM a name and assign it to an existing group.
When you purchase an IoT SIM for Japan, a registration deadline is printed on the reverse of the SIM card package. You must register the SIM card to your account before the indicated deadline. If the deadline has already passed, you will be unable to register the SIM card to your account. If you have purchased and received an IoT SIM for Japan with a registration deadline that has already passed, contact Soracom Support to receive a replacement SIM card. A registration deadline is printed on the reverse side of SIM card packages to which it applies.
Bulk Registration of IoT eSIMs
If you have purchased IoT embedded SIMs (eSIMs) in a reel from a store other than Soracom's, you can register the IoT eSIMs in bulk by entering the 19-digit First ICCID, 19-digit Last ICCID, and 8-character Authentication Passcode in the Soracom User Console.
- The 8-character Authentication Passcode is printed on a label on the exterior of the packaging:
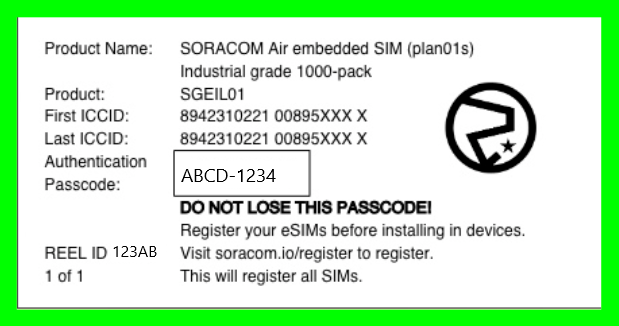
- The First and Last ICCIDs are partially printed on the exterior packaging label as well as the label on the reel itself, and the remaining digits can be confirmed by checking the ICCID numbers printed on the SIM directly.
- When bulk registering Soracom IoT SIMs, a separate Authentication Code will be provided for each reel of eSIMs. Therefore, this process will have to be repeated for each reel of eSIMs being registered.
-
Sign in to the User Console. From the Menu, open the SIM Management screen. Ensure that you have selected the correct coverage type for your region.
-
Click the Register SIM button.
- From the Authentication Passcode tab, enter the 19-digit First SIM ICCID, 19-digit Last SIM ICCID, and 8-character Authentication Passcode, then click Register
It is not possible to register individual IoT eSIMs from a reel. Entire reels must be registered simultaneously.
Downloading a List of Registered SIMs
You can download a CSV file containing a list of all SIMs registered to your account.
See Downloading Registered SIM Data for further details.
Programmatic Usage
You can also use the Soracom API and Soracom CLI to register IoT SIMs to your account.
Soracom API
To access the Soracom API, first use the auth API to obtain an API Key and Token. Refer to the API Usage Guide for instructions on how to use the API Key and Token in API requests.
Then, use the registerSim API to register an IoT SIM:
Soracom CLI
To use the Soracom CLI, you must first configure it to authenticate with your account information, authorization key, or SAM user credentials.
Then, run the following command to register an IoT SIM: