Connecting to Soracom
Once you have created a Virtual SIM (either Standalone or as a Subscription Container), Arc will return a set of WireGuard configuration details containing the following parameters:
- Client private key
- Client public key
- Client IP address
- Server public key
- Server endpoint hostname or IP address and port
- Allowed IPs
These details will allow the WireGuard client on your device to connect to Soracom, and also allow Arc to securely authenticate your device.
When using the supplied settings for Wireguard it is highly recommended to add PersistentKeepalive settings to the Peer section, such as PersistentKeepalive = 25.
While this is not required, it will be necessary in situations such as:
- Accessing the device through a Network Address Translation (NAT) system.
- Remotely accessing the device using Soracom Napter or Gate.
- Accessing a server running on the device.
Although Arc will automatically generate a set of private and public keys for your device to use, you can also generate your own private and public keys and register the public key to your Virtual SIM, for additional security. For more information, refer to the Credential section.
You can then use these details to configure the WireGuard client on your device and connect to Soracom. When using the Soratun command line tool with a bootstrapping method, the WireGuard configuration details will be sent directly to your device.
Connecting Using Soratun
Soratun is a command line tool that combines a WireGuard client implementation together with the ability to create a Virtual SIM directly from the device that will be connecting to Soracom. Although using Soratun is optional, you may find the process of setting up a device to be easier when using Soratun. For more information, refer to the Soratun Overview section.
When using the Soratun tool to connect to Soracom, you can either perform bootstrapping (creating a Virtual SIM directly from your device) and then connect to Soracom, or simply use Soratun to connect to Soracom using existing settings.
In either case, you will need to follow the Soratun Installation instructions to install Soratun on your device first.
With Bootstrapping
When bootstrapping, the Soratun tool will send a request to Soracom to create a new Virtual SIM. Soratun provides several bootstrapping methods that allow you to choose the type of Virtual SIM (Standalone or Subscription Container) you want to create. For more information on bootstrapping, refer to the Soratun Overview section.
Once Soracom has created a Virtual SIM for your device, the WireGuard configuration details will be returned directly to your device. If you specified the --config flag during bootstrapping, these details will be saved to a Soratun configuration file on your device at the file path you specified. For example:
soratun bootstrap cellular --config /path/to/arc.jsonIf you did not specify the --config flag, the details will be saved to an arc.json file in the current working directory.
You can then run soratun up while using the --config flag again to specify the Soratun configuration file to connect to Soracom:
sudo soratun up --config /path/to/arc.json
>
>DEBUG: (soratun0) 2021/06/17 14:37:03 device started
>...
>DEBUG: (soratun0) 2021/06/17 14:37:03 assign IP address: 123.45.67.89
>DEBUG: (soratun0) 2021/06/17 14:37:03 set link up: soratun0
>DEBUG: (soratun0) 2021/06/17 14:37:03 add route: 100.127.0.0/16
>DEBUG: (soratun0) 2021/06/17 14:37:03 Interface up requested
>DEBUG: (soratun0) 2021/06/17 14:37:03 peer(cx/Q…7vVA) - Received handshake response
Once you have confirmed that the connection is working correctly, you can follow the additional instructions in the Soratun Installation section to configure Soratun to run automatically as a service.
Without Bootstrapping
If you created your Virtual SIM through the User Console or Soracom API/CLI, the WireGuard configuration details will be returned to your browser, application, or terminal. You will then need to copy the individual details to your device so that your device can connect to Soracom.
For reference, Soratun provides a config command that will display a Soratun configuration file template:
soratun config
>{
>  "privateKey": "AAAAAAAAAAAAAAAAAAAAAAAAAAAAAAAAAAAAAAAAAAA=",
>  "publicKey": "AAAAAAAAAAAAAAAAAAAAAAAAAAAAAAAAAAAAAAAAAAA=",
>  "simId": "890000xxxxxxxxxxxxx",
>  "logLevel": 2,
>  "enableMetrics": true,
>  "interface": "soratun0",
>  "arcSessionStatus": {
>    "arcServerPeerPublicKey": "AAAAAAAAAAAAAAAAAAAAAAAAAAAAAAAAAAAAAAAAAAA=",
>    "arcServerEndpoint": "127.0.0.1:11010",
>    "arcAllowedIPs": [
>      "100.127.0.0/16"
>    ],
>    "arcClientPeerIpAddress": "127.0.0.1"
>  }
>}
You can redirect the output to a file in order to create a Soratun configuration file from the template:
soratun config > /path/to/arc.jsonThen, open the file and edit the following parameters to match the WireGuard configuration details you received when creating the Virtual SIM:
privateKey(required) - The client private keypublicKey(required) - The client public keysimId(optional) - The SIM ID of the Virtual SIM (for reference only)arcSessionStatusarcServerPeerPublicKey(required) - The server public keyarcServerEndpoint(required) - The server endpoint hostname and port (for example:abc.arc.soracom.io:11010)arcAllowedIPs(required) - An array consisting of the Allowed IPs CIDR block (default:100.127.0.0/16)arcClientPeerIpAddress(required) - The Client IP address
For details on other parameters in the Soratun configuration file, refer to the Soratun Command Reference section.
After saving the Soratun configuration file, you can then run soratun up while using the --config flag to specify the file to connect to Soracom:
sudo soratun up --config /path/to/arc.json
>
>DEBUG: (soratun0) 2021/06/17 14:37:03 device started
>...
>DEBUG: (soratun0) 2021/06/17 14:37:03 assign IP address: 123.45.67.89
>DEBUG: (soratun0) 2021/06/17 14:37:03 set link up: soratun0
>DEBUG: (soratun0) 2021/06/17 14:37:03 add route: 100.127.0.0/16
>DEBUG: (soratun0) 2021/06/17 14:37:03 Interface up requested
>DEBUG: (soratun0) 2021/06/17 14:37:03 peer(cx/Q…7vVA) - Received handshake response
Once you have confirmed that the connection is working correctly, you can follow the additional instructions in the Soratun Installation section to automatically run Soratun as a service.
Connecting Using WireGuard
Depending on your platform, you may be able to configure and activate the WireGuard connection using either a graphical interface or a command line interface.
Graphical Interface
If you have installed the official WireGuard desktop client on your Windows or macOS computer, you can use the graphical interface to configure your Arc connection.
Once you have created a Virtual SIM, copy the WireGuard configuration details.
Then, to add the WireGuard configuration details to your WireGuard client:
-
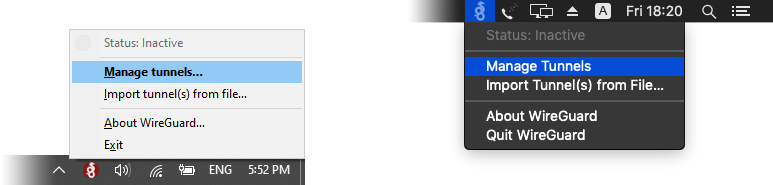
Open WireGuard. If you do not see the configuration window, click the WireGuard icon in your system tray or menu bar, then click Manage tunnels.
-
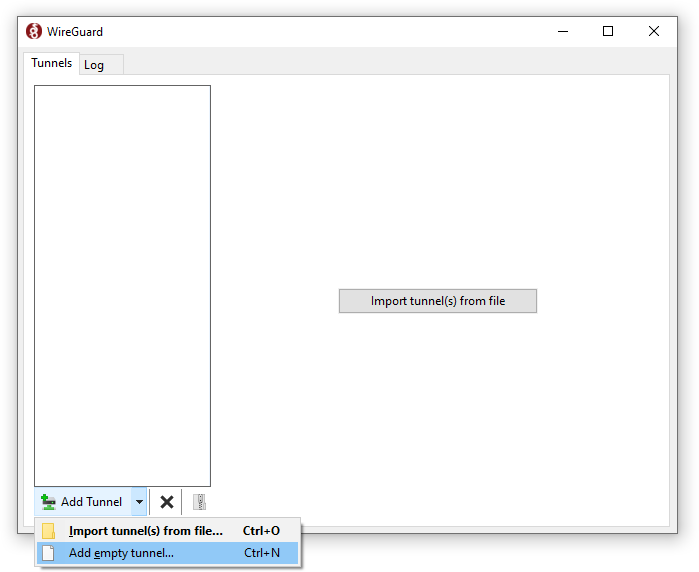
In the configuration window, click the Add Tunnel or button, then select Add empty tunnel...:
-
In the tunnel configuration window, paste the WireGuard configuration details provided by Arc when you created the Virtual SIM:
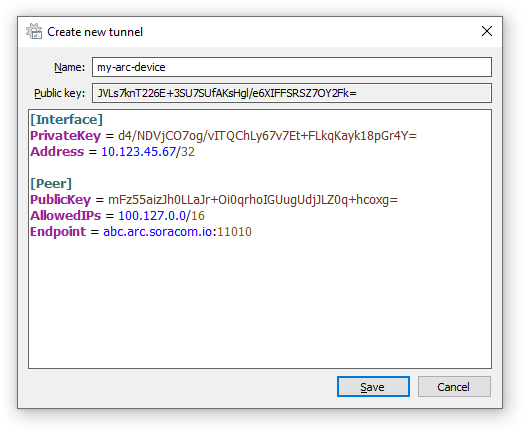
By default, the Windows and macOS WireGuard clients will automatically generate a private key. Make sure to use the private key provided to you by Arc. If you prefer to use the private key generated by the WireGuard client, make sure to follow the instructions in the Credentials section to register the public key of your device's WireGuard client to your Virtual SIM.
Then click Save.
-
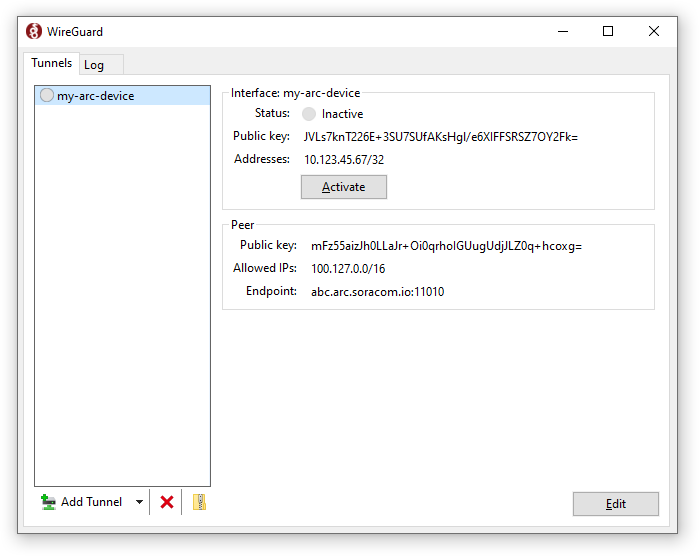
Finally, click the Activate button to connect to Soracom:
Many Linux WireGuard clients also provide a graphical interface for configuring the Arc connection. However, rather than a dedicated interface, the WireGuard client configuration may be built in to another network configuration tool such as NetworkManager.
In general, regardless of the appearance of the graphical interface, you will need to enter the same information provided in the WireGuard configuration details.
For more information, refer to the WireGuard installation instructions for your particular Linux distribution.
Command-Line Interface
If you are installing a WireGuard client on a device without a display, you can configure the WireGuard client and activate the connection using the command line.
For reference, the steps for configuring WireGuard and connecting to Soracom on a Raspberry Pi are below:
-
Install WireGuard:
sudo apt-get install wireguard -
Create a new WireGuard network interface called
wg0:sudo ip link add dev wg0 type wireguard -
Create a new WireGuard configuration file located at
/etc/wireguard/wg0.conf, and paste in the WireGuard configuration details provided to you by Arc when you created the Virtual SIM:sudo nano /etc/wireguard/wg0.conf[Interface] PrivateKey = d4/NDVjCO7og/vITQChLy67v7Et+FLkqKayk18pGr4Y= Address = 10.123.45.67/32 [Peer] PublicKey = mFz55aizJh0LLaJr+Oi0qrhoIGUugUdjJLZ0q+hcoxg= AllowedIPs = 100.127.0.0/16 Endpoint = abc.arc.soracom.io:11010Then save the file.
-
Finally, use the
wg-quickcommand to activate the connection and connect to Soracom:sudo wg-quick up wg0
You can now access Soracom platform services, such as Beam, Funnel, Funk, and Harvest.