Creating Virtual SIMs
Creating a Virtual SIM will incur an initial fee. In addition, the Virtual SIM will incur a monthly service fee until the Virtual SIM is terminated. Refer to the Pricing & Fee Schedule for more information.
To configure a device to connect to Soracom using Arc, you must first create a Virtual SIM. You can create Virtual SIMs from the User Console, using the Soracom API or CLI, or using the Soratun command line tool provided by Soracom.
- The User Console will provide an easy, interactive way to create individual Virtual SIMs.
- For larger operations, you can use the Soracom API or CLI to perform the same Virtual SIM creation process programmatically.
Both of the methods above are generally intended to be performed on a computer, rather than on the devices that will connect to Soracom using Arc. This means you will need to separately copy or enter the Arc-provided WireGuard configuration to the device to complete the setup.
Unlike the User Console and Soracom API or CLI methods, the Soratun command line tool will allow you to create a Virtual SIM directly from the device that will use the Arc connection. This process is called bootstrapping, and can be used to allow a device to create its own Virtual SIM and configure its WireGuard settings automatically.
This section describes the process of creating a Virtual SIM using the User Console and Soracom API or CLI.
If you prefer to create a Virtual SIM directly from a device, refer to the Soratun section.
Creating a Standalone Virtual SIM
Arc will automatically generate a set of client private and public keys that will allow your device to establish a secure connection to Soracom. However, you can also use your own set of private and public keys for additional security. For more information, refer to the Credentials section.
-
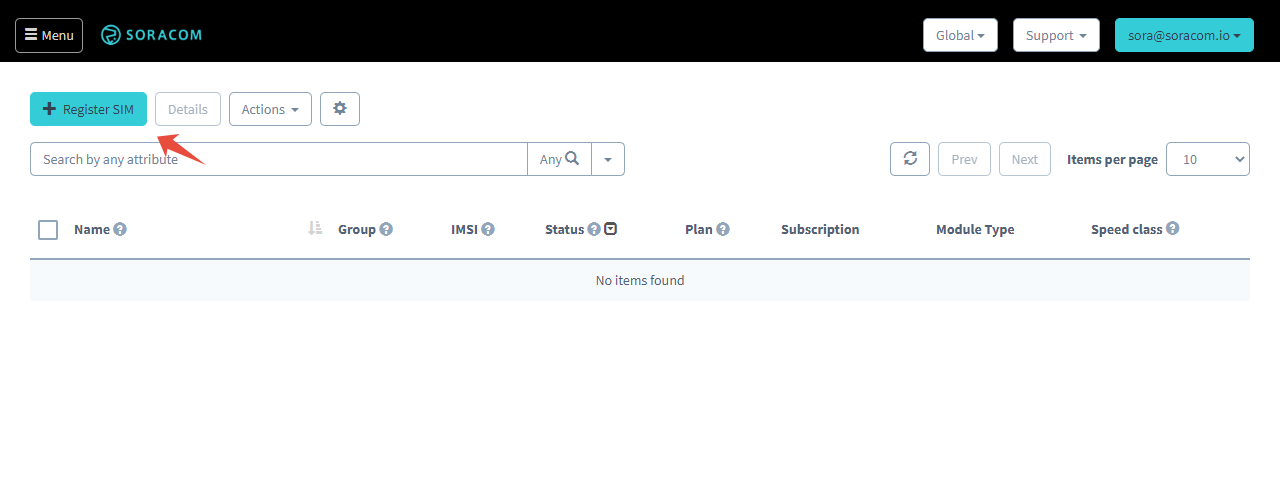
Login to the User Console. From the Menu, open the SIM Management screen.
-
Click the Register SIM button.

-
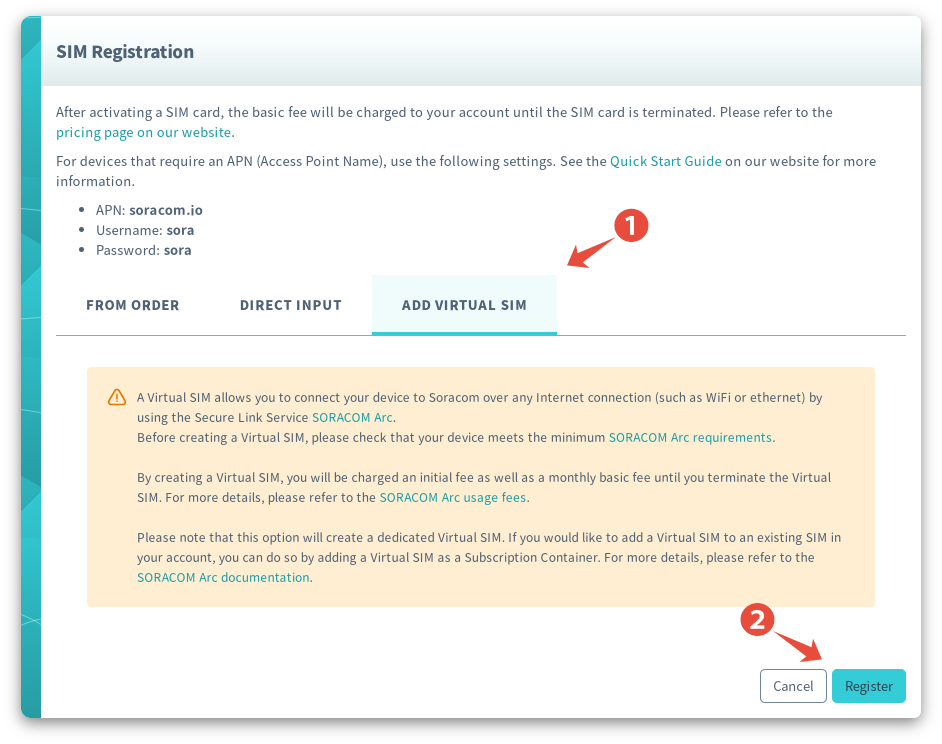
Click the Add Virtual SIM tab, then click Register to create a new Virtual SIM.

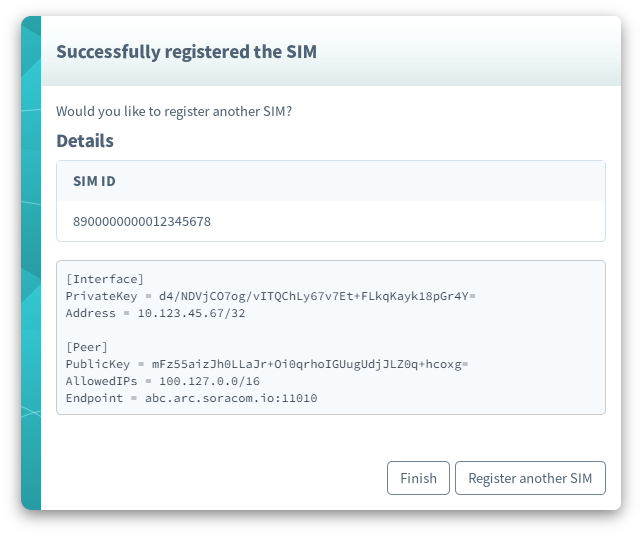
Once your Virtual SIM has been created, its SIM ID and WireGuard configuration details will be displayed:

You can then copy the WireGuard configuration, and proceed to the Connection instructions to configure the WireGuard client on your device.
The private key will be displayed only once, and you must make sure to copy the private key to your device.
When using the supplied settings for Wireguard it is highly recommended to add PersistentKeepalive settings to the Peer section, such as PersistentKeepalive = 25.
While this is not required, it will be necessary in situations such as:
- Accessing the device through a Network Address Translation (NAT) system.
- Remotely accessing the device using Soracom Napter or Gate.
- Accessing a server running on the device.
Adding a Virtual SIM to an IoT SIM
-
Login to the User Console. From the Menu, open the SIM Management screen.
-
From the list of subscribers, click the for the SIM you want to manage.
-
Click the Actions menu, then select Add Virtual SIM....
-
Read the subscription delivery fee warning and usage charge, then click Add Subscription.

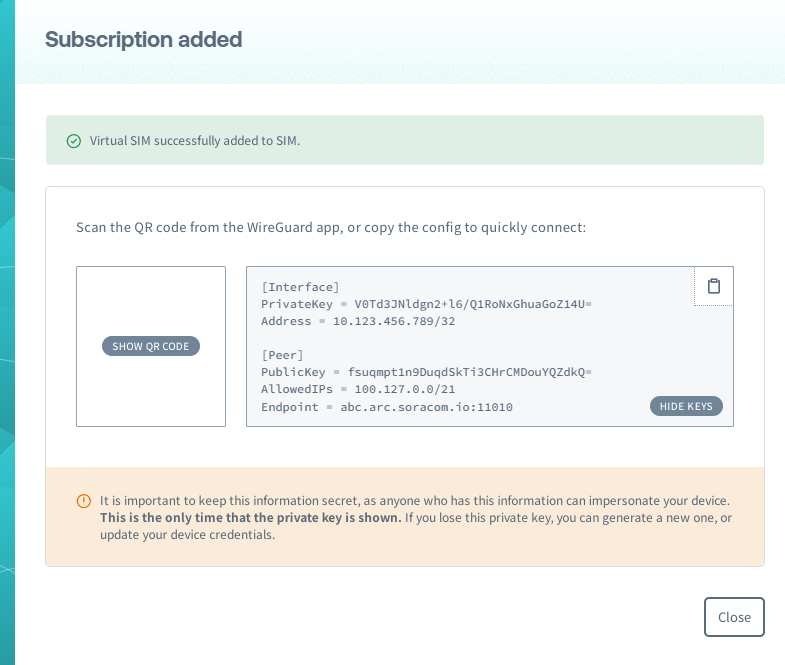
Once your Virtual SIM has been added to the selected SIM, its WireGuard configuration details will be displayed:

You can then copy the WireGuard configuration, and proceed to the Connection instructions to configure the WireGuard client on your device.
When using the supplied settings for Wireguard it is highly recommended to add PersistentKeepalive settings to the Peer section, such as PersistentKeepalive = 25.
While this is not required, it will be necessary in situations such as:
- Accessing the device through a Network Address Translation (NAT) system.
- Remotely accessing the device using Soracom Napter or Gate.
- Accessing a server running on the device.
The private key will be displayed only once, and you must make sure to copy the private key to your device.
Arc will automatically generate a set of client private and public keys that will allow your device to establish a secure connection to Soracom. However, you can also use your own set of private and public keys for additional security. For more information, refer to the Credentials section.
Programmatic Usage
In addition to creating Virtual SIMs from the User Console, you can also create them programmatically using the Soracom API or CLI.
Soracom API
To access the Soracom API, first use the auth API to obtain an API Key and Token. Refer to the API Usage Guide for instructions on how to use the API Key and Token in API requests.
Then, to create a Standalone Virtual SIM, use the createSim API to create a new Virtual SIM:
curl -X POST \
|  -H 'X-Soracom-API-Key: <MY-API-KEY>' \
|  -H 'X-Soracom-Token: <MY-TOKEN>' \
|  -H 'Content-Type: application/json' \
|  -d '{
|        "type": "virtual",
|        "subscription": "planArc01"
|      }' \
| https://g.api.soracom.io/v1/simsAlternatively, to create a Subscription Container Virtual SIM, use the addSubscription API to add a Virtual SIM to an existing SIM:
curl -X POST \
|  -H 'X-Soracom-API-Key: <MY-API-KEY>' \
|  -H 'X-Soracom-Token: <MY-TOKEN>' \
|  -H 'Content-Type: application/json' \
|  -d '{
|        "type": "virtual",
|        "subscription": "planArc01"
|      }' \
| https://g.api.soracom.io/v1/sims/<SIM-ID>/profiles/<ICCID>/add_subscriptionIn either case, the API will return details about the Virtual SIM that was created, including the Virtual SIM IMSI for identification purposes, as well as the WireGuard configuration details. You can then use these details to configure the WireGuard client on your device and activate the WireGuard connection, as described in the Connection section.
Soracom CLI
To use the Soracom CLI, you must first configure it to authenticate with your account information, authorization key, or SAM user credentials.
Then, run the following command to create a Standalone Virtual SIM:
Alternatively, run the following command to add a Virtual SIM to an existing SIM as a Subscription Container:
soracom sims add-subscription --sim-id "<SIM-ID>" --iccid "<ICCID>" --type "virtual" --subscription "planArc01" --coverage-type gIn either case, the CLI will return the same response as the API example above. You can then use these details to configure the WireGuard client on your device and activate the WireGuard connection, as described in the Connection section.