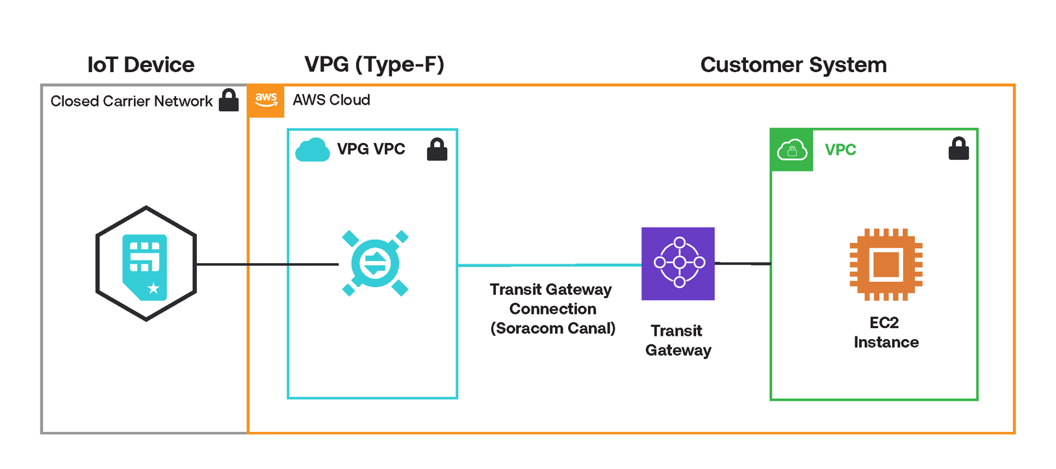
Transit Gateway Connection Configuration
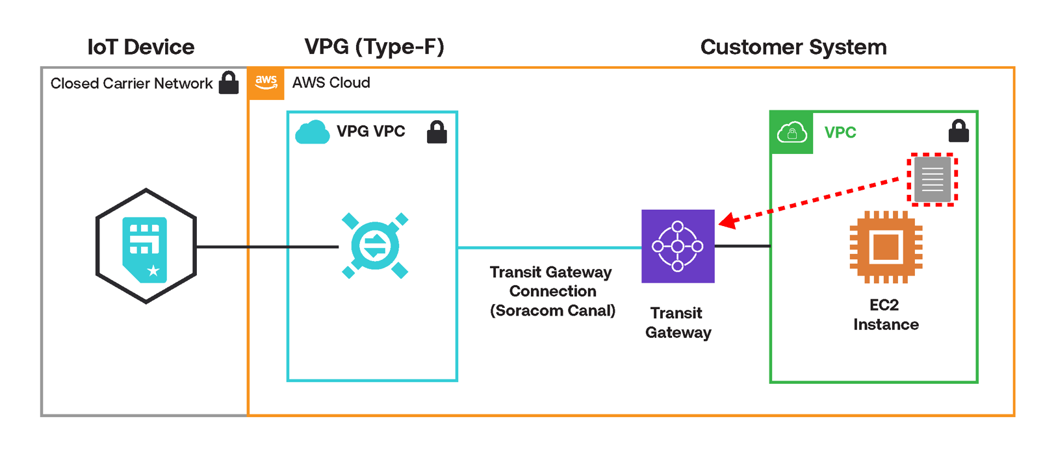
The Soracom Canal VPC peering connects a Type-F or Type-G VPG to your AWS Transit Gateway. This connection enables one-way connection with Carrier Grade NAT (CGNAT) from devices using IoT SIMs to instances such as EC2 in your Amazon VPC over a Transit Gateway connection. If you need bidirectional communication with Canal VPC peering, you also need Soracom Gate.
Requirements
To configure Canal with a Transit Gateway Connection, you will need:
- An AWS Transit Gateway located in the same AWS region as your VPG with Default route table propagation enabled. If you haven't already created a Transit Gateway, follow the instructions in the Creating a Transit Gateway section of this document.
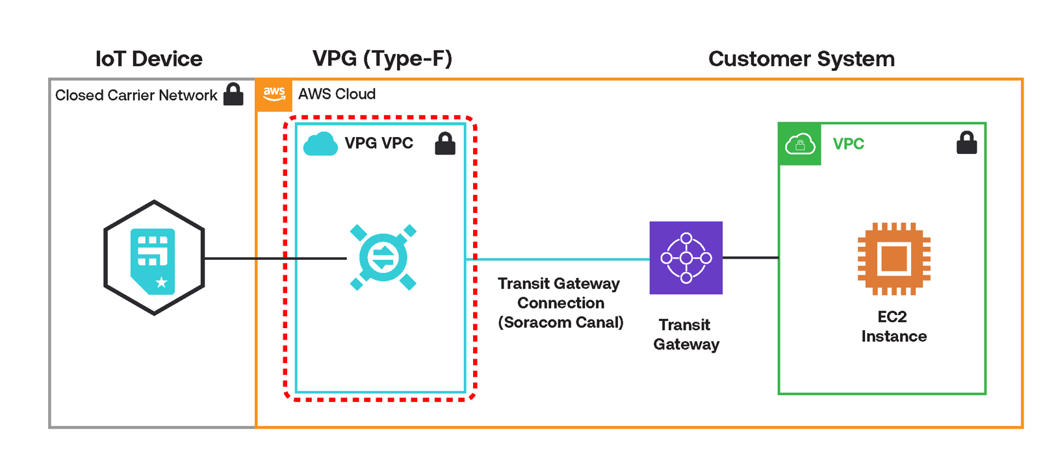
- A Type-F or Type-G VPG. If you haven't already created a VPG, follow the instructions in the Creating a VPG section of this document.
Limitations
If you have created a VPG in Japan coverage, your VPC cannot include the 10.21.0.0/16 IP address range. If your AWS VPC uses a CIDR block that includes this range, you will need to create a new VPC with a CIDR block that does not include this range.
Creating a Transit Gateway connection will incur fees. Refer to the Pricing & Fee Schedule for more information.
Configuration
Creating a VPG
Creating a VPG will incur fees. Refer to the Pricing & Fee Schedule for more information.
Follow the instructions from the Virtual Private Gateway Configuration documentation to create a new VPG with the following options:
- Type - Select
Type-ForType-G(other VPG types do not support Transit Gateway connections). - Use internet gateway -
ONorOFF. SelectONif you have a requirement to communicate with the internet without sending data through the Transit Gateway. Otherwise, selectOFF. - Rendezvous Point - Select the rendezvous point in the same region as your Transit Gateway. If you do not see your region listed you will have to create a new Transit Gateway in one of the supported regions and peer to your current region in AWS. Soracom does not currently support inter-region attachment.
- CIDR Range for device subnet (optional) - The CIDR block of IP addresses assigned to Air and Arc devices that connect to this VPG. If left blank, a default block of
10.128.0.0/9will be used. Manually specified Device Subnets must be within the10.0.0.0/8,172.16.0.0/12, or192.168.0.0/16CIDR ranges and have a subnet mask of/24or larger.
For more information on each option, refer to the Virtual Private Gateway Configuration documentation.
Creating a Transit Gateway

If you have already created a Transit Gateway you may skip this step, however, confirm that your Transit Gateway has Default route table propagation enabled, and that it is in the same region as your VPG rendezvous point before proceeding.
You can create a Transit Gateway by following these instructions:
-
Sign in to the AWS Management Console, click the Services menu, and open the VPC dashboard.
-
In the Region selector, choose the Region that you selected for your VPG rendezvous point.
-
In the navigation menu's Transit gateways section, click Transit gateways.
-
Click Create transit gateway.
-
Configure your transit gateway as desired, ensuring that Default route table propagation is enabled. Then click Create transit gateway. The transit gateway will now be provisioned by AWS.
-
Wait for the Transit Gateway to be provisioned and its state to become Available.
-
In the navigation menu's Transit gateways section, click Transit gateway attachments.
-
Click Create transit gateway attachment.
- Set a descriptive name in the Name tag field, under Transit gateway ID select the transit gateway you just created, and under VPC ID choose your VPC. Then click Create transit gateway attachment.
Sharing the Transit Gateway
You can now share the Transit Gateway resource that you have created with Soracom.
-
Sign in to the AWS Management Console, click the Services menu and open the Resource Access Manager dashboard.
-
Click Create resource share.
-
Set the following fields:
- Resource Share Name - Any name.
- Resources - Select Transit Gateways from the dropdown menu, then select the Transit Gateway you would like to connect.
Then click Next.
-
On the Associate managed permissions page leave the default settings and click Next again.
-
On the Grant access to principals page set the following fields:
- Principals - Allow sharing with anyone.
- Select principal type - Select AWS account and enter one of the following account IDs depending on your VPG coverage type, then click Add.
- Japan coverage:
762707677580. - Global coverage:
950858143650.
- Japan coverage:
Then click Next.
- Click Create resource share. Make sure to note the ID of the resource share. This will be required when applying for your connection.
Applying for the Transit Gateway Connection
You may now submit a support ticket to request a connection to your Transit Gateway.
-
Gather the following information for your support request:
-
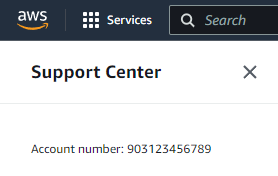
Your AWS account ID number. You can find your AWS account number by signing into the AWS Management Console. On the upper right corner of the console, click the ? support menu, then select Support Center. Your AWS account number will be displayed at the top of the navigation menu on the left side:

- The AWS region where your Transit Gateway is located.
- Your Soracom VPG ID. This can be found in your VPG list and the VPG overview table.
- The CIDR range which you want to route to the Transit Gateway.
- The Transit Gateway Resource Share ID. You can find the ID of a resource share by signing in to the AWS Management Console, clicking the Services menu and opening the Resource Access Manager dashboard. Then, from the Shared by me category in the navigation menu, select resource shares.
-
-
Submit a support ticket, selecting I want to connect an AWS Transit Gateway to my VPG as the category for your request.
- Soracom will initiate the share and you will be notified of a connection from an Amazon VPC with VPG to your Transit Gateway. You must then authorize that Transit Gateway connection. Once it has been accepted, Soracom will add the routing settings for Transit Gateway to the VPG's route table and notify you via the support ticket.
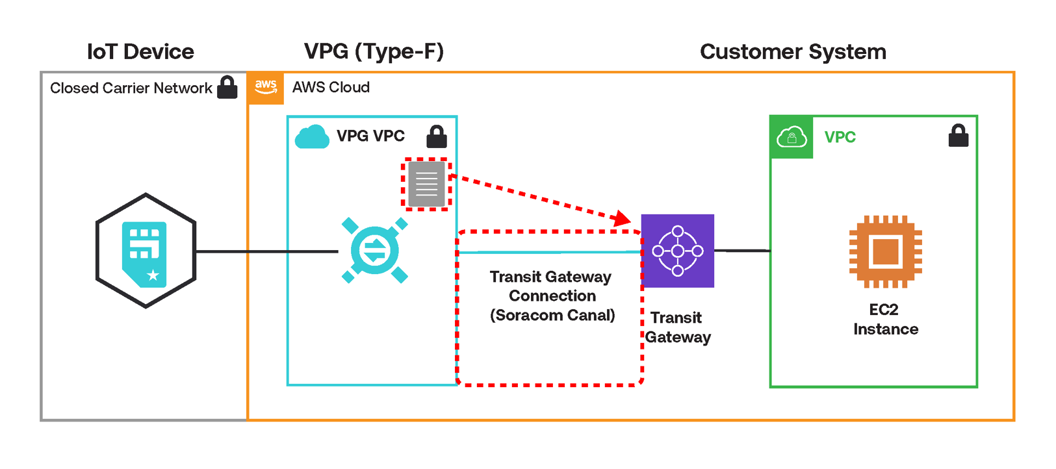
Adding Transit Gateway Routing to Your Amazon VPC Route Table
To communicate from the VPG to your Amazon VPC via the Transit Gateway, you need to configure the return communication routing settings from your Amazon VPC to the Transit Gateway.
-
Sign in to the AWS Management Console, click the Services menu, and open the VPC dashboard. Then click the Your VPCs section.
-
Click the route table ID in the Main route table column for the VPC that is connected to your VPG.
-
Click the checkbox for route table, select the Routes tab, and click Edit routes.
-
Click Add route.
-
In the new route set the following fields:
- Destination - Enter the CIDR block of the Transit Gateway Connection ID sent to you by Soracom.
- Target - Select Transit Gateway and enter the Transit Gateway ID of the Transit Gateway you created in Creating a Transit Gateway.
- Click Save Changes.
Terminating Canal Connections
If you no longer need a closed network connection using Canal you may delete the VPG associated with the Canal connection. If you would like to keep using your VPG but remove the Canal connection, contact Soracom Support for assistance.