Using Flux with Generative AI to Analyze Images
Introduction
Soracom Flux is a low-code IoT application builder designed for advanced automation.
In this guide, we send image data from an IoT device to Soracom and use Flux with a generative AI platform to analyze the data and send alerts to Slack when user-defined conditions are met.
Refer to the Pricing & Fee Schedule for detailed information on Soracom Flux pricing. Soracom Flux includes a free tier providing limited usage for certain features at no cost.
Enabling Soracom Harvest Files will incur fees based on the amount of data uploaded. Refer to the Pricing & Fee Schedule for information on Harvest Files pricing.
Requirements
For this project, you will need the following:
-
A Soracom Account and a registered IoT SIM
If you don't already have a Soracom account or a registered IoT SIM, follow the steps in the Quick Start guide.
- A Slack account
Project Overview - Warehouse Safety Monitoring
A camera continuously monitors a warehouse, capturing images for analysis. The system uses AI image analytics to identify workers and equipment. If a person is detected, generative AI evaluates the scene. If an anomaly such as a worker not wearing a helmet is found, an alert with a description is sent to Slack, notifying supervisors to take immediate action.
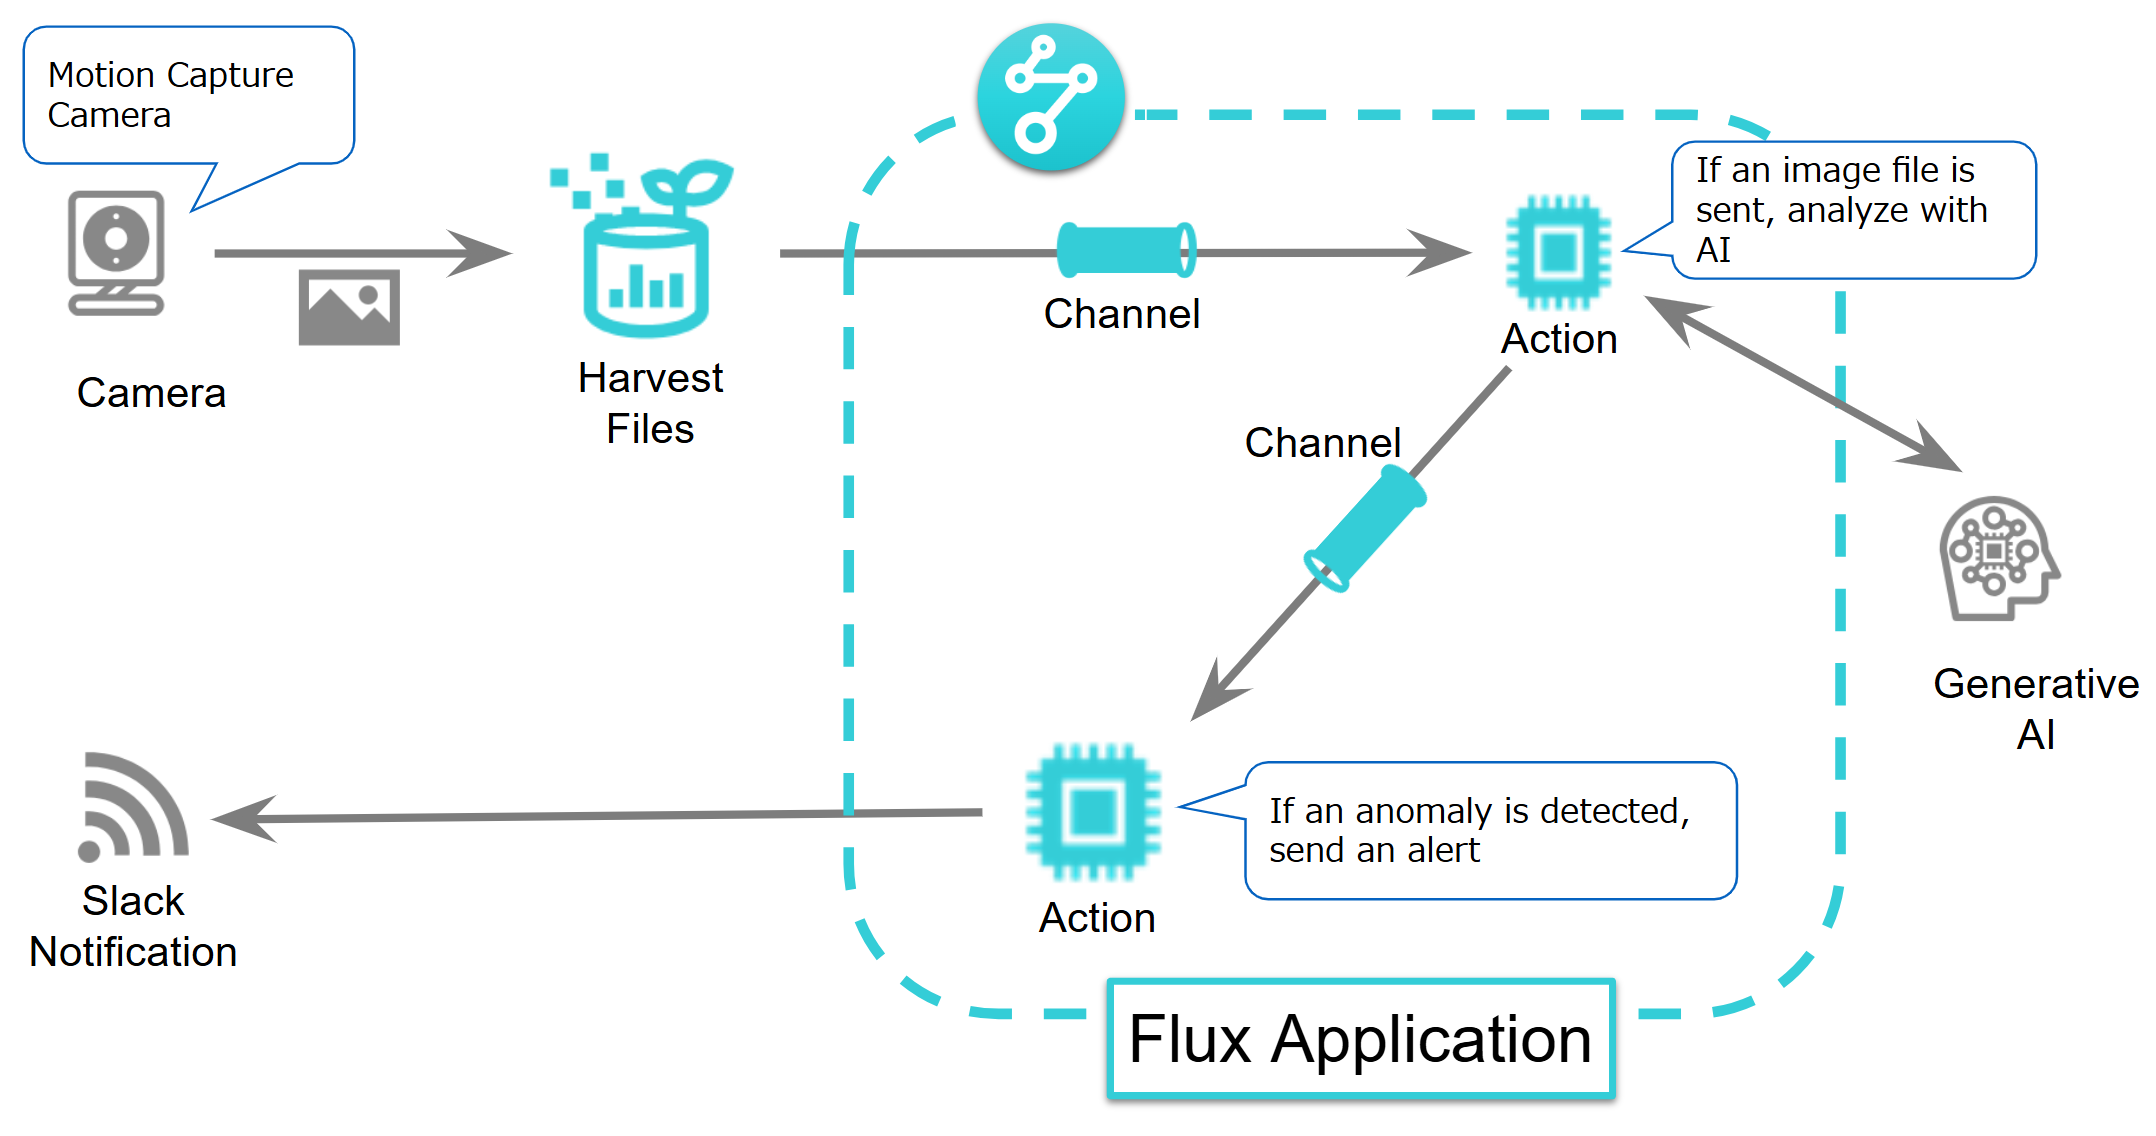
- Harvest Files is for uploading image files to Soracom.
- The process within the dotted line represents the Flux app.
Project Steps
Enable Harvest Files for Your Soracom IoT SIMs
Configure your device to send image files to the Soracom platform through Soracom Harvest Files. Image files uploaded to Soracom will serve as the event source for your Flux app.
-
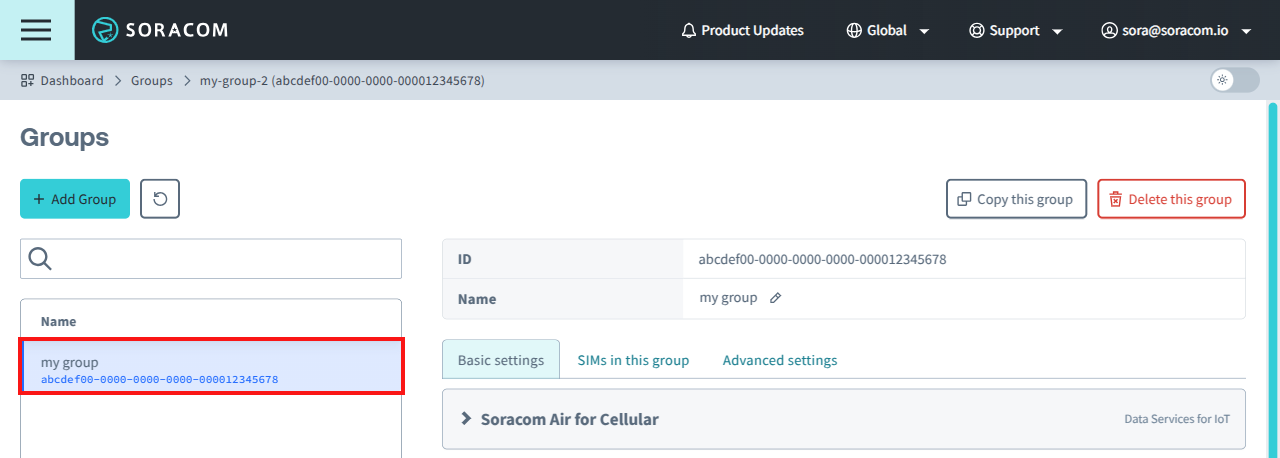
Login to the User Console. From the Menu, expand Soracom Air for Cellular and select Groups.
-
Select a group, then select the Basic settings tab.
-
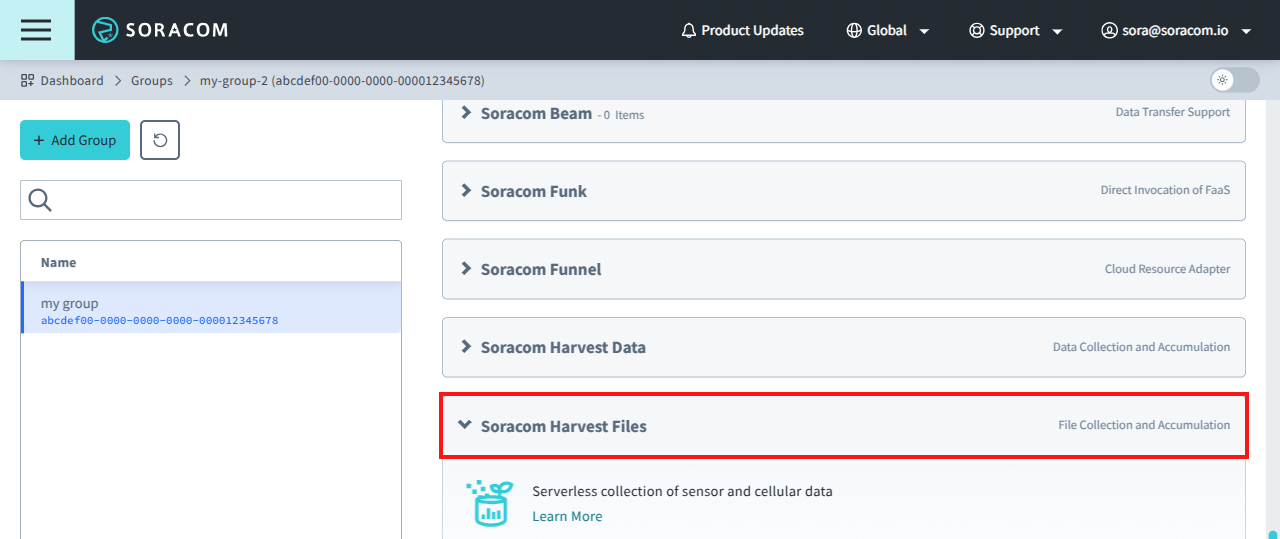
Click the Soracom Harvest Files section to expand its settings.
-
Enable Harvest Files by toggling the setting on.
-
Enter your desired path into the Default Path field (e.g.,
/flux/latest.jpg).You can choose any path as the request URL to where you would like the file to be saved within Harvest Files. For further information, see the documentation on Default Path.
-
Click Save.
A confirmation dialog will appear, including a link to detailed information on the Pricing & Fee Schedule for Harvest Files.
-
Click OK after acknowledging the dialog to save your configuration.
- Add an IoT SIM to the group.
Create a Flux App
A Flux app can integrate various forms of inputs and apply sophisticated business logic to achieve desired outcomes.
-
Login to the User Console. From the Menu, expand Soracom Flux and select Flux Apps.
-
Click Create a new Flux app.
-
Name the Flux app and provide an optional description, then click Create.
The Flux app will be created and the Studio tab in Soracom Flux Studio will automatically be displayed.
Create a Channel
A channel is a Flux component that connects an event source to actions in your Flux app.
-
Open the Studio tab in Soracom Flux Studio:
- If you have just created a Flux app, you will already be in the Studio tab.
- If you are returning, follow Step 1 under Create a Flux App to access your Flux Apps, then select your app to open the Studio tab.
-
Click Create a channel.
-
Choose Soracom Harvest Files as the event source and click Next.
-
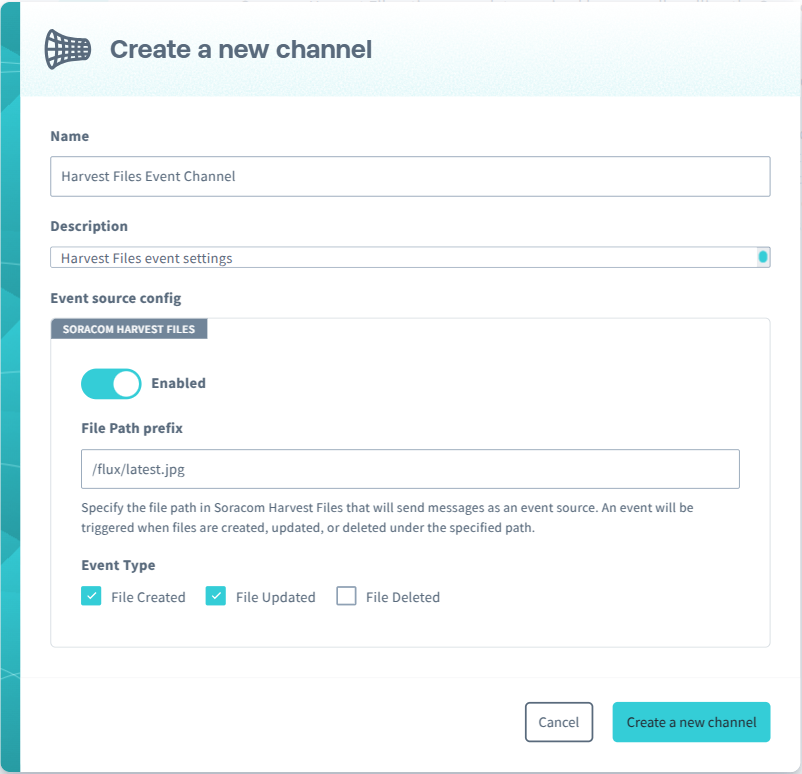
Configure the following:
- Name: Name your channel.
- Description: Optionally provide a summary of the channel.
-
Event source config:
- Enable Soracom Harvest Files.
-
Set File Path prefix for image file uploads:
-
Enter the desired path (e.g.,
/flux/latest.jpg).Files with paths that match this prefix will trigger events.
-
- Select Event Types to trigger the event source:
- Check File Created and File Updated.
-
Click Create a new channel.
- After confirming that your configuration is correct, click the to return to the Studio tab.
Create an AI Action
An action is a component that can be added to a channel that can conditionally process information from an event source to execute a desired effect.
-
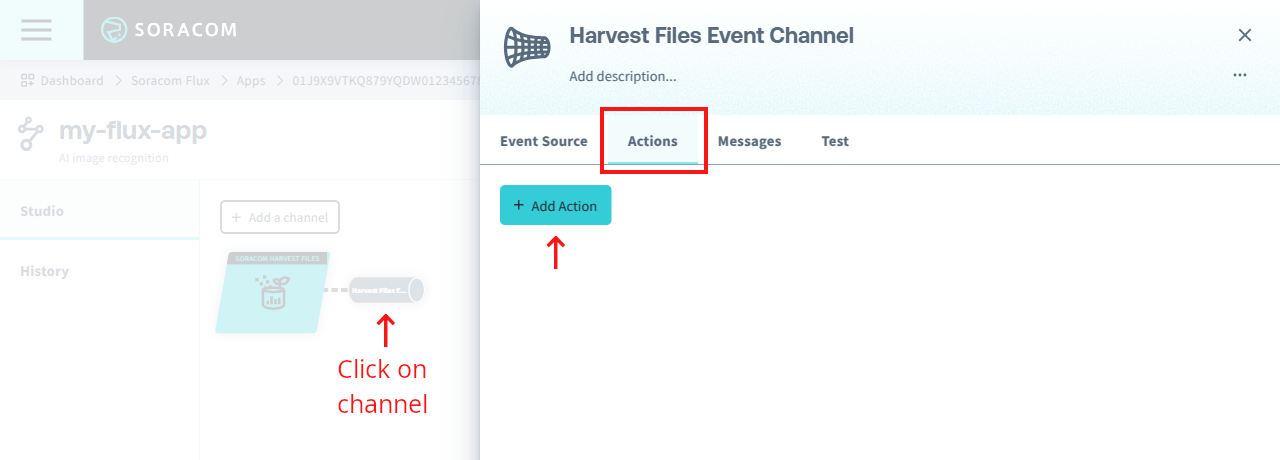
Click on the channel created in the previous section to open the configuration dialog, then select the Actions tab and click Add Action.
-
In the Create a new action dialog, choose AI as your action type, then click OK.
-
Configure the following:
- Name: Enter an action name.
- Description: Optionally provide a summary.
- Enabled: Set the action to enabled.
-
Condition:
-
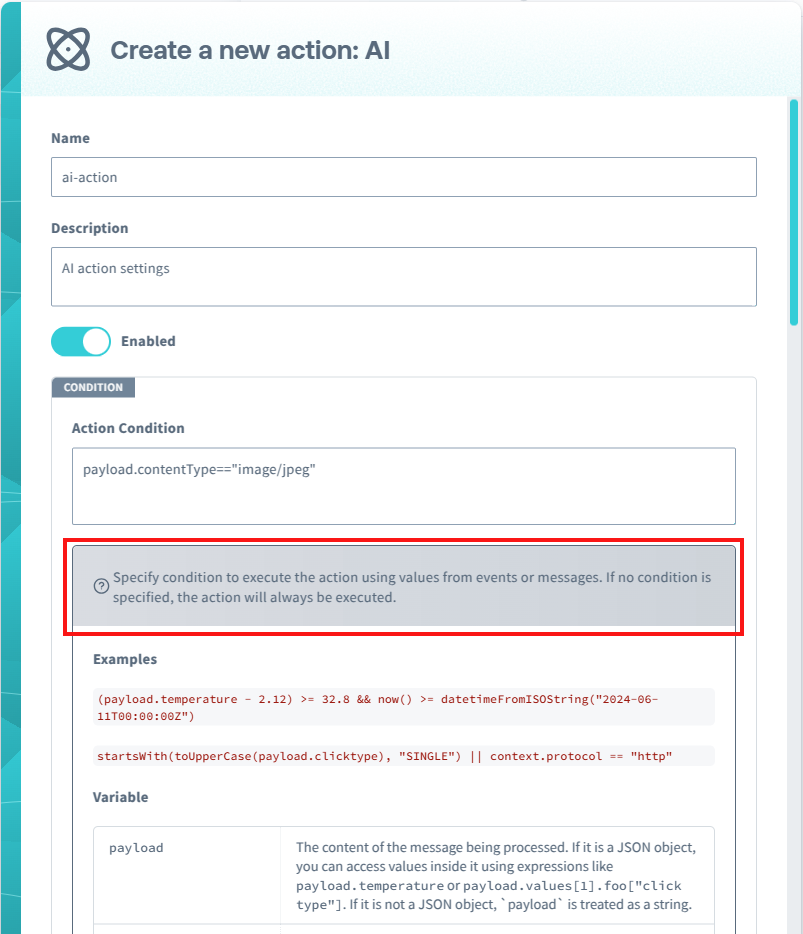
Action Condition: Define when the action should trigger.
Example:
payload.contentType=="image/jpeg"instructs the action to respond to JPEG images.Click the ? Specify condition to... section of the dialog to reveal a full guide on example conditions, variables, operators, and functions.
-
-
Configure the following in the Config section of the dialog:
- AI model: Select an available AI model.
Note that some AI models do not support image analysis and the Use image option is grayed out.
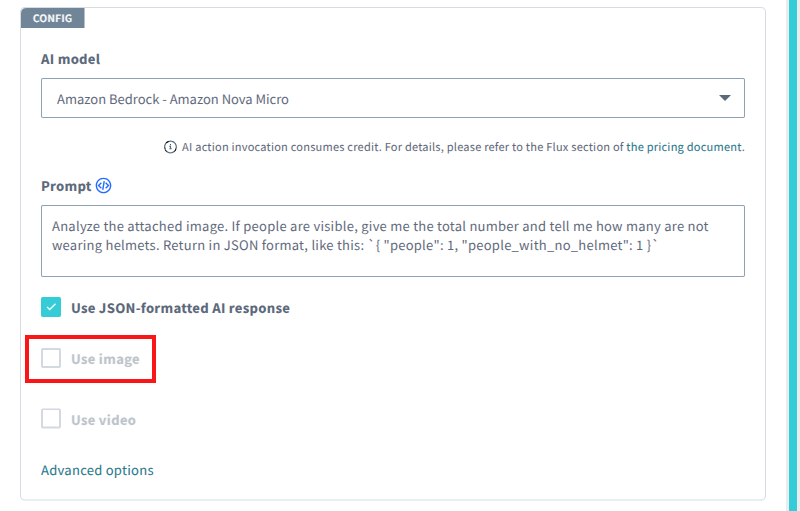
For the purposes of this guide, select an AI model that offers this capability.
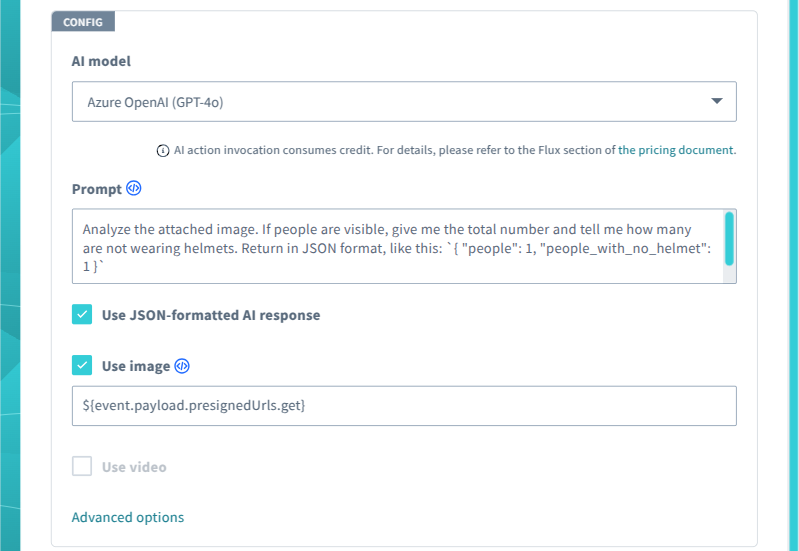
- Prompt: Enter instructions for the AI model, e.g.:
Analyze the attached image. If people are visible, give me the total number and tell me how many are not wearing helmets. Return in JSON format, like this: `{ "people": 1, "people_with_no_helmet": 1 }` -
Use JSON-formatted AI response: Check this box to format responses as JSON. Include JSON instructions in the Prompt field.
-
Use image: Check this option to send a still image to the AI model and specify the URL of the image. For example, if you are using the Soracom Harvest Files event source in this Flux app, specify
${event.payload.presignedUrls.get}to send the file uploaded to Soracom Harvest Files to the generative AI.Use
${}notation to invoke evaluation of the assigned expression. In this case, the URL from the Harvest Files event source message is being referenced:event.payload.presignedUrls.get.
- AI model: Select an available AI model.
-
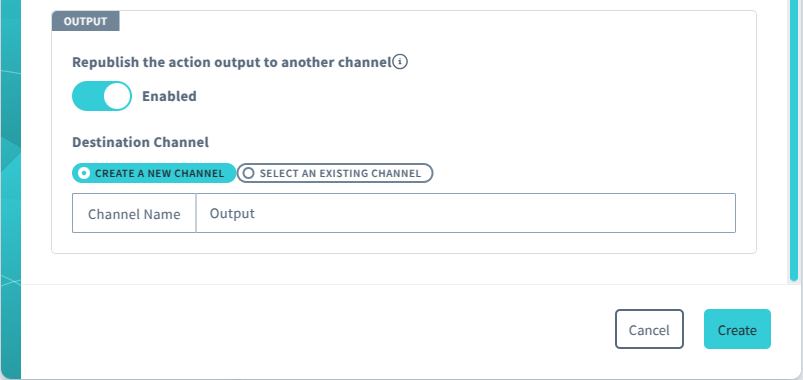
Configure the following in the Output section of the dialog:
Republish the action output to another channel: Set to Enabled to republish to another channel and set the following:
- Destination Channel: Select Create a New Channel.
- Channel Name: Enter a name (e.g.,
Output).
-
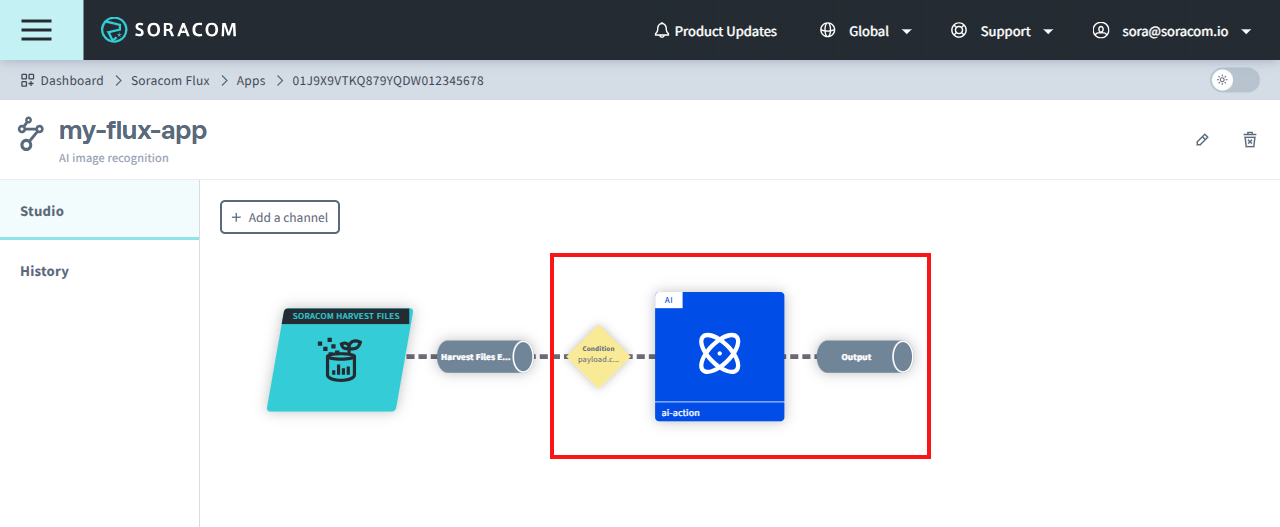
Click Create then click to close and return to the Studio and see the new condition, AI action, and channel.
Create a Slack Notification Action to Send Responses to Slack
In this section, we'll create an action to send out a Slack alert if conditions are met.
-
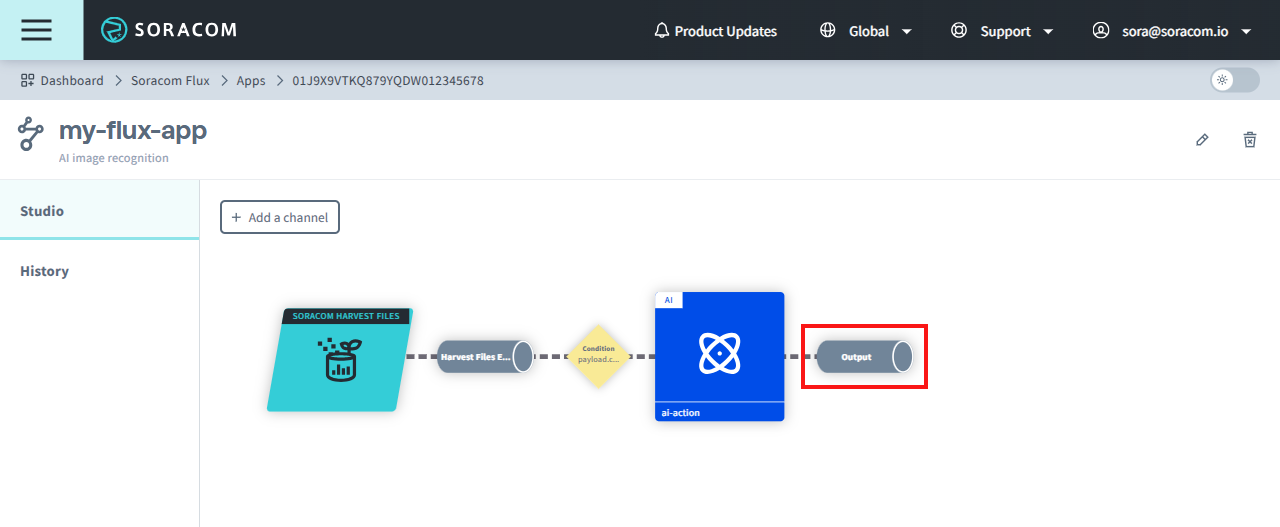
Click on the output channel created in the previous section.
-
Select the Actions tab and click the Add Action button.
-
Select Slack Notification as your action type, then click OK.
-
Configure the Slack Notification action:
- Name: Name the Slack Notification action.
- Description: Optionally provide a summary.
- Enabled: Set the action to enabled.
-
Condition:
-
Action Condition: Define when the action should trigger.
Example:
payload.output.people_with_no_helmet > 0Click the ? Specify condition to... section of the dialog to reveal a full guide on example conditions, variables, operators, and functions.
-
-
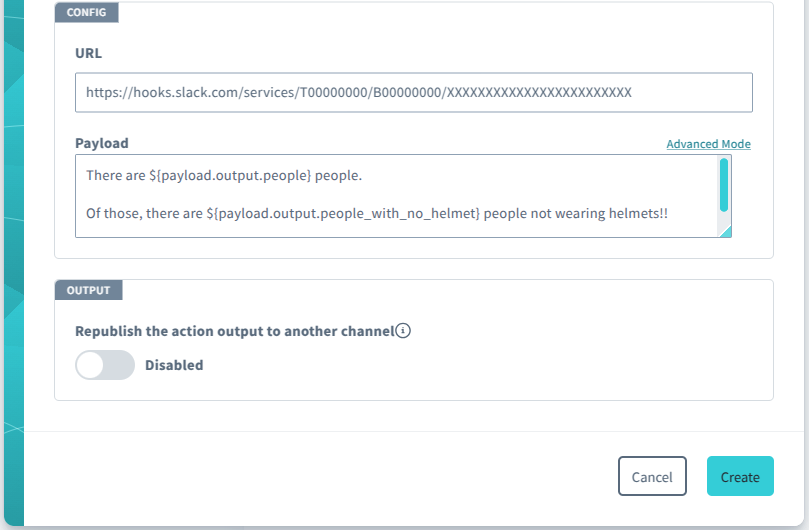
Set the following in the Config section of the dialog:
-
URL: Enter the incoming Webhook URL associated with the Slack channel you want to notify.
For information on setting up a URL, refer to the official Slack Documentation.
-
Payload: Specify the message you want to receive on your Slack account.
The data received by this channel is being referenced in the Payload field. In this case we are using
${payload.output.people}to reference the AI action's output.For example:
There are ${payload.output.people} people.

Of those, there are ${payload.output.people_with_no_helmet} people not wearing helmets!!
-
-
Configure the following in the Output section of the dialog:
- Republish this action output to another channel: Set republishing to Disabled.
-
Click Create.
-
After confirming that your configuration is correct, click the to return to the Studio tab and see the new channel.
The AI action should now be successfully set up to analyze images and send Slack notifications for any anomalies detected. Confirm that your Slack Notification action exists in your application as shown below.

Testing
Upload an Image
-
Upload an image containing a person without a helmet to Harvest Files from your device.
The curl example below is using the example default path demonstrated in Enable Harvest Files for Your Soracom IoT SIMs.
curl -X PUT \
|  -H "Content-Type: image/jpeg" \
|  --data-binary @a.jpg \
|  http://harvest-files.soracom.io/
As the default path was in the example was set to
/flux/latest.jpg, the file, a.jpg in the curl command will be stored aslatest.jpg.Note that in this example guide, if there are no people without a helmet in the image, no further action will be taken.
-
Check to confirm that the message was sent to Slack as configured.
-
From the Menu, expand Soracom Flux and select Flux Apps.
-
Select your Flux app for this project.
-
Select the History tab to review actions taken by the app.
-
Here, you can review records such as Message, Context, Input, and Output for all channels in the app.
You can see further details on viewing logs here.
Troubleshooting and Expected Behavior
If no output or incorrect data is sent to Slack or other channels, review the History tab in Soracom Flux Studio to inspect the output data.
Verify that each action is correctly linked to the destination channel. If output republishing is enabled, ensure the destination channel is correctly specified.
Note that generative AI platforms may produce unexpected results. Review your workflows in detail to verify they achieve desired outcomes.
Verify File and Data Requirements
-
Ensure that the image file sent to Soracom Harvest Files is of the type specified in the AI action (e.g., JPEG).
-
If a non-image file is uploaded to Soracom Harvest Files, the app will not take any action.
- The image file format must also match what you define in the Flux AI action's Action Condition setting. In this guide's example,
payload.contentType=="image/jpeg"is defined as the Action Condition. If a.pngfile is uploaded, the file will not invoke the AI action.
Verify AI Action Configuration
Ensure the AI model is configured correctly in the Config tab of the AI action. Verify that both Use JSON-Formatted AI Response and Use Image options are selected, and check that the correct prompt format is used.
Slack Notification Action Configuration
The Slack Notification action will send a message only if the AI detects people in the image file based on the Action Condition set. Additionally, the AI platform must detect an anomaly in the image (e.g., people not wearing helmets) to trigger a notification.
SAM User Permissions
Under your Soracom Account, you can grant SAM Users (with limited permissions) access to Soracom Flux.
For more information on SAM Users, see Users & Roles.
Example permission statement:
{
  "statements": [
    {
      "api": "Flux:*",
      "effect": "allow"
    },
    {
      "effect": "allow",
      "api": "FileEntry:listFiles",
      "condition": "pathVariable('path') matches 'flux'"
    },
    {
      "effect": "allow",
      "api": "FileEntry:getFile",
      "condition": "pathVariable('path') matches 'flux/.'"
    },
    {
      "effect": "allow",
      "api": "FileEntry:putFile",
      "condition": "pathVariable('path') matches 'flux/.*'"
    }
  ]
}
The permission statement example above is provided for clarity in relation to this guide. Adjust permissions according to your specific requirements.