Using Beam with Multiple Credentials
Introduction
Soracom Beam allows you to easily send data from a device to cloud services over a cellular connection. Beam allows you to offload encryption workloads from the device to the cloud and avoid data overhead associated with common encrypted protocols, while still maintaining end-to-end encryption. Beam also lets you manage data transfer endpoints in the cloud so that your device does not need to be reconfigured when you make a change on your backend.
For more information on Soracom Beam, take a look at the Beam documentation .
When using Beam to transfer data to AWS IoT Core, device authentication is handled using X.509 certificates. Typically, these certificates would be installed directly the device, with each device receiving its own unique set of credentials. Although this process is straightforward, it presents a number of challenges at scale, such as the manual process of generating and installing large numbers of credentials, and additional work to revoke and re-provision credentials in case a certificate is compromised.
Just as Soracom Beam allows you to offload encryption duties to the cloud, Beam can also handle credential management. In a basic use case, you can easily add your IoT Core credentials to Beam in order to accept data from your device, encrypt it, and forward it to IoT Core. Beam takes care of the authentication process with IoT Core, all without installing any certificates on the device.
While Beam will take care of encryption and authentication between Soracom and AWS, data transfer between your device and Soracom is secured using SIM authentication and encryption mechanisms built into cellular networks.
By default, Beam will only allow you to associate one set of X.509 certificates in an entry point configuration, which establishes a one-certificate to many-devices relationship. As AWS IoT Core can apply different access policies to each device certificate, you may prefer a one-certificate to one-device association instead. We can actually achieve this behavior very easily with one configuration change.
In this guide, we'll cover how to configure Beam to programmatically handle multiple credentials in order to MQTT data from multiple devices to AWS IoT Core. Let's get started!
In this guide, we will go through configuring Multiple Credentials with the Soracom Beam service. However, Multiple Credentials can also be configured for Soracom Funk.
Prerequisites
This guide assumes that you are familiar with the basics of AWS, as well as how to configure your IoT device to publish MQTT messages.
We recommend reviewing the Beam to AWS IoT Core guide , as most of the AWS IoT Core and Soracom Beam setup is the same.
In addition to the prerequisites of the Beam to AWS IoT Core guide, you will need the following:
- Two (2) IoT SIM devices which can publish MQTT messages, or alternatively one (1) IoT SIM device as well as one (1) additional Soracom IoT SIM card
Goal
Once we have completed this guide, we can add multiple X.509 certificates to Soracom Beam. When our devices send MQTT data to Beam, Beam will then take a look at which IoT SIM card is sending the data in order to determine which set of credentials to use, then connect to AWS IoT Core to send the data.
Configure AWS IoT Core
Follow the steps in the Beam to AWS IoT Core guide Configure AWS IoT Core section for configuring AWS IoT Core, repeating the instructions so that you create two sets of things, credentials, and policies.
For each set, let's attach two different policies so that we can verify later that our credentials are correctly associated with our two devices:
Make sure to replace the AWS region and AWS account number with your values in the policy statements below!
Device 1
-
Thing configuration:
- Name - Any name you like
- Security - A set of X.509 certificates:
xxxx-certificate.pem.crtcertificatexxxx-private.pem.keyprivate key- The Root CA for AWS IoT certificate
-
Policy configuration:
- Name -
PubSubToAnyTopic, or another name you prefer - Statements - the following policy statement:
{ "Version": "2012-10-17", "Statement": [ { "Effect": "Allow", "Action": "*", "Resource": "*" } ] } - Name -
Device 1 will use a certificate that is associated with a policy that allows it full access to IoT Core, including publishing and subscribing to any topic.
Device 2
-
Thing configuration:
- Name - Any name you like
- Security - A set of X.509 certificates:
yyyy-certificate.pem.crtcertificateyyyy-private.pem.keyprivate key- The Root CA for AWS IoT certificate
-
Policy configuration:
- Name -
PubSubBeamtest, or another name you prefer - Statements - the following policy statement:
{ "Version": "2012-10-17", "Statement": [ { "Effect": "Allow", "Action": [ "iot:Connect" ], "Resource": "arn:aws:iot:us-east-2:900012345678:*" }, { "Effect": "Allow", "Action": [ "iot:Publish" ], "Resource": "arn:aws:iot:us-east-2:900012345678:topic/beamtest" } ] } - Name -
Device 2 will use a certificate that is associated with a policy that limits what it can do on IoT Core. Specifically, it will only be able to publish to the beamtest topic, and cannot subscribe to any topics.
Forwarding Destination
Once you have set up two sets of devices, don't forget to also make a note of your IoT Core Custom endpoint. Follow the instructions in the Beam to AWS IoT Core guide Find the Forwarding Destionation section, as we will need it next.
Configure Soracom Beam
The first part of configuring Beam is quite similar to the Beam configuration instructions of the Beam to AWS IoT Core guide, with just a few small changes to make things easier. Let's get Beam set up initially for Device 1.
We'll need the following files handy:
- Our Device 1 X.509 certificate,
xxxx-certificate.pem.crt - Our Device 1 X.509 private key,
xxxx-private.pem.key - The Root CA for AWS IoT certificate
1. Create an IoT SIM Group
Although we can reuse an existing group, let's create a new group since we're going to do some custom configuration later.
- From the User Console, click the Menu icon and select SIM Management.
-
Find the IoT SIMs in the list that correspond to Device 1 and Device 2, and click the to select both of them. Then click the Actions menu, and select Change group.

-
Click the Group dropdown and select Create group.... Enter a name for your group, such as
beam-to-aws-iot-multi, then click Create. Finally, click Change Group.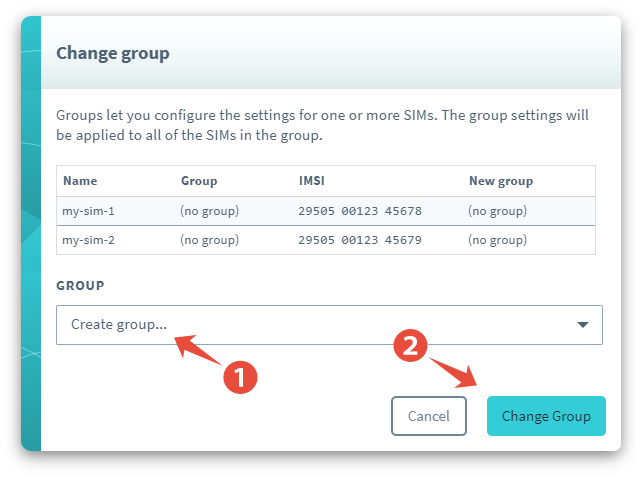
Your IoT SIMs will now be added to this group. You should see your group in the Group column for the IoT SIMs.
2. Add a Beam Configuration
Let's open the group in order to set up Beam. You can either click the name of the group from the SIM Management page, or from the Groups page.
-
From the group settings page, click the SORACOM Beam panel.

-
Click the + button to add a new configuration, and select MQTT entry point.

-
Enter the following Destination settings:
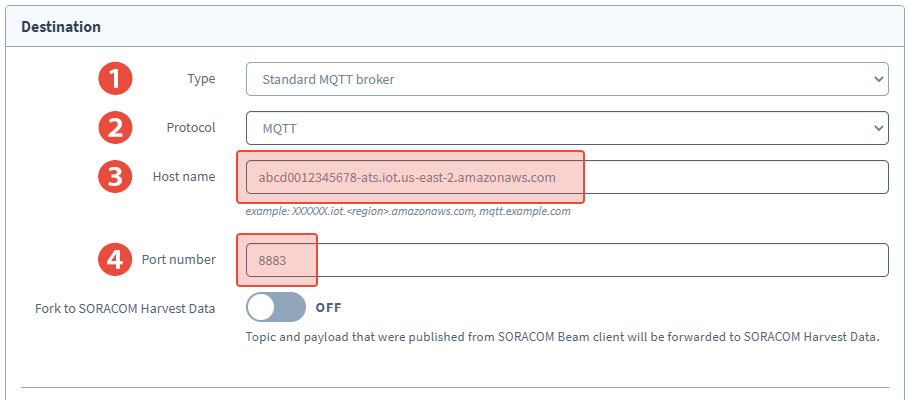
- Type - Standard MQTT broker
- Protocol - MQTTS
- Host name - Our AWS IoT Core custom endpoint from earlier
- Port number -
8883
-
Next, we need to provide our X.509 certificate from Device 1. Click to enable Client cert, then click the + button to add the certificate.
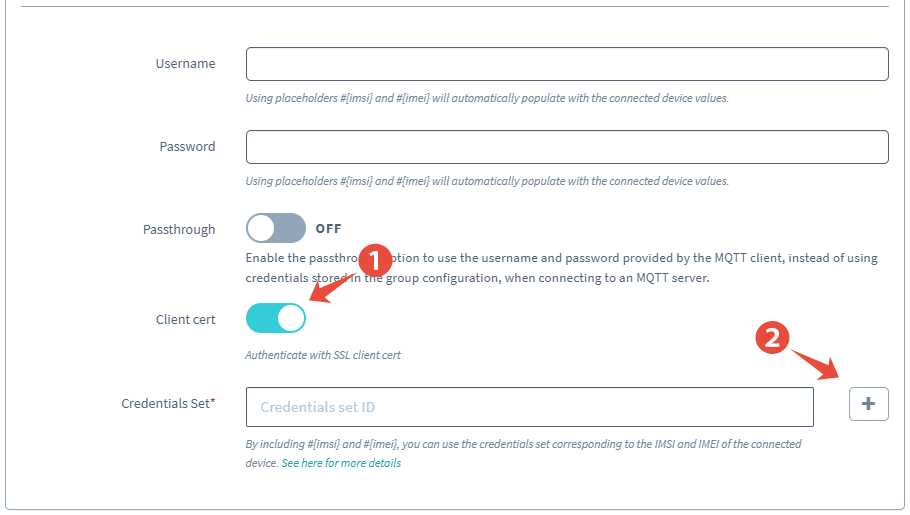
-
Enter the Name
device-295000012345678, replacing the IMSI with the IMSI of the SIM card used in Device 1, for this set of credentials, then copy and paste the contents of the device private key, device certificate, and Root CA for AWS IoT certificate into the corresponding fields.
By naming this credential set using the IMSI of the SIM card that is used in the device, changing it later to a template will be very intuitive.
Click Register to save the certificate.
The certificate will automatically be selected for the Beam configuration.
Finally, click Save to save the configuration.
3. Enable Multi-Credential Usage
As you can probably guess, we will organize our credential sets (the sets of X.509 certificates from IoT Core) using an IMSI number that corresponds to the IoT SIM card in each device. Beam understands which IoT SIM is sending data, and therefore can simply switch between different credential sets, as long as they are named appropriately.
Of course, our current Beam configuration is still set to our device-295000012345678 credentials, which is statically set. To configure Beam to automatically replace the numbers with the IMSI of the IoT SIM that is sending data, we need to replace the number with a placeholder variable. Beam lets us use the placeholder #{imsi} inside the credential set ID, which will then enable the dynamic credential selection.
To change device-295000012345678 to device-#{imsi}, we simply need to update our Beam settings:
-
While we still have our Group settings page open, look inside the SORACOM Beam panel, then click the button for the MQTT configuration in order to edit it.
-
In the Credential Set option, change the credential set to
device-#{imsi}: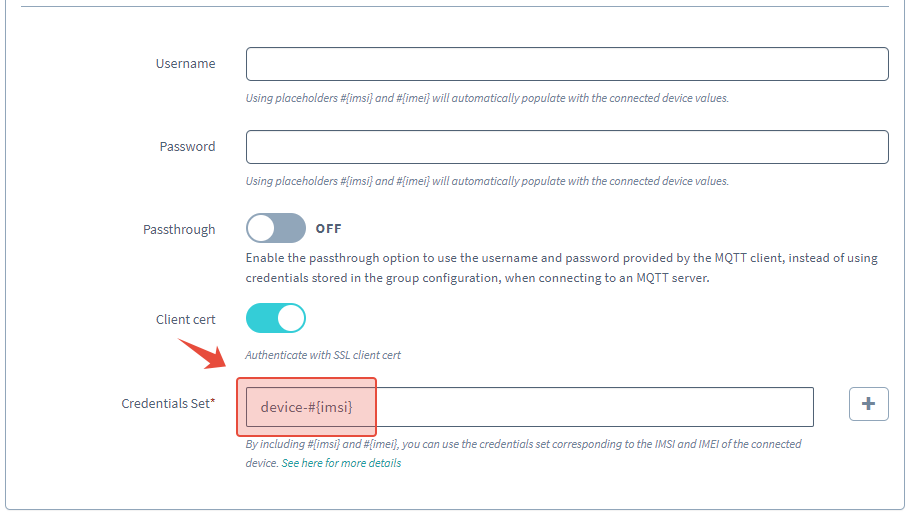
- Click the Save button.
Beam will now replace the #{imsi} placeholder in our template string with the IMSI of our IoT SIM when it looks for credentials to use.
You can also use the Soracom API or Soracom CLI to change the credential set ID to use a template string. Refer to the Beam MQTT Entry Point documentation for more details on how to use the Advanced Configuration method.
4. Add More Credentials
Although we have now configured Beam to handle multiple credentials, we still haven't registered the X.509 certificates from Device 2! Fortunately this process is very quick.
-
Click your account menu, then select Security.
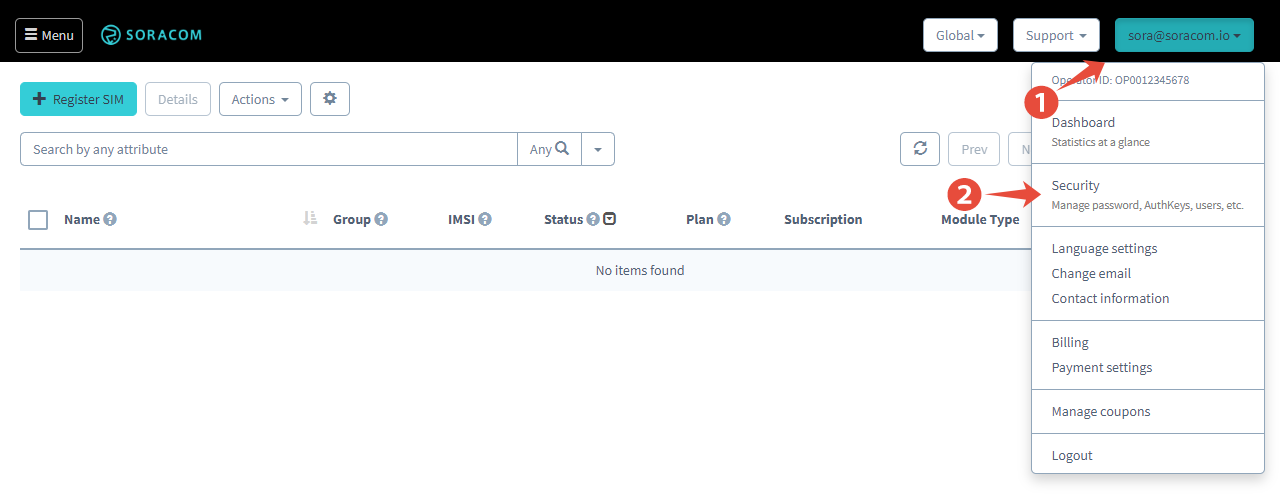
-
Click the Credentials tab, then click Register a credential set.
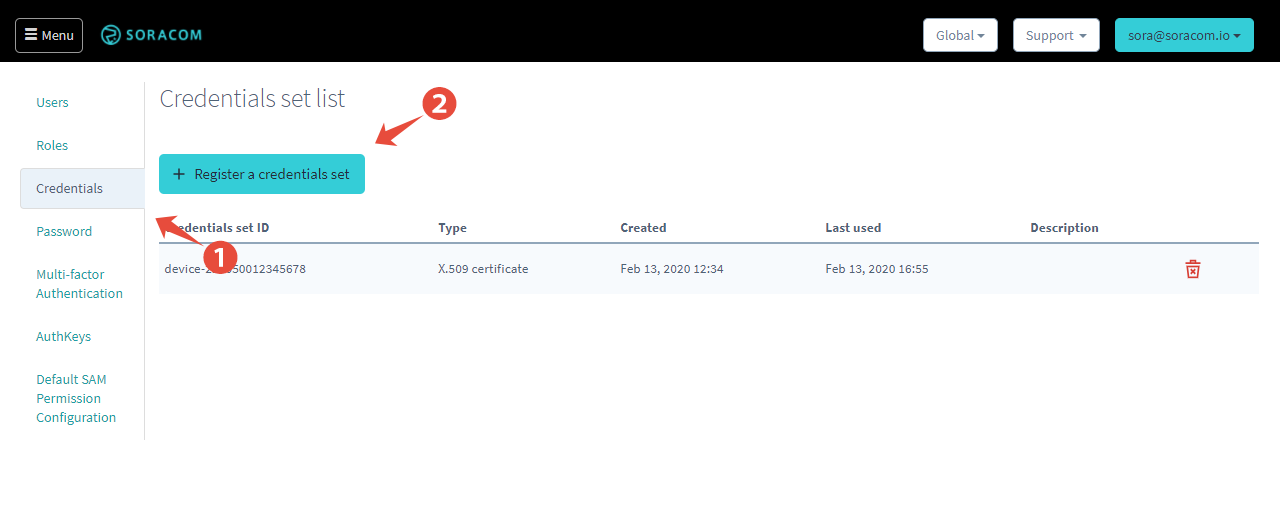
The dialog for registering the X.509 credentials from Device 2 mostly the same from earlier. Just remember to follow the device-#{imsi} format for the Credential set ID.
You can repeat this process for as many devices as you'd like, and even explore the Credential createCredential API for adding new credentials programmatically.
Now with multiple credentials ready, it's time to test!
Testing Device 1
Let's test using a Raspberry Pi, since the mosquitto-clients package will provide some helpful output. If you haven't already, install the package using the following command:
sudo apt-get install mosquitto-clientsNow let's monitor the messages on AWS IoT Core by opening the Test area from our browser, and subscribing to the beamtest topic.
First, let's check that publishing to beamtest works:
mosquitto_pub -d -h beam.soracom.io -t beamtest -m 'Hello, world!'
>Sending CONNECT
>Received CONNACK (0)
>Sending PUBLISH (d0, q0, r0, m1, 'beamtest', ... (13 bytes))
>Sending DISCONNECT
No surprises there. How about publishing on a different topic? Let's subscribe to the a/different/topic topic in our browser. Then on the Raspberry Pi:
mosquitto_pub -d -h beam.soracom.io -t 'a/different/topic' -m 'So, we meet again'
>Sending CONNECT
>Received CONNACK (0)
>Sending PUBLISH (d0, q0, r0, m1, 'a/different/topic', ... (17 bytes))
>Sending DISCONNECT
Great! It looks like Device 1 should be able to publish to any topic.
Now let's try subscribing to a topic and publishing a message from IoT Core.
mosquitto_sub -d -h beam.soracom.io -t 'let/me/know'
>Sending CONNECT
>Received CONNACK (0)
>Sending SUBSCRIBE (Mid: 1, Topic: let/me/know, QoS: 0)
>Received SUBACK
>Subscribed (mid: 1): 0
Then from IoT Core's Test section, we can publish a message to the let/me/know topic, and we should see it arrive on our Pi:
>Received PUBLISH (d0, q0, r0, m0, 'let/me/know', ... (21 bytes))
>Hello from the cloud!
Looking good!
Testing Device 2
Let's run the same tests again with Device 2. Because Device 2 has our second SIM, Beam will use the AWS IoT Core credentials that are associated with its IMSI. In turn, IoT Core will apply the stricter policy that we set up at the beginning.
First up, publishing to beamtest:
mosquitto_pub -d -h beam.soracom.io -t beamtest -m 'Hello, again!'
>Sending CONNECT
>Received CONNACK (0)
>Sending PUBLISH (d0, q0, r0, m1, 'beamtest', ... (13 bytes))
>Sending DISCONNECT
Still good! Next, a topic that is not allowed in the stricter policy:
mosquitto_pub -d -h beam.soracom.io -t 'a/different/topic' -m 'Can you hear me?'
>Sending CONNECT
>Received CONNACK (0)
>Sending PUBLISH (d0, q0, r0, m1, 'a/different/topic', ... (16 bytes))
>Sending DISCONNECT
Nope, our message does not arrive at IoT Core, as we would expect. Note that from the device perspective, the publish was still successful, because the device was able to connect to Beam and publish the message. However, as our stricter IoT Core policy does not allow publishing to other topics, the message does not get past Beam.
Last, let's try subscribing:
mosquitto_sub -d -h beam.soracom.io -t 'let/me/know'
>Sending CONNECT
>Received CONNACK (0)
>Sending SUBSCRIBE (Mid: 1, Topic: let/me/know, QoS: 0)
>Sending CONNECT
>Received CONNACK (0)
>Sending SUBSCRIBE (Mid: 2, Topic: let/me/know, QoS: 0)
>Sending CONNECT
>Received CONNACK (0)
>Sending SUBSCRIBE (Mid: 3, Topic: let/me/know, QoS: 0)
Looks like our mosquitto_sub client can't stay connected. Indeed, when Beam tries to subscribe using Device 2's credentials, AWS IoT Core is rejecting the request and closing the connection. Beam then closes the connection accordingly, which means our multi-credential configuration is working as intended!
Add a Default Credential
Although Beam will now automatically switch credentials based on which IoT SIM is sending data by dynamically putting the IMSI of the IoT SIM into our device-#{imsi} template, we might run into one issue: What happens if we add a new IoT SIM to our Group in order to send data via Beam, but we don't have a credential set registered for that device?
If Beam cannot find a matching credential set, it will replace the #{imsi} placeholder with the string default and attempt to use a credential set that has the corresponding name. In our example, this means that our template device-#{imsi} will become device-defualt.
In turn, we can register an extra set of certificates using the ID device-default so that any devices that connect to Beam but do not have a corresponding credential set will fall back to this certificate.
This way, our device can continue to connect to Beam and send data even if we forget to create or register a unique set of credentials for additional devices. Alternatively, we can use this fallback behavior to provide a set of credentials with fewer permissions, such as permission to connect to our MQTT broker and initiate a provisioning process but not to send data, in order to improve our application security.
Conclusion
Congratulations, you've successfully published an MQTT message to AWS IoT Core through Soracom Beam. On top of that, you're set up to support multiple devices. Notice that we didn't need to store any of the AWS IoT Core endpoint details or certificates on the devices. Since the connection between the device and Soracom's cloud is encrypted over cellular, we just had to configure the hop between Soracom and AWS. This means that devices can be deployed at scale without having to worry about managing credentials, endpoints, or compute resources needed to manage cryptographic handshakes.