Send Device Location Data to Amazon Location Service Using Beam
Introduction
Amazon Location Service is a useful AWS service that allows you to store and process position updates from your devices.
In a normal scenario you may have to configure each individual device with its own credentials to connect to AWS, as well as consume extra battery power to encrypt that data before it is sent.
With Soracom Beam, you can solve both of these issues by storing AWS credentials in the Soracom User Console and allowing Beam to encrypt your data in the cloud before its transmission to AWS.
Using Beam provides the following benefits:
- No need to install AWS credentials on the device to send data to your Tracker.
- Devices can send location and other data to your Tracker simply by specifying and accessing a Beam entry point. There is no need for the device to go through the Signature version 4 signing process.
Note that this guide uses Soracom Beam's Website entry point in order to send location data. Beam's HTTP entry point cannot be used.
This guide will show you how to configure Amazon Location Service to allow Soracom Beam to send data to an Amazon Location Service Tracker (hereafter "Tracker") in your AWS account.
Prerequisites
For successful completion of this process the following items are necessary:
- A Soracom account with a Soracom IoT SIM or a Soracom Arc Virtual SIM.
- A device capable of running Python, such as a RaspberryPi.
- Your device should also be configured to connect to a cellular network using a Soracom IoT SIM, or configured to connect to Soracom using Soracom Arc.
- That your device can obtain GPS data (latitude and longitude) by itself.
- An AWS account.
- Your AWS account ID.
Create an AWS IAM Role for Beam
1. Create an IAM Role
First, create an IAM role in your AWS account. We will configure this role with specific permissions that will allow Soracom Beam to access Amazon Location Service.
-
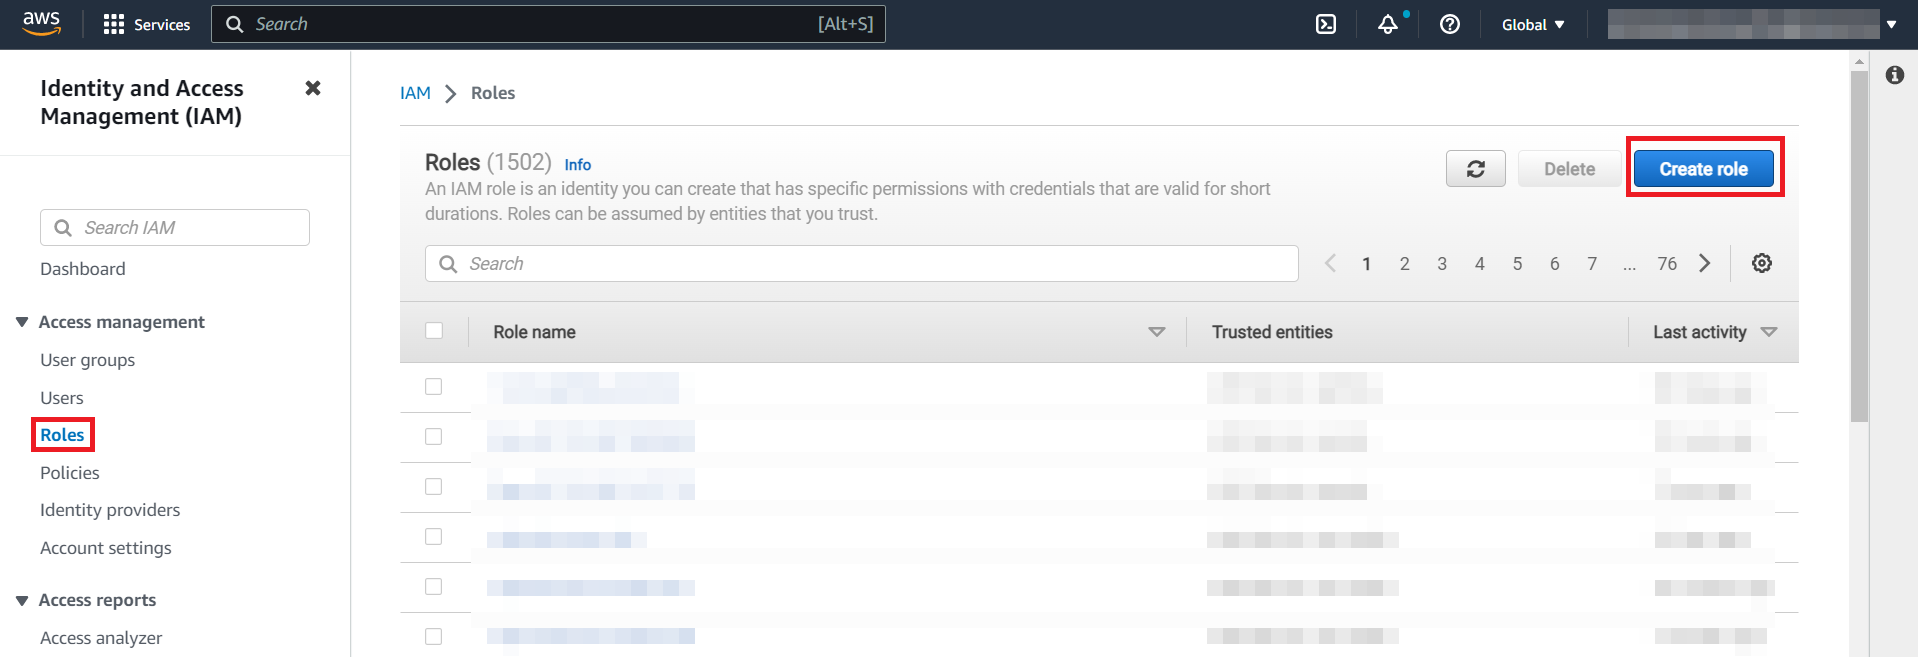
Sign in to your AWS account and open the IAM console.
-
Click Access Management, click Roles, and then click Create Role.
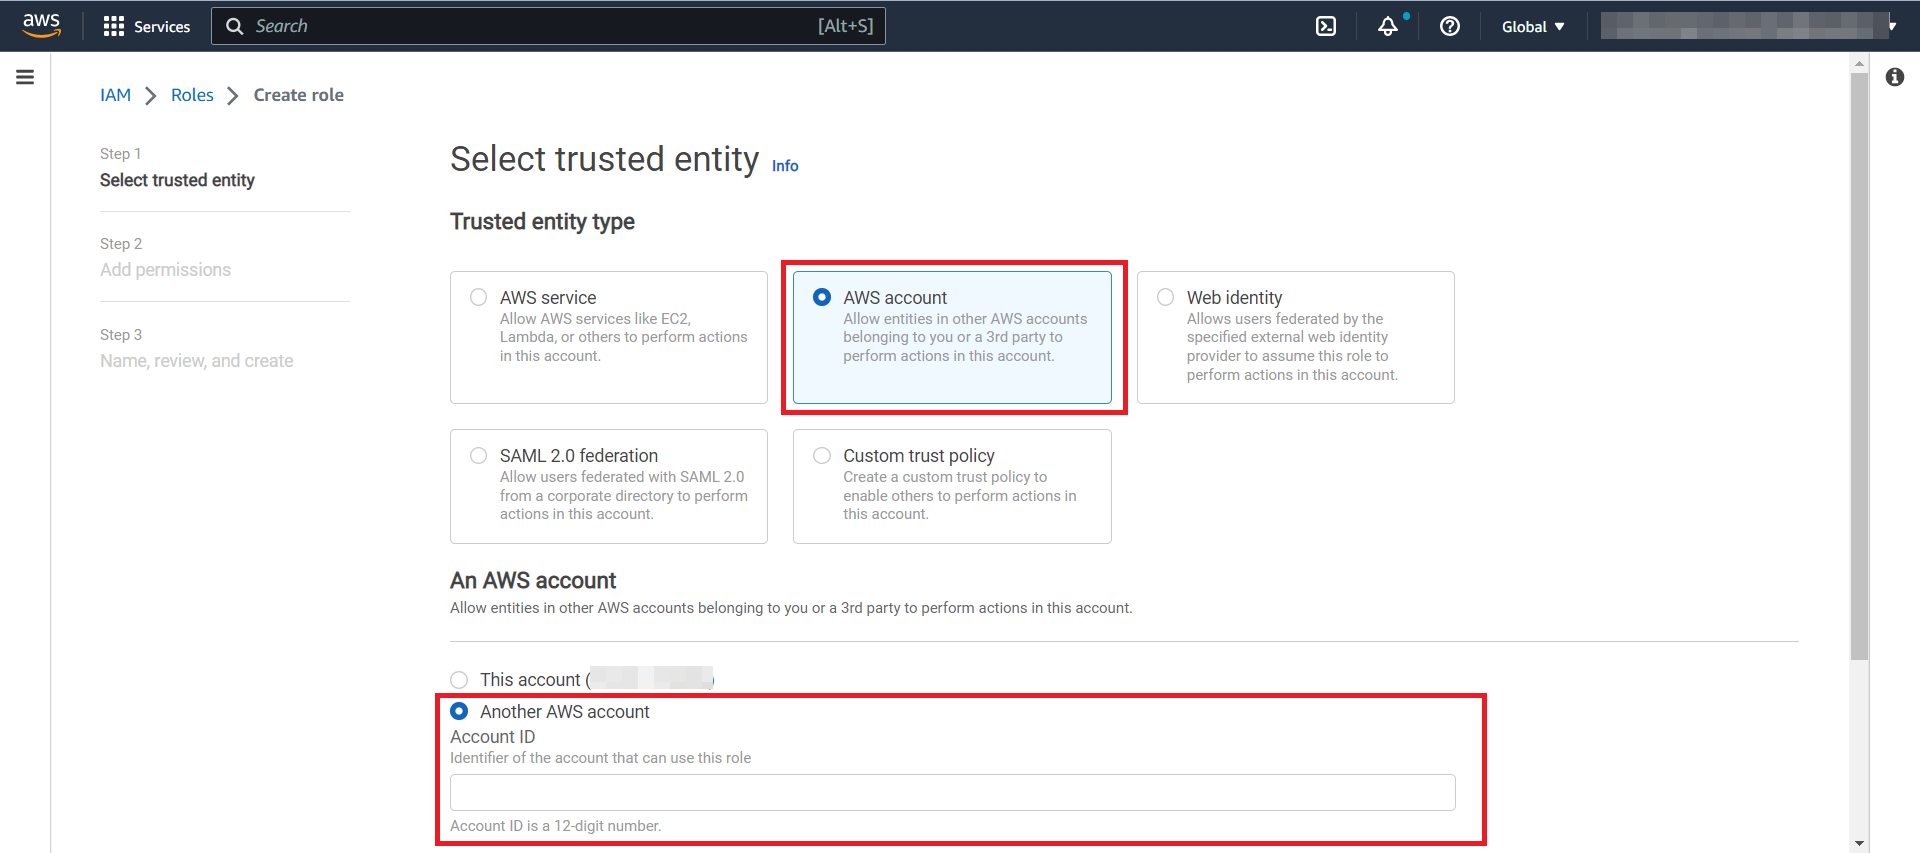
-
Click AWS Accounts, then Another AWS Account, and enter one of the following Soracom AWS account IDs that corresponds to the coverage type of your Soracom IoT SIM in the Account ID field:
- Global Coverage:
950858143650 - Japan Coverage:
762707677580
- Global Coverage:
-
Click the Require external ID checkbox and enter any string in the External ID field, such as
External-ID-abcdefgh12345678. Make a note of this External ID as we will use it later.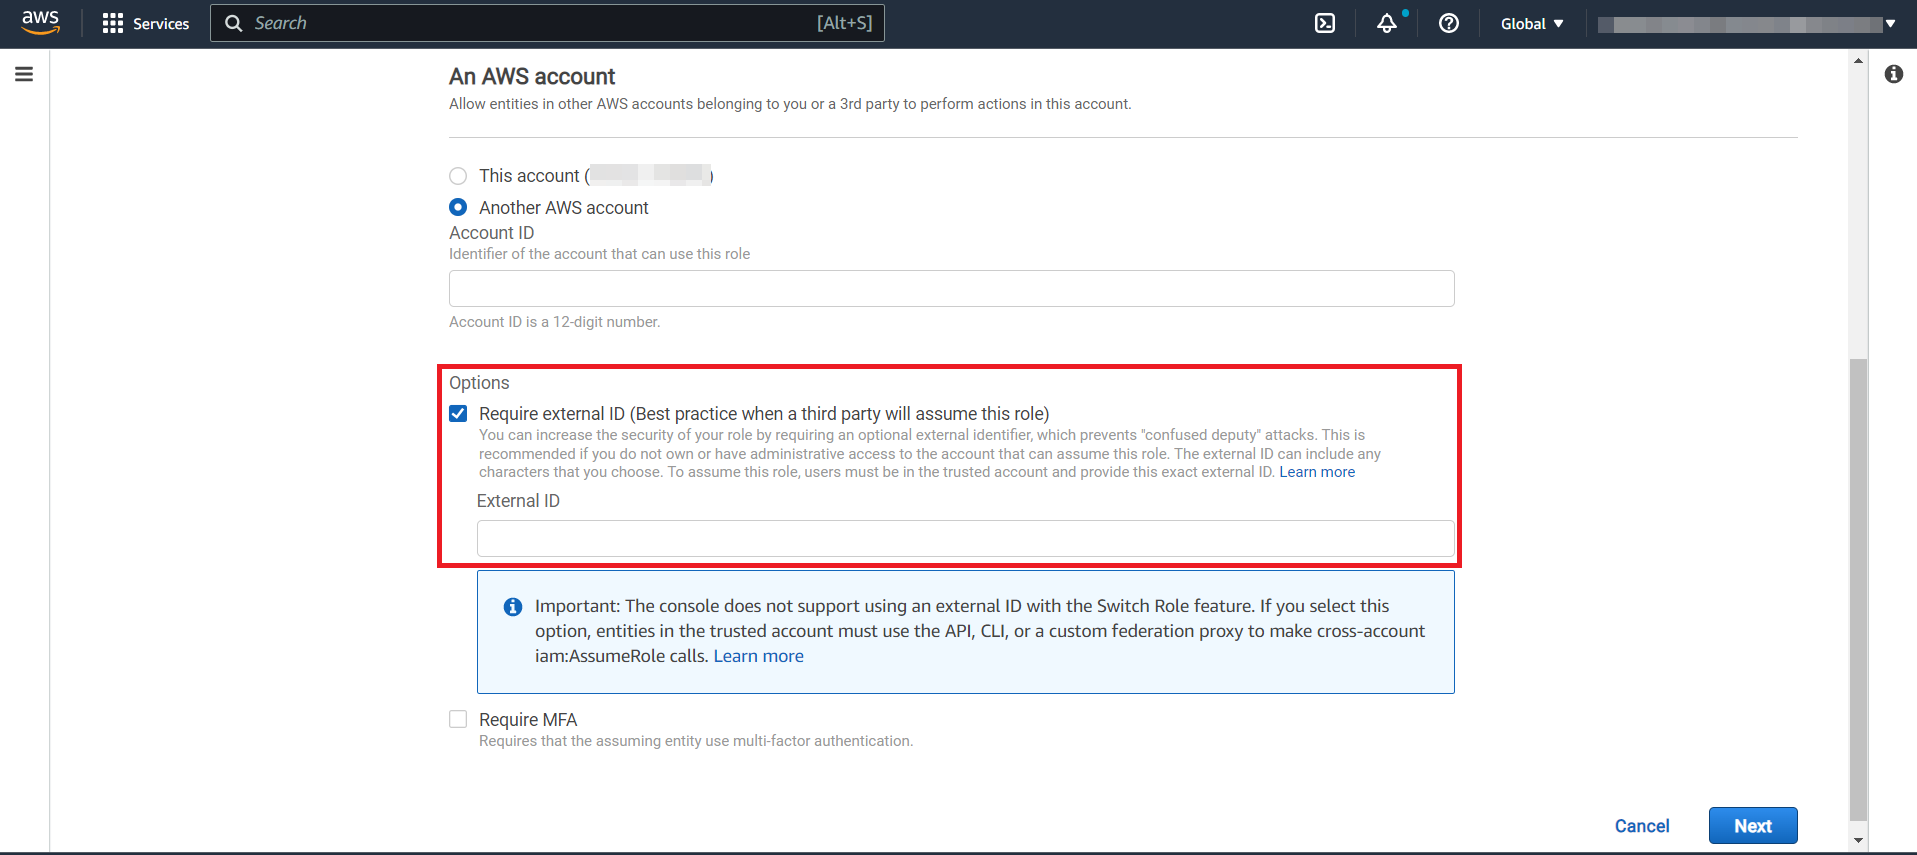
For more information on external identities, see How to use an external ID when granting access to your AWS resources to a third party - AWS Identity and Access Management.
2. Create a Policy
Next, we need to create a policy which will allow this role to access Amazon Location Service.
-
Click Next. The Add Permissions screen will appear.
-
Click Create Policy.
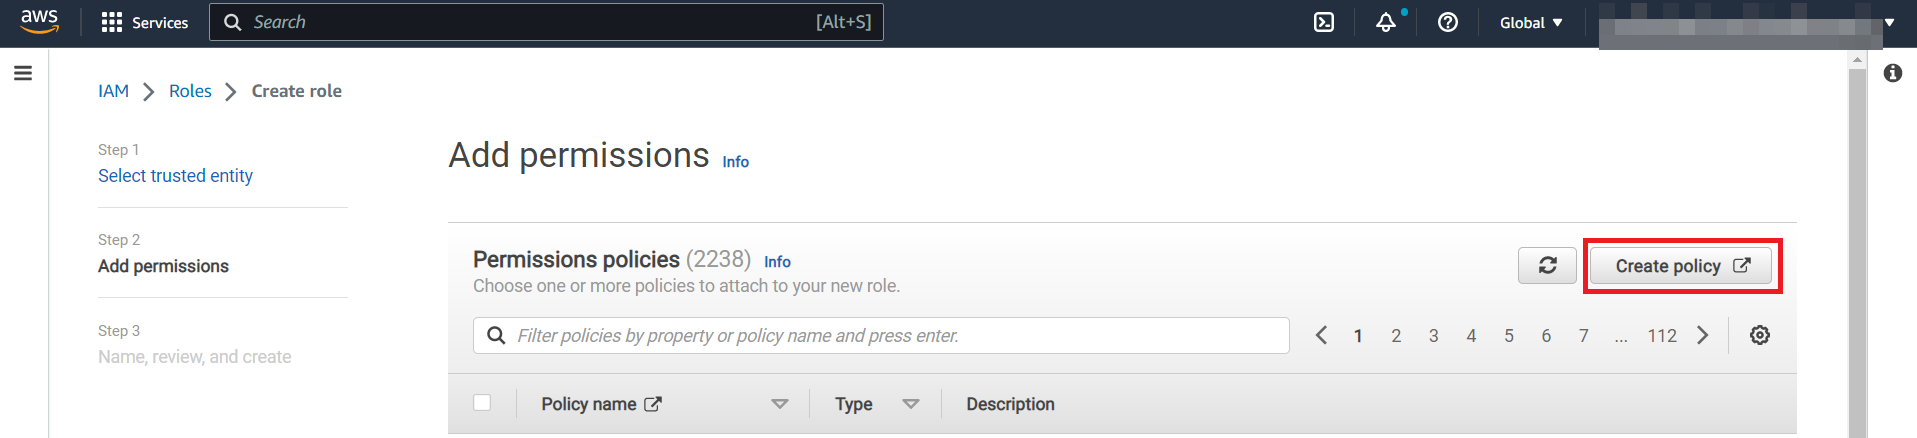
In a separate window or tab, the Create Policy screen will appear.
When you are done with the Create Policy screen, come back to the Add Permissions screen where you see Create Policy and continue with the creation of the IAM role. Do not close the screen!
-
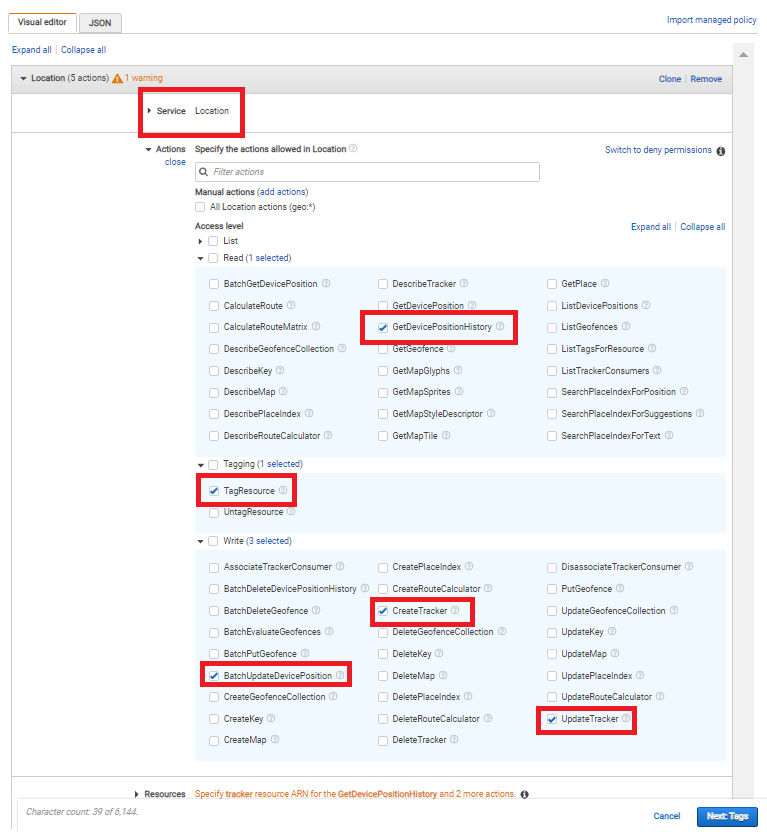
Set the following fields:
- Click Select Service and click Location.
- Check the following permissions. You can filter by entering the following strings in the Filter Action field.
- GetDevicePositionHistory
- TagResource
- BatchUpdateDevicePosition
- CreateTracker
- UpdateTracker
-
Click on Resources > Specific > Add ARN under tracker. The Add ARN screen will appear.
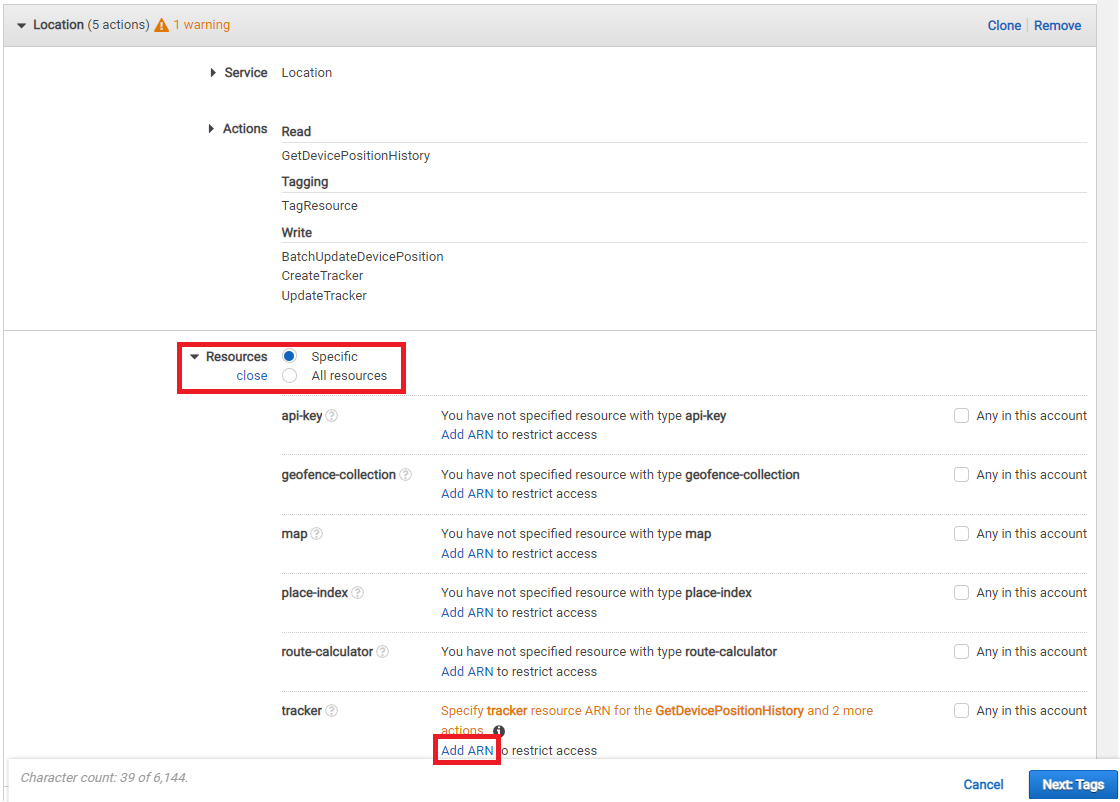
-
Under Specify ARN for tracker, enter the Amazon Location Service ARN for your AWS account (e.g.,
arn:aws:geo:us-east-1:900012345678:tracker/*). Ensure that you use the correct region in the ARN string and the Region field. Then click Add.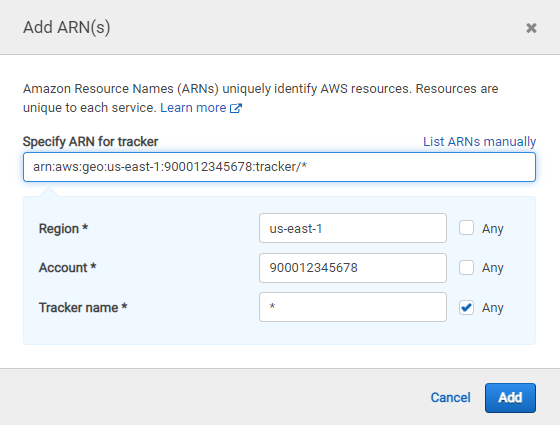
Return to the Create Policy screen.
-
Click Next: Tags, then Next: Review.
-
Enter a name for the AWS IAM policy (e.g.
beam-tracker-role) in Name and click Create Policy.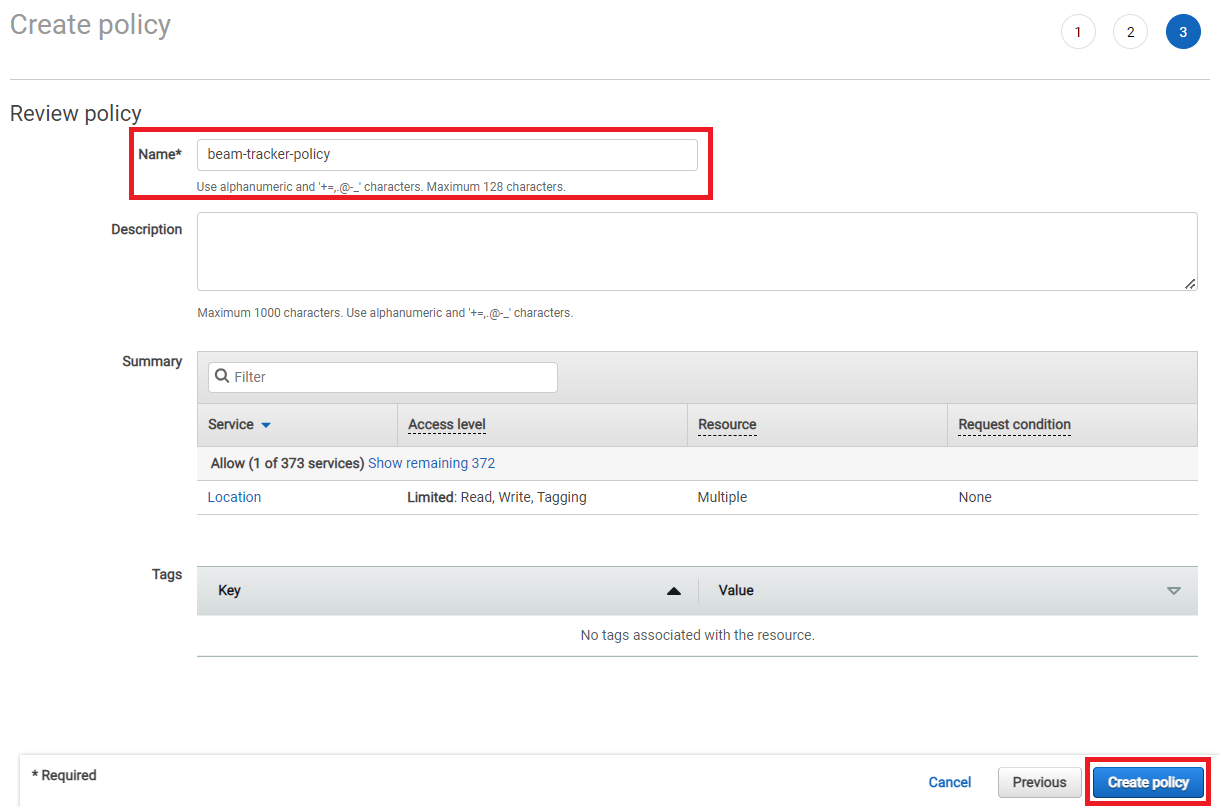
An AWS IAM policy will be created and the policy screen will appear.
3. Add the Policy to the IAM Role
With the policy created, we can now add it to the IAM role.
-
Close the window or tab in which the policy screen is displayed to return to the Add Permissions screen.
-
Click on the refresh button, then click on serach field, type the name of the AWS IAM policy you entered in step 11 in the text box, and press Enter.

The AWS IAM policy you created will be displayed.
-
Check the boxes for the AWS IAM policy you created and click Next.
-
Enter a name for the IAM role in Role name and click Create role.
-
Click on the name of the IAM role you created. You should see its ARN which looks like
arn:aws:iam::900012345678:role/beam-tracker-role. Make a note of this IAM Role ARN, as we will use it later.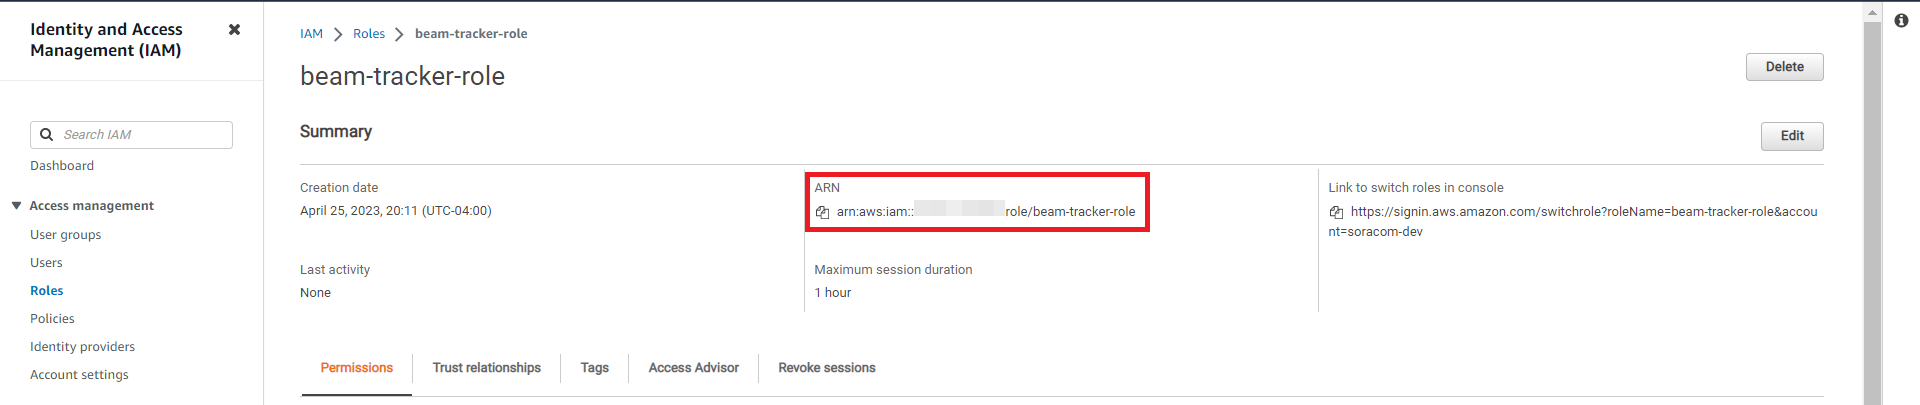
4. Register the IAM Role Credentials to Your Soracom Account
In order for Soracom Beam to have permission to send data to your Amazon Location Service Tracker, it needs to use the IAM role that we just created. Let's register the IAM role to your Soracom account by creading a new Soracom Credential Set. You will need the IAM Role ARN and External ID created earlier.
To create a credential set:
-
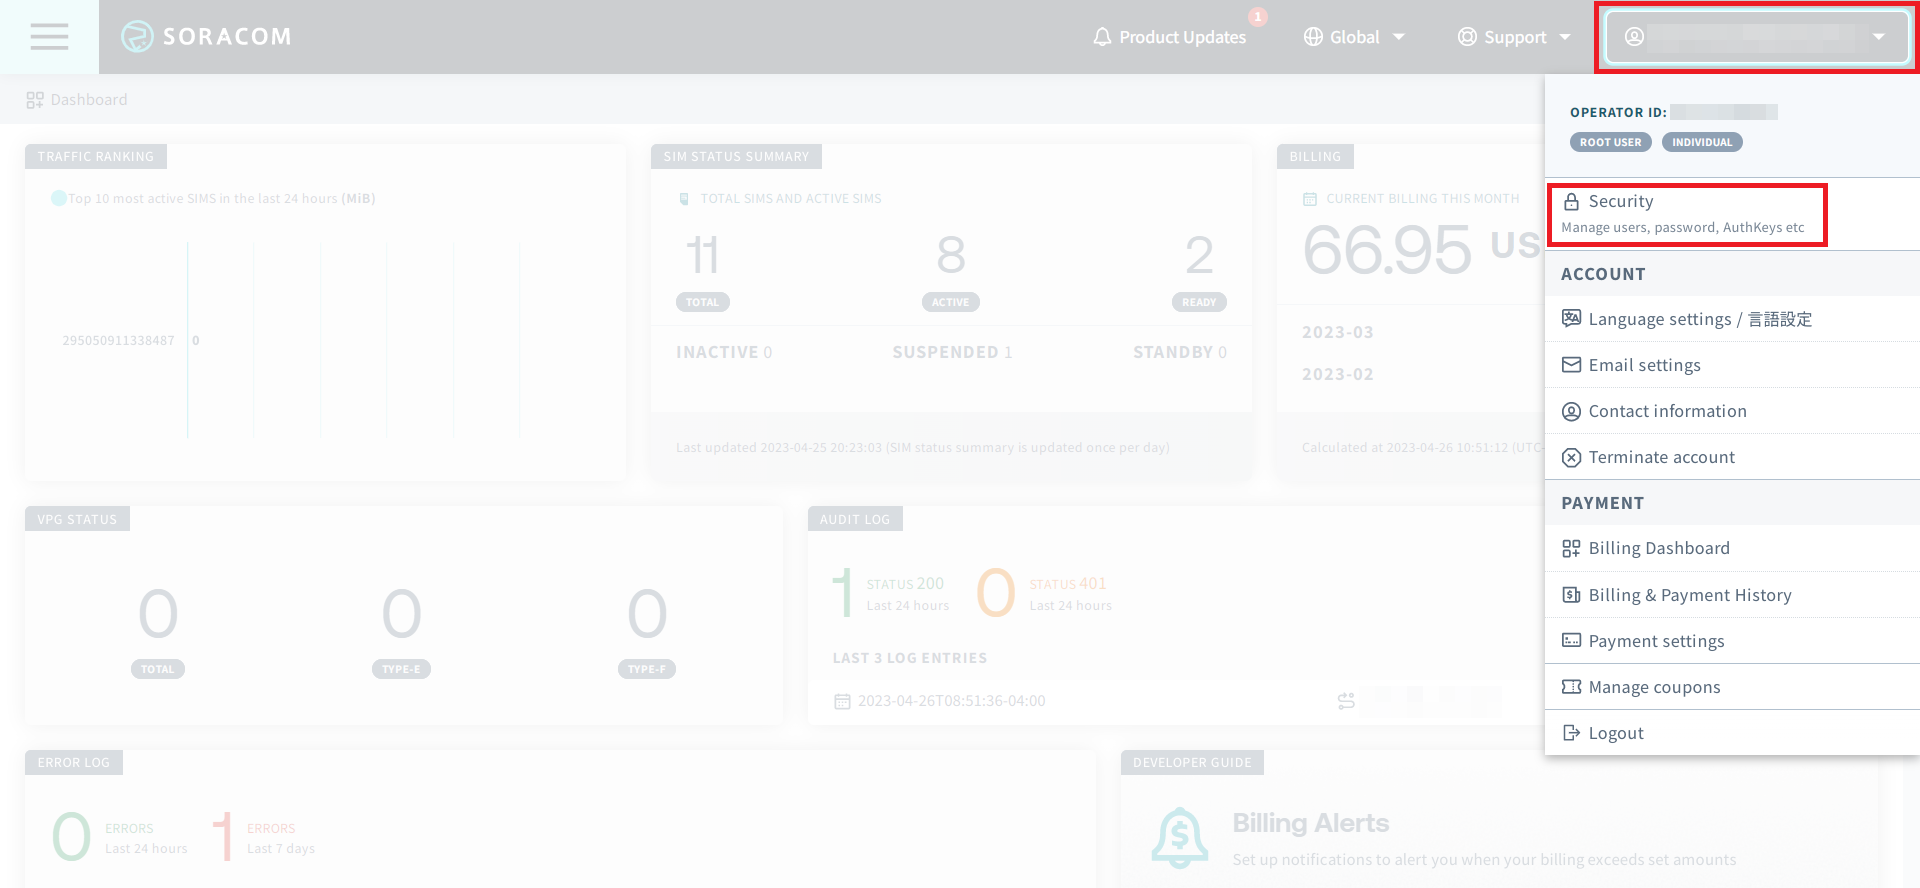
Sign in to the User Console. Click your account menu, then select Security.
-
From the Security screen, click the Credentials tab. Then click the Register credentials button.

-
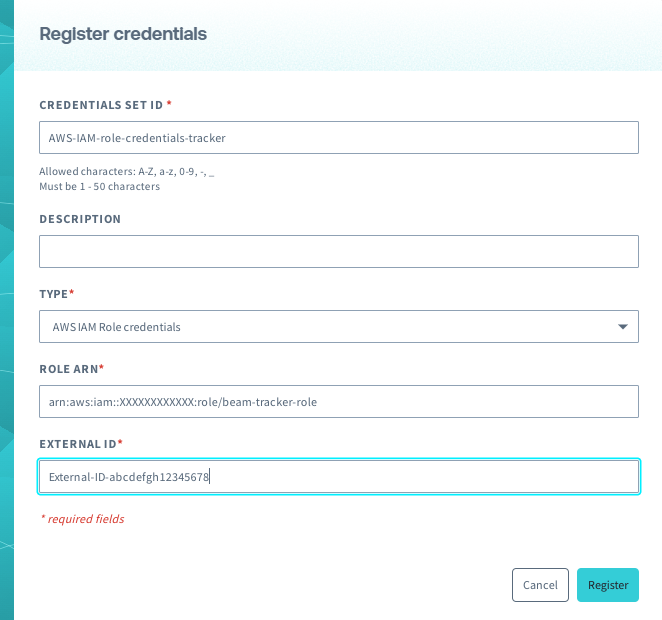
Enter your IAM credentials as follows, then click Register:
-
Credential Set ID: Enter a name to identify the credential. Example:
AWS-IAM-role-credentials-tracker. -
Type: Select
AWS IAM Role credentials. -
Role ARN: Enter your IAM Role ARN from earlier, such as:
arn:aws:iam::900012345678:role/beam-tracker-role. - External ID: Enter your External ID. Example:
External-ID-abcdefgh12345678.
-
Configure Soracom Beam
5. Create a Group
-
From the Menu, open the Groups screen.
-
If this is your first group, click the Create a group button. If not, click the Add Group button.
-
Enter a descriptive name for your group such as
beam-trackerand click Create. -
From the Menu, open the SIM Management screen.
-
From the list of subscribers, click the for the SIM you want to modify.
-
Click the Actions menu, then select Change group.
- From the Group dropdown menu select the group we have just created, then click Change Group.
6. Set up Soracom Beam
Configure Beam's Website entry point. If configured as described here, the following functions are possible:
- Transfering data sent from devices using Soracom IoT SIM cards from Beam to your Tracker.
- Retrieving data stored in your Tracker from devices using a Soracom IoT SIM.
Only the operations for changing group settings are explained here. For more information on how Groups work and what to do to create a group, see Group Settings.
-
From the Menu, open the Groups screen.
-
Select the group that we created in the previous step (e.g.
beam-tracker). -
Click SORACOM Beam on the SIM group screen.
-
Click Add Configuration → Website Entry Point. The SORACOM Beam - Website configuration screen will be displayed.
-
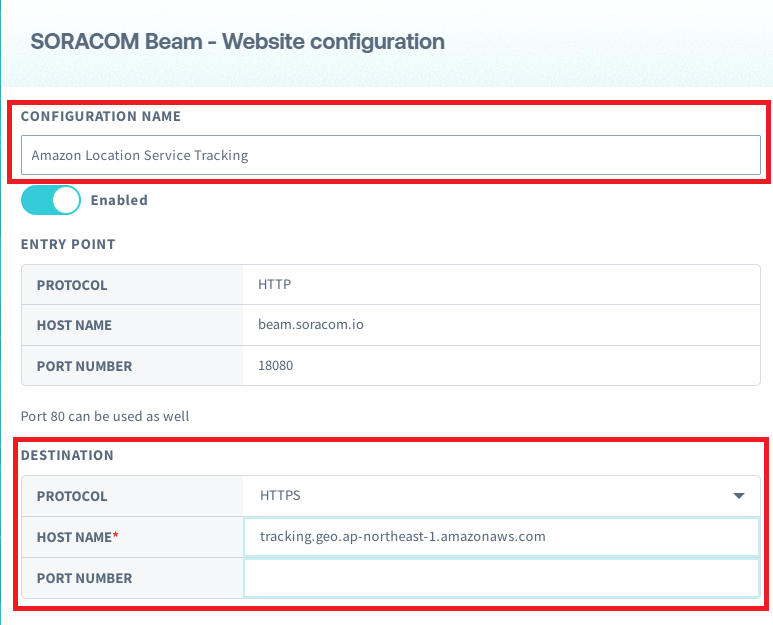
Configure the following fields:

-
Configuration Name: Enter a name for the configuration. Example:
Amazon Location Service Tracker. -
Destination → Protocol: Select
HTTPS. -
Destination → Host Name: Enter
tracking.geo.${Amazon Location Service region}.amazonaws.com. Example:tracking.geo.us-east-1.amazonaws.com. -
Destination → Port Number: Leave blank.
- Header Manipluations → Authorization Header: Turn it on and set it as follows:
- Type: Select
AWS Signature V4. - Service: Select
geo(Amazon Location Service). - Region: Select the Amazon Location Service region.
- Credential ID: Select the AWS IAM role credentials you registered in the Register AWS IAM Role Credentials step (e.g.
AWS-IAM-role-credentials-tracker).
- Type: Select
-
- Click Save.
In case your SIM has not been added to the group with this Beam configuration, make sure to add your SIM so that Beam will transmit the data to Amazon Location Service.
7. Enable Soracom Air Metadata Service
In the steps that follow, we will use the Soracom Air Metadata Service to obtain the SIM ID and use it as a device identifier in Amazon Location Service. Therefore, activate the Metadata Service in the group to which the SIM being used belongs. For more information, see Configuring Metadata Services.
-
From the Basic Settings tab, click the SORACOM Air for Cellular panel to expand its settings.
-
Enable the Metadata Service option by switching the option to ON.
-
Disable Readonly and Enable Minimize Response Body
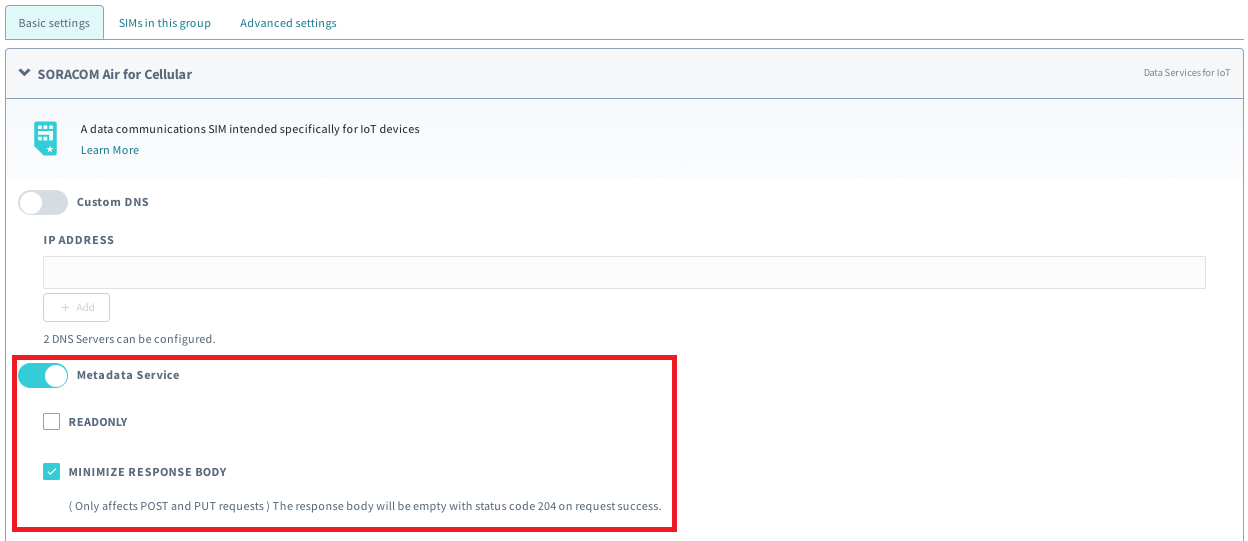
- Click the Save button at the bottom of the panel.
Test the Connection
In this step we will create a tracker named beam-tracker using a Python script in your Tracker.
Create a Tracker
- Install the
requestspackage on the device.
pip install requests- Download create_tracker.py to the device.
create_tracker.py is a sample script that uses Metadata Service to obtain the SIM ID and create a new tracker named beam-tracker in your Tracker.
- Create a tracker by executing the following command on the device:
python create_tracker.pyThe console will then ouput information about your tracker:
8942300000012345678
{'TrackerName': 'beam-tracker', 'TrackerArn': 'arn:aws:geo:us-east-1:900012345678:tracker/beam-tracker', 'CreateTime': '2023-01-11T12:20:04.118Z'}
Send Location Data to the Tracker
- Download send_locations.py to the device.
send_locations.py is a sample script that uses the Metadata Service to obtain the SIM ID and send three fixed locations at 2 second intervals to a tracker named beam-tracker in your Tracker.
- Execute the following command on the device to send the location information:
python send_locations.pyRetrieve Location Data from the Tracker
If your application requires your device to retrieve past location data, you can do so with the following example. However if not, you can skip this section.
- Download get_locations.py to the device.
get_locations.py is a sample script that uses the Metadata Service to retrieve the SIM ID and get location information for the past 3 days from a tracker named beam-tracker in your Tracker.
- Execute the following commands on the device to obtain location information:
python get_locations.pyThe console will then output information about the retrieved location data:
{'DevicePositions': [{'DeviceId': 'beam-tracker-8942300000012345678', 'SampleTime': '2023-01-19T09:50:09.933Z', 'ReceivedTime': '2023-01-19T09:50:13.177Z', 'Position': [139.7583, 35.6664], 'Accuracy': {'Horizontal': 1}}, {'DeviceId': 'beam-tracker-8942300000012345678', 'SampleTime': '2023-01-19T09:50:15.951Z', 'ReceivedTime': '2023-01-19T09:50:16.522Z', 'Position': [139.7501, 35.6701], 'Accuracy': {'Horizontal': 1}}, {'DeviceId': 'beam-tracker-8942300000012345678', 'SampleTime': '2023-01-19T09:50:18.733Z', 'ReceivedTime': '2023-01-19T09:50:19.3Z', 'Position': [139.744207, 35.669823], 'Accuracy': {'Horizontal': 1}}]}