AuthKeys
While the Soracom User Console provides full access to your Soracom account using a web browser, you may want to perform SIM and device management, service configuration, or other tasks programmatically, such as to deactivate a SIM when a webhook is called, or to configure a SIM during your manufacturing process.
AuthKeys provides a secure mechanism for accessing your Soracom account programmatically using the Soracom API and Soracom CLI tools.
Overview
When signing in to your Soracom account using the web-based User Console, your Root user (primary email address and password) or SAM user (Operator ID, username, and password) login information is used to generate a temporary API key and token. This key/token pair is stored in your browser and used to authorize any actions you perform while on the User Console.
An AuthKey provides a similar mechanism for generating this temporary API key and token, which can then be used to call the Soracom API or run the Soracom CLI tool.
Each AuthKey contains a pair of values:
- an AuthKey ID which acts as a username
- an AuthKey Secret which acts as a password
Using an AuthKey to generate an API key and token ensures that you do not expose your Root user or SAM user credentials in your code, and allows you to practice password rotation without affecting any applications that are using an AuthKey.
Although you can also use your Root user or SAM user credentials to manually generate an API key and token, we strongly recommend using an AuthKey for security.
Furthermore, unlike your Root user or SAM user login information, an AuthKey cannot be used to sign in to the Soracom User Console, and can be easily revoked and reissued for security or as your application requirements change, without affecting your ability to sign in to the User Console.
Access Control
Each AuthKey will inherit the permissions assigned to the corresponding credentials:
-
AuthKeys generated for your Root user will be granted full admin access to your Soracom account and can be used to call any Soracom API or execute any Soracom CLI command.
- AuthKeys generated for a SAM user will be granted any permissions provided to the SAM user through Default SAM User Permissions settings, Roles attached to the user, or Inline Permissions.
While it is possible to create a SAM user and provide it with full permissions, you can also combine a SAM user with limited permissions together with an AuthKey in order to strictly limit what actions your application is allowed to perform on your Soracom account.
Despite its name, a SAM user does not necessarily need to correspond to an individual in your organization. By creating a SAM user without a password, the user will not be able to access the User Console. However, the SAM user's AuthKey can still be used by your application to generate an API key/token pair and access the Soracom API that have been granted to the user.
For more information on controlling access, refer to the Users and Roles documentation.
Limitations
- Your Root user is limited to two (2) AuthKeys.
- Each SAM user is limited to two (2) AuthKeys. However, you may create as many SAM users as needed.
- If your Root user or SAM user already has two (2) AuthKeys, you must first revoke one in order to generate a new AuthKey.
- Even if a SAM user is granted full permissions, certain account security APIs (such as resetting the Root user password) are only available to the Root user for security.
Compared to Credential Sets
An AuthKey is an authentication mechanism that allows an external application (such as a webhook on your backend system) to access your Soracom account and perform actions using the Soracom API or Soracom CLI.
By comparison, a Credential Set is used by Soracom to programmatically interact with or perform actions on an external service or device on your behalf.
Root User AuthKeys
To generate an AuthKey for your Root user:
-
Sign in to the User Console.
-
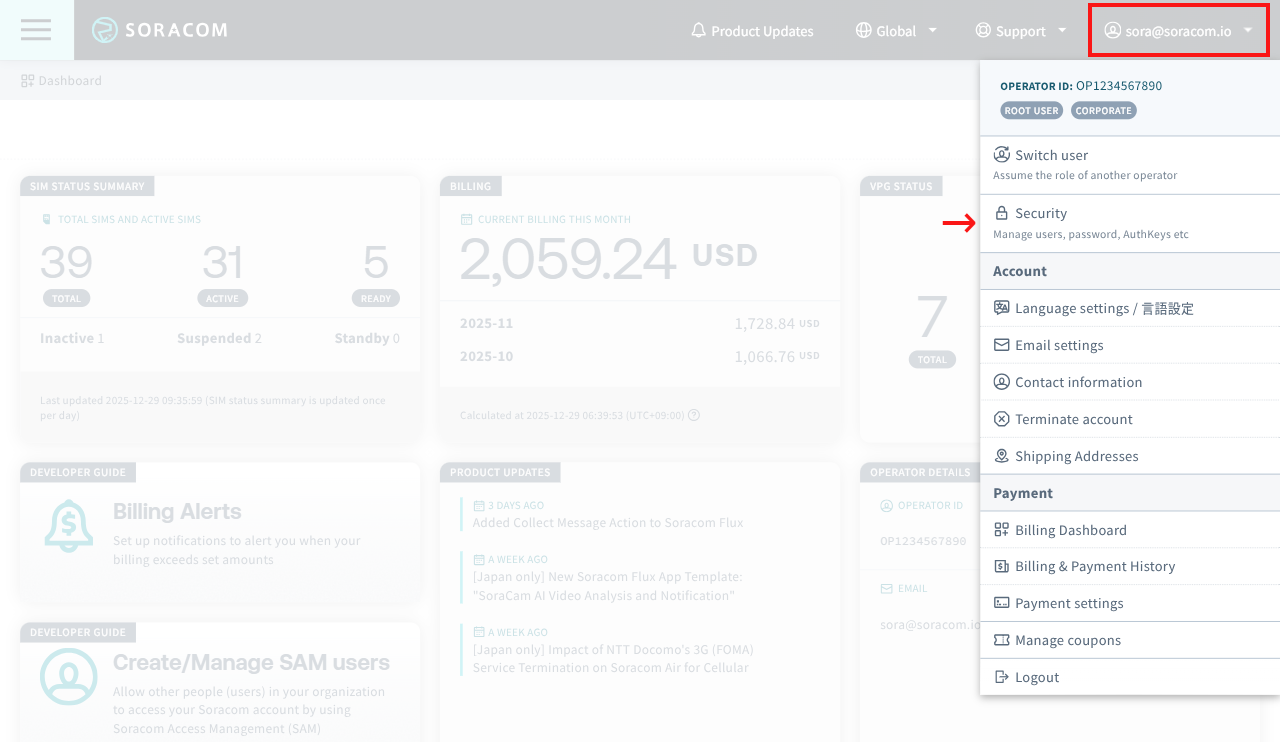
Click your account menu, then select Security.
-
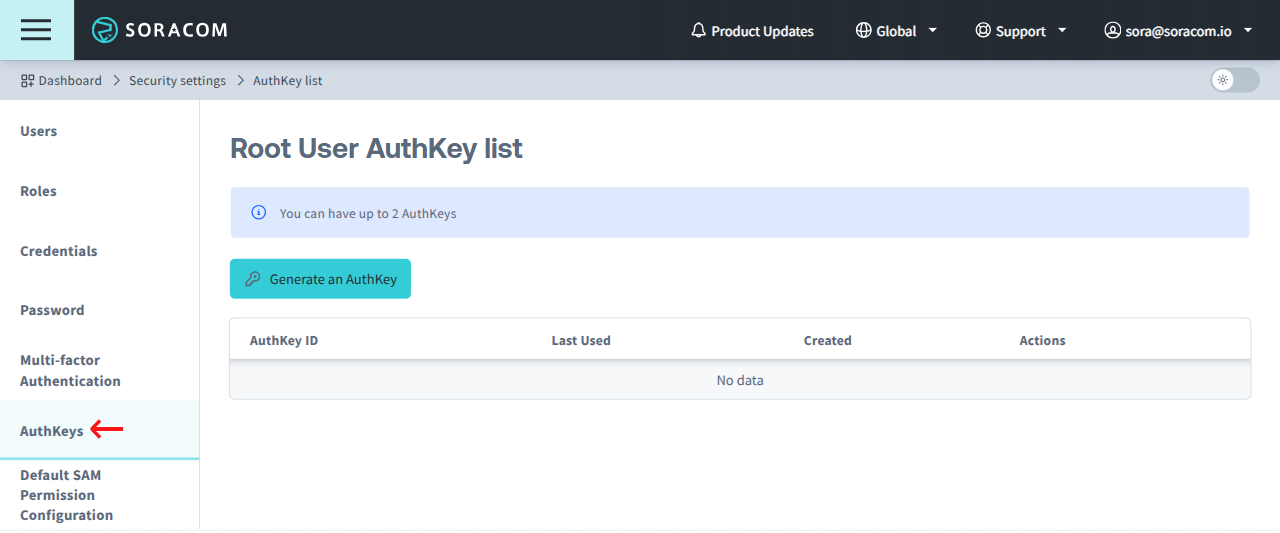
From the Security screen, click the AuthKeys tab. Then click the Generate an AuthKey button.
-
An AuthKey ID and AuthKey Secret key pair will be automatically generated.
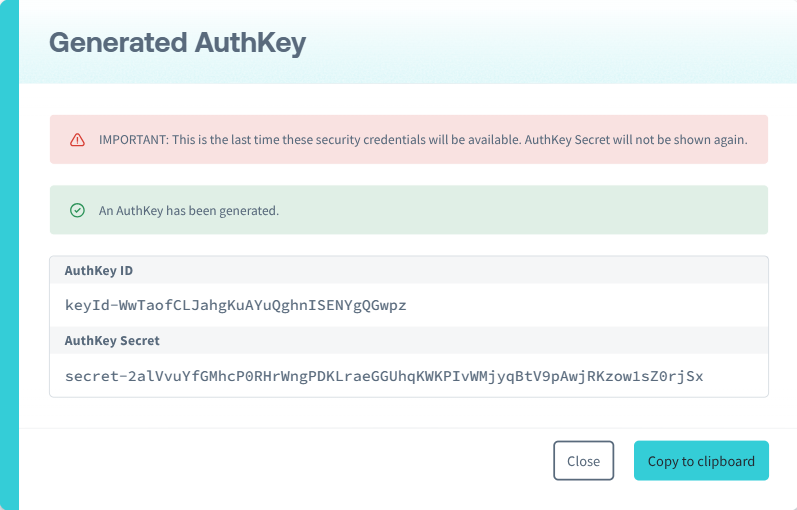
Make sure to save the AuthKey Secret as it will not be displayed again.
When generating a new AuthKey, the AuthKey Secret will only be shown once. Ensure that you save the secret key in a secure location. If you lose the secret key, you will need to generate a new AuthKey.
Your new AuthKey will be listed, including information about when it was generated and when it was last used. You can also use this screen to revoke and remove any unused AuthKeys associated with your Root user.
SAM User AuthKeys
Access to managing SAM User AuthKeys is limited in the following ways:
- When signed in as the Root Account - You can manage AuthKeys for all SAM Users.
- When signed in as a SAM User - Access depends on API permissions granted to your SAM User.
Depending on on your SAM User's permissions, you may be able to manage AuthKeys for all SAM Users, for a specific SAM User, or only for your SAM User. The ability to manage AuthKeys can also be disabled (and in turn only be managed by a different SAM User or by the Root Account) in order to prevent an application from using an AuthKey to generate further AuthKeys. Refer to the Users and Roles documentation Permission Statements section for more information.
To generate or revoke an AuthKey for a SAM User:
-
Sign in to the User Console.
-
Click your account menu, then select Security.
-
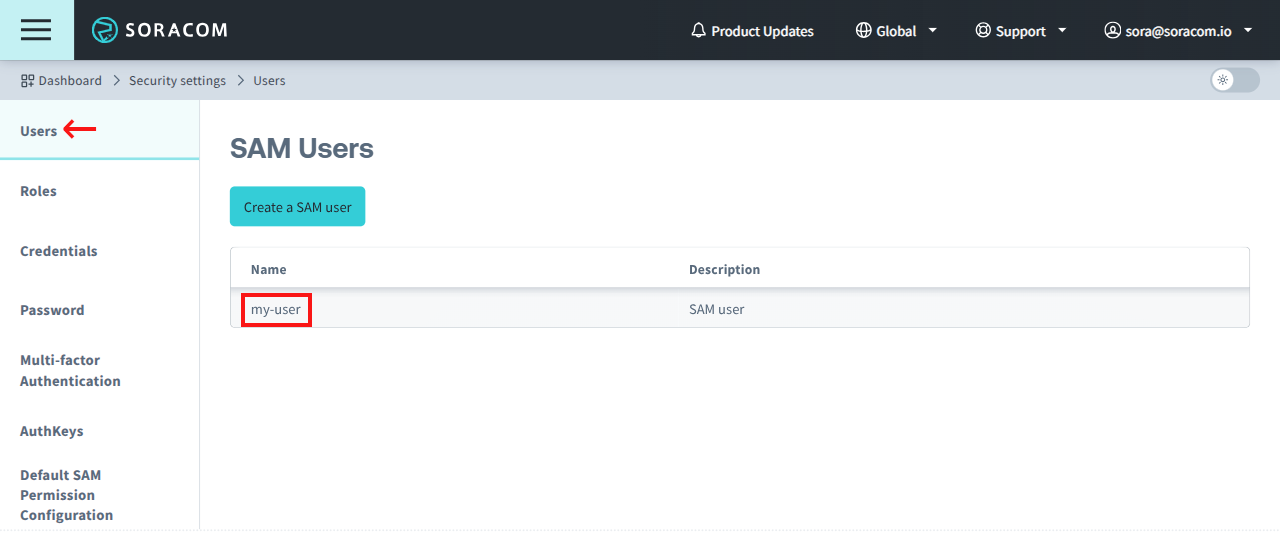
From the Security screen, click the Users tab. Then click the name of the SAM User you want to manage.
-
From the SAM User settings page, click the Authentication tab. Then from the AuthKeys panel, click the Generate an AuthKey button.
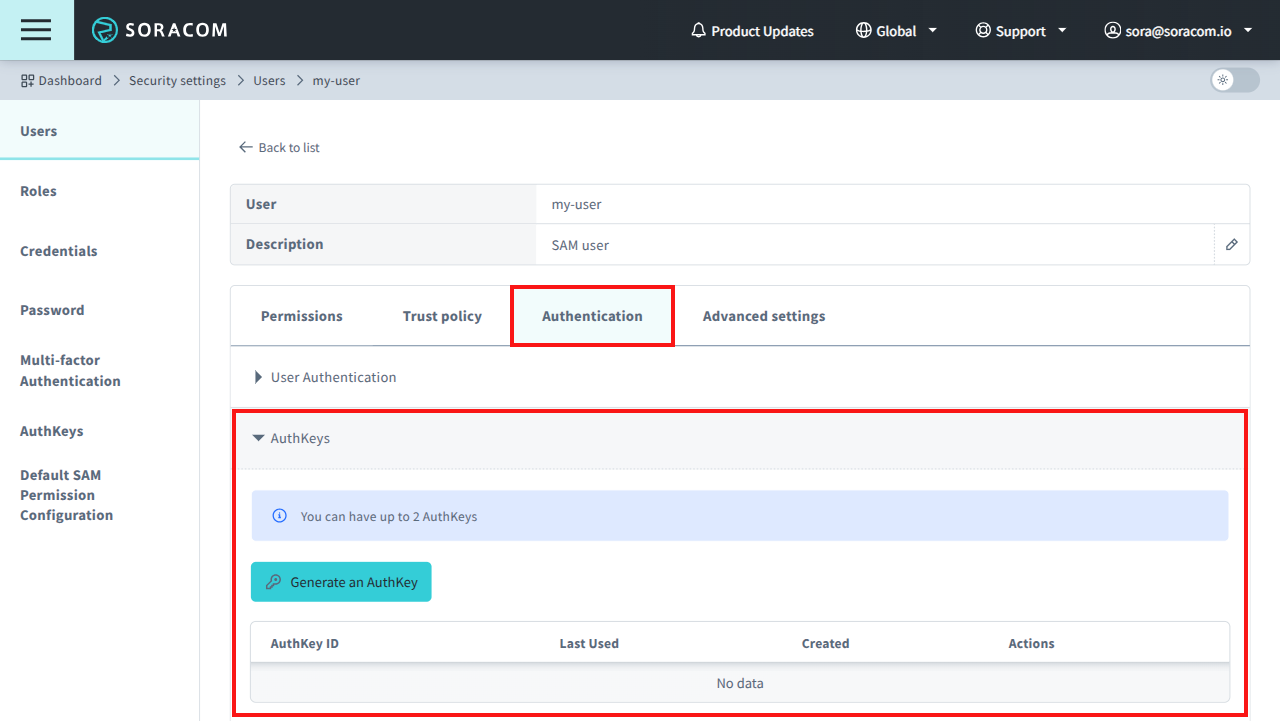
-
An AuthKey ID and AuthKey Secret key pair will be automatically generated.
When generating a new AuthKey, the AuthKey Secret will only be shown once. Ensure that you save the secret key in a secure location. If you lose the secret key, you will need to generate a new AuthKey.
Your new AuthKey will be listed, including information about when it was generated and when it was last used. You can also use this screen to revoke and remove any unused AuthKeys associated with the SAM User.
Refer to the Users and Roles documentation for more information about SAM User authentication methods.
API Authentication
Soracom API
Accessing the Soracom API with an AuthKey consists of two steps:
-
Send an HTTP
POSTrequest to the/authAPI endpoint, including your AuthKey ID and AuthKey Secret in the body of the request asauthKeyIdandauthKeyvalues, respectively. If verified, the API will return a response which containsapiKeyandtokenvalues. - Include the
apiKeyandtokenvalues in any subsequent API calls as HTTP request headers using the following format:X-Soracom-API-Key: <apiKey>X-Soracom-Token: <token>
For more details on using the Soracom API, refer to the API Reference Guide documentation.
Examples
#!/bin/bash

# This example uses `jq` to parse JSON responses. Ensure that you have
# installed jq to your system, and that you can run the `jq` command.

AUTH_KEY_ID="keyId-xxxxxxxxxx"
AUTH_KEY="secret-yyyyyyyyyy"

# Soracom API /auth endpoint
#
# First we need to call the auth API to get an API key and token. We need to
# set up an HTTP request with appropriate headers and pass our AuthKeys in as
# the HTTP request body.
body="{
  \"authKeyId\": \"${AUTH_KEY_ID}\",
  \"authKey\": \"${AUTH_KEY}\"
}"

# Create the Soracom API auth HTTP request and store the response. Here we will
# store the HTTP status code in the `auth` variable, and the HTTP response body
# in a file named `response`
auth=$( curl -s -w "%{http_code}" -o response -X POST \
  -H "Content-Type: application/json" \
  -d "${body}" \
  https://g.api.soracom.io/v1/auth )

# If the response contains an error code, log the error and exit
if [ "$auth" != "200" ]; then
  echo "Soracom API auth error: $( cat response )"
  exit 1
fi

# Soracom API /sims endpoint
#
# If our script reaches this point, then the previous HTTP request completed
# successfully. We can now use the `apiKey` and `token` values to call other
# Soracom API endpoints.
apiKey=$( cat response | jq -r .apiKey )
token=$( cat response | jq -r .token )

# Create the Soracom API listSims HTTP request and store the response. We will
# similarly store the HTTP status code in the `sims` variable, and the HTTP
# response body in the `response` file
sims=$( curl -s -w "%{http_code}" -o response -X GET \
  -H "X-Soracom-API-Key: ${apiKey}" \
  -H "X-Soracom-Token: ${token}" \
  https://g.api.soracom.io/v1/sims )

# If the response contains an error code, log the error and exit
if [ "$sims" != "200" ]; then
  echo "Soracom API listSims error: $( cat response )"
  exit 1
fi

# Output the response
cat responseSoracom CLI
To configure the Soracom CLI tool to use AuthKeys, simply run the soracom configure command and follow the prompts to authenticate using AuthKeys.
You can configure multiple AuthKeys by using the --profile flag with Soracom CLI. Simply run soracom configure --profile <myOtherProfile> and follow the same prompts. Then when you use the soracom command with the --profile <myOtherProfile> flag, Soracom CLI will generate the API key and token using the AuthKeys that correspond to that profile.
When using the Soracom CLI, all authentication credentials are stored in plaintext in your ~/.soracom (Mac and Linux) or C:\Users\<user>\.soracom (Windows) directory. Take care to ensure that access to this data is secure.
The Soracom CLI tool will automatically request the API key and token so that you do not need to manually generate them before accessing other API endpoints. For example, to list the SIMs in your account, simply run:
soracom sims listFor more information, refer to the official Soracom CLI repository.