Switch User
Switch User is a feature that allows a Root user or Soracom Access Management (SAM) user to quickly switch to an alternate SAM user without having to enter a password, or having to sign out of the User Console then sign back in. This is especially helpful for accounts where the SAM user is changed frequently, or accounts that utilize shared SAM users.
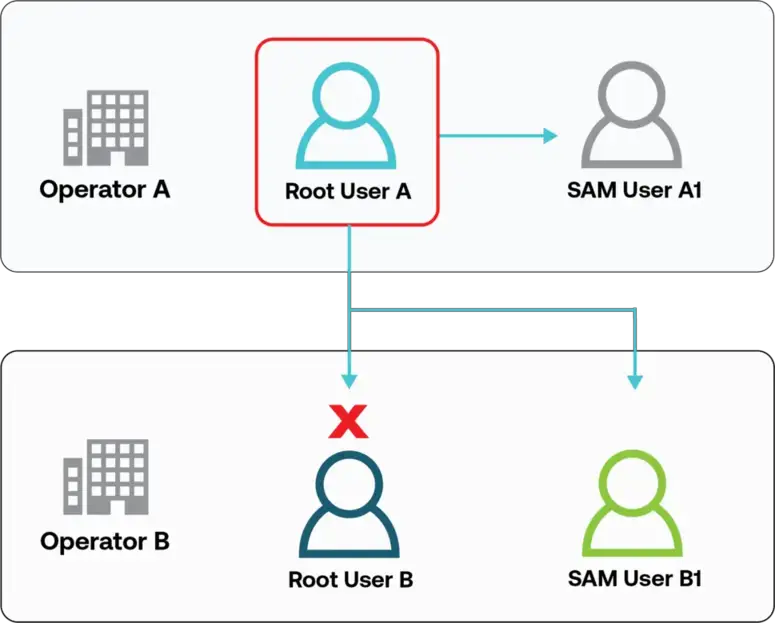
For Root Users
While you are signed in to the Soracom User Console as the Root user of your account, you can switch to a SAM user under the same account, or to a SAM user that exists under a different account. You cannot switch to another Root user.
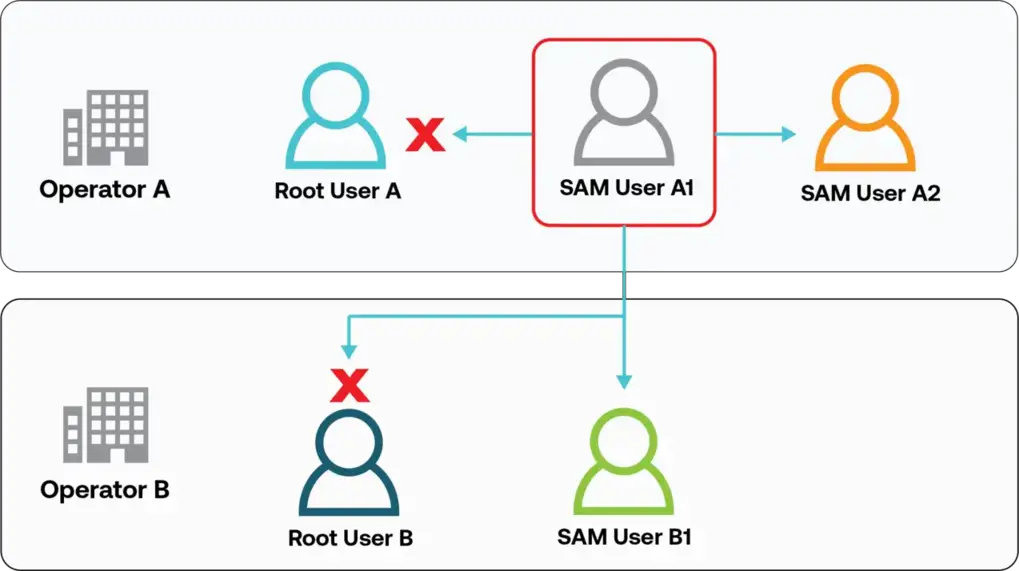
For SAM Users
While you are signed in to the Soracom User Console as a SAM user under one account, you can sign back in as another SAM user of the same account, or as a SAM user of another account. You cannot switch to a Root user.
Setting Trust Policies
To utilize the Switch User feature, you must register the origin user's information with the destination user. This is called a trust policy.
To create a new trust policy you can follow these instructions:
-
Sign in to the User Console.
-
Click your account menu, then select Security.
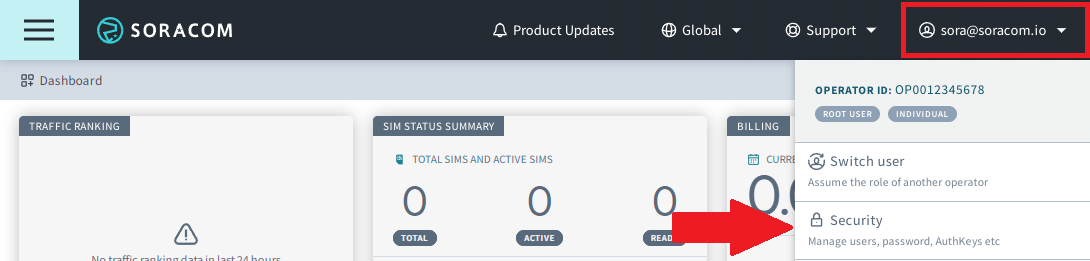
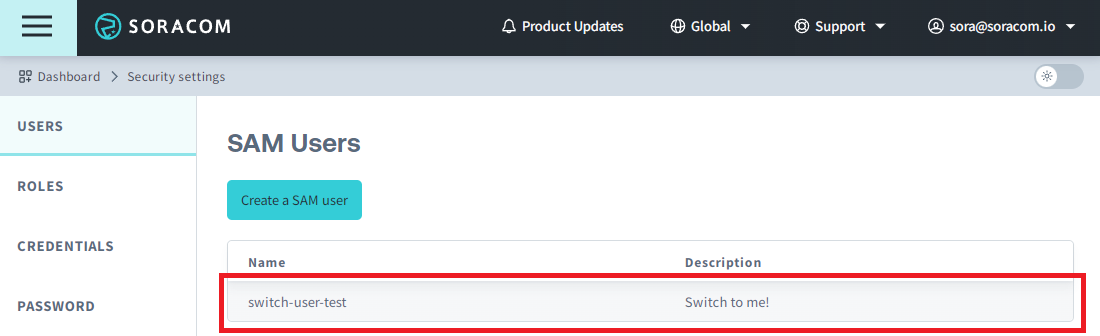
The SAM user list screen will be displayed.
-
Select the destination SAM user that you would like to switch to.
-
Click Trust Policy and enter the appropriate JSON for your trust policy. Additional information on trust policy syntax is discussed below. In this example, we are allowing the Root user of
OP0012345678and its SAM usersam-user-1to switch into the SAM userswitch-user-testthat we selected in the previous step.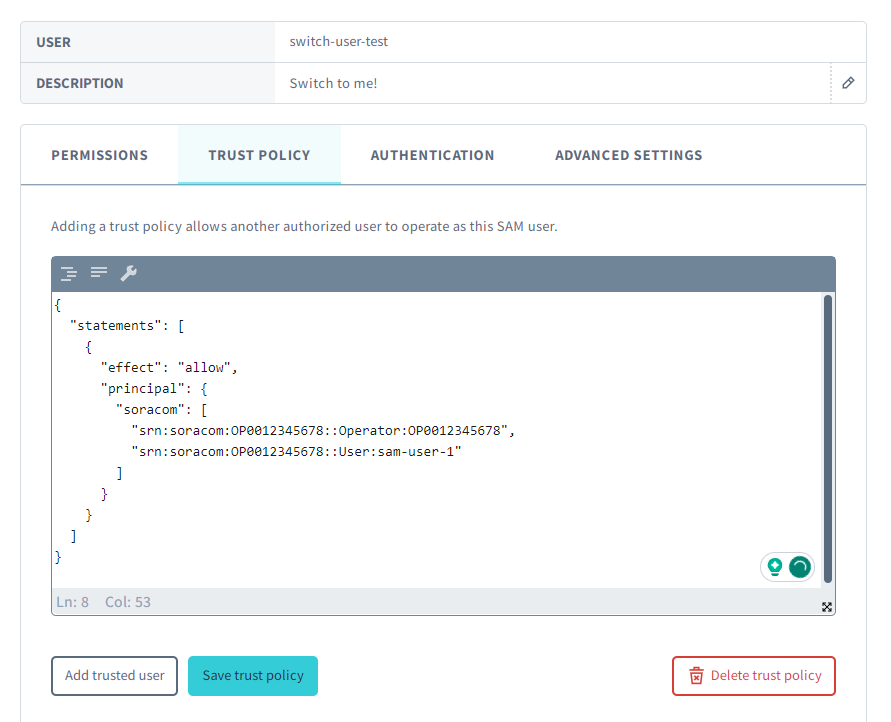
Example JSON:
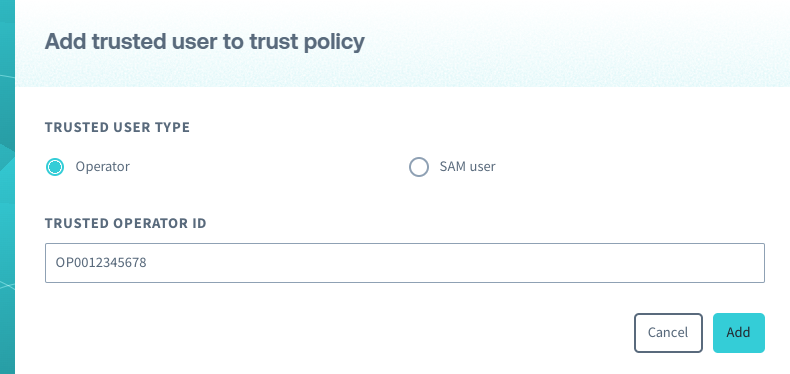
{
"statements": [
  {
    "effect": "allow",
    "principal": {
      "soracom": [
        "srn:soracom:OP0012345678::Operator:OP0012345678",
        "srn:soracom:OP0012345678::User:sam-user-1"
      ]
    }
  }
]
}
You can also quickly add a user to your trust policy by clicking the Add trusted user button and entering their account information.
After you have entered your JSON click Save trust policy.
When a trust policy is set, verification of the existence of the specified Operator or SAM user is not performed. If you are unable to switch to the SAM user you have created the trust policy under, make sure that the operator ID and SAM user name you entered in the trust policy are correct.
-
Read the displayed information carefully, and if you agree, click Save.
To allow a SAM user to switch to another SAM user, the following APIs must be allowed in the origin SAM user's permissions statement:
Operator:generateAuthTokenAuth:switchUser
Adding a Destination User
To add a destination user to your Switch User list:
-
Sign in to the User Console.
-
Click your account menu, then select Switch user.
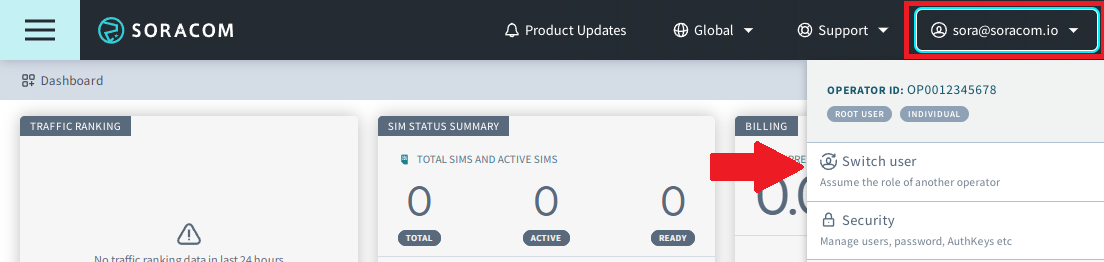
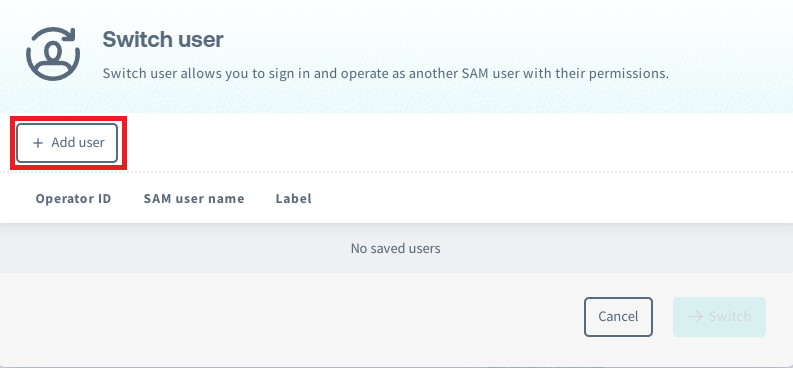
The switch user screen will be displayed.
-
Click the Add user button.
-
Enter the information of your destination user:
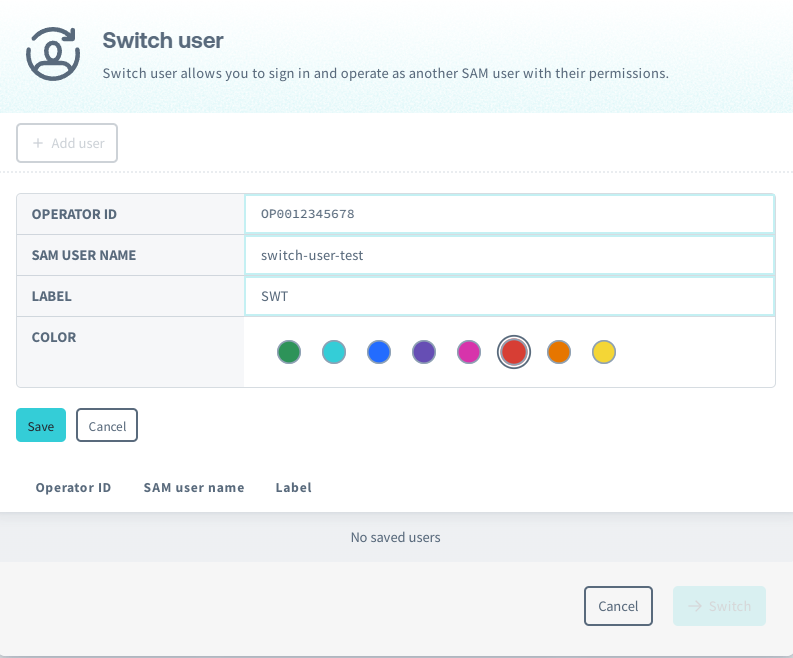
The fields are explained below:
Field Explanation Operator ID Enter the Operator ID of the SAM user you want to switch to. SAM User Name Enter the SAM user name of the user you want to switch to. SAM user names are case sensitive. Label A display name for this user that will be shown in the Switch User menu. Color Select the color of the bar that will appear at the top of the User Console when switched to this user. Then click Save.
When destination user details are saved, verification of the existance of the destination user and it's trust policy is not performed. If you are unable to switch to the destination user, ensure that you have entered all information correctly and that you are allowed access in that user's trust policy.
The Switch User destination users list is saved in your browser's cookies. This means that:
- If your browser cookies are deleted, your saved destination users will be removed from your Switch User list.
- If you sign in to the same Root user in another browser, your saved destination users will not persist.
Switching Users
-
Sign in to the User Console.
-
Click your account menu, then select Switch user.
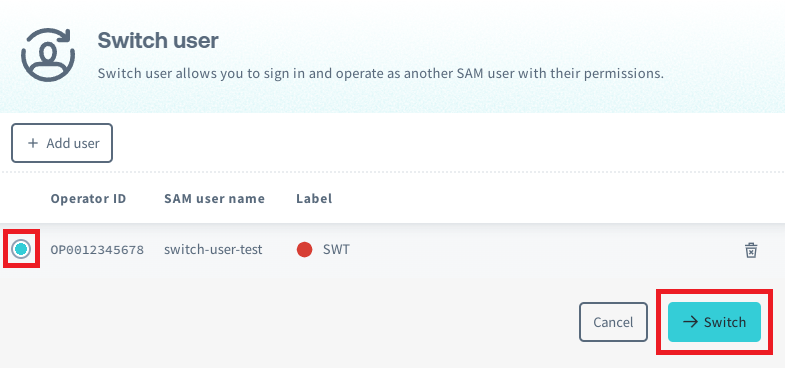
-
Select the user you want to switch to and click Switch
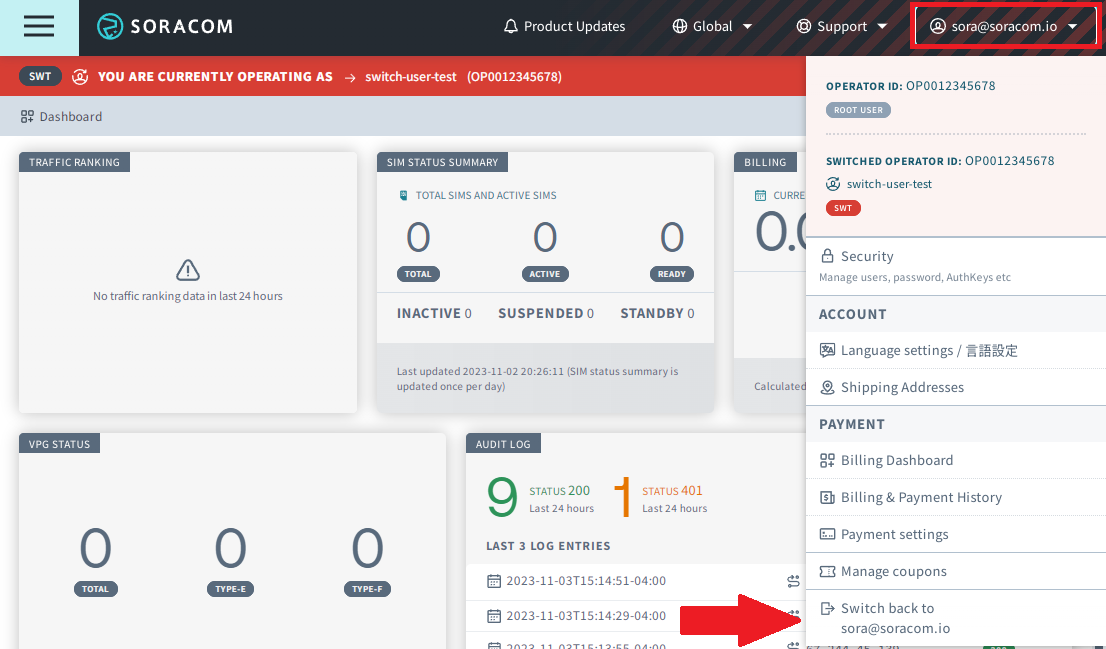
When you switch to the destination SAM user, a bar with the color you selected will be displayed at the top of the screen to indicate that it has been switched.

You cannot utilize the Switch User function again to proceed to a further destination SAM user registered to the list of the current SAM account you have switched to.
-
To return to your original user, click your account menu and select Switch back to [your original user] or click the door icon on the right side of the colored Switch User UI bar.
Trust Policy Syntax
The JSON format for setting trust policies for SAM users is called "trust policy syntax" and is highly customizable.
As an example, the trust policy below would allow clients to switch to the SAM user with this policy from the origin account OP1123456789 and it's SAM user named example. But only if they are attempting access from the IP address range 10.0.0.0/24, and are attempting access after July 1st, 2023.
  {
    "statements": [
      {
        "effect": "allow",
        "principal": {
          "soracom": [
            "srn:soracom:OP1123456789::Operator:OP1123456789",
            "srn:soracom:OP1123456789::User:example"
          ]
        },
        "condition": "currentDate >= date(2023, 07, 01) and ipAddress('10.0.0.0/24')"
      }
    ]
  }
This table explains the elements of the JSON seen above:
| Element | Data Type | Description |
|---|---|---|
statements[] |
Array | An array of statement blocks, which are objects containing elements principal, effect, and condition. |
statements.principal{} |
Array | An array of SRNs (Soracom Resource Names) that represent the users targeted by the statement block. To specify a Root user, use the format srn:soracom:${operator_id}::Operator:${operator_id}.To specify a SAM user, use the format srn:soracom:${operator_id}::User:${sam_user_name}. |
statements.effect |
String | Specifies whether to allow or deny switches from the specified users in the principal block. If conditions are defined, the effect will only take place when they are met. |
statements.condition |
String | Conditions for a statement block to take effect, such as by using an IP address or time of switch. |
Wildcards (*) cannot be used to specify multiple operators or SAM users in a trust policy.
Conditions
Conditions can be set to specify when a statement block is valid, such as the switch request coming from a particular IP address range or at a specific daily time range. You can specify conditions using a combination of functions, variables, and operators.
Functions
In order to simplify common or repetitive conditions, several helper functions are available in order to reduce condition complexity or verbosity. Note that some functions will return a boolean value, while others will return a string value that should be combined with a comparison operator.
-
date(YYYY, MM, DD)- Creates a date object that can be used to evaluate against thecurrentDatevariable."condition": "currentDate >= date(2023, 01, 27)" -
dateTime(YYYY, MM, DD, HH, MM, SS)- Creates a datetime object that can be used to evaluate against thecurrentDateTimevariable."condition": "currentDateTime >= dateTime(2023,01,27,15,00,00)" -
ipAddress(CIDR range, ...)- Returnstrueif the API client source IP address falls within one of the specified CIDR ranges. Each CIDR should be specified as a string in CIDR notation, such as:"condition": "ipAddress('10.0.0.1/24')"Multiple CIDR ranges can be specified using additional parameters, and will return
trueas long as the API client source IP address falls within at least one of the specified CIDR ranges:"condition": "ipAddress('10.0.0.1/24', '10.0.0.2/24', '2001:db8:1234::/48', '2001:db8:abcd::/48')"
Variables
The following variables can be used as conditions for enabling statement blocks.
| Variable | Description |
|---|---|
currentDate |
An object representing the current date (UTC). Compare with date(YYYY, MM, DD). |
currentDateTime |
An object representing the current date and time (UTC). Compare with dateTime(YYYY, MM, DD, HH, MM, SS). |
sourceIp |
A string representing the client's IP address (Ex. 10.0.0.1). Compare it directly to another string to evaluate against a single IP address, or compare it against ipAddress(CIDR range, ...) to evaluate against a range. |
Operators
Comparison and logical operators can be used to evaluate whether or not a statement is true or specify complex conditions.
Available comparison operators are:
| Comparison Operator | Description |
|---|---|
eq/== |
Values must be equal |
ne/!= |
Values must not be equal |
lt/< *1 |
The first value must be less than the second value. |
le/<= *1 |
The first value must be less than or equal to the second value. |
gt/>*1 |
The first value must be greater than the second value. |
ge/ >= *1 |
The first value must be greater than or equal to the second value. |
matches |
The first value must match the regular expression defined in the second value. |
*1 Do not use when evaluating strings.
Examples of Use
-
Enable the statement block after
January 27, 2023:"condition": "currentDate >= date(2023, 01, 27)" -
Enable the statement block after
January 27, 2023 15:00:00:"condition": "currentDateTime >= dateTime(2023,01,27,15,00,00)" -
Enable the statement block when accessed from a specific IP address (
10.0.0.1):"condition": "sourceIp == '10.0.0.1'" - Enable the statement block when accessed from a specific IP address range (
10.0.0.0/24):"condition": "ipAddress('10.0.0.0/24')"