Send Messages to Microsoft Teams
Introduction
Soracom Flux is a low-code IoT application builder designed for advanced automation.
In this guide, we send messages to a Microsoft Teams channel using a Soracom Flux Webhook Action. It walks you through setting up a seamless integration between Soracom Flux and Microsoft Teams. By configuring a Microsoft Power Automate workflow to receive and process webhook requests and by creating a Flux App complete with channels and webhook actions, you can automate the delivery of notifications to your Teams channel.
Refer to the Pricing & Fee Schedule for detailed information on Soracom Flux pricing. Soracom Flux includes a free tier providing limited usage for certain features at no cost.
Requirements
For this project, you will need the following:
-
A Soracom Account
If you don't already have a Soracom account, follow the steps in the Quick Start guide.
-
An Account and a License for Microsoft Power Automate and Microsoft Teams
For more information, refer to the following:
- A Notification Channel in Microsoft Teams
Create a Workflow in Microsoft Power Automate
Build a workflow using Microsoft Power Automate that acts as the intermediary between Soracom Flux and Microsoft Teams. The workflow is designed to receive a webhook request from Flux, process the payload, and then post the message to a designated Teams channel.
- Log in to Microsoft Power Automate.
-
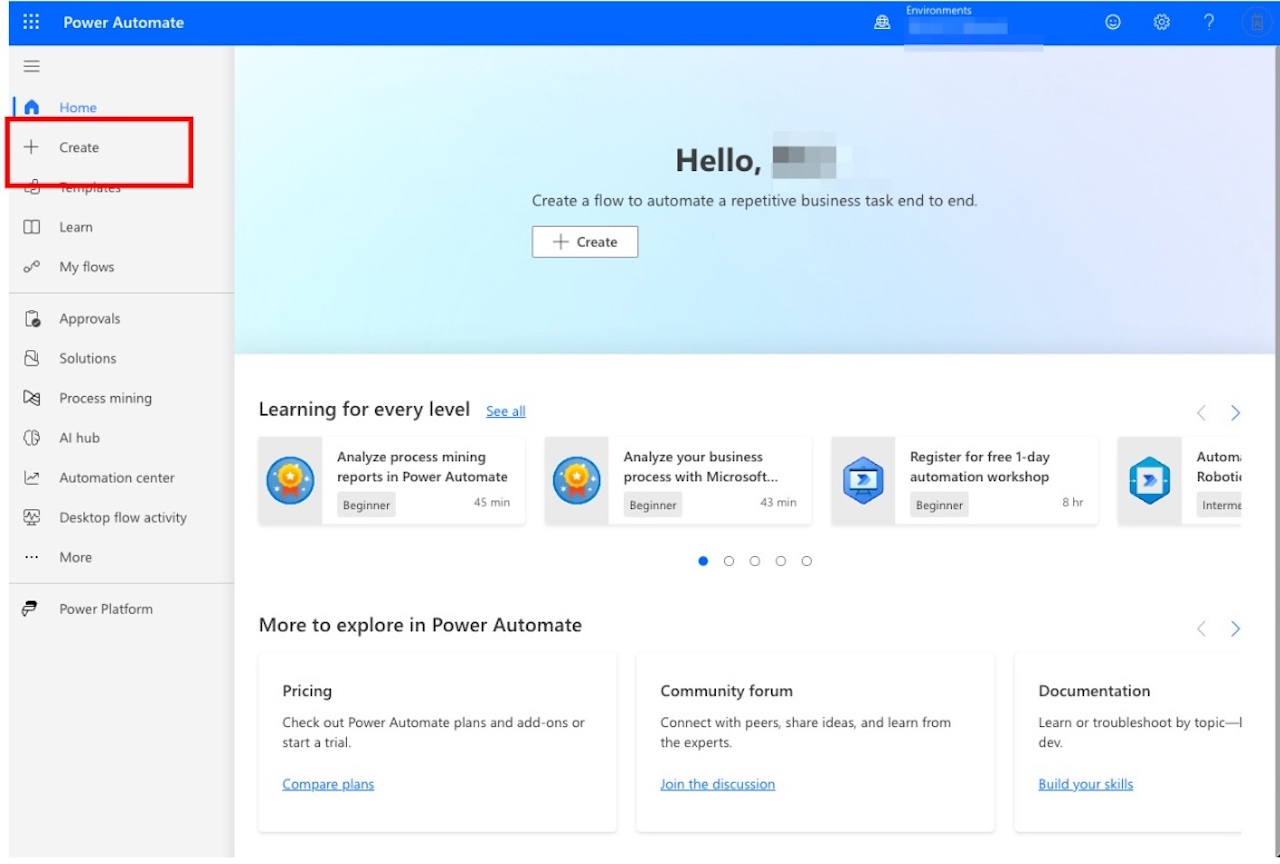
Click Create in the left navigation panel.
-
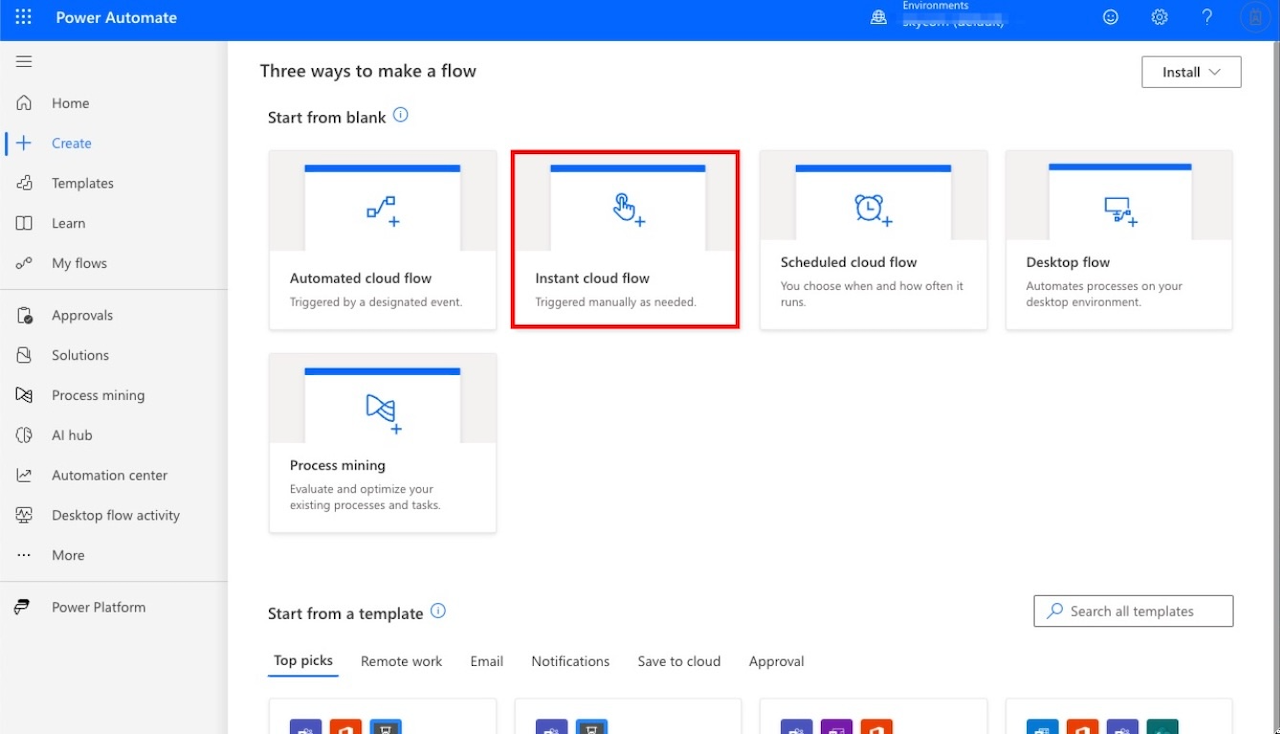
Click Instant cloud flow.
-
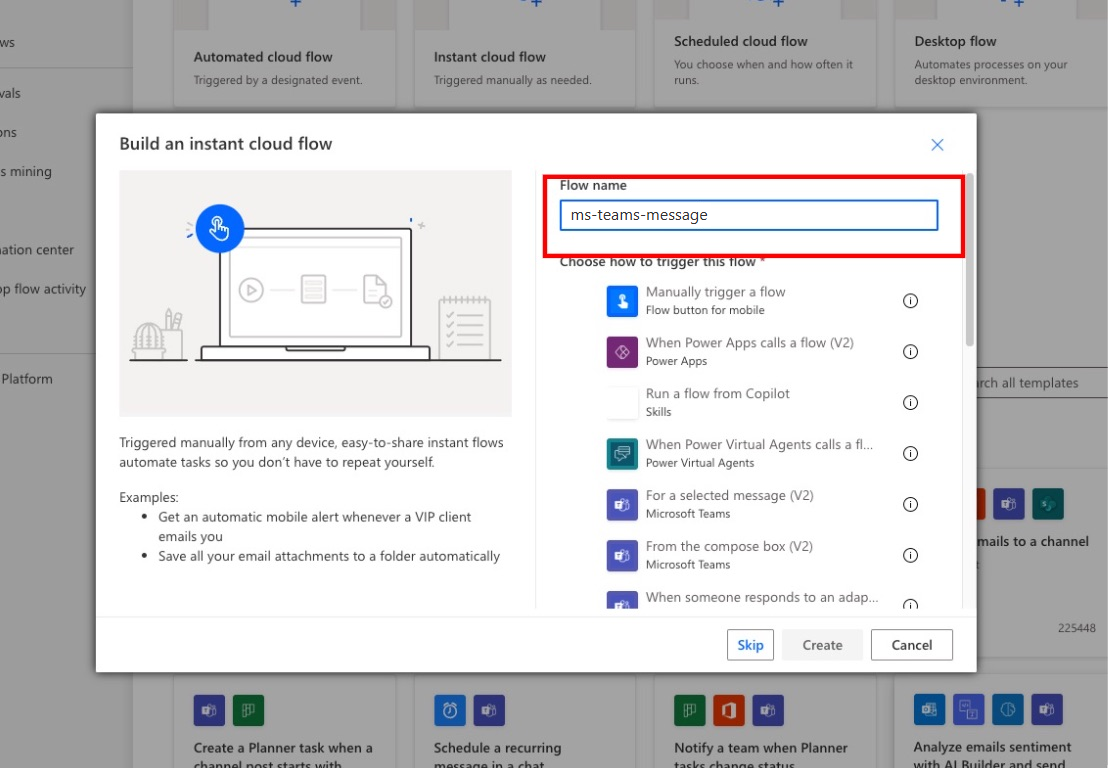
Enter a Flow name.
-
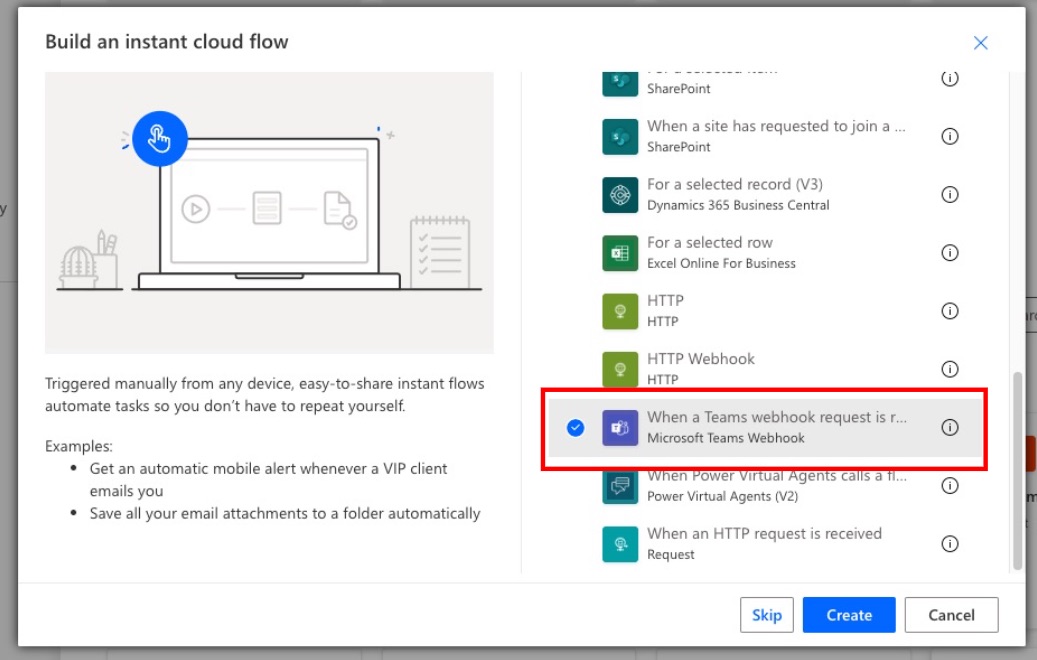
From Choose how to trigger this flow, select When a Teams webhook request is received, then click Create.
-
Click the button to add an action.
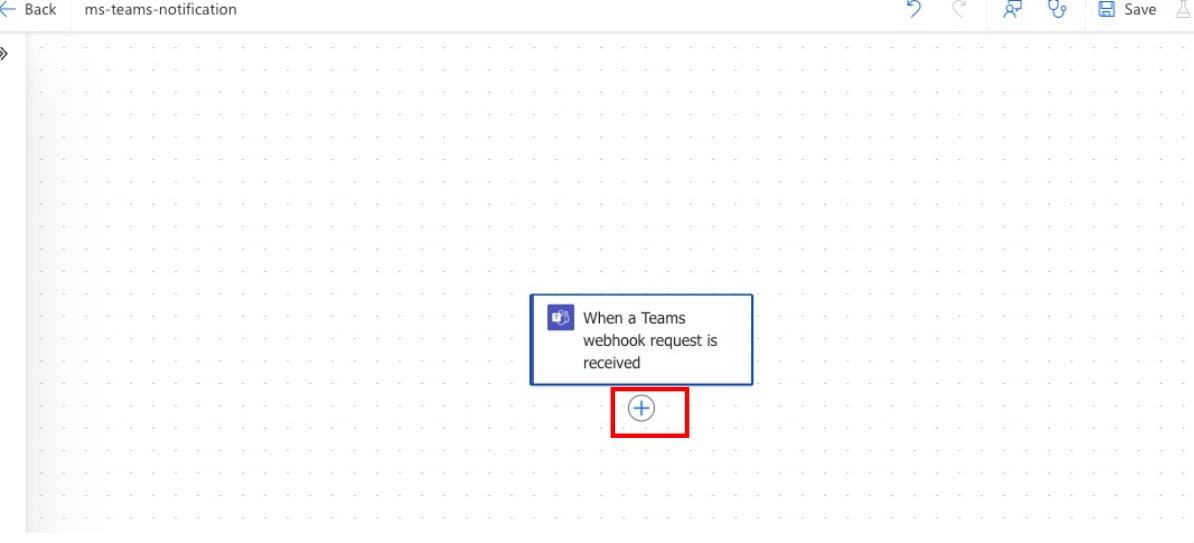
-
In Add an action, enter Post message in a chat or channel and select Post message in a chat or channel.
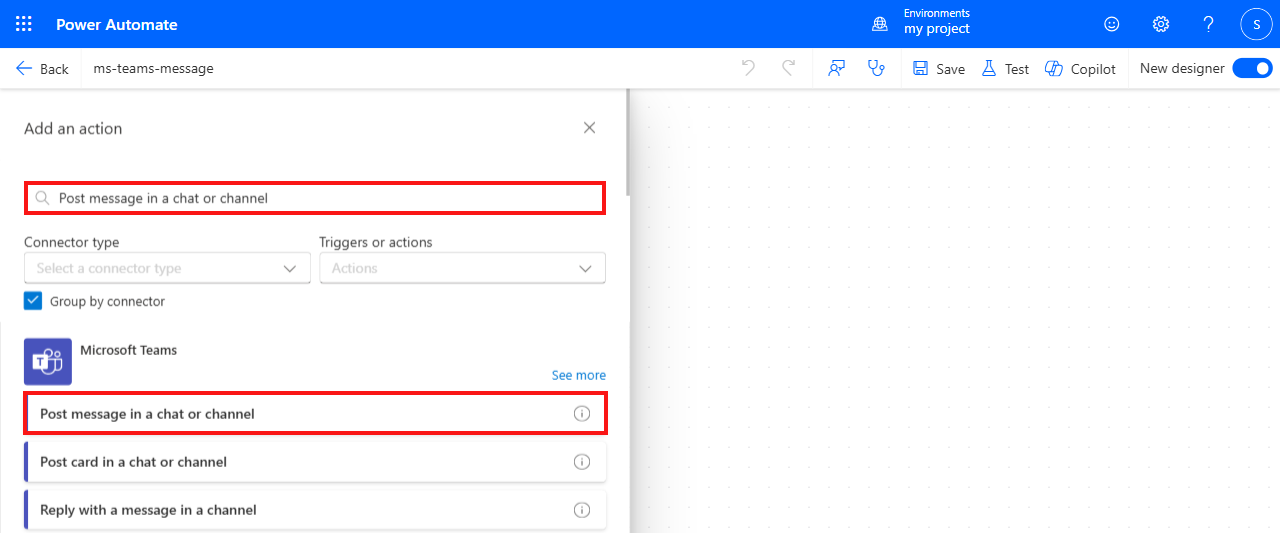
Sign in to Microsoft Teams.
If you are not already signed in to Microsoft Teams, sign in and create a connection to Microsoft Teams. Click Sign In and follow the on-screen instructions.
-
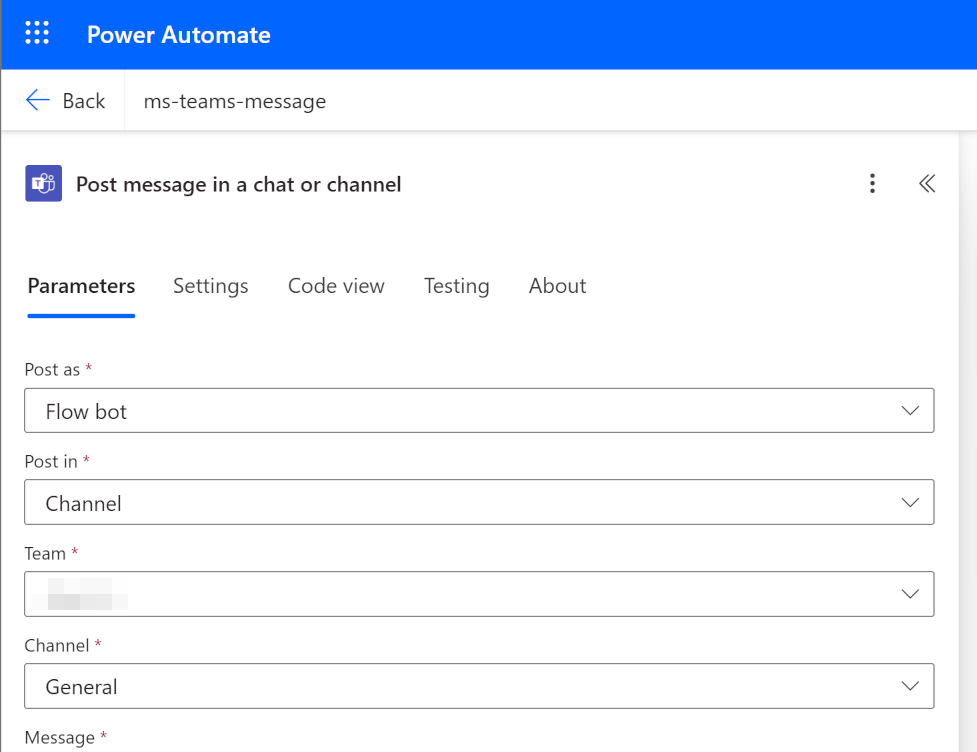
Configure the following fields:
- Post as: Select Flow bot.
- Post in: Select Channel.
- Team: Select the target team.
- Channel: Select the target channel.
For more information about the settings, see Send a message in Teams using Power Automate.
-
Click the Message input field, then click the fx button.
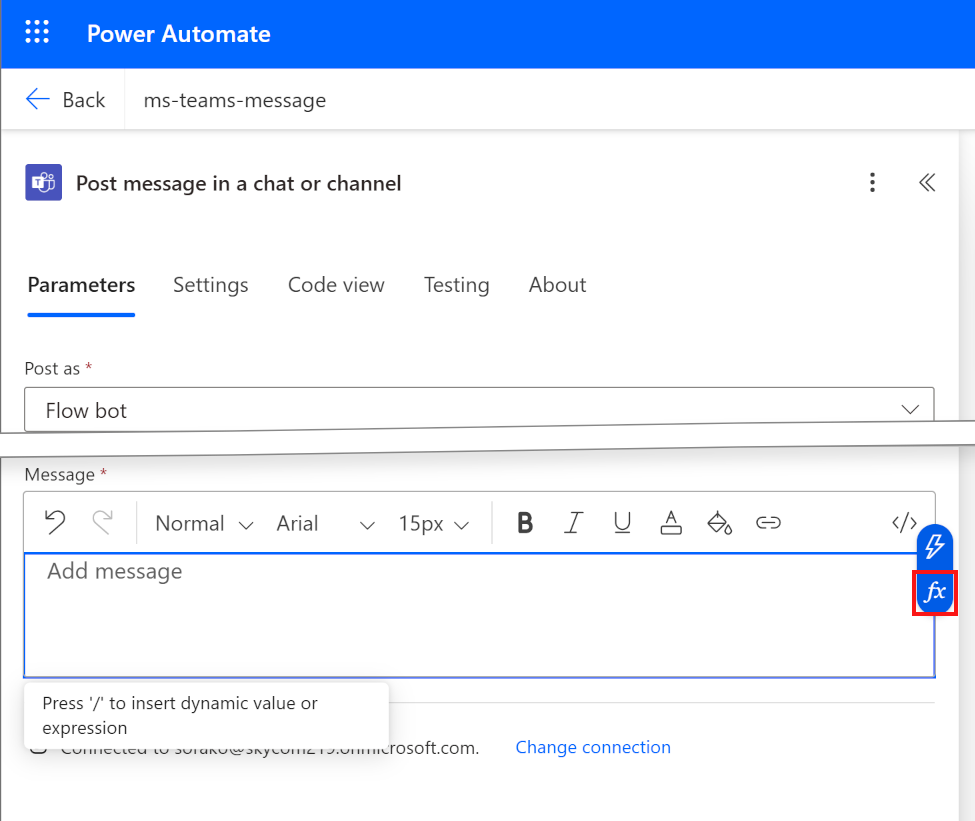
-
Enter
triggerBody()?['text'], then click Add.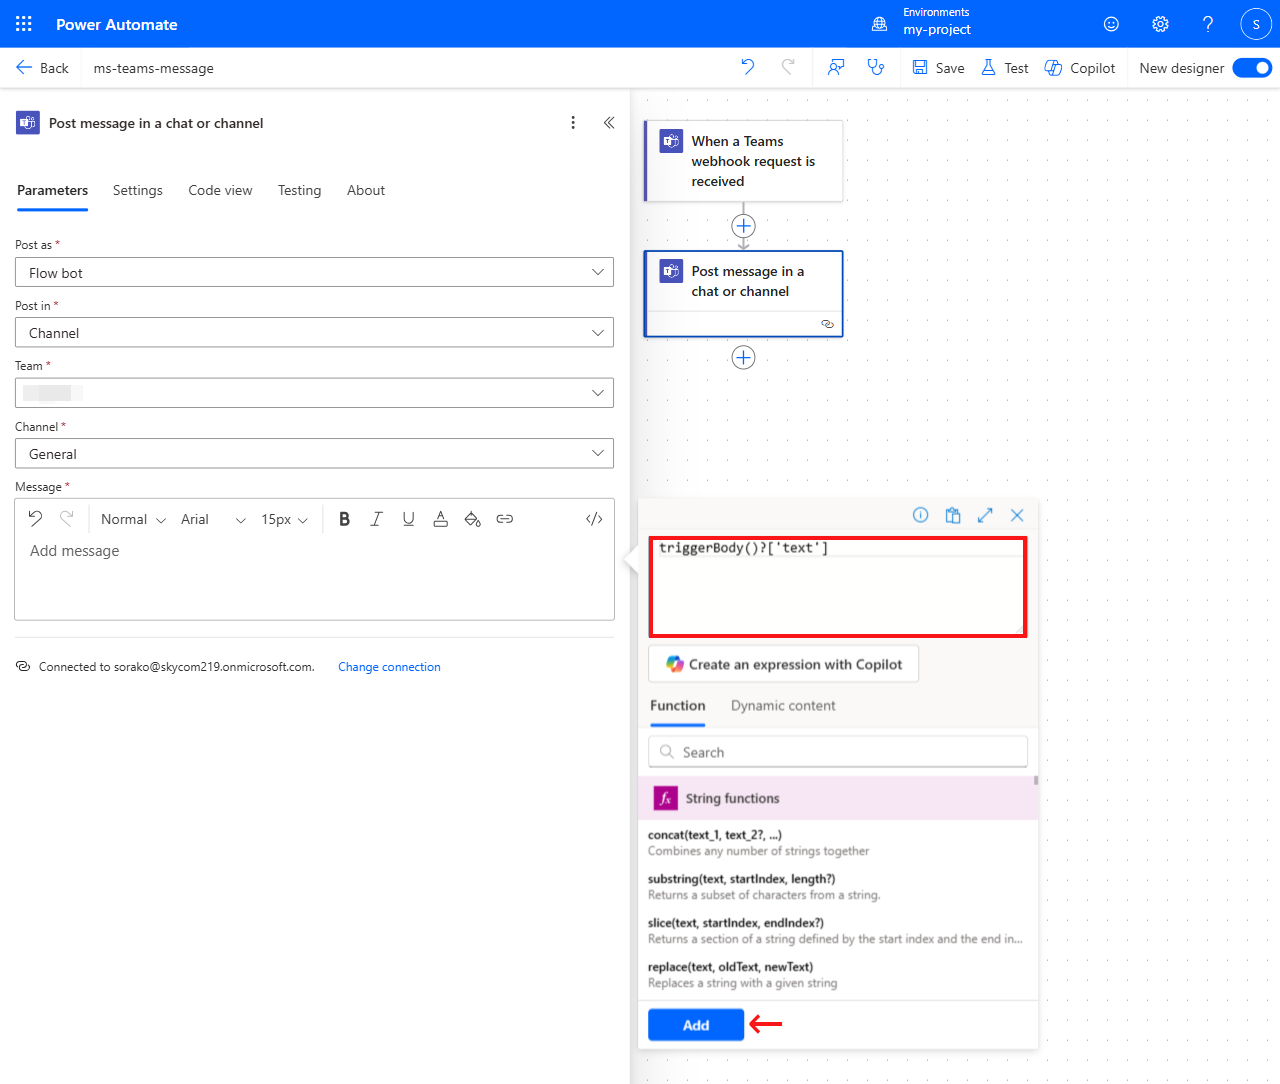
The
triggerBody()function retrieves the HTTP body from the trigger such as an incoming webhook that initiates the workflow. For example, if you use@{triggerBody()?['text']}, it will return a result like{"text": "Hello from Flux!"}when that data is received in the webhook's HTTP body.For more details on functions, see Reference guide to workflow expression functions in Azure Logic Apps and Power Automate.
-
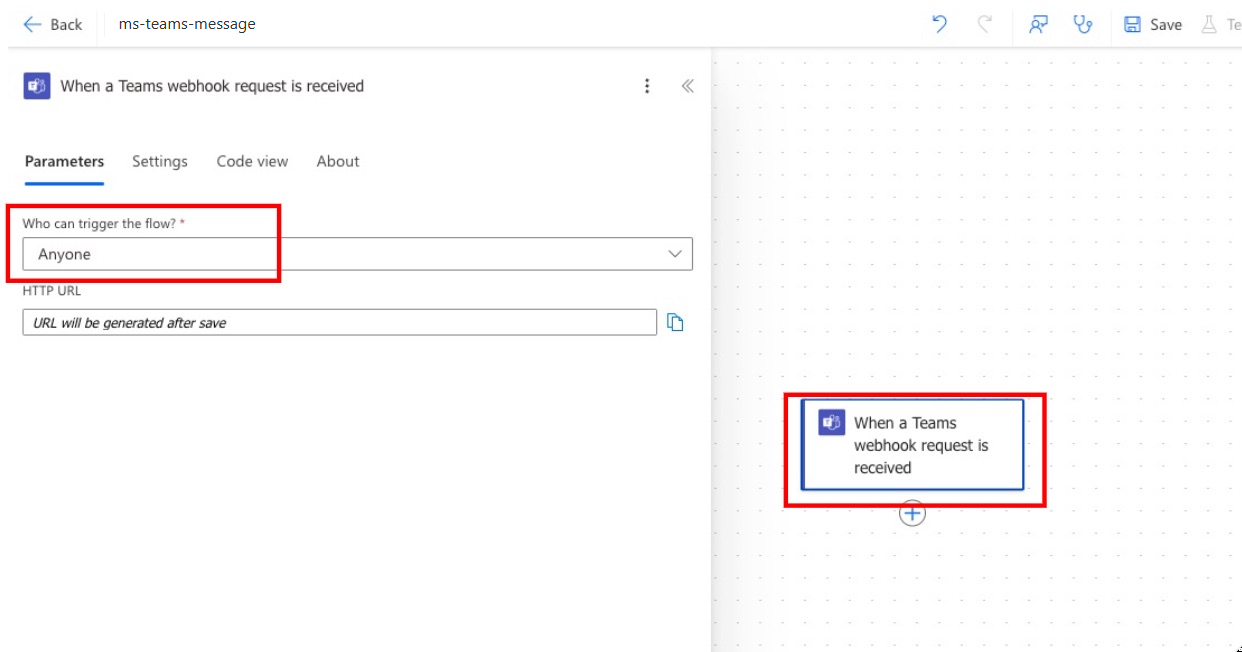
Click the When a Teams webhook request is received component and in the left navigation panel, select Anyone under Who can trigger the flow?.
-
Click Save to save your flow.
-
Click the When a Teams webhook request is received trigger to see the HTTP URL provided in the flow and click the button to copy the value.
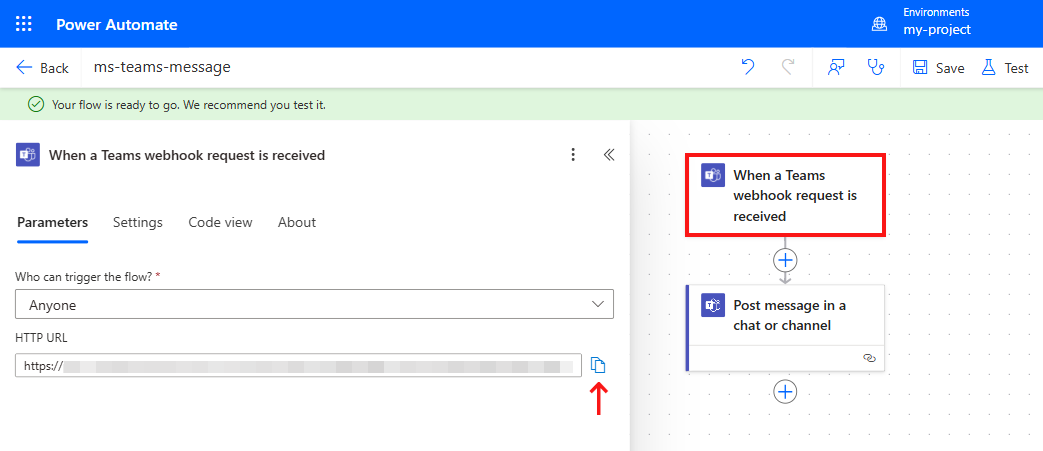
The HTTP URL will be used in the next step when configuring the Webhook Action in Soracom Flux.
To see the HTTP URL again:
- Open the left navigation panel.
- Select My flows, then the Cloud flow you created.
- Click Edit.
- Click the When a Teams webhook request is received trigger.
Create a Flux App
A Flux app can integrate various forms of inputs and apply sophisticated business logic to achieve desired outcomes.
-
Login to the User Console. From the Menu, expand Soracom Flux and select Flux Apps.
-
Click Create a new Flux app.
-
Name the Flux app and provide an optional description, then click Create.
The Flux app will be created and the Studio tab in Soracom Flux Studio will automatically be displayed.
Create a Channel
A channel is a Flux component that connects an event source to actions in your Flux app.
-
Open the Studio tab in Soracom Flux Studio:
- If you have just created a Flux app, you will already be in the Studio tab.
- If you are returning, follow Step 1 under Create a Flux App to access your Flux Apps, then select your app to open the Studio tab.
-
Click Create a channel.
-
Choose API/Manual Execution as the event source and click Next.
-
Configure the following:
- Name: Name your channel.
- Description: Optionally provide a summary of the channel.
-
Click Create a new channel.
- After confirming that your configuration is correct, click the to return to the Studio tab.
Create a Webhook Action
An action is a component that can be added to a channel that can conditionally process information from an event source to execute a desired effect.
This step configures a Webhook action within your Flux app. When triggered, the action sends a message to your selected Microsoft Teams channel.
-
Click on the channel created in the previous section to open the configuration dialog, then select the Actions tab and click Add Action.
-
In the Create a new action dialog, choose Webhook as your action type, then click OK.
-
Configure the following:
- Name: Enter an action name.
- Description: Optionally provide a summary.
- Enabled: Set the action to enabled.
-
Condition:
-
Action Condition: Define when the action should trigger.
In this case, leave this field blank so that the action executes each time it is called.
-

-
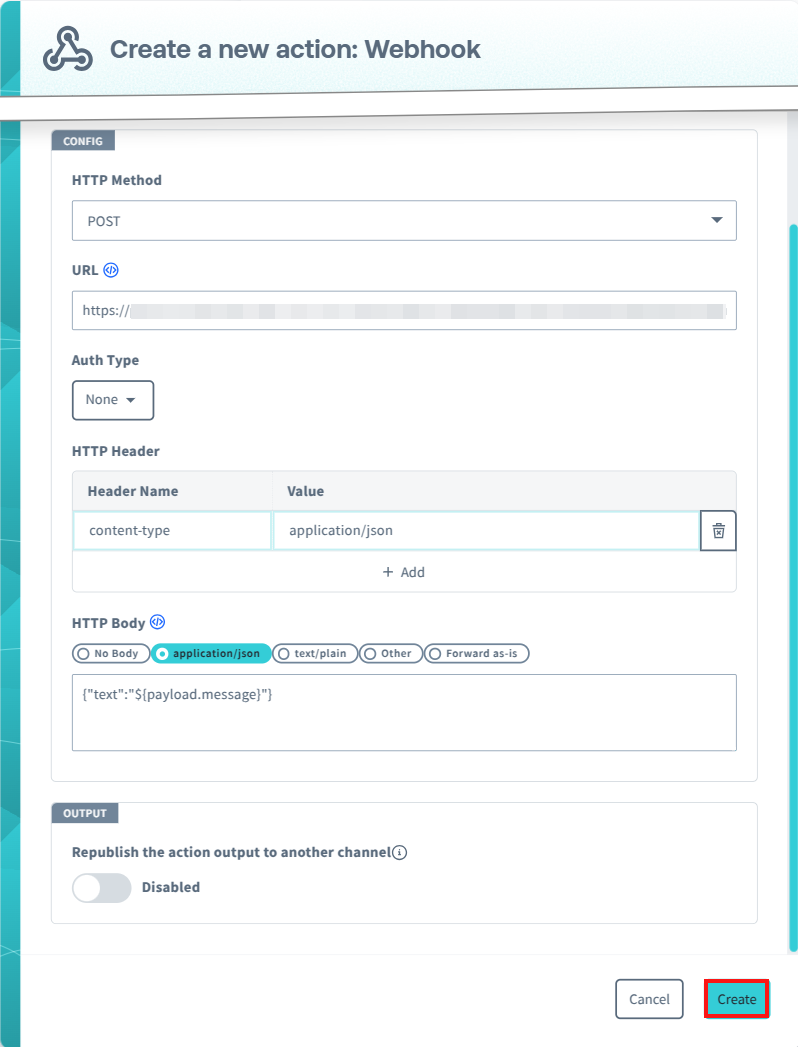
Configure the following in the Config section of the dialog:
- HTTP Method: Select POST.
- URL: Enter the URL obtained from Create a Workflow in Microsoft Power Automate.
- Auth Type: Select None.
-
HTTP Header: Set the HTTP header to
Content-Type: application/jsonfor the Webhook HTTP request.Selecting application/json for HTTP Body automatically sets this value to
Content-Type: application/json. -
HTTP Body: Select application/json to set the HTTP body of the Webhook HTTP request and enter the following in JSON:
{"text":"${payload.message}"}
-
Configure the following in the Output section of the dialog:
- Republish this action output to another channel: Set republishing to Disabled.
-
Click Create.
- After confirming that your configuration is correct, click the to return to the Studio tab and see the new channel.
Testing
Send Messages from the API/Manual Execution Channel
-
From the Menu, expand Soracom Flux and select Flux Apps.
-
Select your Flux app for this project.
-
Click on the channel created in the Create a Channel section to open the configuration dialog and select the Test tab.
-
In the Body field, enter JSON syntax containing the message you want to send to the Microsoft Teams channel, then click Execute.
For example, entering
{"message":"Hello from Flux!"}will send "Hello from Flux!" to a Microsoft Teams channel.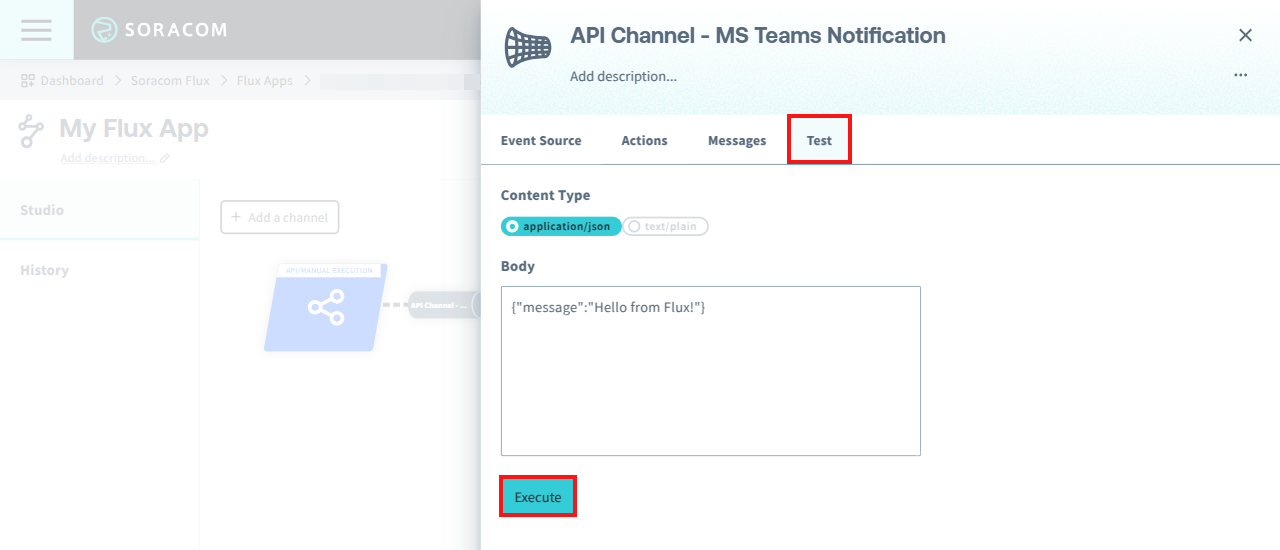
Verify That Notifications Are Being Received in Microsoft Teams
-
Open Microsoft Teams.
-
Click Teams and select your channel.
A message should be displayed such as "Hello from Flux!".
Check the Execution History of the Flux App
-
Login to the User Console. From the Menu, expand Soracom Flux and select Flux Apps.
-
Click on the Flux app you created.
-
Select the History tab.
For each channel, the Message, Context, Input, and Output of the action executed from that channel are displayed.
To learn about detailed logging, see the View Logs documentation.