Cellular Connectivity Basics
While Soracom Air for Cellular generally provides a frustration-free experience for enabling cellular connectivity for IoT or M2M devices, in some cases there may be differences in how a device or local network behaves which can result in unpredictable or unreliable cellular network connectivity. In these situations, without the ability to inspect the cellular network itself, it's often difficult to identify the specific issue that might be causing connection problems. However, some basic knowledge of what typically occurs between powering on a device and sending data over a cellular connection can be helpful with understanding where a connectivity issue might be occurring.
Basic Requirements
Before a cellular-enabled device can connect to Soracom, it needs to be set up and configured. The amount of set up will vary depending on your device: some devices may already be set up out of the box and simply need a SIM card and APN settings, while others may require additional configuration. However, in general you will want to make sure that the following items are properly set up:
Soracom provides setup guides for reference devices, which include more detailed instructions. Refer to the Developer Guides section for more information.
Hardware Check
Radio Technology and Frequency Band
Your device or modem should support both the radio technology (such as 2G, 3G, 4G/LTE, or LTE-M) and the frequency bands provided by a local network operator. In some cases, a device or modem may have regional versions, such as a North American or European variant, which are designed specifically to support the radio technologies and frequency bands available in their respective regions. You may need to check with the device or modem manufacturer to confirm what your device or modem supports.
In addition, you will need to check that the local network operator is supported by Soracom. You can refer to the Supported Carriers documentation for a list of supported carriers in your country.
When checking radio technology and frequency band compatibility, note that the frequency band requirement is strictly between your device and the local network operator, and Soracom does not have any restrictions on what frequency bands are supported. However, in some cases, Soracom is unable to provide cellular connectivity on a particular radio technology, even though your device and the local network operator both support the radio technology.
Antenna
Your device or modem should have a built-in antenna, or an appropriate external antenna should be securely attached.
If your device or modem requires the use of an external antenna, you will want to use the original antenna included with the device or modem when possible, as the original antenna is typically designed for use with cellular communication. If you are using a third party antenna, you will want to check that the antenna is designed for cellular use. Although external antennas are often interchangeable, some antennas are only designed for other types of wireless communication (such as WiFi or LoRa), which can result in poor performance when using them with a cellular modem.
In some situations, you may also need to confirm that the antenna is certified for use in your country.
Device Certification
Your device or modem should have the proper certifications for the region in which it will be deployed. Cellular device certification typically falls into three categories:
| Certification Type | Description | Examples |
|---|---|---|
| Regulatory | Ensures the device complies with regional or national wireless communication laws. Regulatory certification is independent of firmware | TELEC (Japan), FCC (United States), and CE (Europe). |
| Compliance | Verifies adherence to 3GPP standards for mobile telecommunications protocols. Compliance certification is independent of firmware | PTCRB and GCF |
| Carrier | Evaluates a device’s interoperability and stability on specific networks. Unlike the other certifications, carrier certification requires submitting the device's firmware for testing, as network-specific behavior can be influenced by firmware revisions | Docomo and AT&T |
Certification requirements vary by market and carrier, making it essential to identify the appropriate ones for your deployment region. Soracom advises using devices with the relevant regulatory certifications for the region, PTCRB compliance certification, and carrier certifications for your target carriers. Carrier certifications are particularly critical for LPWAN deployments to ensure stability and interoperability.
Carrier certifications are tied to the device's radio behavior and not the SIM card in use. An AT&T-certified device retains its AT&T certification even when used with a Soracom IoT SIM card.
SIM Card
If you are using a device or modem that has a SIM card slot, your Soracom IoT SIM card should be inserted into the slot, making sure to follow the correct orientation indicated by the device or modem.
While Soracom IoT SIM cards are designed to easily withstand typical handling, they are not indestructible. When inserting a SIM card into your device or modem, take care to avoid using unnecessary force which could cause permanent damage and render the SIM card unusable.
Device Configuration
Access Point Name (APN) Settings
When a device or modem connects to a cellular network, the Access Point Name (APN) is used by the network to establish data connectivity. You will need to set up the APN setting on your device so that the local network operator can correctly route your device or modem's data connection to Soracom (some devices may not require all of these settings):
- Access Point Name -
soracom.io - Username -
sora - Password -
sora - Authentication Type -
PAPorCHAP - PDP Type -
IPorIPv4
Please ensure your device is configured to use IPv4. IPv6 is not supported by Soracom.
4G/LTE and newer devices are often able to automatically retrieve the soracom.io APN setting directly from the network. However, for 2G and 3G connections, the APN must be configured on the device in advance. In general, you should configure the APN setting whenever possible.
When a device uses a Soracom SIM to connect to a cellular network, Soracom will authenticate the device using credentials that are stored inside the SIM. In turn, the Username and Password settings can be treated as optional and omitted. However, these settings are provided in order to support devices that do not allow these settings to be omitted.
The process for configuring these settings will depend on your device. Some devices will allow you to enter these settings through a web admin UI or built-in app, while others may require the use of AT commands or SMS for configuration. Refer to your device's manual for instructions.
Data Roaming
In some cases, a device may block data connections as a preventative measure to avoid unexpected charges when it detects that the SIM used for the cellular connection is roaming on the local network operator. If your device has this type of feature, you will need to ensure that data roaming is enabled, otherwise your device will not be able to establish a data connection when using a Soracom IoT SIM.
Roaming is a standard process with Soracom IoT SIMs, and you can find data charges for each country on the Supported Carriers page.
SIM Activation
Finally, when your device attempts to connect to a cellular network, Soracom will check the SIM's Subscriber Status in order to determine whether or not your device should be allowed to connect, and will then approve or reject the connection accordingly. To connect to a cellular network, your SIM should be in one of the following statuses:
- Ready
- Active
- Standby
For more details about each status, refer to the Subscriber Status documentation.
Connection Process
Once your device is set up and configured, you can power it on in order to connect to a cellular network. In general, there are three main steps involved during the cellular connection process:
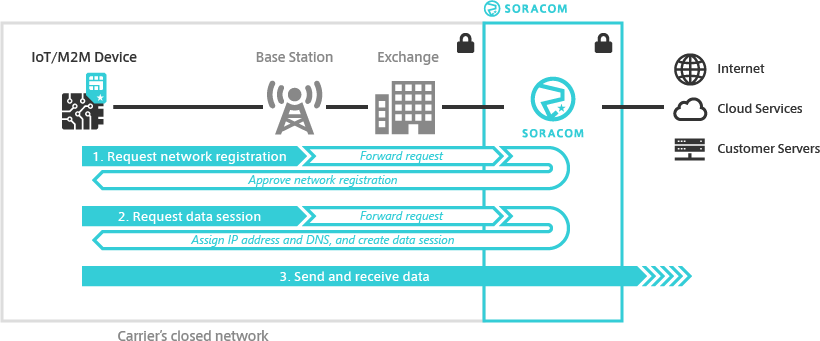
Requesting Network Registration
During the network registration process, a modem will first discover what networks are available in the vicinity of the device, and will attempt to communicate with a cellular network. This lets the network know that the device is located in the area, and to begin setting up the cellular connection. The network registration process consists of the following steps:
-
The modem scans for nearby radio towers and checks which network operators they belong to.
When using a brand new Soracom IoT SIM card, or when your device has moved from one country or region to another, this step may take several minutes to complete. The duration of this network scan procedure depends on several factors, such as how many radio technologies and frequency bands the modem needs to scan, and how many different network operators are in the area. It is important that the modem is not interrupted during this process, otherwise it may have difficulty continuing to the next step.
Note that while 3GPP-compliant modems should handle this process automatically, some devices may override the standard behavior and interrupt the modem if the modem has not finished registering in a short amount of time. If you notice that your device is having trouble registering to a network when using a new Soracom IoT SIM, or when moving between countries or regions, you may need to check with the device manufacturer if the device is mistakenly interrupting the network scan procedure.
-
For each network operator detected, the modem checks if it is allowed to register to the network. During this step, the network will request the subscriber (SIM) details from the modem, and then check with Soracom whether to allow or disallow network registration.
If the subscriber status is Suspended, Soracom will notify the local network that the subscriber is not allowed to register to the network, even if the local network is one of Soracom's supported carriers.
- Once the modem has found a suitable network where it is allowed to register, the modem will request network registration, and the local network will complete the registration process.
Once the modem has registered to a network, SMS and USSD services will be available (where supported). If using a device that shows network status information such as a gateway that reports the cellular network status, you should be able to see the name of the local network operator, as well as the signal strength.
However, at this stage, a data connection has not been established, so your device will not yet be able to send or receive data. On devices that show the network status, you may see an icon indicating that data communication is not available.
If your SIM's subscriber status is in the Ready or Standby status, Soracom will automatically change the status to Active as soon as your modem has registered to a network. While you should be able to check the User Console to see that the subscriber status has changed to Active, the data connection status will still appear as Offline at this point.
Requesting Data Session
Next, the modem will continue to the following steps in order to establish a data connection:
-
The modem sends a request to the local network operator to create a data session with the configured APN settings.
Typically this step should occur automatically. However, in some devices, if data roaming is disabled, the device will actively prevent the modem from sending this request.
-
The local network uses the APN details to forward the create data session request to Soracom.
-
Once Soracom receives the create data session request, Soracom will assign an IP address to the modem, send the IP address and DNS server details back to modem, and finish setting up the data connection.
When a session is created a subnet mask is not assigned by Soracom
Once the data session has been created, the modem will be able to begin sending and receiving data using the cellular connection.
At the same time, Soracom will update the subscriber status from Offline to Online, and you will be able to check this status from the User Console. Additionally a data session log will be recorded in the SIM's Session details.
Sending and Receiving Data
Finally, with a data connection established, your device can use the cellular connection provided by the modem to send and receive data:
-
Your device sends IP packets to the Soracom platform, a cloud endpoint, or other Internet service using the modem's cellular data connection, or receives IP packets in similar fashion.
- As data is transferred over the data connection, Soracom will record the data usage amount.
When sending or receiving data, you can check the data usage to help narrow down potential connectivity issues. For example, when your device sends data to a server but you are unable to see the data arriving at your server, the data usage history can give you a better idea of where an error may be occurring:
- If Soracom has not recorded any data usage, there may be an issue with the local network operator, such as poor signal or temporary local outage, which is preventing the IP packets from reaching Soracom.
- If Soracom has recorded data usage, there may be an issue with your server's firewall or other network routing which is preventing the IP packets from successfully reaching your server. You can then use the Soracom Peek service to capture the traffic as it passes through Soracom, which can help with checking for traffic that is blocked due to firewall or routing settings.