Users & Roles
Soracom Access Management (SAM) is a user and permission management feature that allows you to provide individuals in your organization or external applications with access to your Soracom account. SAM lets you assign granular permissions to users or external applications—so they can only perform the actions you allow—without sharing your Soracom root credentials.
For example, you can provide members of your technical department with full access to your Soracom account, and your accounting department with access only to billing and payment functions. You can also create users for external applications (for example, cloud services) to programmatically access your account and integrate SIM purchasing or lifecycle management with your own procurement and delivery systems.
Overview
SAM consists of the following components:
- Users - Individuals or external applications that are granted access to your Soracom account.
- Authentication Methods - The method by which a user signs in and authenticates themselves.
- Roles - A reusable set of Permissions which can be applied to one or more users. Roles are divided into two types:
- Soracom Managed Roles New - Standard roles in which the permissions are defined and managed by Soracom.
- Operator Managed Roles - Custom roles in which you define and manage the permissions.
- Permissions - A list of functions or actions (and optionally conditions) a user is or is not allowed to perform. Permissions are divided into three types:
- Default SAM User Permissions - Permissions that automatically apply to all users in your account.
- Role Permissions - Permissions defined in Soracom Managed Roles or Operator Managed Roles that apply to all users that have been given the role.
- Inline Permissions - Permissions that apply only to a specific user.
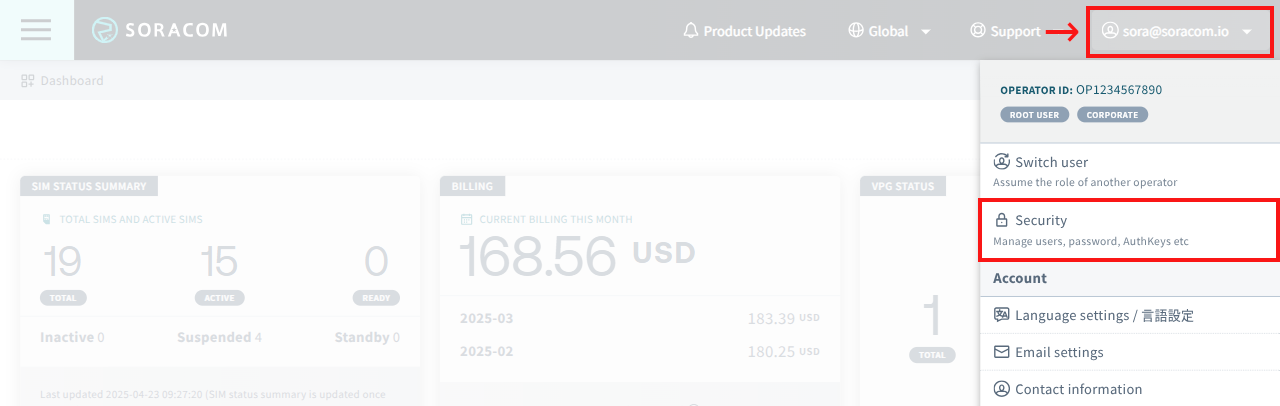
Except for Soracom Managed Roles, permissions are defined using Permission Statements. SAM users, authentication methods, roles, and permissions are managed from the Security screen. Sign in to the User Console. Click your account menu, then select Security.
You must be signed in to your Soracom account as the Root user (email address and password credentials), or as a SAM user (Operator ID, username, and password credentials) which has been given User:* and Role:* API permissions, in order to manage security settings.
Authentication Methods
A SAM user's Authentication Method is how the user will sign in and authenticate themselves. The following methods are available:
| Method | Can be used to access | Credentials |
|---|---|---|
| Password*1 | User Console, Soracom API, and Soracom CLI | Operator ID, Username, and Password |
| AuthKeys | Soracom API and Soracom CLI only | AuthKey ID and AuthKey Secret |
*1 - Password authentication can be combined with Multi-Factor Authentication to improve account security.
Each authentication method is optional. For example, you can create a user with only AuthKeys authentication, which will allow an external application access to your account using the Soracom API or CLI, but not the User Console.
If a user is expected to access both the User Console as well as the Soracom API or CLI, enabling both password and AuthKeys authentication provides the benefit of being able to revoke an AuthKey without affecting the user's ability to sign in to the User Console.
Permission Hierarchy
A SAM user's permissions can be defined through Default SAM User Permissions (applied to all users), Role Permissions (applied to specific users with a given role), or Inline Permissions (applied to a single user).
If a user's permissions consists of a combination of these definitions, a deny permission will always take precedence over any allow permission based on which API matches the permissions. For example:
| Default SAM User Permissions | Inline Permissions | Effect |
|---|---|---|
Access to Sim:listSims is set to deny |
Access to Sim:listSims is set to allow |
The user is not allowed to use the Sim:listSims API |
Access to Sim:listSims is set to allow |
Access to Sim:listSims is set to deny |
The user is not allowed to use the Sim:listSims API |
Access to * is set to allow |
Access to Billing:* is set to deny |
The user is not allowed to use any Billing:* APIs, however they can use all other APIs |
This behavior also applies when multiple roles are attached to a user, such as combining Soracom Managed Roles with Operator Managed Roles.
Limitations
- Each Soracom account is limited to a maximum of 100 SAM users.
- Each Soracom account is limited to a maximum of 20 Operator Managed Roles.
- Each SAM user is limited to a maximum of 2 AuthKeys.
If you require higher limits, contact us.
Users
You must be signed in to your Soracom account as the Root user or as a SAM user which has been given User:* permissions in order to manage users.
Creating a SAM User
When creating a new SAM user, all authentication methods are disabled by default for security. After creating a user, follow the next steps to set up an authentication method for the user.
-
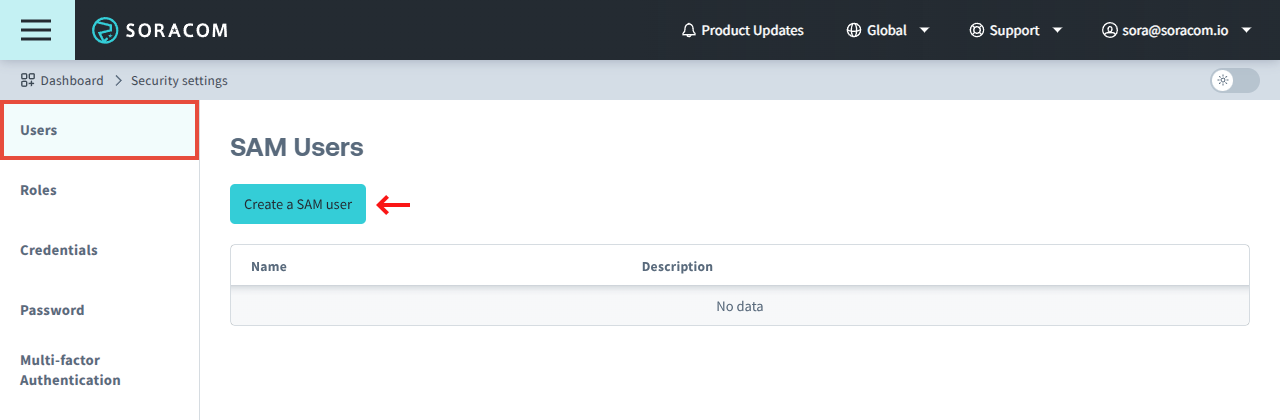
Open your account menu, click Security, then select the Users tab.
-
Click the Create a SAM user button.
-
Enter a unique Username for the SAM user. This username will be used to sign in to the User Console or access the Soracom API. You can also add a Description to help identify this user.
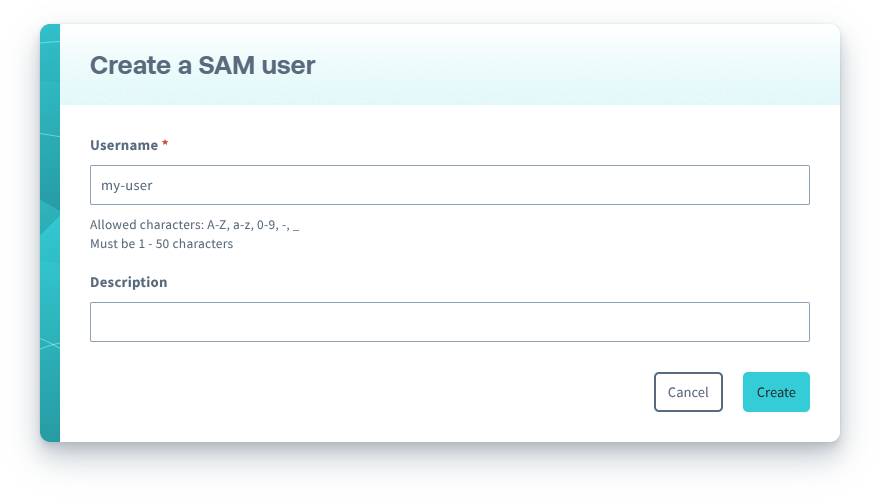
Click the Create button.
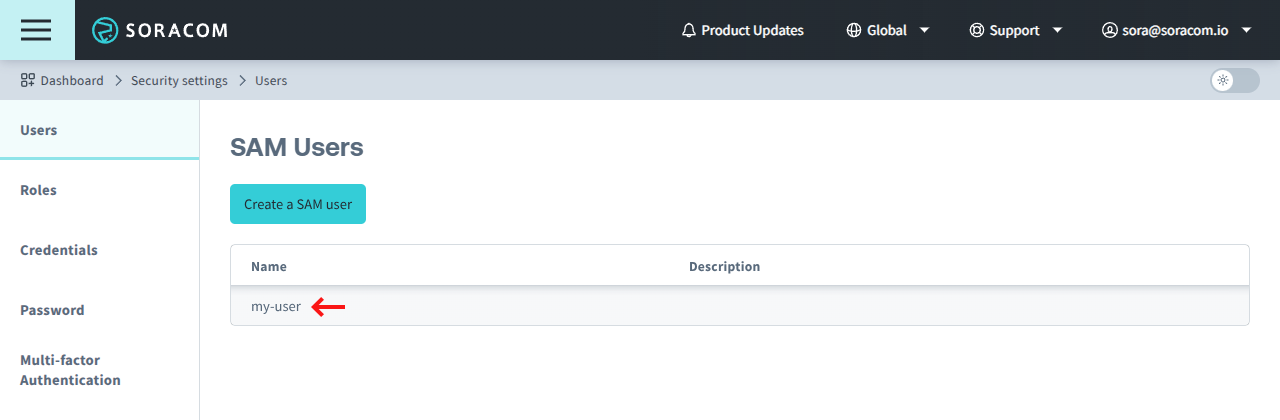
The user will appear in the list of SAM Users.
Enabling Password Authentication
-
Click the Name of the SAM user you want to manage.
-
From the SAM user settings page, select the Authentication tab.
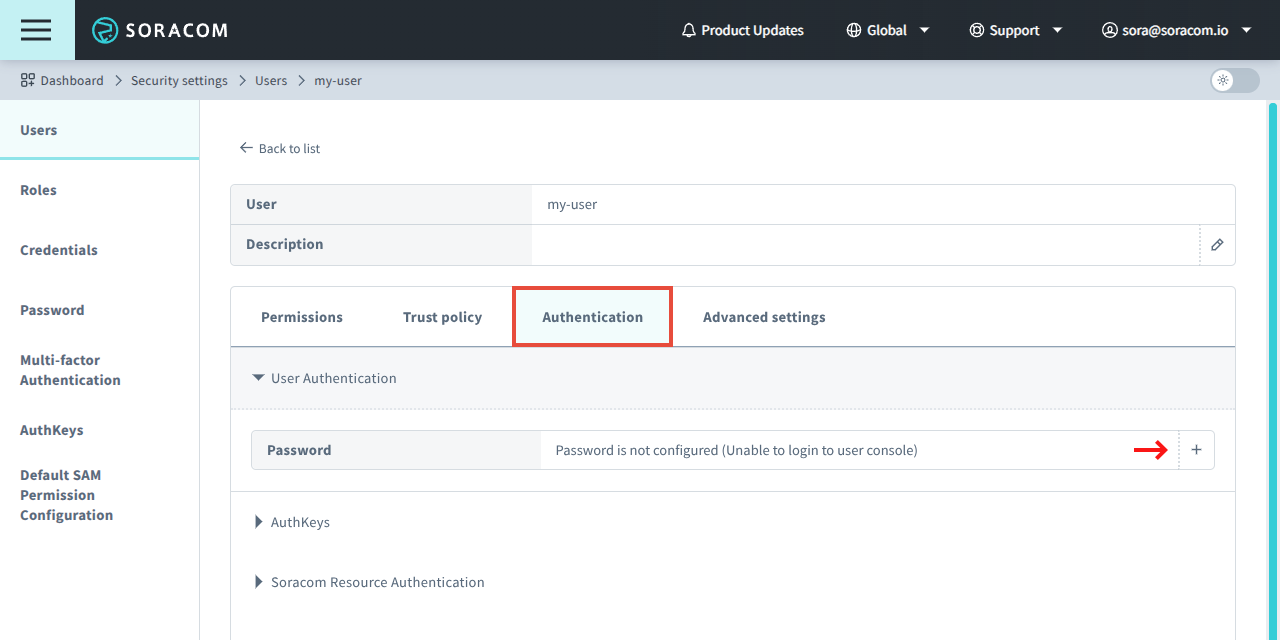
- From the User Authentication panel, click to set a password. Then follow the prompt to create a password for the SAM user.
Once a password has been created, an individual will be able to sign in to the User Console using the Operator ID of the Soracom account, their SAM username, and the specified password. For convenience, a sign in URL will be displayed once a password has been created.
Changing a SAM User Password
You must be signed in to your Soracom account as the Root user or as a SAM user with User:updateUserPassword permissions. These steps apply when changing another user's password. To change your own password, refer to Changing Your Password.
-
Open your account menu, click Security, then select the Users tab.
-
Click the Name of the SAM user whose password you want to change.
-
From the SAM user settings page, select the Authentication tab.
-
From the User Authentication panel, click next to the password.
-
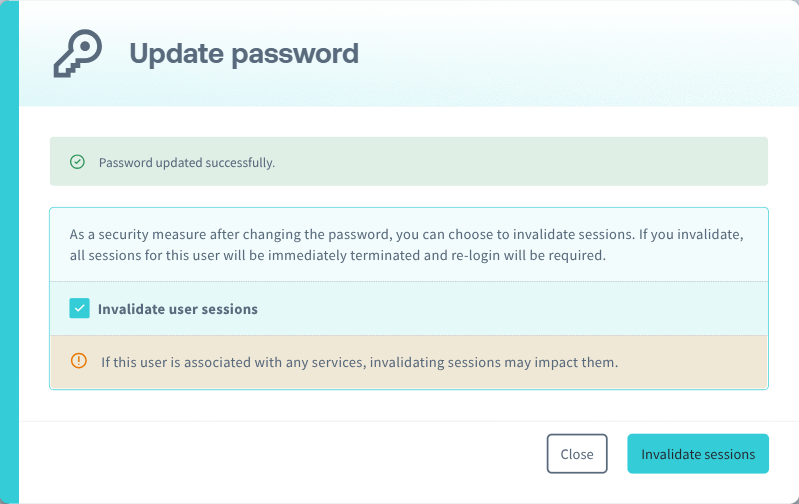
In the Update password dialog, enter and confirm a new Password, then click Update.
-
After the password is updated, choose whether to invalidate the SAM user's existing sessions:
- To leave existing sessions valid until they expire normally, click Close.
-
To immediately end the SAM user's existing User Console and API sessions, check Invalidate user sessions, then click Invalidate sessions. The user must sign in again before they can continue using the User Console or making API calls.
When you change your own password, whether you are signed in as the Root user or as a SAM user, Invalidate sessions is not shown and your other active sessions are not invalidated. To invalidate your own sessions, sign out of all browsers and API clients manually.
Removing a SAM User Password
You must be signed in to your Soracom account as the Root user or as a SAM user with User:updateUserPassword permissions. Removing a password disables password authentication for the SAM user; AuthKeys authentication (if any) is unaffected.
Once the password is removed, the SAM user can no longer sign in to the User Console. To allow the user to sign in again, set a new password. Refer to Enabling Password Authentication.
-
Open your account menu, click Security, then select the Users tab.
-
Click the Name of the SAM user whose password you want to remove.
-
From the SAM user settings page, select the Authentication tab.
-
From the User Authentication panel, click next to the password.
-
In the confirmation dialog, confirm the removal.
-
After the password is removed, choose whether to invalidate the SAM user's existing sessions:
- To leave existing sessions valid until they expire normally, click Close.
-
To immediately end the SAM user's existing User Console and API sessions, check Invalidate user sessions, then click Invalidate sessions. The user must sign in again before they can continue, either using a remaining authentication method such as AuthKeys or after a password is set again.
Enabling AuthKeys Authentication
-
Click the Name of the SAM user you want to manage.
-
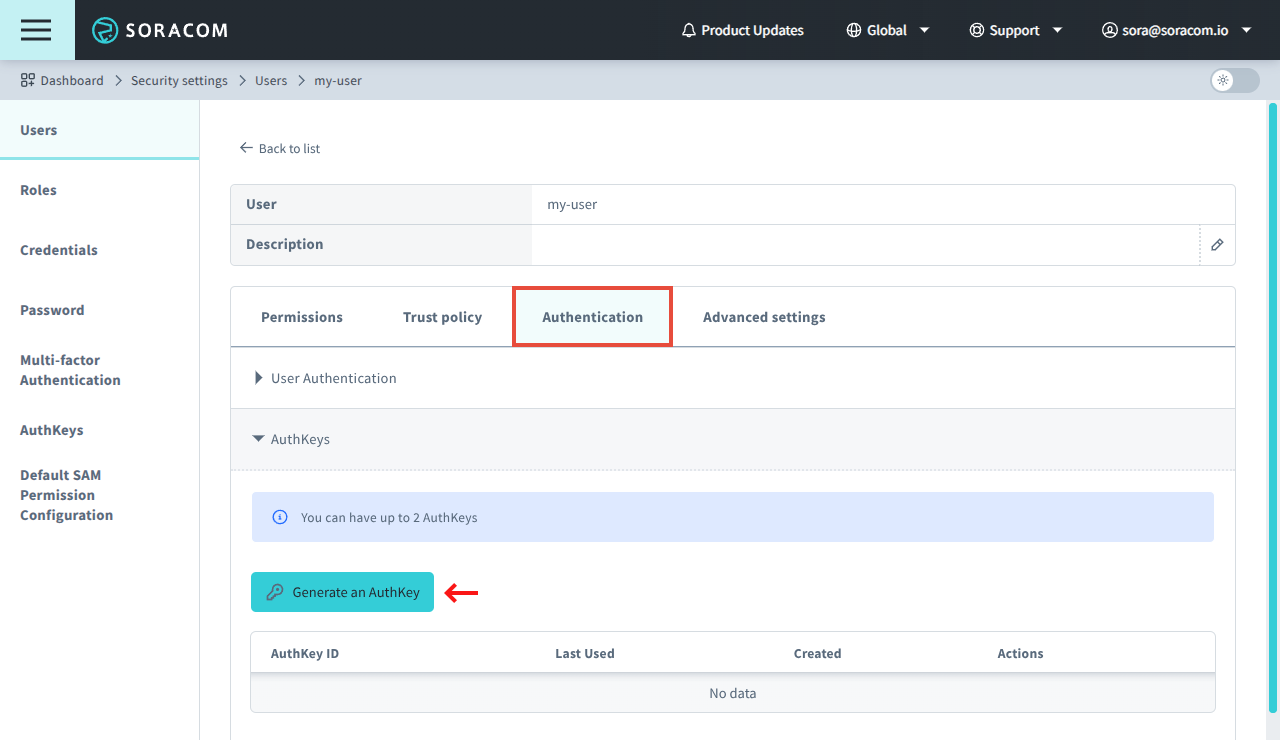
From the SAM user settings page, select the Authentication tab.
-
From the AuthKeys panel, click Generate an AuthKey to create a new AuthKey.
An AuthKey ID and AuthKey Secret key pair will be automatically generated.
When generating a new AuthKey, the AuthKey Secret will only be shown once. Ensure that you save the secret key in a secure location. If you lose the secret key, you will need to generate a new AuthKey.
Roles
You must be signed in to your Soracom account as the Root user or as a SAM user which has been given Role:* permissions in order to manage roles.
Some Role APIs include a username parameter which can be used to limit a SAM user to managing their own user (or specific users) and not others. Refer to API Parameters and Wildcards and Conditional Permissions sections below.
Attaching a Soracom Managed Role
Soracom provides several pre-defined roles with permissions suitable for typical organizational and departmental requirements, such as engineering, accounting, procurement, and operations. These roles can be attached to a SAM user without the need to create Operator Managed Roles and defining Permission Statements.
Although Soracom Managed Roles cannot be modified, they can be combined with other roles, including Operator Managed Roles. For example, to allow a user full access to manage SIMs but restrict their ability to use Soracom Napter to remotely access devices, you can attach the SIMFullAccess Soracom Managed Role, then create and attach an Operator Managed Role to deny access to the Napter PortMapping:* APIs.
-
Open your account menu, click Security, then select the Users tab.
-
Click the Name of the SAM user you want to manage.
-
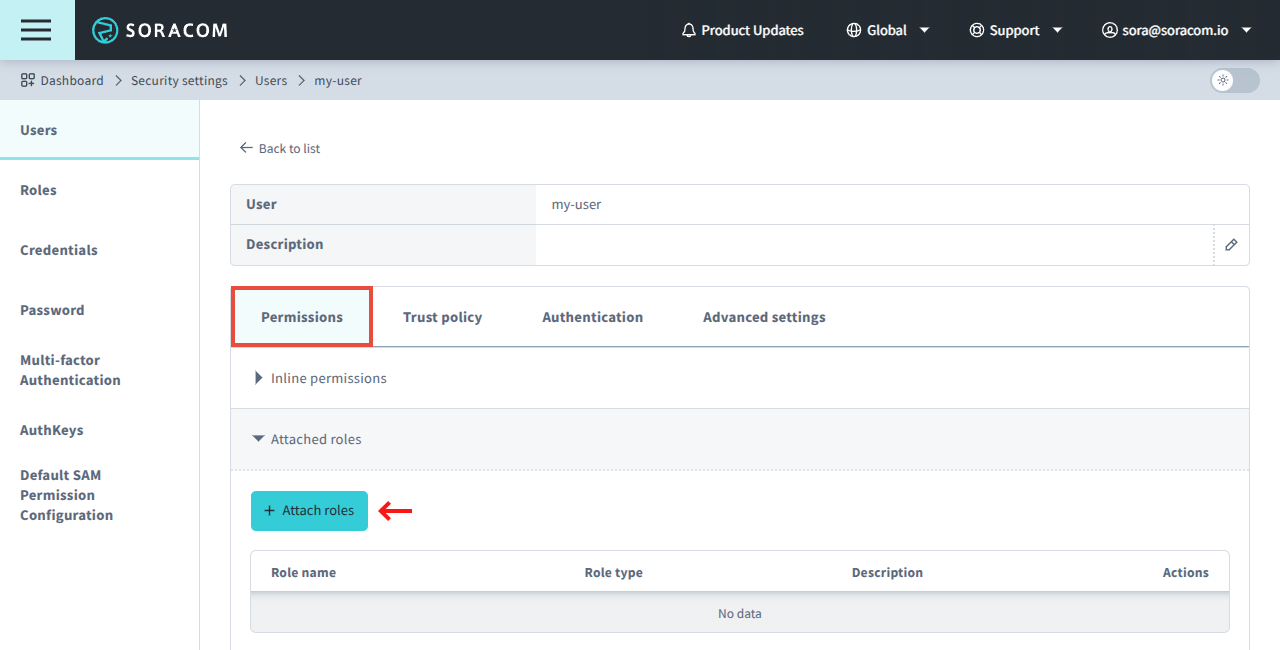
From the SAM user settings page, select the Permissions tab. Then from the Attached roles panel, click the Attach roles button.
-
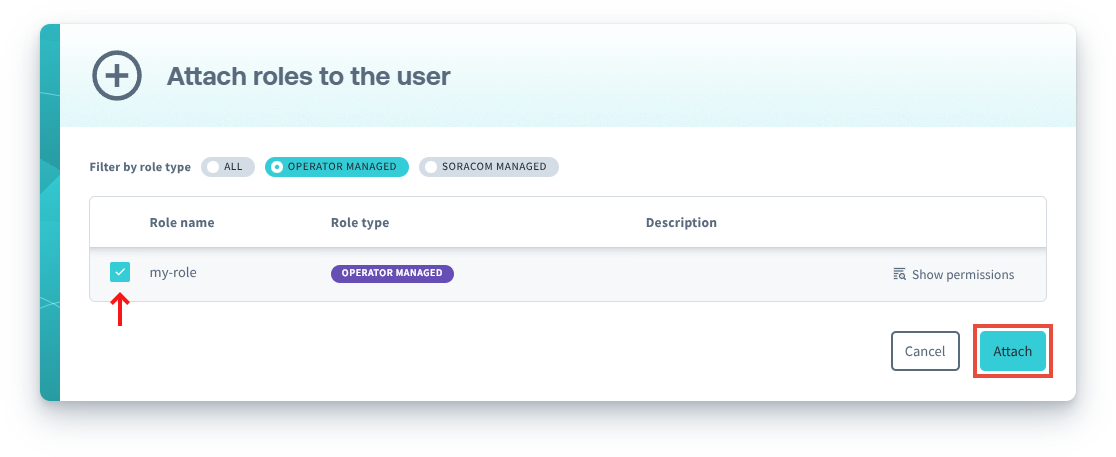
Select the role(s) you want to attach to the SAM user, then click the Attach button.
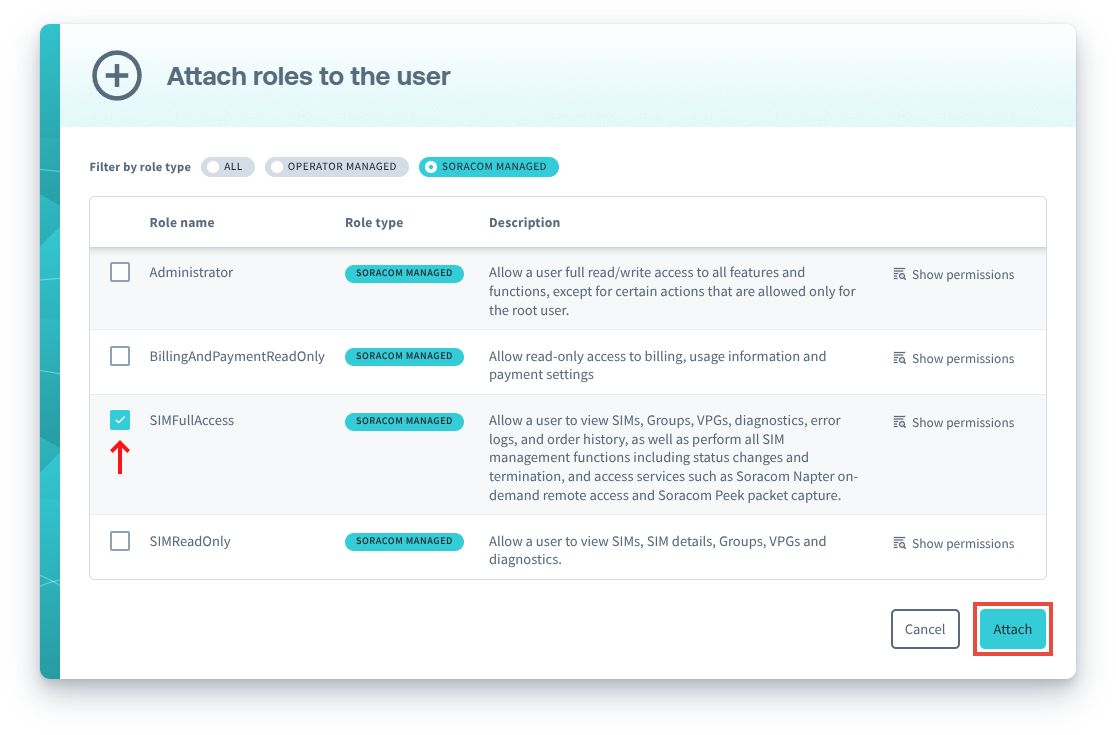
Soracom Managed Roles are displayed with a Soracom Managed label, and you can use the corresponding filter to show only these roles.
You can also click the Show Permissions button to review the permissions that will be applied to the user.
Roles can be removed from a user by clicking the Detach button.
Soracom Managed Role Version History
Soracom Managed Roles are automatically updated by Soracom. When a role's permissions are updated, a new version is created and automatically applied to users with the role.
You can view the version history of Soracom Managed Roles in order to confirm which permissions have been updated:
-
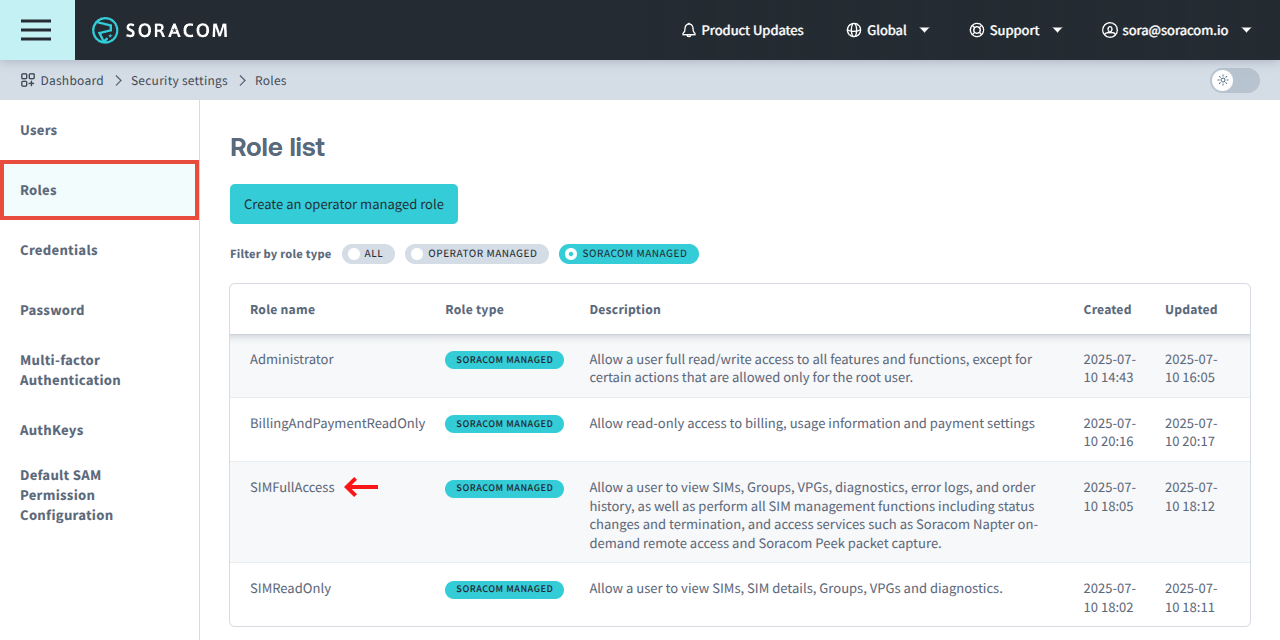
From the Security screen, select the Roles tab.
-
Click Soracom Managed filter to display Soracom managed roles, then click the role you want to view.
-
In the Permissions tab, click a version to see its permissions.

Creating an Operator Managed Role
-
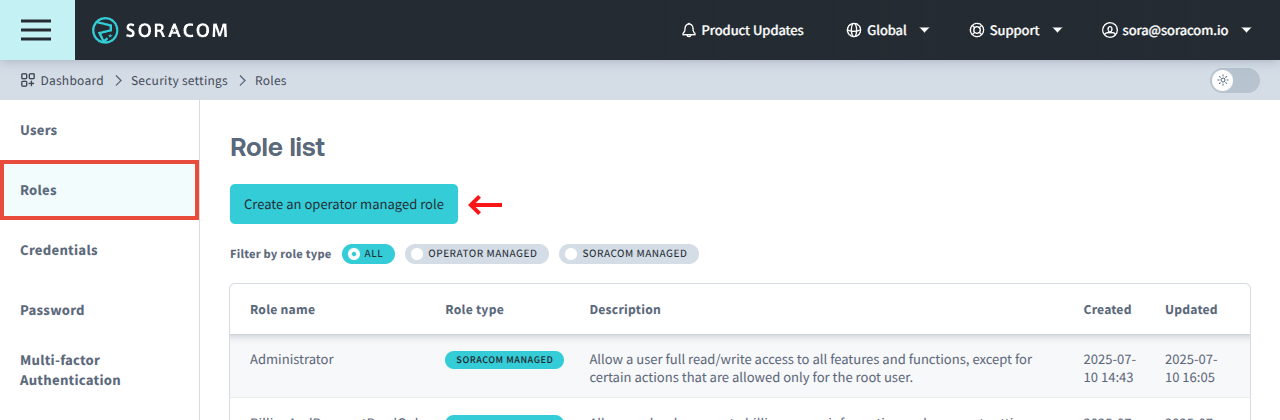
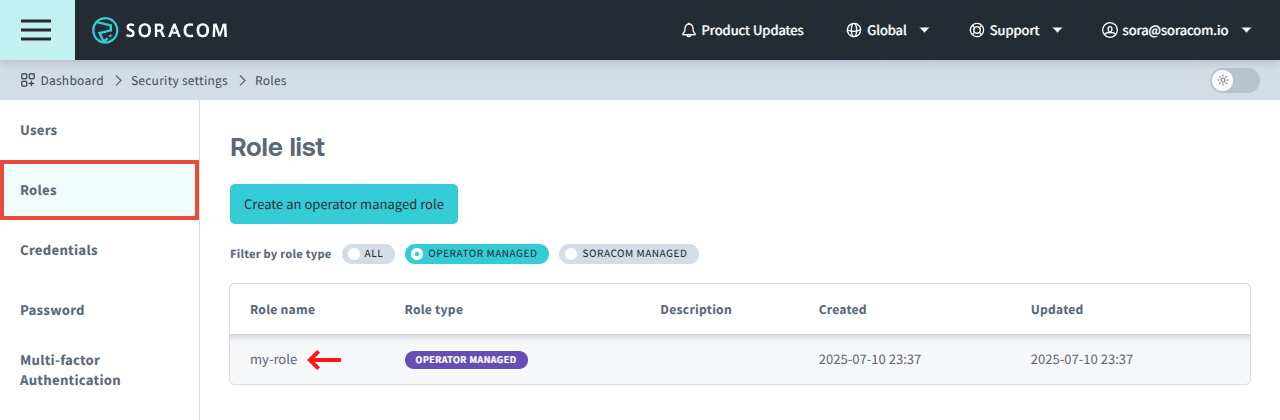
From the Security screen, select the Roles tab. Then click the Create an operator managed role button.
-
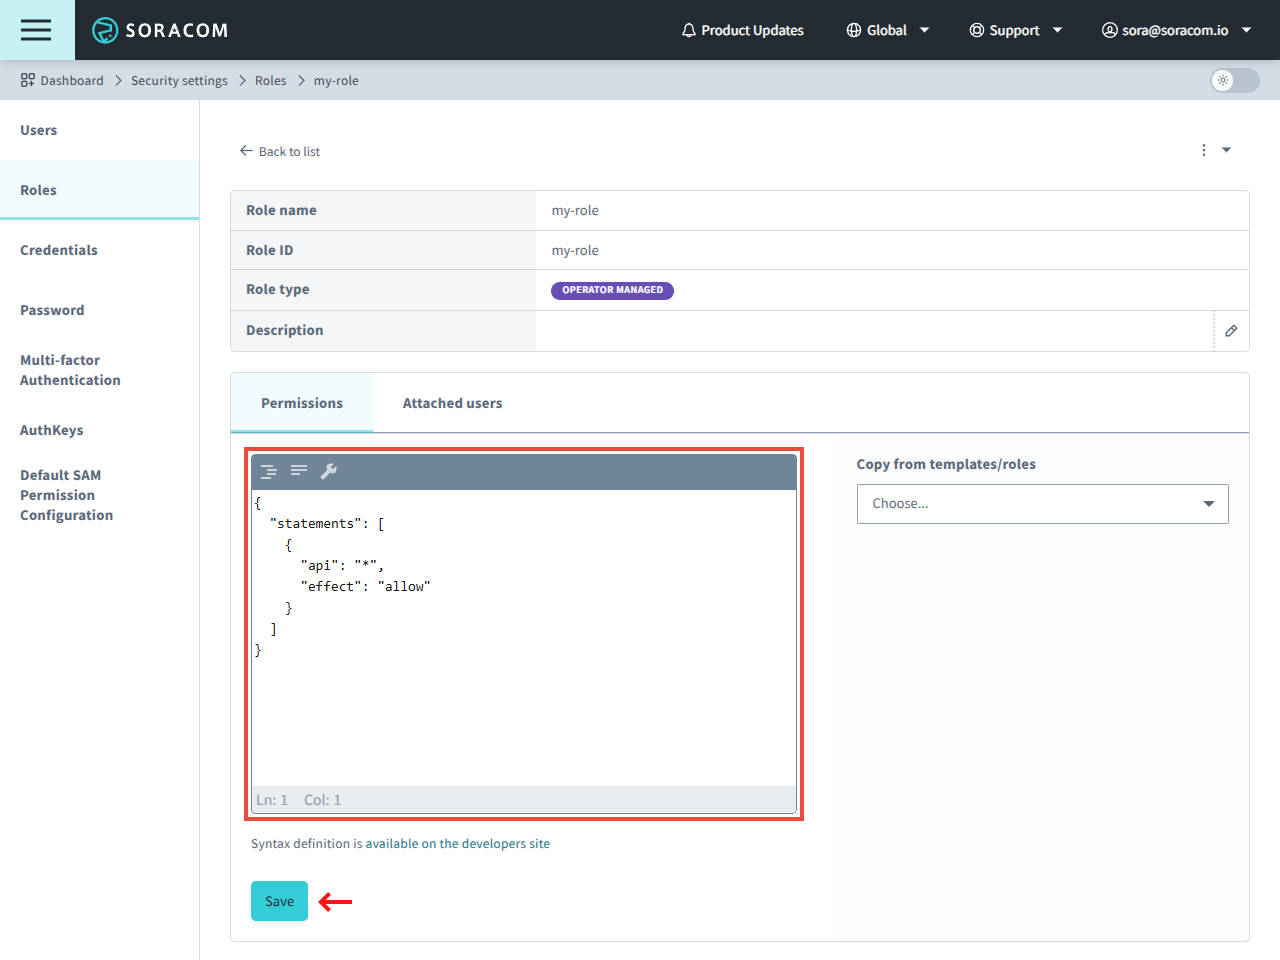
Enter a name for the role, and optionally a Description to identify the role. Then enter the Permissions using the Permission Statement format, and click the Save button.
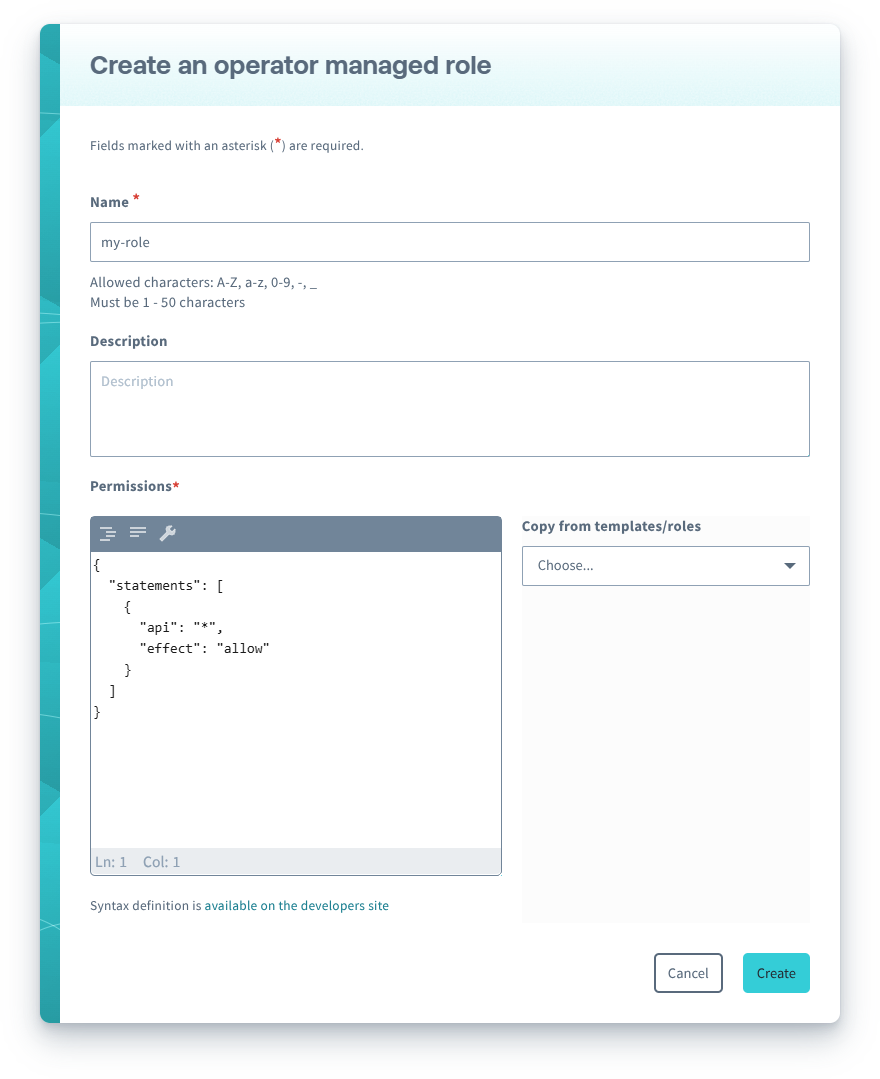
You can copy permissions from a Soracom Managed Role or another Operator Managed Role into your clipboard by clicking the Copy from templates/roles menu, selecting a role, and clicking Copy to clipboard to copy the configuration.
Attaching an Operator Managed Role
Once a role has been created, it can be attached to a SAM user:
-
Open your account menu, click Security, then select the Users tab.
-
Click the Name of the SAM user you want to manage.
-
From the SAM user settings page, select the Permissions tab. Then from the Attached roles panel, click the Attach roles button.
-
Select the role(s) you want to attach to the SAM user, then click the Attach button.
Operator Managed Roles are displayed with an Operator Managed label, and you can use the corresponding filter to show only these roles.
You can also click the Show Permissions button to review the permissions that will be applied to the user.
Roles can be removed from a user by clicking the Detach button.
To delete a role, you need to detach the role from all attached SAM users.
Permissions
Once a SAM user authentication method has been enabled, an individual or external application will be able to access the Soracom User Console, Soracom API, or Soracom CLI. However, by default, that user will not have any permissions and therefore will not be allowed to perform any actions.
You can add Permissions to SAM users in order to allow or deny access to different parts of the User Console, API, or CLI. Permissions are defined using one of the following:
- Default SAM User Permissions - Permissions that automatically apply to all users in your account.
- Role Permissions - Permissions defined in Soracom Managed Roles or Operator Managed Roles that apply to all users with the given role.
- Inline Permissions - Permissions that apply only to a specific user.
Soracom Managed Roles cannot be modified. If you need to customize the permissions in a role, use Operator Managed Roles instead.
Configuring Default SAM User Permissions
You must be signed in to your Soracom account as the Root user in order to manage Default SAM User Permissions.
-
From the Security screen, select the Default SAM User Permission Configuration tab.
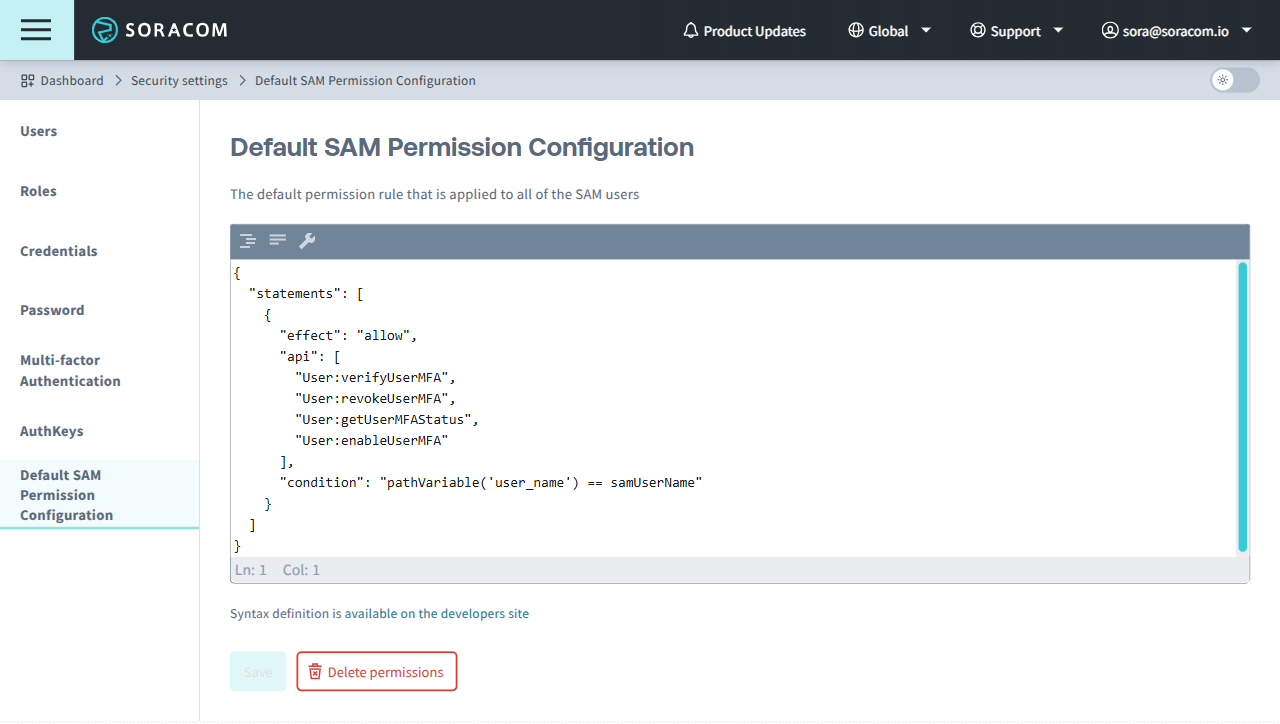
- Enter the Permissions to apply to all users using the Permission Statement format, then click the Save button.
Once the default permissions have been modified, they will apply to all SAM users in your account with no further configuration required. However, any signed-in SAM users will need to sign out and sign in again in order for the new default permissions to take effect.
Configuring Operator Managed Role Permissions
You must be signed in to your Soracom account as the Root user or as a SAM user which has been given Role:* permissions in order to manage Operator Managed Role Permissions.
Operator Managed Role Permissions are typically configured when creating an Operator Managed Role.
If you need to modify the permissions of an existing Operator Managed Role:
-
From the Security screen, select the Roles tab. Then click the Role name of the role you want to manage.
-
Update the Permissions using the Permission Statement format as needed, and click the Save button.
Configuring Inline Permissions
You must be signed in to your Soracom account as the Root user or as a SAM user which has been given User:* permissions in order to manage Inline Permissions.
Some User APIs include a username parameter which can be used to limit a SAM user to managing their own user (or specific users) and not others. Refer to API Parameters and Wildcards and Conditional Permissions sections below.
-
Open your account menu, click Security, then select the Users tab.
-
Click the Name of the user you want to manage.
-
From the SAM User settings page, select the Permissions tab.
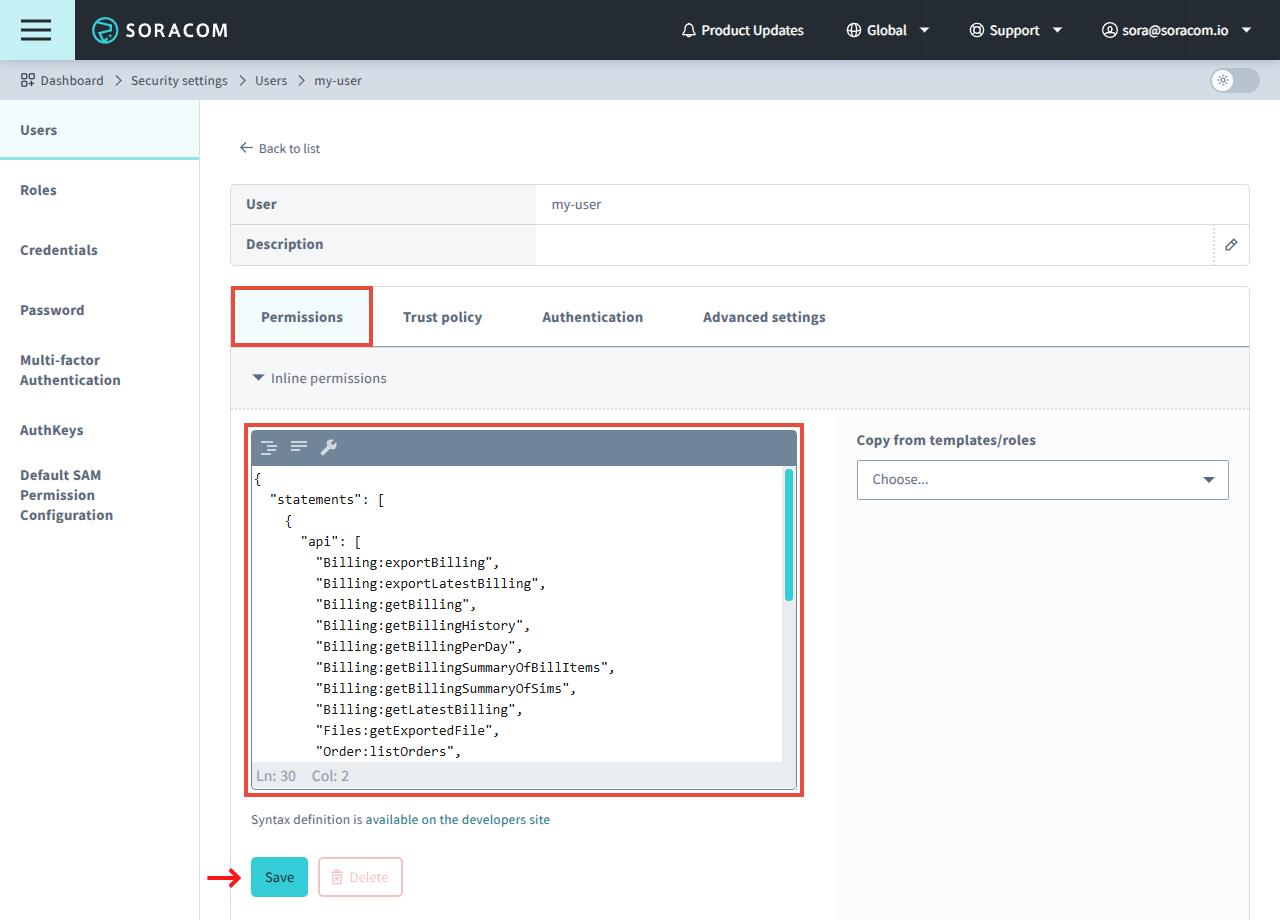
- In the Inline permissions panel, enter the Permissions using the Permission Statement format, and click the Save button.
Permission Statements
Permission Statements define the specific API(s) that a user (or a user with a particular role) should or should not be allowed to access. Permission statements use a JSON format which looks like this:
{
  "statements": [
    {
      "effect": "allow",
      "api": ["Sim:list*", "Group:*"],
      "condition": "currentDate >= date(2016, 02, 01) and ipAddress('10.0.0.1/24')"
    }
  ]
}
Each permission statement includes the following parameters:
- statements (array of objects, required) - An array of statement objects, each containing:
- effect (string, required) - Define whether this permission should
allowordenyaccess to the specified API(s). - api (string or array of strings, required) - The API(s) which should be included in this permission. The asterisk
*symbol can be used as a wildcard to match multiple APIs. - condition (string, optional) - An expression to be evaluated in order to determine if a requested API should match the permission statement.
- effect (string, required) - Define whether this permission should
API Parameters and Wildcards
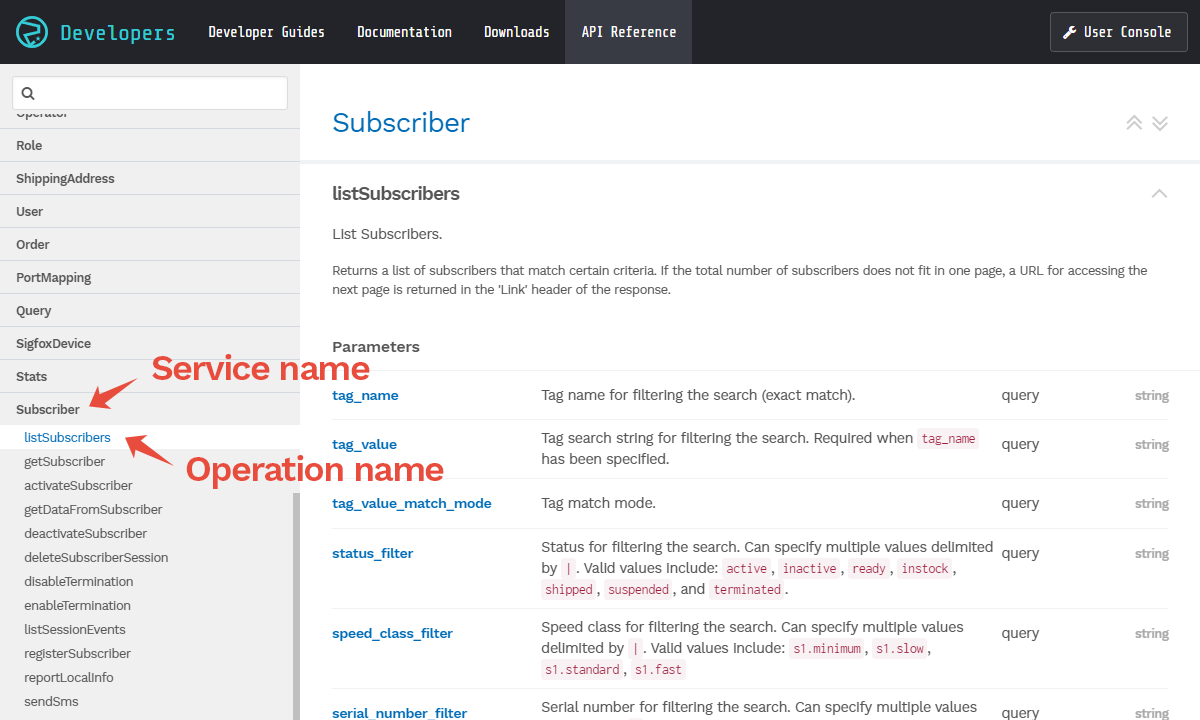
Each permission statement must include one or more API paths, with each path specified using the following format: Service:Operation.
The Service and Operation names are defined according to the Soracom API. You can find all available service and operation names using the API Reference.
To specify a single API in a permission statement, simply use the full service and operation name in the API path parameter. For example:
"api": "Sim:listSims",You can use the * wildcard in order to match multiple APIs. For example,
"api": "Sim:list*",will match both the Sim:listSims, Sim:listSimSessionEvents, and Sim:listSimStatusHistory APIs.
You can also use the * wildcard to match all operations within a service. Setting:
"api": "Sim:*",will match all APIs underneath Sim.
Similarly,
"api": "*",will match all APIs.
Even if a SAM user has been given permission to access all APIs, root account level operations, such as changing the root account email or password, cannot be performed.
The api parameter can also be defined using an array of strings, with each string following the same Service:Operation format. This can be used to simplify the permission statement for multiple APIs. For example:
"api": ["Sim:list*", "Group:*"],will match Sim:listSims, Sim:listSimSessionEvents, Sim:listSimStatusHistory, as well as all operations within Group.
Conditional Permissions
In some cases, it is useful to allow or deny access to a particular API on a conditional basis, such as based on the IP address of the user accessing the API, the SIM ID of the SIM, or even the username of the SAM user.
By setting the condition parameter of a permission statement, the specified expression will be evaluated in order to determine if the requested API matches the statement, and if so, to apply the allow or deny effect to the request.
Each condition expression may contain a variable, function, placeholder, or static value, and will be evaluated using comparison or arithmetic operators. Multiple expressions may be combined using logical operators.
Operators
- Comparison operators
eqor==- Values must be equal.neor!=- Values must not be equal.ltor<- The first value must be less than the second value.leor<=- The first value must be less than or equal to the second value.gtor>- The first value must be greater than the second value.geor>=- The first value must be greater than or equal to the second value.matches- The first value must match a regular expression defined in the second value.
- Logical operators
and- Two expressions must be trueor- At least one expression must be truenotor!- An expression must not be true
- Arithmetic operators
+- Addition-- Subtraction*- Multiplicationdivor/- Divisionmodor%- Modulus
Variables
When an API request is made, the details of the API request itself can be used to determine whether a permission should be applied.
- currentDate - The UTC date of the API request, in
yyyyMMddformat. Use with the date() function."condition": "currentDate >= date(2016,01,27)" - currentDateTime - The UTC date and time of the API request, in
yyyyMMddHHmmssformat. Use with the dateTime() function."condition": "currentDateTime >= dateTime(2016,01,27,15,00,00)" - sourceIp - The source IP address of the API request. Can be used with a static string:
"condition": "sourceIp == '10.0.0.1'"Or with a regular expression using
matches:"condition": "sourceIp matches '10\.0\.0.*'"When using the ipAddress() function, sourceIp does not need to be specified in the expression.
- httpMethod - The HTTP method (
GET,POST,PUT, orDELETE) of the API request. Use with a static string:"condition": "httpMethod == 'GET'"When using the httpMethod() function, httpMethod does not need to be specified in the expression.
- samUserName - The username of the SAM user used to call the API. Can be used with a static string:
"condition": "samUserName == 'my-user'"Or combined with a placeholder:
"condition": "samUserName == pathVariable('user_name')"
Functions
In order to simplify common or repetitive conditions, several helper functions are available in order to reduce condition complexity or verbosity. Note that some functions will return a boolean value, while others will return a string value that should be combined with a comparison operator.
- date(yyyy, MM, dd) - Creates a date object that can be used to evaluate against the currentDate variable.
- dateTime(yyyy, MM, dd, HH, mm, ss) - Creates a datetime object that can be used to evaluate against the currentDateTime variable.
-
ipAddress(CIDR range, ...) - Returns true if the API client source IP address falls within one of the specified CIDR ranges. Each CIDR should be specified as a string in CIDR notation, such as:
"condition": "ipAddress('10.0.0.1/24')"Multiple CIDR ranges can be specified using additional parameters, and will return true as long as the API client source IP address falls within at least one of the specified CIDR ranges:
"condition": "ipAddress('10.0.0.1/24', '10.0.0.2/24', '2001:db8:1234::/48', '2001:db8:abcd::/48')" - httpMethod(method, ...) - Returns true if the HTTP method used for the API request matches one of the specified methods. Each method should be specified as a string, such as:
"condition": "httpMethod('GET')"Multiple methods can be specified using additional parameters, and will return true as long as the HTTP method used for the API request matches one of the specified methods:
"condition": "httpMethod('GET', 'POST')" - pathVariable(placeholder) - Returns a string of the API request path specified by the placeholder, which can then be used to evaluate a comparison against a variable or a static string. Refer to the Placeholders section below.
Placeholders
In some cases, you may want to evaluate a conditional expression based on the API path rather than the request itself. As API paths are dynamic and vary based on the target resource (such as the SIM ID of a SIM card, or the username of a SAM user), the pathVariable() function can be used to extract a part of the API path in order to evaluate a conditional expression.
Many Soracom APIs will include one or more path variables, with each variable identified by a placeholder name. You can find path variables and placeholder names using the API Reference.
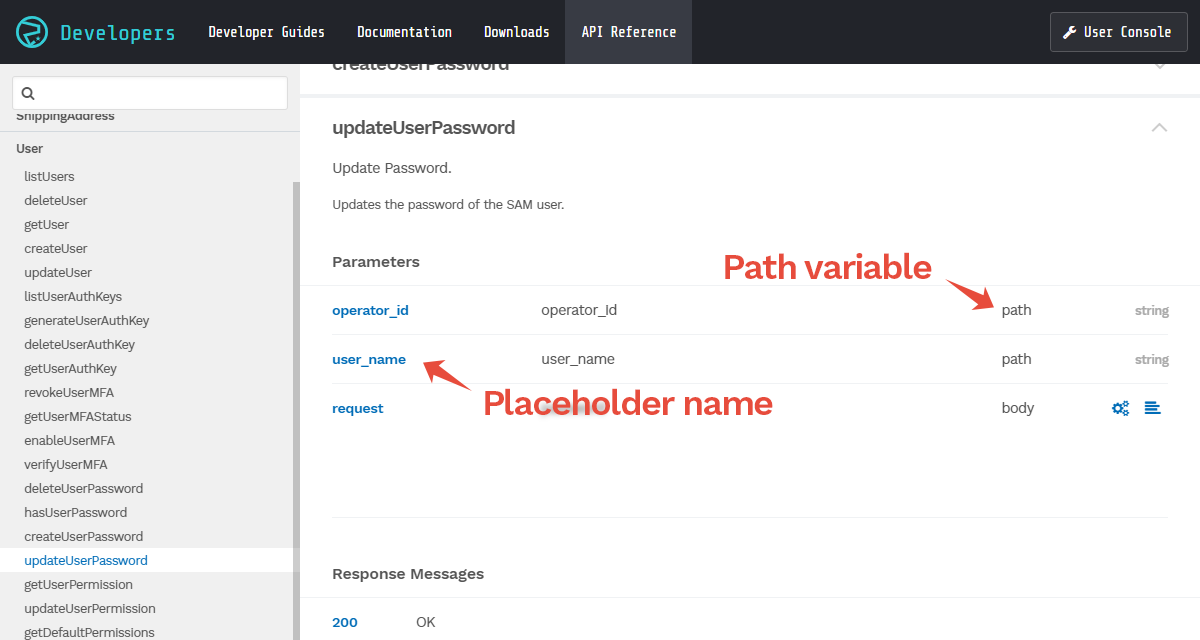
By passing the placeholder name as a string into the pathVariable() function, the string value of that portion of the API request path will be returned to the conditional expression.
For example, the Sim:updateSimSpeedClass API has an API path of /sims/{sim_id}/update_speed_class. If a SAM user accesses this API for a SIM card with SIM ID 8942300000012345678, the API path of the request will be /sims/8942300000012345678/update_speed_class.
We can use the sim_id placeholder name in order to retrieve the value from the API path:
"condition": "pathVariable('sim_id') == '8942300000012345678'"The pathVariable() function will extract the sim_id from the API path, and then we can compare it against a static string to determine whether a permission should be applied.
In this example, if a SAM user does not have other permissions, the following inline permission statement:
{
  "statements": [
    {
      "effect": "allow",
      "api": "Sim:updateSimSpeedClass",
      "condition": "pathVariable('sim_id') == '8942300000012345678'"
    }
  ]
}
will allow the SAM user to update the speed class for the specified SIM card, but not for other SIMs.
In some cases, you may want to evaluate a variable in the API path against a variable in the API request.
For example, the User:updateUserPassword API has an API path of /operators/{operator_id}/users/{user_name}/password. If a SAM user accesses this API for a SAM user with username my-user, the API path of the request will be /operators/OP0012345678/users/my-user/password.
If we want to allow a SAM user the ability to change their own password but not the password of other SAM users, we can check that the user_name placeholder matches a particular value:
"condition": "pathVariable('user_name') == 'my-user'"However, the static string 'my-user' will need to change for every user, and when managing a large number of SAM users, setting a custom permission for each account is tedious.
Instead, we can evaluate against the samUserName variable:
"condition": "pathVariable('user_name') == samUserName"This will ensure that the SAM user creating the API request and the SAM user that will be modified according to the request must match, regardless of the actual username.
We can then simply add the following permission statement:
{
  "statements": [
    {
      "effect": "allow",
      "api": "User:updateUserPassword",
      "condition": "pathVariable('user_name') == samUserName"
    }
  ]
}
to the Default SAM User Permission configuration, which will then be applied to all SAM users.