Harvest Data Options
Harvest Data provides the following options:
- Category : Set a category name for the data to be stored in Harvest Data.
- Batch Write : Send multiple data points with a single command from a device.
- Overwrite Timestamp with Payload Data : Set an arbitrary timestamp for data sent from the device.
Batch Write is always enabled together with Overwrite Timestamp with Payload Data. However, Overwrite Timestamp with Payload Data can be enabled without Batch Write.
Category
By assigning a category name to your data, you can later filter and retrieve it based on that category.
Batch Write
Send multiple data points to Harvest Data in a single command by enabling Batch Write. This approach can help reduce power consumption on the cellular module and extend the device's battery life.
Enabling Batch Write
- Sign in to the User Console. From the Menu, expand Soracom Air for Cellular and select Groups.
-
Select a group.
For more information on creating and managing groups, see Managing Groups.
- Expand Soracom Harvest Data and toggle the switch to on.
-
Toggle Batch Write to on.
This will automatically enable Overwrite Timestamp with Payload Data.
JSON Pointer to Data Array: Specify the JSON Pointer that identifies the data array in the payload (e.g.,
/data). -
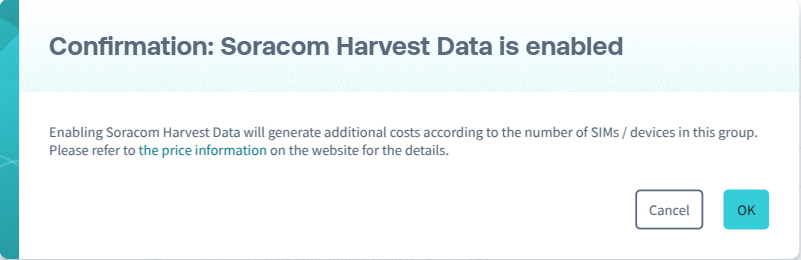
Click Save.
A confirmation dialog will be displayed:
Configuring JSON Pointer to Data Array
A JSON Pointer is a standardized syntax for identifying a specific value within a JSON document (RFC 6901).
For example, set the JSON Pointer to /data if your device sends data in the following format:
{
    "data": [
        {"time": "2025-03-24T00:00:00Z", "temperature": 15.5},
        {"time": "2025-03-25T00:00:00Z", "temperature": 15.4}
    ]
}
All data in the array must include a timestamp value in one of the supported timestamp formats that can be parsed by enabling Batch Write and Overwrite Timestamp with Payload Data.
To send the entire data array without modifications, enable Batch Write and leave the JSON Pointer to Data Array field blank. This will reference the entire JSON object.
Limitations
- Multiple write requests will be made according to the number of data items included in the array, and these requests may incur data fees. Refer to the Pricing & Fee Schedule for more details.
- Up to 100 different data points can be sent in a single data transmission.
- The Batch Write feature is always used together with Overwrite Timestamp with Payload Data.
- The value in the
x-soracom-timestampheader will be ignored when Batch Write is enabled.x-soracom-timestampis a custom HTTP header used to set an arbitrary time as the data timestamp. See the Examples for more details. - Do not include duplicate timestamps in a single data array. If duplicate timestamps are present, only one will be saved while other duplicates will be ignored, returning the response status code
207 Multi-Status.
Overwrite Timestamp with Payload Data
Normally, the timestamp of data in Harvest Data is the time when the data is saved in Harvest Data. This default behavior can be overridden by using the timestamp included in the transmitted payload data.
- Overwrite Timestamp with Payload Data: Enable this option to use the timestamp from the payload data instead of the default timestamp.
- Payload Format: Specify the format of your data. Currently, only JSON is supported for timestamp overwriting. When this option is enabled, Harvest Data always processes the payload as JSON, even when data is sent over TCP or UDP. Non-JSON payloads cannot be used with timestamp overwriting.
- JSON Pointer to Timestamp: Provide the JSON Pointer that identifies the timestamp in the payload (e.g.,
/time). - Format: Choose the format of your timestamps from Date/Time (ISO-8601), Unix Time (seconds), or Unix Time (milliseconds).
Configuring JSON Pointer to Timestamp
A JSON Pointer is a standardized syntax for identifying a specific value within a JSON document (RFC 6901).
For example, set the JSON Pointer to /time if the device sends data as shown below.
{
  "temperature": 12.3,
  "humidity": 45.6,
  "time": "2025-03-24T12:34:56.789Z"
}
When used together with Batch Write, the JSON Pointer should be relative to each data item, not to the root of the JSON document. For example, set the JSON Pointer to /time if the device sends data as shown below. JSON Pointers such as /data/0/time and /data/1/time are not valid.
{
  "data": [
    {"time": "2025-03-24T00:00:00Z", "temperature": 15.5},
    {"time": "2025-03-25T00:00:00Z", "temperature": 15.4}
  ]
}
Date and time cannot be used as a timestamp if the values are split into multiple properties.
For example, the following format is not supported because the date and time are in separate properties:
{
"temperature": 12.3,
"humidity": 45.6,
"date": "2025-03-20",
"time": "12:34:56.789"
}
The timestamp must be contained in a single property.
Choosing Timestamp Format
There are three formats available to parse the time values in the JSON document.
- ISO 8601 - Choose this format when the device sends the following
Stringvalues as timestamps:"time": "2025-03-24T12:34:56.789Z""time": "2025-03-24T12:34:56Z"*1"time": "2025-03-24T12:34:56.789-08:00""time": "2025-03-24T12:34:56-08:00"*1
- Unix Time (seconds) - Choose this format when the device sends the following
StringorNumbervalues as timestamps:"time": "1742787296"*1"time": 1742787296*1
- Unix Time (milliseconds) - Choose this format when the device sends the following
StringorNumbervalues as timestamps:"time": "1742787296789""time": 1742787296789
*1 When the milliseconds are not provided, Harvest Data automatically adds .000 milliseconds.
When ISO-8601 is set, the timezone identifier such as Z for UTC+00:00 and -08:00 for non-UTC timezones is necessary.
Strings without a timezone identifier, such as 2025-03-24T12:34:56, are not valid and will fail to save, returning an error.
Limitations
-
If data is sent with the same timestamp as existing data for the same resource ID, the previously sent data will be overwritten by the data sent last.
-
If the data format is JSON, individual properties within the JSON document are overwritten separately. In other words, any previously stored properties remain unless they are overwritten by a property with the same name.
Example Data Sent First Data Sent Later Stored Data 1 {"temperature": 20}{"humidity": 30}{"temperature": 20, "humidity": 30}
(humidity is added)2 {"temperature": 25, "humidity": 30}{"temperature": 28}{"temperature": 28, "humidity": 30}
(temperature is overwritten, humidity remains the same)
-
- Failure to parse the timestamp—for example, due to a missing timezone identifier in an ISO-8601 timestamp string or sending a correct Unix Time value while configured to use ISO-8601—will result in the data not being saved.
- Data that is too old or too far in the future cannot be saved. Specifically, Harvest Data will not save data with timestamps older than 40 days (3,456,000 seconds) or more than 1 day (86,400 seconds) in the future from when Harvest Data processes the data.
- The value in the
x-soracom-timestampheader will be used as its timestamp when bothx-soracom-timestampand Overwrite Timestamp with Payload Data are set.x-soracom-timestampis a custom HTTP header to set an arbitrary time as the data timestamp. See the Examples for more details. - The
x-soracom-timestampheader will be ignored if Batch Write is enabled.
Understanding Data Processing Behavior
By default, data sent to Harvest Data over TCP or UDP is treated as binary data. In this case, Harvest Data Base64-encodes the data before storing it.
When Overwrite Timestamp with Payload Data is enabled, Harvest Data instead expects JSON format data and will not Base64-encode it.
For example, if you send the following JSON data via TCP or UDP:
{"data": [{"time": "2025-03-24T00:00:00Z", "temperature": 10.5}, {"time": "2025-03-25T00:00:00Z", "temperature": 9.4}]}When Overwrite Timestamp with Payload Data Is Disabled
When this option is disabled, data sent via TCP or UDP is handled as binary data. It is Base64-encoded and stored with the current timestamp:
{"payload":"eyJkYXRhIjpbeyJ0aW1lIjoiMjAyNS0wMy0yNFQwMDowMDowMFoiLCJ0ZW1wZXJhdHVyZSI6MTAuNX0seyJ0aW1lIjoiMjAyNS0wMy0yNVQwMDowMDowMFoiLCJ0ZW1wZXJhdHVyZSI6OS40fV19"}However, if you configure the Binary Parser with the @json predefined format while Overwrite Timestamp with Payload Data remains disabled, the JSON data will be preserved without Base64 encoding.
When Overwrite Timestamp with Payload Data Is Enabled
When this option is enabled, the JSON data is not Base64-encoded. It is parsed and stored using the timestamp specified in the payload. When used together with Batch Write, the data array is processed and each element becomes a separate entry with its own timestamp:
First entry with timestamp 2025-03-24T00:00:00Z:
{"time": "2025-03-24T00:00:00Z", "temperature": 10.5}Second entry with timestamp 2025-03-25T00:00:00Z:
{"time": "2025-03-25T00:00:00Z", "temperature": 9.4}When Overwrite Timestamp with Payload Data is enabled, the Binary Parser @json predefined format setting has no effect on data processing.
Uploading Data to Harvest Data
Devices using IoT SIMs that are assigned to the group where these settings are configured send their data to Harvest Data.
The example below illustrates group settings and explains the response returned when sending data to Harvest Data using Unified Endpoint as the endpoint.
-
Enable Batch Write.
Overwrite Timestamp with Payload Data is automatically enabled when Batch Write is enabled.
-
Configure the following for Batch Write:
- JSON Pointer to data array: Enter
/data.
- JSON Pointer to data array: Enter
-
Configure the following for Overwrite timestamp with payload data:
- Payload format: Select JSON.
- JSON Pointer to timestamp: Enter
/time. - Format: Select Date/Time (ISO-8601).
-
Click Save.
-
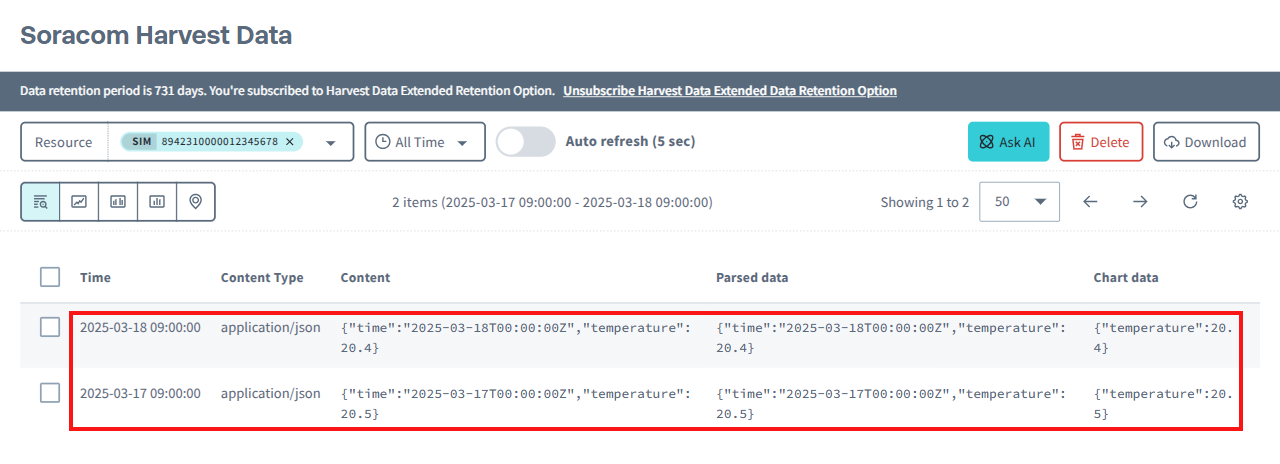
Send data from the device to the Unified Endpoint.
curl -v http://uni.soracom.io \
-H 'content-type: application/json' \
-d '{
  "data": [
    {"time": "2025-03-24T00:00:00Z", "temperature": 20.5},
    {"time": "2025-03-25T00:00:00Z", "temperature": 20.4}
  ]
}'
* Host uni.soracom.io:80 was resolved. * IPv6: (none) * IPv4: 100.127.69.42 * Trying 100.127.69.42:80... * Connected to uni.soracom.io (100.127.69.42) port 80 > POST / HTTP/1.1 > Host: uni.soracom.io > User-Agent: curl/8.5.0 > Accept: */* > content-type: application/json > Content-Length: 147 > < HTTP/1.1 201 Created < Date: Fri, 28 Mar 2025 08:55:22 GMT < Content-Length: 51 < Connection: keep-alive < Keep-Alive: timeout=65 < * Connection #0 to host uni.soracom.io left intact {"total":2,"status":{"successCount":2,"errors":[]}}The response format from Unified Endpoint varies depending on which Soracom services are enabled. Refer to Unified Endpoint Response Format for more information.
The data is saved in Harvest Data and the processing result is returned in the response. The meaning of each property in the response is as follows:
| Properties | Details |
|---|---|
| total | The number of data entries recognized by Harvest Data. |
| status.successCount | The number of data entries saved to Harvest Data. |
| status.errors[].index | The number of data entries that could not be saved to Harvest Data. |
| status.errors[].code | Error code. |
| status.errors[].message | Error message. |