Resource Authentication
Resource Authentication is a security feature that utilizes Soracom Access Management (SAM) Users to give resources in your Soracom account access to the Soracom API.
Typically, a SAM user is an individual or external application with specific permissions that authorize them to perform actions within your Soracom account, such as sending a Ping Test to detect if a device is offline or to start a Peek packet capture session to inspect data coming from a device.
With Resource Authentication, you can similarly authorize a resource within your Soracom account to perform actions.
Resource Authentication is configured by attaching the Soracom Resource Name (SRN) of a resource to a SAM user. This allows the resource to authenticate itself as the SAM user and invoke Soracom APIs with the permissions granted to the SAM user.
Compared to individuals or external applications which must authenticate with the Soracom API using their password or AuthKey, resources within your account are authenticated automatically and do not require separate password or AuthKey management.
See the Users & Roles documentation for more details on configuring SAM user permissions.
Terminology
- Resource - An entity within your account, such as a SIM, Group, User, Event Handler, and so on.
- At this time, only the Flux Soracom API Action resource can be used with Resource Authentication.
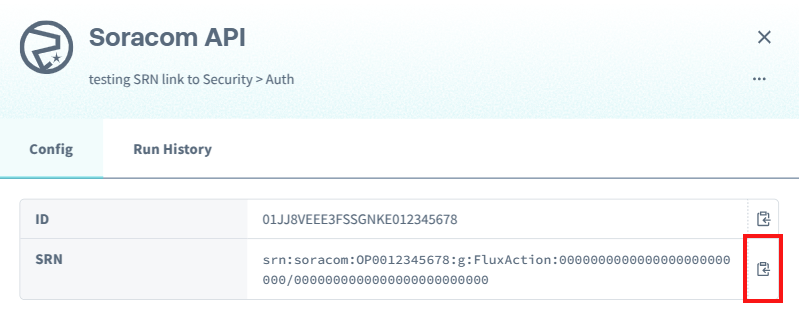
- Soracom Resource Name (SRN) - An ID that uniquely identifies the resource within your account.
Using Resource Authentication with Flux
You can use Resource Authentication with the Flux Soracom API Action in order to allow a Flux app to perform actions within your Soracom account based on the app's Event Source triggers and conditions.
Automatic Configuration
When you create a new Flux Soracom API Action, Resource Authentication will be configured automatically for the action itself and the SAM user that the action will authenticate itself as. During this process:
- If selected, a new SAM user will be created
- If a new SAM user is being created, it will be given permission to access the API that was selected for the Soracom API Action
- The SAM user's Trust Policy will be updated to allow Flux to authenticate as the user
- The SRN of the Soracom API Action will be attached to the SAM user
You must be signed in to your Root user or as a SAM user that has permission to create or update users.
-
Sign in to the User Console. From the Menu, expand Soracom Flux and select Flux Apps.
-
Open an existing Flux App, or create a new Flux App.
-
Select an existing Channel, or add a new Channel.
-
Select the Actions tab and click Add Action. The Create a new action dialog will appear.
-
Select Soracom API and click OK.
-
Configure the action as follows:
-
Enter a Name and optionally a Description for the action.
-
In the Condition section, set an Action Condition if required. You can expand the information section below the Action Condition input to show a detailed guide on usage.
-
In the Config section:
-
Select the API you want the action to invoke and configure the URL and HTTP Body if required.
See the API Reference documentation for more information on Soracom APIs and API usage.
-
Review and confirm that you understand the potential costs associated with the selected API.
-
Choose an option for SAM User to execute API:
-
Create a new SAM User will create a new SAM User and automatically configure Resource Authentication for this action. You can customize the SAM User Name if required.
-
Select a SAM User will allow you to select an existing SAM User to update and will automatically configure Resource Authentication for this action.
Only SAM Users with an existing Trust Policy that allows Flux to authenticate as the user will be available. For instructions on updating the Trust Policy of an existing SAM User accordingly, refer to the Manual Configuration section below.
For security, if you select an existing SAM User, its permissions will not be modified. After you finish creating the Soracom API Action, make sure to update the SAM User's permissions as needed.
-
- Finally, enable the Output option if you wish to use the Soracom API response in further actions.
-
-
- Click Create.
The Soracom API Action will be created, and the SAM User that the action will authenticate as will be created or updated.
If you selected an existing SAM user, make sure to update its permissions as needed so that the Soracom API Action will have permission to access the API.
Manual Configuration
When you modify an existing Flux Soracom API Action, you will need to configure Resource Authentication manually for the SAM User that the action will authenticate itself as. This process includes:
- Setting a SAM User's Trust Policy
- Setting a SAM User's permissions
- Modifying a Soracom API Action to use a different SAM User
Depending on how your SAM Users have already been configured, some steps may not be required.
You must be signed in to your Root user or as a SAM user that has permission to create or update users.
Setting a SAM User's Trust Policy
A SAM User's Trust Policy allows Flux to authenticate as the user.
-
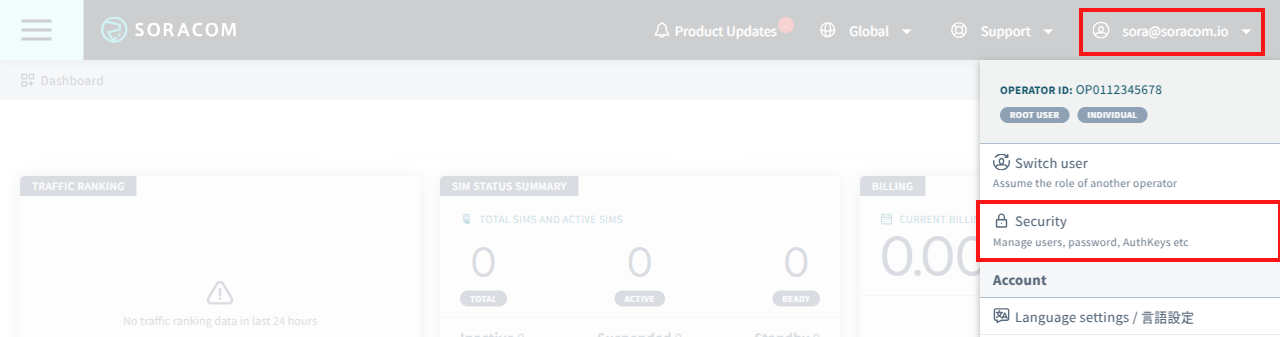
Click your account menu, then select Security.
-
From the Users tab, select a SAM User to configure.

-
Click the Trust policy tab.
-
Edit the policy to include the following:
{
  "statements": [
    {
      "effect": "allow",
      "principal": {
        "service": [
          "Flux"
        ]
      }
    }
  ]
}
If the SAM User has any existing policies, you may need to merge the policy.
- Click Save trust policy.
Setting a SAM User's Permissions
A SAM User's permissions allows a Soracom API Action to access the specified API.
-
Click your account menu, then select Security.
-
From the Users tab, select a SAM User to configure.
-
Click the Permissions tab.
-
Edit the permissions to allow the specified API.
Refer to Users & Roles for more information on configuring permissions.
- Click Save.
Modifying a Soracom API Action to Use a Different SAM User
-
Sign in to the User Console. From the Menu, expand Soracom Flux and select Flux Apps.
-
Open the Flux App containing the Soracom API Action you want to modify.
-
Click the Soracom API Action.
-
From the Config section, modify the SAM User to execute the API setting for the SAM User you want the action to use.
- Click Update.
With the above instructions, the SRN of the Soracom API Action will be automatically detached from the previous SAM User and attached to the new SAM User.
Managing SAM User Resource Attachments
Viewing Attached Resources
-
Click your account menu, then select Security.
-
From the Users tab, select the SAM User you want to view.
-
Click the Authentication tab and expand the Soracom Resource Authentication section. A list of resources attached to the user will be displayed.
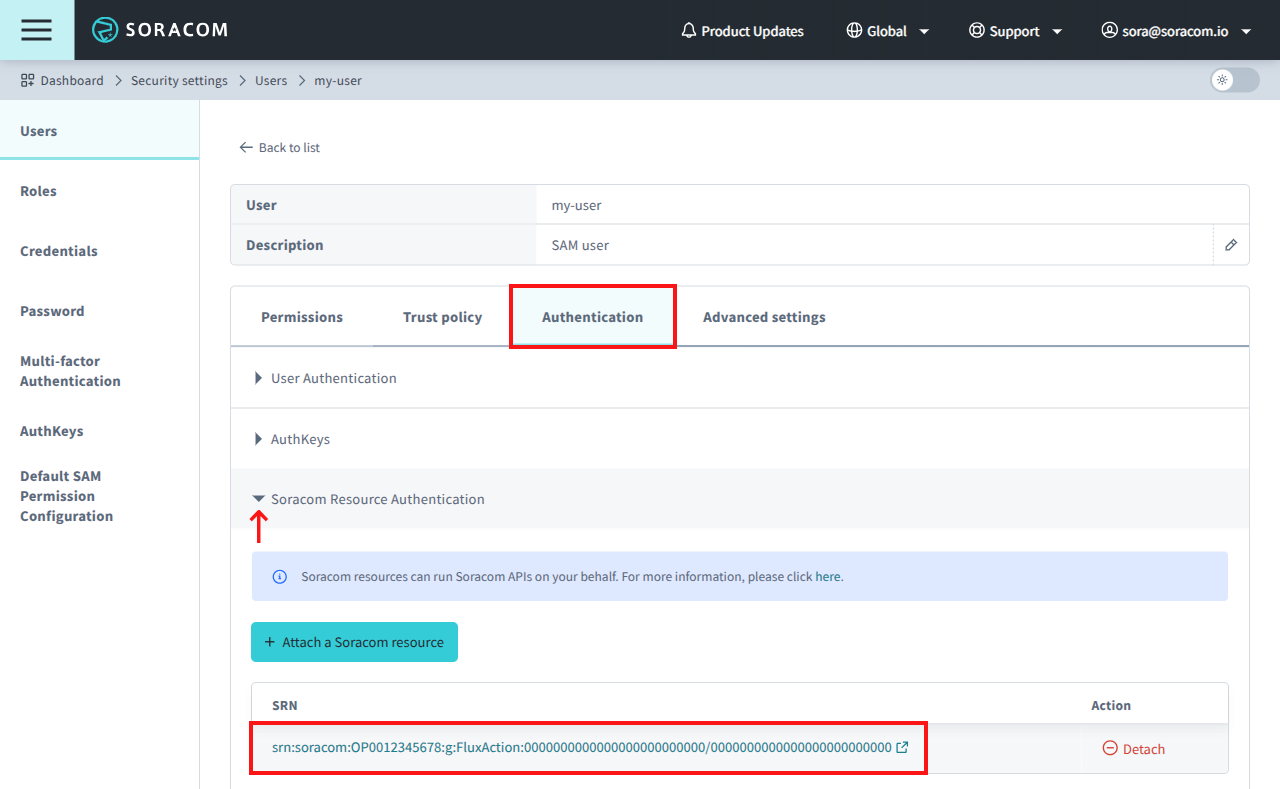
You can click on the SRN link to view the resource itself.
Manually Attaching a Resource
A resource can only be attached to one SAM User at a time. If you want to attach a resource to a different SAM User, detach it from its current SAM User first by following the instructions in the next section.
-
Copy the SRN of the resource you want to attach.
-
Click your account menu, then select Security.
-
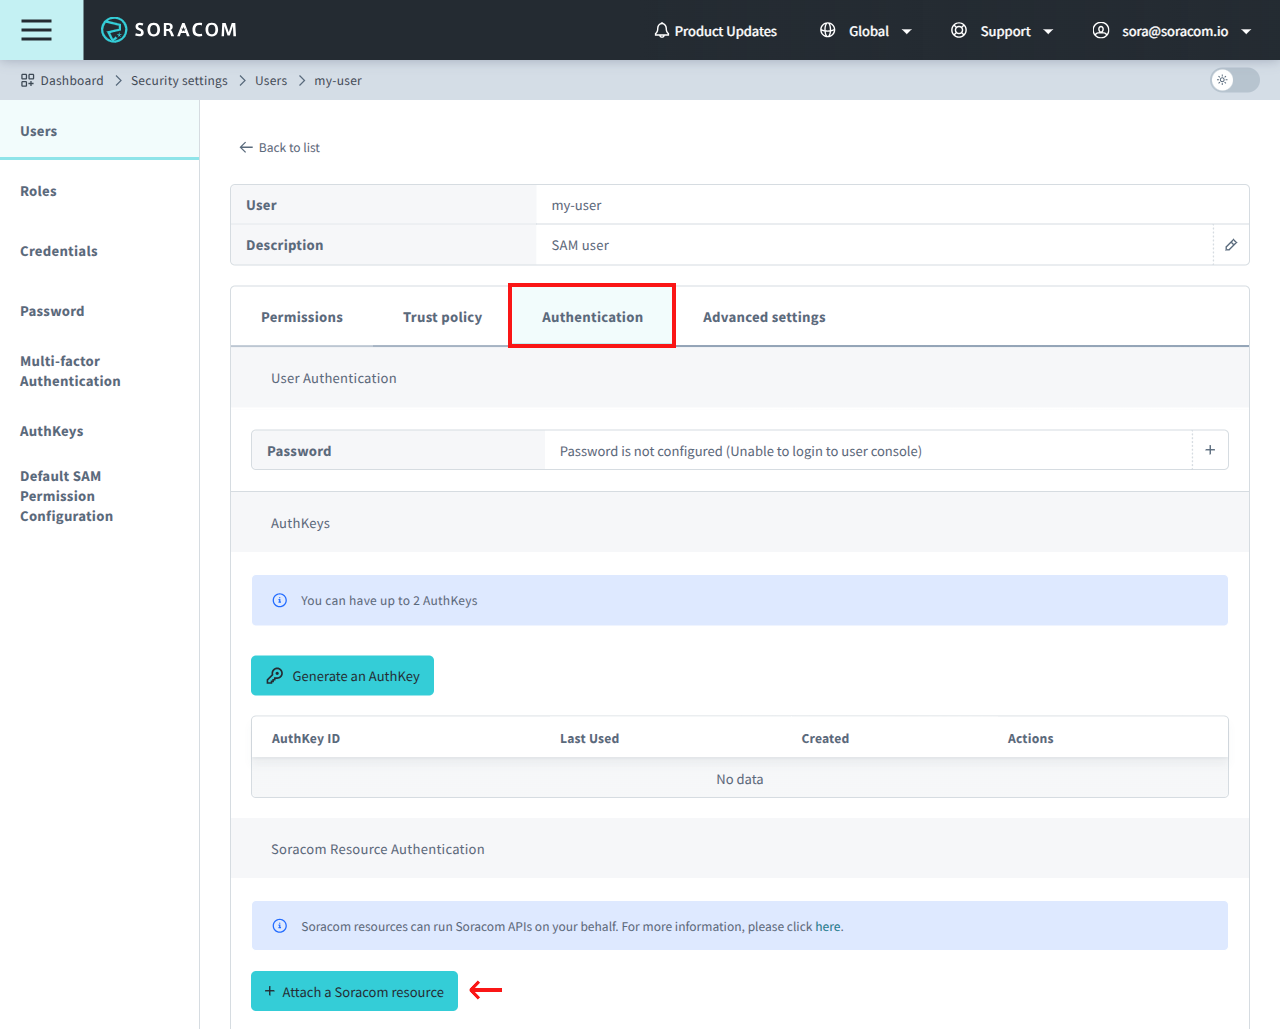
From the Users tab, select a SAM User to configure.
-
Click the Authentication tab, expand the Soracom Resource Authentication section, and click Attach a Soracom resource.
-
Enter the SRN from step 1 and click Attach.
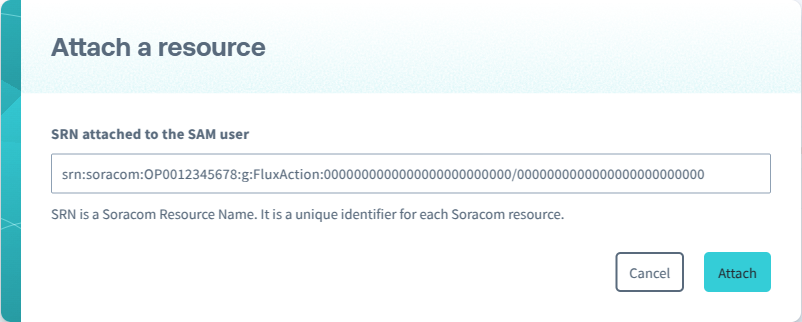
Once attached, the resource will be able to authenticate as the SAM User. However, note that you may still need to configure the SAM User's Trust Policy and permissions in order for the resource to access the Soracom API.
Manually Detaching a Resource
-
Click your account menu, then select Security.
-
From the Users tab, select a SAM User to configure.
-
Click the Authentication tab, expand the Soracom Resource Authentication section, and click the Detach button next to the resource you want to detach.
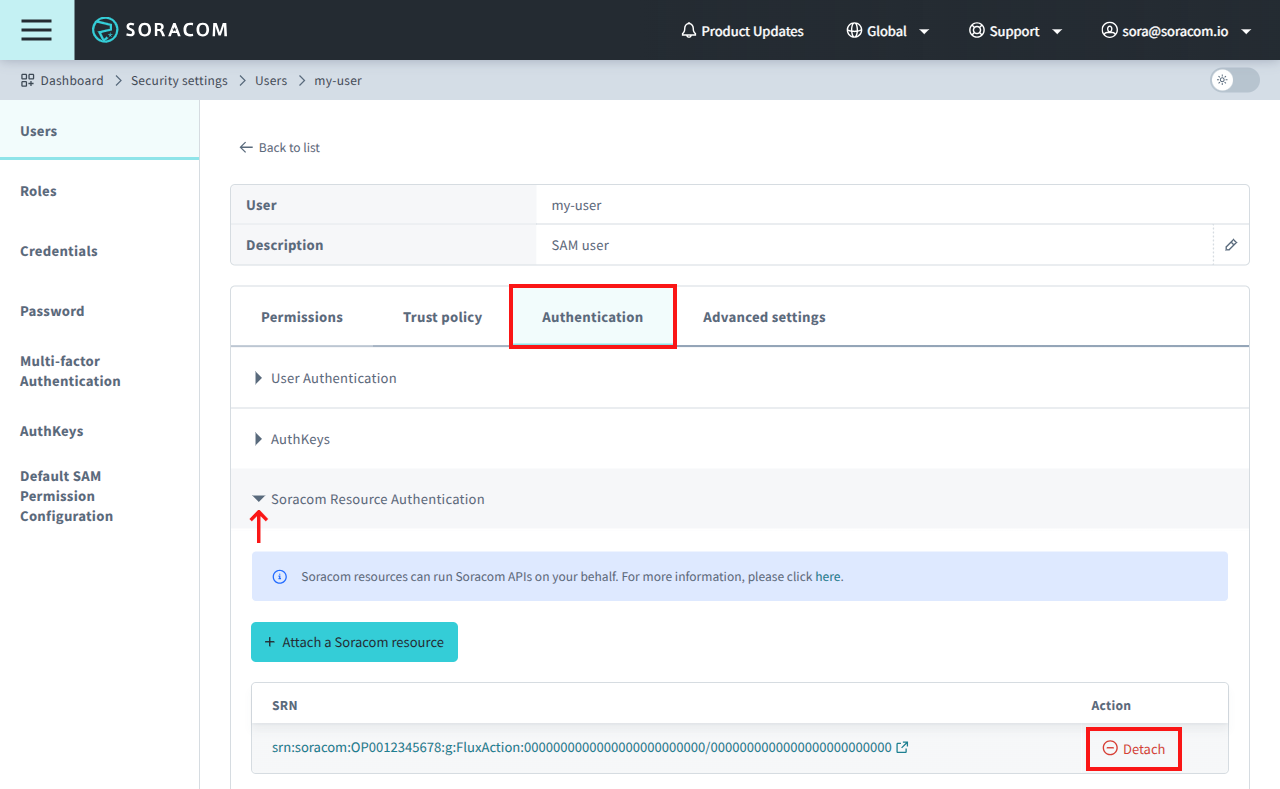
Once detached, the resource will no longer be able to authenticate as the SAM User.