Usage
New You can now connect to your device using SSH directly from your web browser! To learn more, refer to the new Web Terminal documentation.
Napter can be easily accessed directly from the User Console. While Napter provides secure remote access to your device, Napter cannot resolve any connection issues, such as a device being powered off, located in an area without cellular coverage, missing authentication information, or other device-side problems. Before enabling remote access, ensure that your device is properly configured beforehand.
Enabling Remote Access
Enabling Remote Access will incur fees. Refer to the Pricing & Fee Schedule for more information.
-
Sign in to the User Console. From the Menu, open the SIM Management screen.
-
From the list of subscribers, click the for the SIM you want to remotely access.
-
Click the Actions menu, then select On-demand Remote Access.
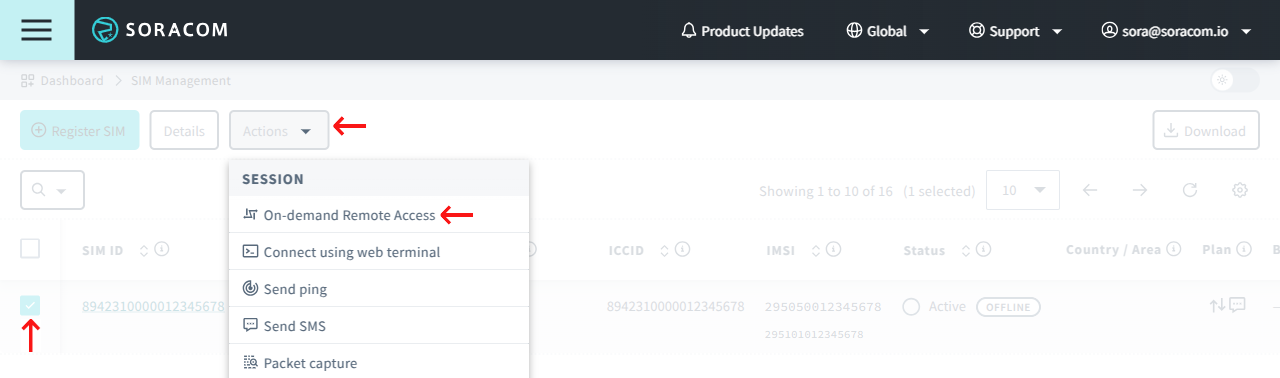
-
Enter the following connection settings:
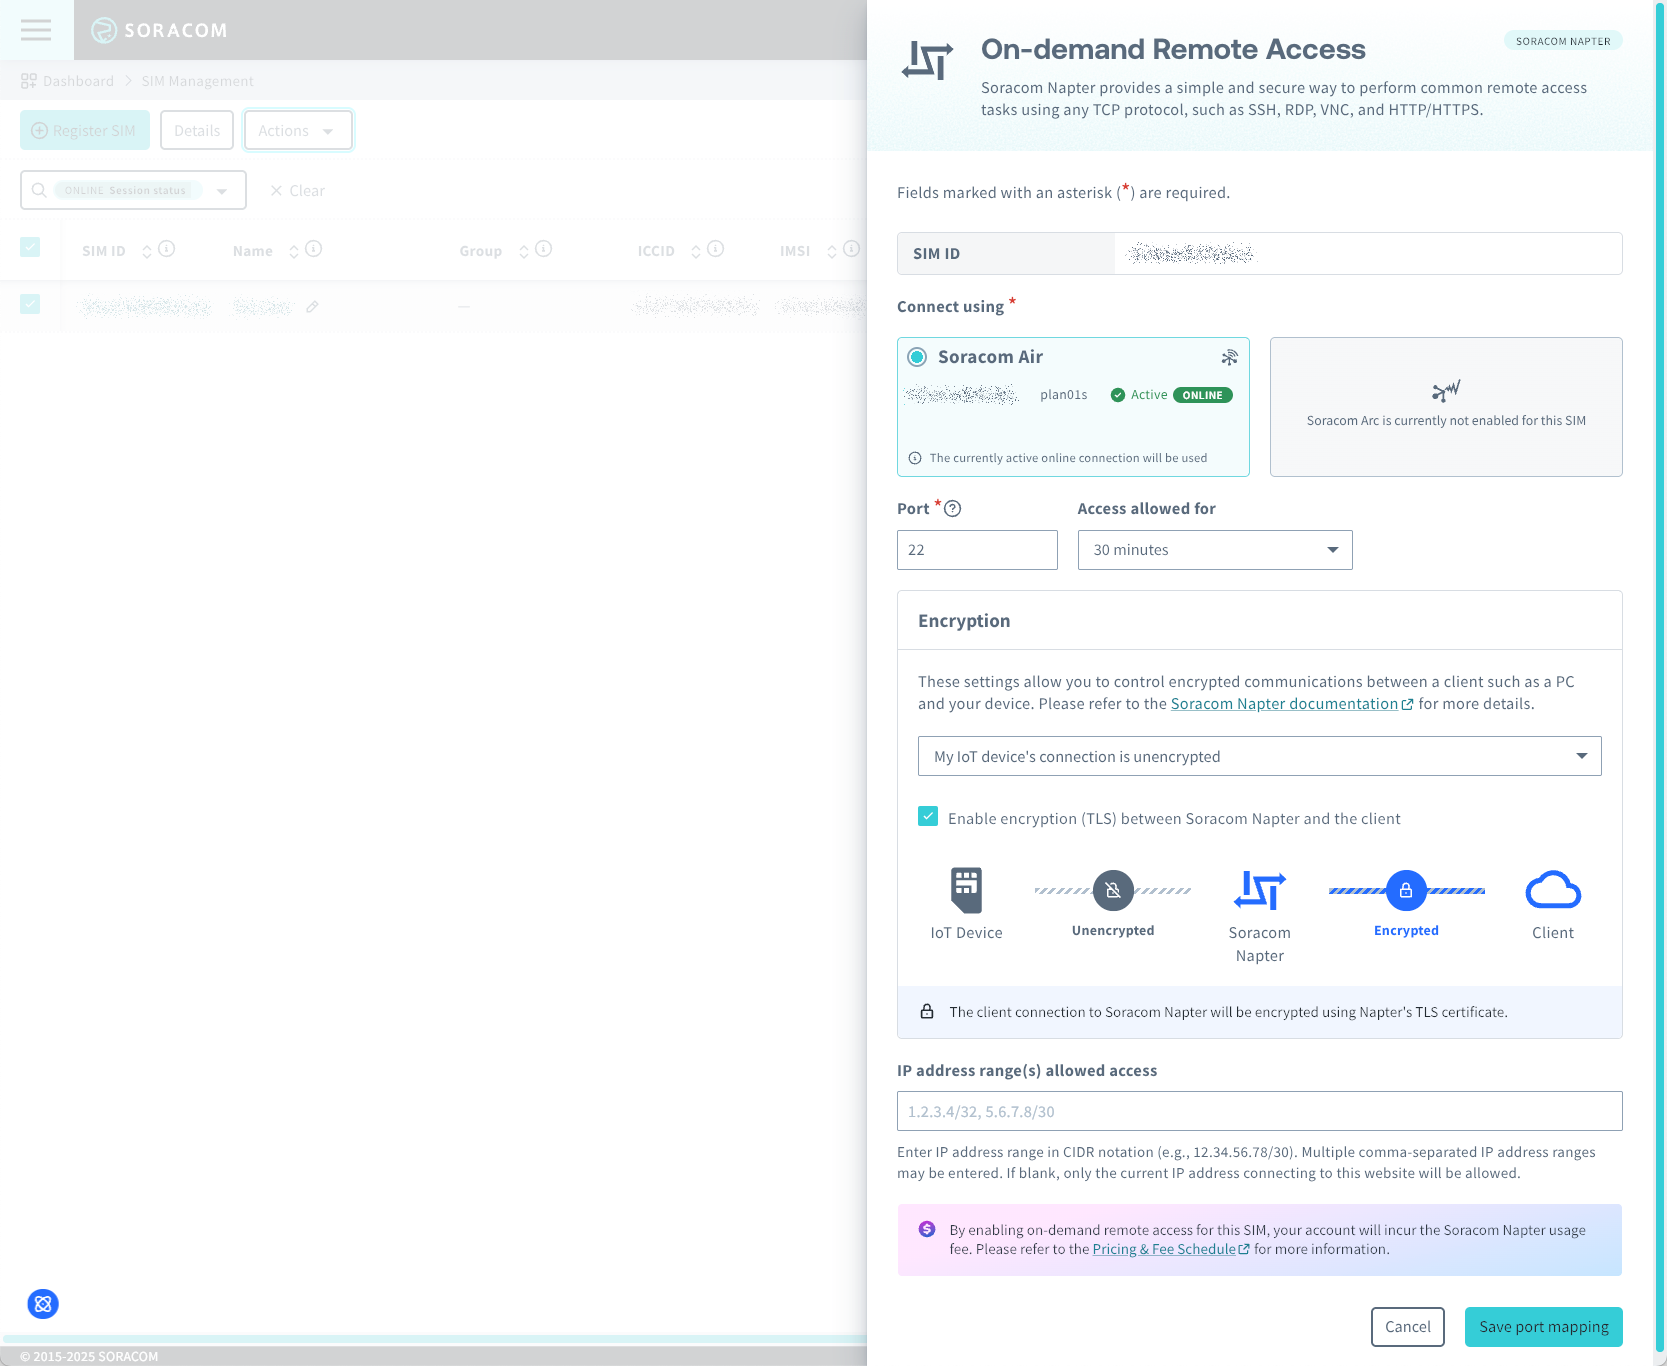
- Connect Using - Napter can allow you to remotely connect to a SIM that is active with either Soracom Air or Soracom Arc. If your device is currently connected with both, you can select which connection to use for remote access.
- Port to expose - The port on your device used for direct access, such as
22for SSH,3389for RDP,5900for VNC, or80for web interface. - Access allowed for - The duration that remote access should be enabled. A maximum of 8 hours can be set.
- IP address range(s) - The range of IP addresses (in CIDR notation) which will be allowed to access the device. Multiple blocks can be specified by separating them with a comma
,. If left blank, the IP address used to access the User Console will be automatically set. For security, you cannot set0.0.0.0/0to enable access from any address.- If you intend to access the SIM using the same device you are creating the Napter connection with, leave this field blank. The global IP address of the PC operating the User Console will be automatically set.
- If you intend to access the SIM using a device with a different global IP address than the one you are creating the Napter connection with, specify an IP address range that includes the global IP address of the device that will be used for access.
- Encryption - When communicating with an IoT device using Napter, data is sent from the device requesting remote access to Soracom, and then from Soracom to the IoT device using the IoT SIM.
- If your IoT device does not support encrypted communication, select My IoT device's connection is unencrypted.
- In this case, selecting Enable encryption (TLS) between Soracom Napter and the client will encrypt the data exchanged between the device requesting the remote access and Soracom. Once remote access is enabled, you can securely connect to Napter with a TLS connection using the connection hostname, such as
https://3-12-45-67.napter.soracom.io:12345.
- In this case, selecting Enable encryption (TLS) between Soracom Napter and the client will encrypt the data exchanged between the device requesting the remote access and Soracom. Once remote access is enabled, you can securely connect to Napter with a TLS connection using the connection hostname, such as
- If your IoT device supports encrypted communication, select My IoT device's connection is encrypted (HTTPS/SSH).
- If your IoT device does not support encrypted communication, select My IoT device's connection is unencrypted.
Here are some common examples of Napter usage and their recommended encryption settings:
- Accessing via SSH - Choose My IoT device's connection is encrypted (HTTPS/SSH).
- Accessing an HTTP (Not TLS encrypted) web server running on the device - Choose My IoT device's connection is unencrypted and enable Enable encryption (TLS) between Soracom Napter and the client.
- Accessing an HTTPS (TLS encrypted) web server running on the device - Choose My IoT device's connection is encrypted (HTTPS/SSH).
- Click the OK button to enable secure remote access.
By clicking the OK button, your account will incur the Napter usage fee. Refer to the Pricing & Fee Schedule for more information.
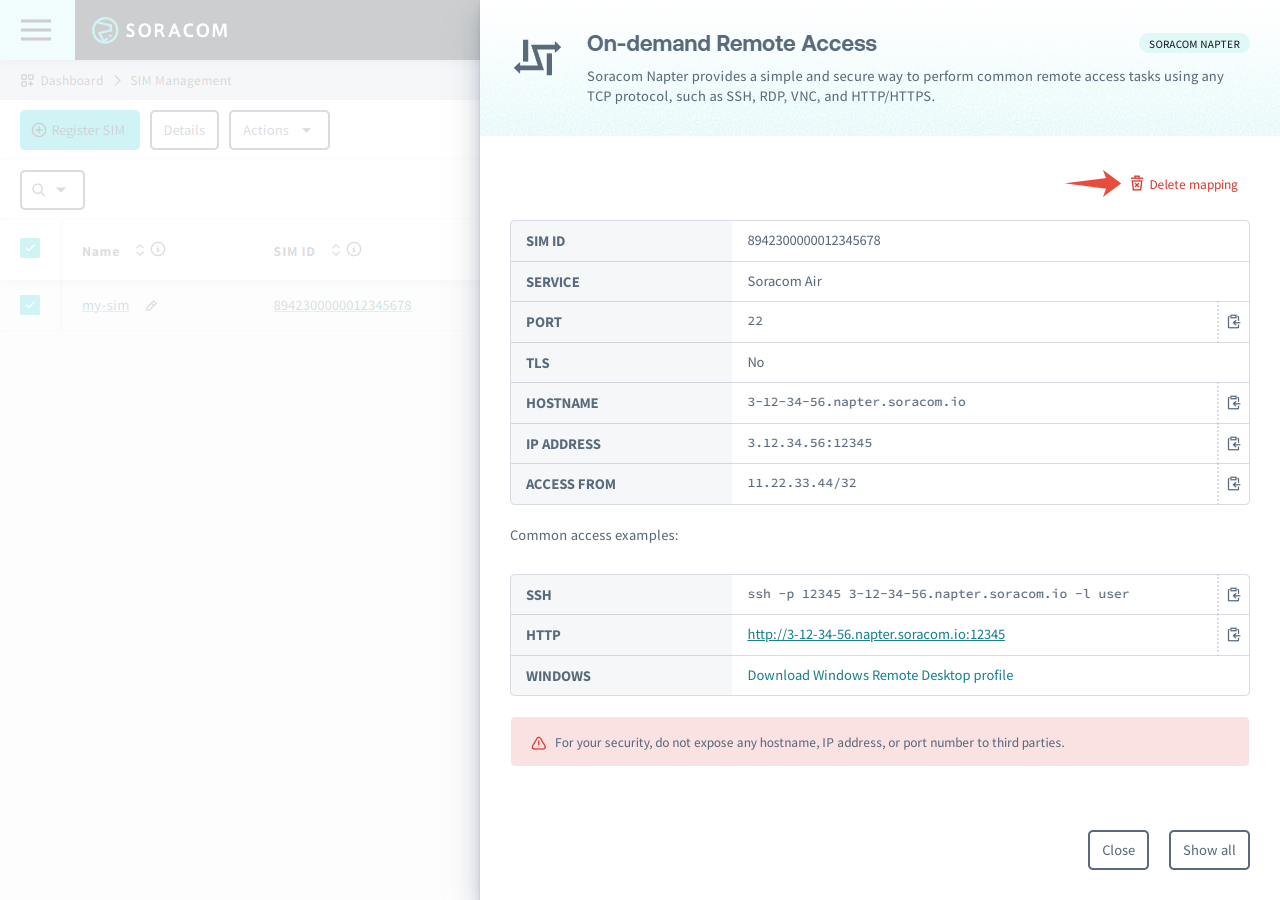
Once remote access has been enabled, the connection settings will be displayed.
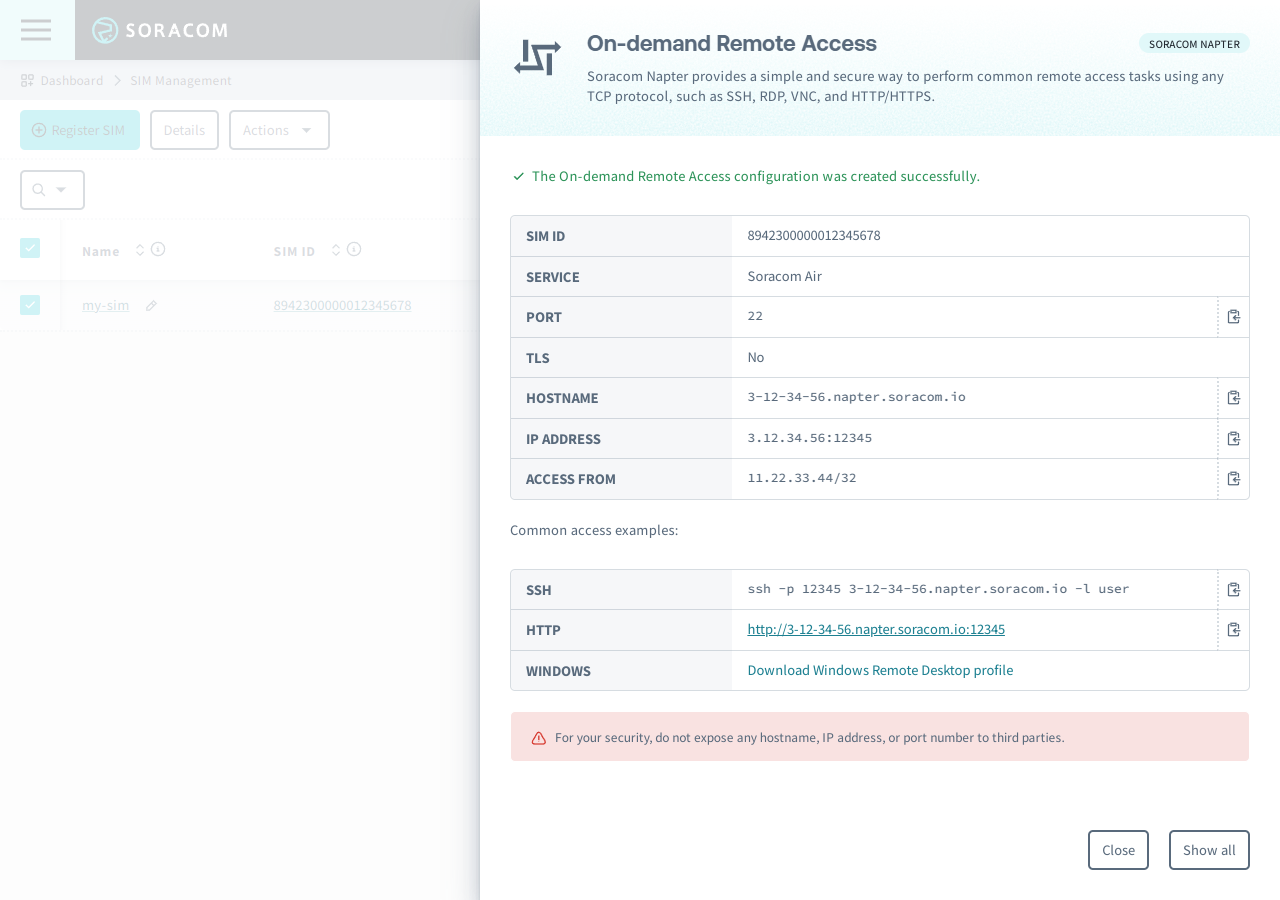
You can then use the IP address or hostname, and port, to establish a connection to your device.
For your convenience, common connection templates are provided to help you quickly start a connection.
Connect to Your Device
Use the IP Address, Hostname, and Port information to connect remotely to your device.
For example, if connecting via SSH, simply initiate an SSH connection using the appropriate information.
ssh -p 12345 3-12-34-56.napter.soracom.io -l userDepending on your device's SSH settings, you may need to specify the local username or provide authentication credentials as part of the SSH command.
The same connection information can be used for other protocols, including RDP, VNC, and HTTP/HTTPS.
Disabling Remote Access
If you have finished using your remote access connection, you can manually delete the connection.
-
Sign in to the User Console. From the Menu, open the SIM Management screen.
-
From the list of subscribers, click the for the SIM you want to disable remote access.
-
Click the Actions menu, then select on-demand Remote Access. Your currently enabled connections will be listed:
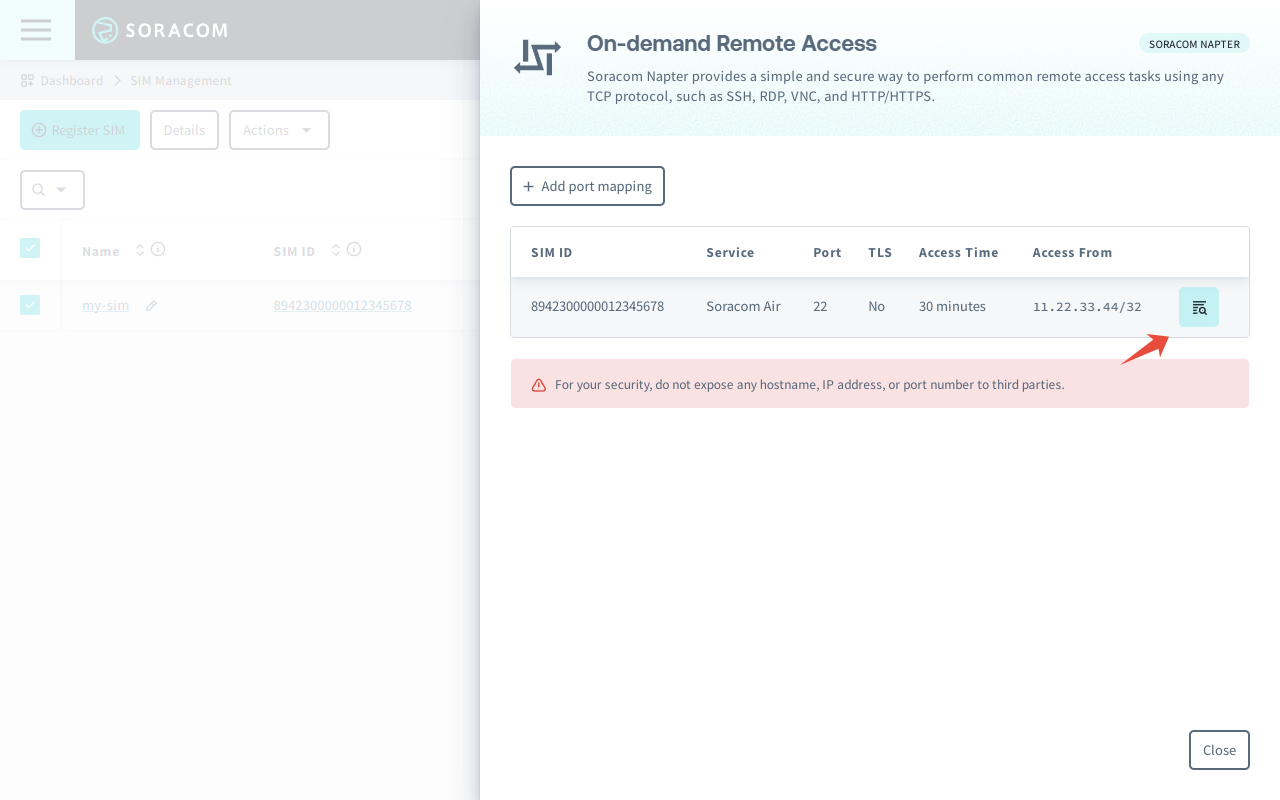
-
Click the button for the connection you want to disable, then click Delete mapping.
Note that once you remove a connection, it will be deleted and cannot be recovered. If you create a new connection, it will receive new IP Address, Hostname, and Port settings.
Troubleshooting Connections
In some situations, you may be unable to connect to your device even if Napter has successfully established an on-demand connection.
The Audit Logs log data can help in troubleshooting potential connection problems.
For example, if the Audit Logs indicate the ACCESS and CONNECTED events, then Napter has successfully received the incoming connection request, and also successfully forwarded the request to the device. Any connection difficulty is therefore likely due to the device not responding to the connection request, such as an unresponsive service, an improperly configured firewall, or bad traffic routing within the device.
A common error you may encounter when using Napter is kex_exchange_identification: Connection closed by remote host. If you experience this error confirm that:
- Soracom's servers are reachable from this device by pinging
pong.soracom.io. - The correct username for the device is being used in the SSH command.
- The device is configured to listen for connections on the port number that was selected for this remote access session in the configuration step.
- The remote access session you created has not expired or been deleted.
- The IP address that the device is being accessed is within the IP address range(s) that were allowed for this remote access session in the configuration step.
If the issue persists contact Soracom Support for further assistance.
Programmatic Usage
You can also enable and disable remote access programmatically to integrate Napter directly into your device management workflow.
Soracom API
To access the Soracom API, first use the auth API to obtain an API Key and Token. Refer to the API Usage Guide for instructions on how to use the API Key and Token in API requests.
Then, use the createPortMappingForSim API to start a new on-demand remote access connection:
curl -X POST \
|  -H 'X-Soracom-API-Key: <MY-API-KEY>' \
|  -H 'X-Soracom-Token: <MY-TOKEN>' \
|  -H 'Accept: application/json' \
|  -H 'Content-Type: application/json' \
|  -d '{
|        "destination": {
|          "service": "air",
|          "port": 22
|        },
|        "duration": 3600,
|        "tlsRequired": false
|      }' \
| https://g.api.soracom.io/v1/port_mappings/sims/<SIM-ID>The destination parameter can be configured accordingly:
- The
serviceparameter can be used to specify which connection,airfor Soracom Air orarcfor Soracom Arc, to use for the on-demand remote access connection. If specifyingair, the connection will be automatically created using whichever Soracom Air subscription is online. - If the
serviceparameter is omitted, the on-demand remote access connection will be created with whatever connection is online, with no guarantee of which connection is used.
The API will return a JSON response containing the following data:
{
  "ipAddress": "3.12.34.56",
  "port": 12345,
  "hostname": "3-12-34-56.napter.soracom.io"
}
You can then use these values to establish a remote access connection to your device.
To list current on-demand remote access sessions for all subscribers or for a specific subscriber:
And to end an on-demand remote access session, pass the ipAddress and port into:
Soracom CLI
To use the Soracom CLI, you must first configure it to authenticate with your account information, authorization key, or SAM user credentials.
Then, run the following command to start a new on-demand remote access connection:
soracom port-mappings create-for-sim --sim-id <SIM-ID> --body '{ "destination": { "service": "air", "port": 22 }, "duration": 3600, "tlsRequired": false }' --coverage-type gThe destination parameter can be configured according to the API example above.
The CLI will return a response similar to the API example above. You can then use a command like jq to parse the response in order to pass the ipAddress or hostname and port values into another command.
SSH Example
You can combine soracom to create an on-demand remote access session, jq to parse the remote access details, and awk to format the details as command arguments in order to create a one-liner SSH connection command:
ssh `soracom port-mappings create-for-sim --sim-id 8942300000012345678 --body '{ "destination": { "service": "air", "port": 22 }, "duration": 3600, "tlsRequired": false }' | jq -r '[.hostname, .port] | join(" ")' | awk '{print "-p " $2 " pi@" $1}'`To list current on-demand remote access sessions, use the following commands to list for all subscribers or for a specific subscriber:
soracom port-mappings listsoracom port-mappings list-for-simsoracom port-mappings list-for-subscriber
And the following command to end an an on-demand remote access session:
soracom port-mappings delete