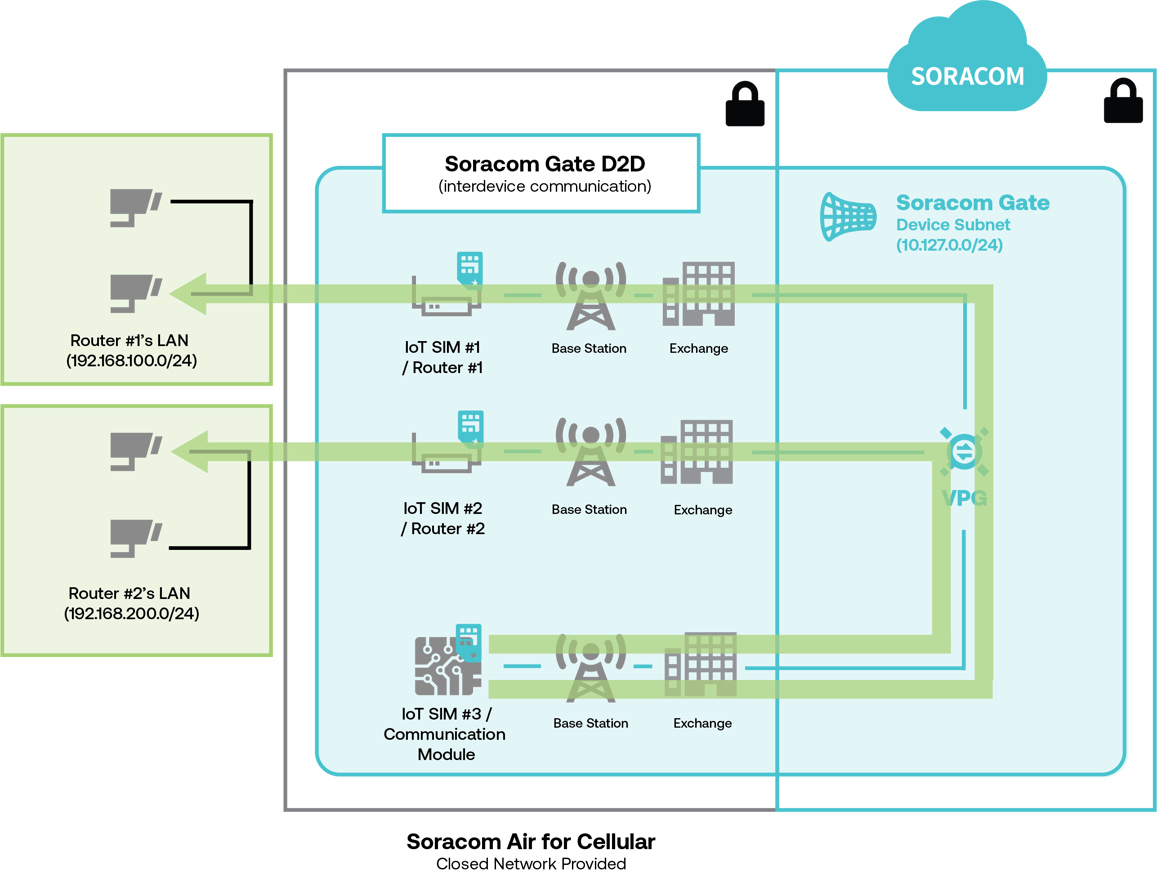
SIM-Based Routing
To access a device on the subnet beyond your cellular router, it used to be necessary to spend extra effort configuring network settings like port forwarding and tunnels for that router. With SIM-based routing, you can link the SIM card in that router and the router's Local Area Network (LAN) IP range. This allows the SIM itself to be set as the routing destination when using Soracom Gate, reducing the time and cost of network maintenance for inter-site connection equipment and IoT gateways.
SIM-Based Routing is a free feature that is included with the cost of your VPG.
Configuration
SIM-based routing is not currently available for Type-F2 VPGs
Before enabling SIM-Based Routing, ensure that you have completed the following:
- Create a Type-F or Type-G Virtual Private Gateway.
- Enable Soracom Gate for your VPG.
- Create a Soracom Air for Cellular Group.
- Configure your group's Virtual Private Gateway option to use your VPG.
- Add Air for Cellular subscribers that you wish to use SIM-Based Routing with to the group.
- Confirm you can access the router with Soracom Gate.
Router Settings
To use SIM-based routing, the cellular router must be able to forward the packets received from Soracom to the devices connected to the router's Local Area Network (LAN). For our configuration guide, we will show how to enable the necessary settings on a Teltonika RUT240 cellular router. However, SIM-Based routing will work with any router capable of packet forwarding and receiving packets from the cellular network.
-
Log in to the RUT240's web interface. By default, this can be reached by navigating to
http://192.168.1.1. -
Click the System tab, then under the Setup Wizard header select LAN.
Set the RUT240's LAN IP address to
192.168.100.1and the DHCP IP address range to192.168.100.100to192.168.100.249.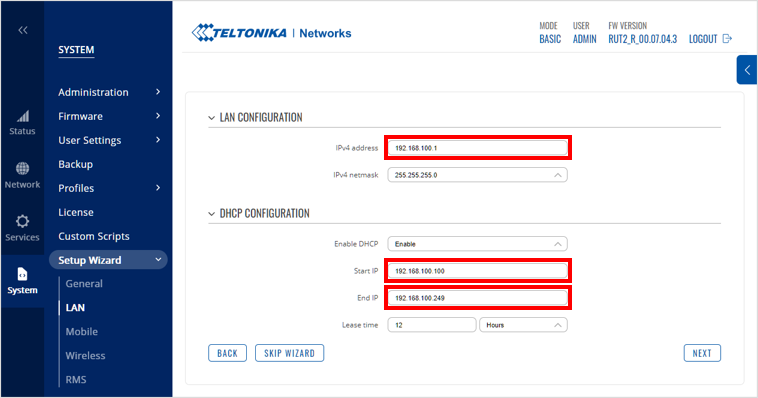
These settings configure the router's LAN IP address and define the range of IP addresses assigned to devices connected to the router.
-
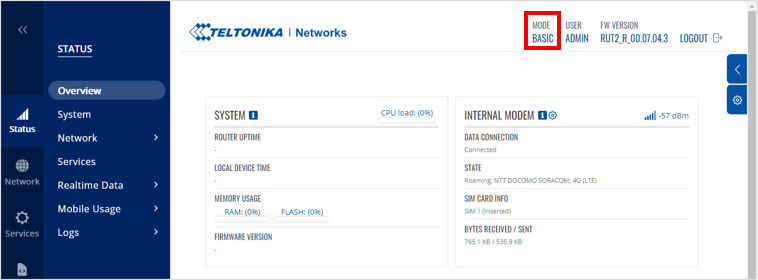
If the RUT240 is in "Basic" mode, click Mode to change it to "Advanced" mode.
-
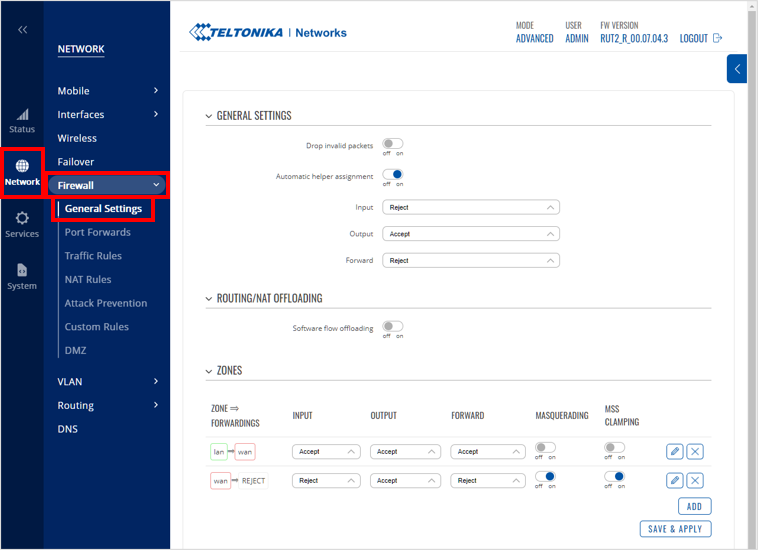
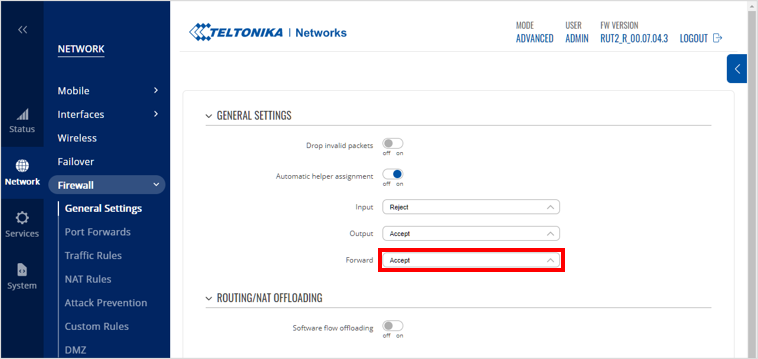
Click the Network tab, then under the Firewall header select General Settings.
-
Change the Forward setting to "Accept".
-
Click Save and Apply
- Connect your device to the router's LAN.
Before proceeding, we recommend that you confirm that devices belonging to the router's LAN can access the Soracom network using Soracom's Ping response service.
ping pong.soracom.ioVPG Settings
You can configure a SIM-Based Routing from the User Console.
-
Sign in to the User Console. From the Menu, open the VPG screen.
-
From the list of VPGs, click the name of the VPG you want to configure to open its settings page.
-
Click the Device LAN tab.
-
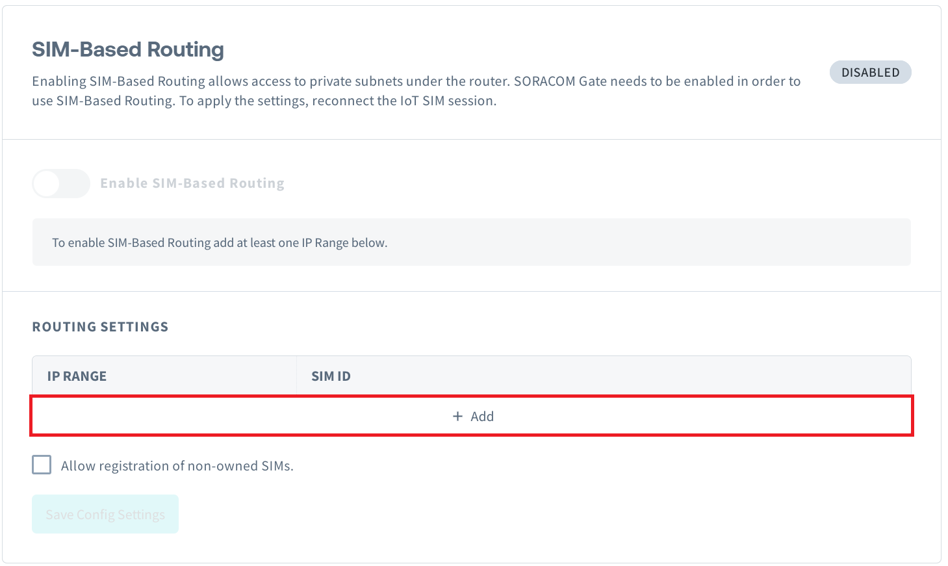
From the SIM-Based Routing panel, click the Add button to add an IP Range entry.
-
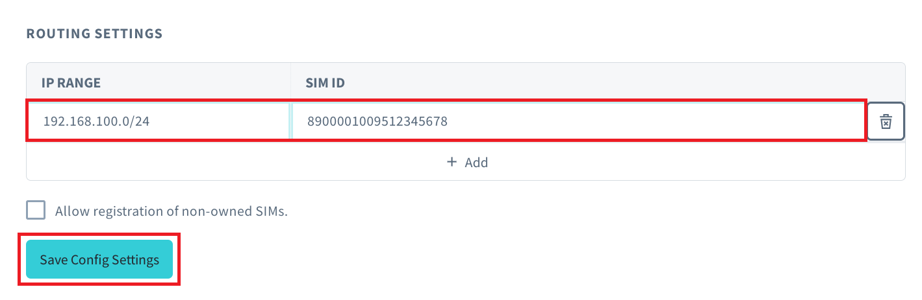
Enter the IP Range of your router's LAN in CIDR notation and the SIM ID of the SIM in that router. Multiple IP range and SIM ID associations can be defined at once.
By default, you will only be able to associate IP ranges with SIM IDs that are currently registered to your account. If you would like to add entries for SIM cards that are not yet registered to your account, check the Allow registration of non-owned SIMs box.
If a Subscription Container has been added to the SIM, the additional subscriptions on the SIM ID will also be displayed as suggestions. SIM-based routing differentiates SIMs by SIM ID, so selecting additional subscriptions will work identically to choosing the primary subscription.
Be aware of the following information when setting associations:
- The same IP range cannot be assigned to multiple SIMs.
- If the IP ranges of multiple entries overlap, packets will be routed to the more precisely matched IP range that has the longest subnet mask. For example: if SIM A is associated with IP range
192.168.100.0/24and SIM B is associated with IP range192.168.100.240/28, traffic for192.168.100.241will be routed to SIM B. - Soracom Arc virtual SIMs cannot be mapped to IP ranges.
-
After you have completed your entries, click Save Config Settings.
-
Click the Enable SIM-Based Routing toggle to enable the feature.
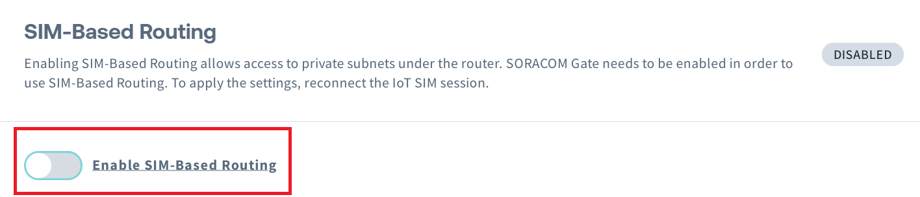
When enabling and disabling SIM-Based routing, there will be a temporary interruption in all communications for the VPG. The new SIM-Based Routing configurations will be available to use once the respective SIMs re-establish their sessions.
Gate Peer Configuration for SIM-Based Routing
To use Gate Cloud-to-Device (C2D) + SIM-Based Routing, you need to configure the Gate peer with the appropriate routing rules. This enables effective communication between cloud and device networks via the specified SIM-based routes.
Routing Configuration
Routes added using the ip route command are stored in the kernel's routing table, which is ephemeral and will be reset when the system reboots.
Use the following command to add the required route:
sudo ip route add 192.168.100.0/24 nexthop via xxx.xxx.xxx.xxx weight 1 nexthop via yyy.yyy.yyy.yyy weight 1 dev vxlan0| Notation | Details |
|---|---|
| xxx.xxx.xxx.xxx | Replace with IP address for the first nexthop. |
| yyy.yyy.yyy.yyy | Replace with IP address for the second nexthop.*1 |
| vxlan0 | Device name for the routing interface. Rename as necessary per your network configuration. |
*1 Additional nexthops can be added to the ip route command as long as the additional connections are supported by the system and network they are being configured for.
Limitations
When using SIM-Based Routing, the following limitations apply:
- When using Soracom Canal's Amazon VPC peering connection, if the IP address range of Amazon VPC and the LAN IP address range of the SIM-based routing router overlap, SIM-based routing will be prioritized.
- In cases involving cloud to device communications with a Gate Peer, outbound filters are ignored.
Programmatic Usage
You can use the Soracom API and Soracom CLI to configure SIM-Based Routing entries programmatically.
For example, the following body assigns the IP range 192.168.2.0/24 to SIM_ID_1, and 192.168.2.128/25 to SIM_ID_2.
{
  "SIM_ID_1": "192.168.2.0/24",
  "SIM_ID_2": "192.168.2.128/25"
}
Then, simply pass in the SIM-Based Routing entries to the Soracom API or Soracom CLI. For either method, you will need to specify the VPG ID.
Soracom API
To access the Soracom API, first use the auth API to obtain an API Key and Token. Refer to the API Usage Guide for instructions on how to use the API Key and Token in API requests.
Then, use the putSimBasedRoutingRoutes API to add or update the SIM-Based Routing entry:
curl -X POST \
|  -H 'X-Soracom-API-Key: <MY-API-KEY>' \
|  -H 'X-Soracom-Token: <MY-TOKEN>' \
|  -H 'Content-Type: application/json' \
|  -d '{
|        "SIM_ID_1": "192.168.2.0/24",
|        "SIM_ID_2": "192.168.2.128/25"
|      }' \
| https://g.api.soracom.io/v1/virtual_private_gateways/<VPG-ID>/gate/routing/static/sims/routesTo enable or disable SIM-Based Routing, use one of the following APIs:
Soracom CLI
To use the Soracom CLI, you must first configure it to authenticate with your account information, authorization key, or SAM user credentials.
Then, run the following command to add or update the IP address mapping entry:
soracom vpg put-sim-based-routing-routes --vpg-id '<VPG-ID>' --body '@path/to/sim-based-routing-entries.json' --coverage-type gIn this sample, we're using the @filename method for passing in the SIM-Based Routing entries which are stored in a separate file, but you can of course pass the raw data into the --body parameter directly.
To enable or disable SIM-Based Routing, use one of the following CLI commands:
soracom vpg enable-sim-based-routing --vpg-id '<VPG-ID>'soracom vpg disable-sim-based-routing --vpg-id '<VPG-ID>'