Soracom LTE-M Button Slack Notification Tutorial
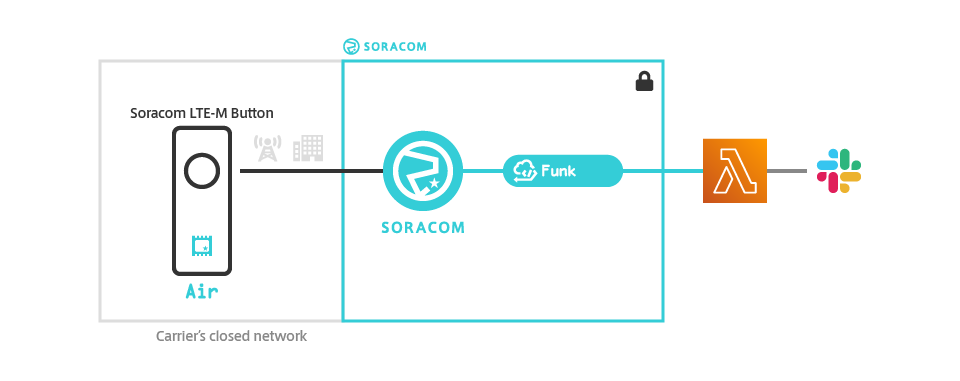
In this tutorial, we will use Soracom Funk to invoke a cloud function when our button is clicked, which will in turn process the data and send a Slack notification. By using a cloud function, we have full control over the logic for processing the button click event.
While sending a notification to Slack is relatively trivial, this example will cover the basic concepts so that you can easily add any further logic that your application requires, such as connecting to databases or integrating with different web applications based on the type of button click.
For this example, we will set up Soracom Funk for use with an AWS Lambda cloud function. Since the Soracom Funk documentation already provides a dedicated guide for setting up Funk with AWS Lambda in order to send a Slack notification, this section will summarize the steps from that guide with a few changes specific for the Soracom LTE-M Button.
Overview
We will perform the following steps to set up Funk with AWS Lambda and Slack:
- Create a Slack webhook
- Create an AWS Lambda function
- Create an AWS IAM user
- Register the AWS IAM credentials to Soracom
- Enable and configure Soracom Funk for our Soracom LTE-M Button group
- Click the button to send a message to Lambda
- Check that we received a Slack notification
- Disable Funk after we're done
AWS Lambda provides a webhook feature called Function URLs which allows you to create a public HTTPS endpoint that can be used to trigger your Lambda function. By enabling a Function URL for your function, you can call the function directly using Soracom Beam, similar to the Soracom LTE-M Button Webhook Tutorial without needing to create a dedicated AWS IAM user and register its credentials to Soracom. However, you will have to provide your own authentication logic in order to secure the URL, such as using the Soracom Beam: Header Manipulation option to add a custom authentication header to the HTTPS request and validating it in your Lambda code.
Prerequisites
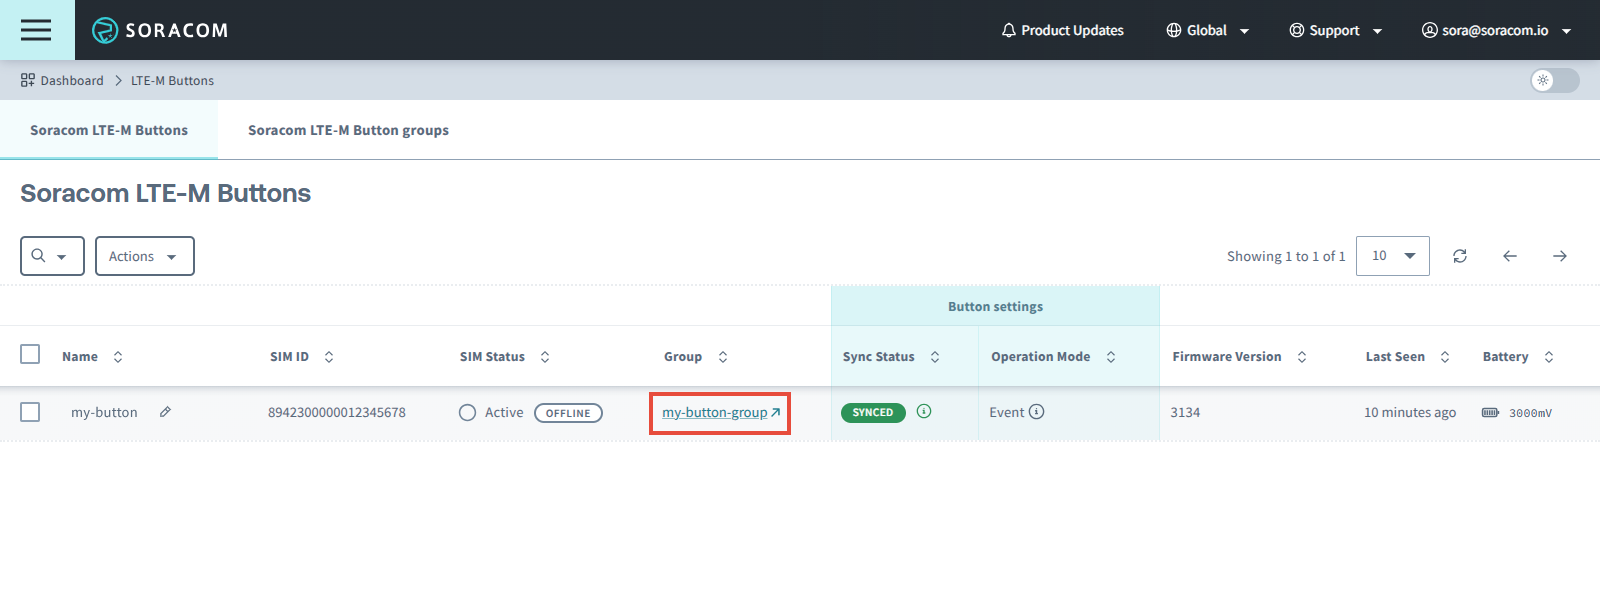
Before proceeding, make sure you have finished setting up your Soracom LTE-M Button using the Getting Started instructions. From the Menu > Gadgets > Soracom LTE-M Button screen, you should be able to see your button in the list of buttons, and its status should be Synced:

To make following this tutorial easier, your button's operation mode should also be configured as one of the following:
If your button's operation mode is configured as Timer, you can still follow this tutorial, however you will need to wait until your button sends a message based on its configured Uplink frequency before a message will be sent to Lambda.
Create a Slack Webhook
Follow the instructions from the Using Funk to Send Data to Slack via AWS Lambda guide for creating a new Slack webhook. In general, you should:
-
Sign in to your Slack workspace, navigate to the Configure apps section, click the Custom Integrations section, and click Incoming WebHooks.
- Click the Add Configuration button, and follow the instructions to select a channel where the webhook will post messages.
At the end of these steps, you should have a Slack Incoming WebHook URL which looks like this:
https://hooks.slack.com/services/T00000000/B00000000/XXXXXXXXXXXXXXXXXXXXXXXXCreate an AWS Lambda Function
Next, follow the instructions from the Using Funk to Send Data to Slack via AWS Lambda guide for creating a new AWS Lambda function. In general, you should:
-
Sign in to your AWS account, select the AWS region where you want your Lambda function to be located, and access the AWS Lambda dashboard.
-
Then, Create a new function, follow the instructions to Author from scratch, give your Lambda function a name such as
my-button-to-slack-function, and select a Node.js runtime. - Copy and paste the following Node.js application into the Function code, which incorporates some additional logic specific for the Soracom LTE-M Button:
import https from 'https';
import url from 'url';

const slackUrl = process.env.SLACK_URL;

export const handler = async function(event, context) {
  // Log the incoming event and context parameters
  console.log('event: %j', event);
  console.log('context: %j', context);

  // Get the 19-digit SIM ID (ICCID) where the click came from
  const simId = context.clientContext.simId;

  // Get the button click type
  const detectType = event.detect_type;

  // Set a custom message to send to Slack depending on click type
  let message;
  if (detectType === 'Single short click') {
    message = `Incoming single click! 💥`;
  } else if (detectType === 'Double short click') {
    message = `Incoming double click! 🔔🔔`;
  } else if (detectType === 'Single long click') {
    message = `Incoming long click! 🎉🎉🎉`;
  } else {
    message = `Unknown incoming event! 🤔`;
  }

  // The message to post to Slack, using Slack's Block payload format
  // https://api.slack.com/block-kit
  var slackWebhookPayload = {
    "blocks": [
      {
        "type": "section",
        "text": {
          "type": "plain_text",
          "text": message,
          "emoji": true
        }
      },
      {
        "type": "context",
        "elements": [
          {
            "type": "mrkdwn",
            "text": `Sent from Soracom LTE-M Button (${simId})`
          }
        ]
      }
    ]
  };

  // Prepare the HTTP POST body
  const requestBody = JSON.stringify(slackWebhookPayload);

  // Prepare the HTTP POST options
  const slackWebhookOptions = url.parse(slackUrl);
  slackWebhookOptions.method = 'POST';
  slackWebhookOptions.headers = {
    "Content-Type": "application/json",
    "Content-Length": Buffer.byteLength(requestBody)
  };

  // Create the HTTP POST request
  return new Promise((resolve, reject) => {
    const req = https.request(slackWebhookOptions, (response) => {
      if (response.statusCode === 200) {
        // AWS Lambda log
        console.log('Message successfully sent to Slack!');

        // Response returned to device
        resolve({ "result": "ok" });
      } else {
        // AWS Lambda log
        console.log(`Slack Incoming WebHook returned error ${response.statusCode}`);

        // Response returned to device
        reject({ "result": "ng" });
      }
    });

    // Send the request body
    req.write(requestBody);
    req.end();
  });
};-
Finally, add a
SLACK_URLEnvironment variable and paste the Slack Incoming WebHook URL generated earlier, and Save your AWS Lambda function. - Once you have created your AWS Lambda function, make a note of the Function ARN. It should look like this:
arn:aws:lambda:us-east-1:900012345678:function:my-button-to-slack-functionCreate an AWS IAM User
Next, follow the instructions from the Using Funk to Send Data to Slack via AWS Lambda guide for creating a new AWS IAM user. In general, you should:
-
Open the AWS IAM dashboard.
-
Add a User with Programmatic access, and attach a policy that gives this user the
lambda:InvokeFunctionpermission for the AWS Lambda function you created. - Generate an Access key ID and Secret access key for the user.
Register the AWS IAM Credentials
Next, follow the instructions from the Using Funk to Send Data to Slack via AWS Lambda guide for registering the AWS IAM user credentials to Soracom. In general, you should:
-
Sign in to the User Console, access the Security screen, and click the Credentials.
- Then, Register a credential set, give it a name such as
my-iam-credentials, and enter the AWS credentials Access key ID and Secret access key generated earlier.
Enable and Configure Soracom Funk
Soracom Funk is a paid service billed according to the number of requests used. A free tier is available, which will provide enough requests for thousands of button clicks each month. However, if you are planning to deploy a large number of Soracom LTE-M Buttons, you might exceed the free tier.
Please note that regardless of the free tier, sending and receiving data over the cellular network will still incur data usage fees.
Finally, let's enable and configure Soracom Funk:
-
In the User Console, navigate back to the Menu > Gadgets > Soracom LTE-M Button screen.
-
Find your button in the Soracom LTE-M Buttons list and click the link for the group:
-
In the group configuration screen, click the Soracom Funk panel to show its settings.
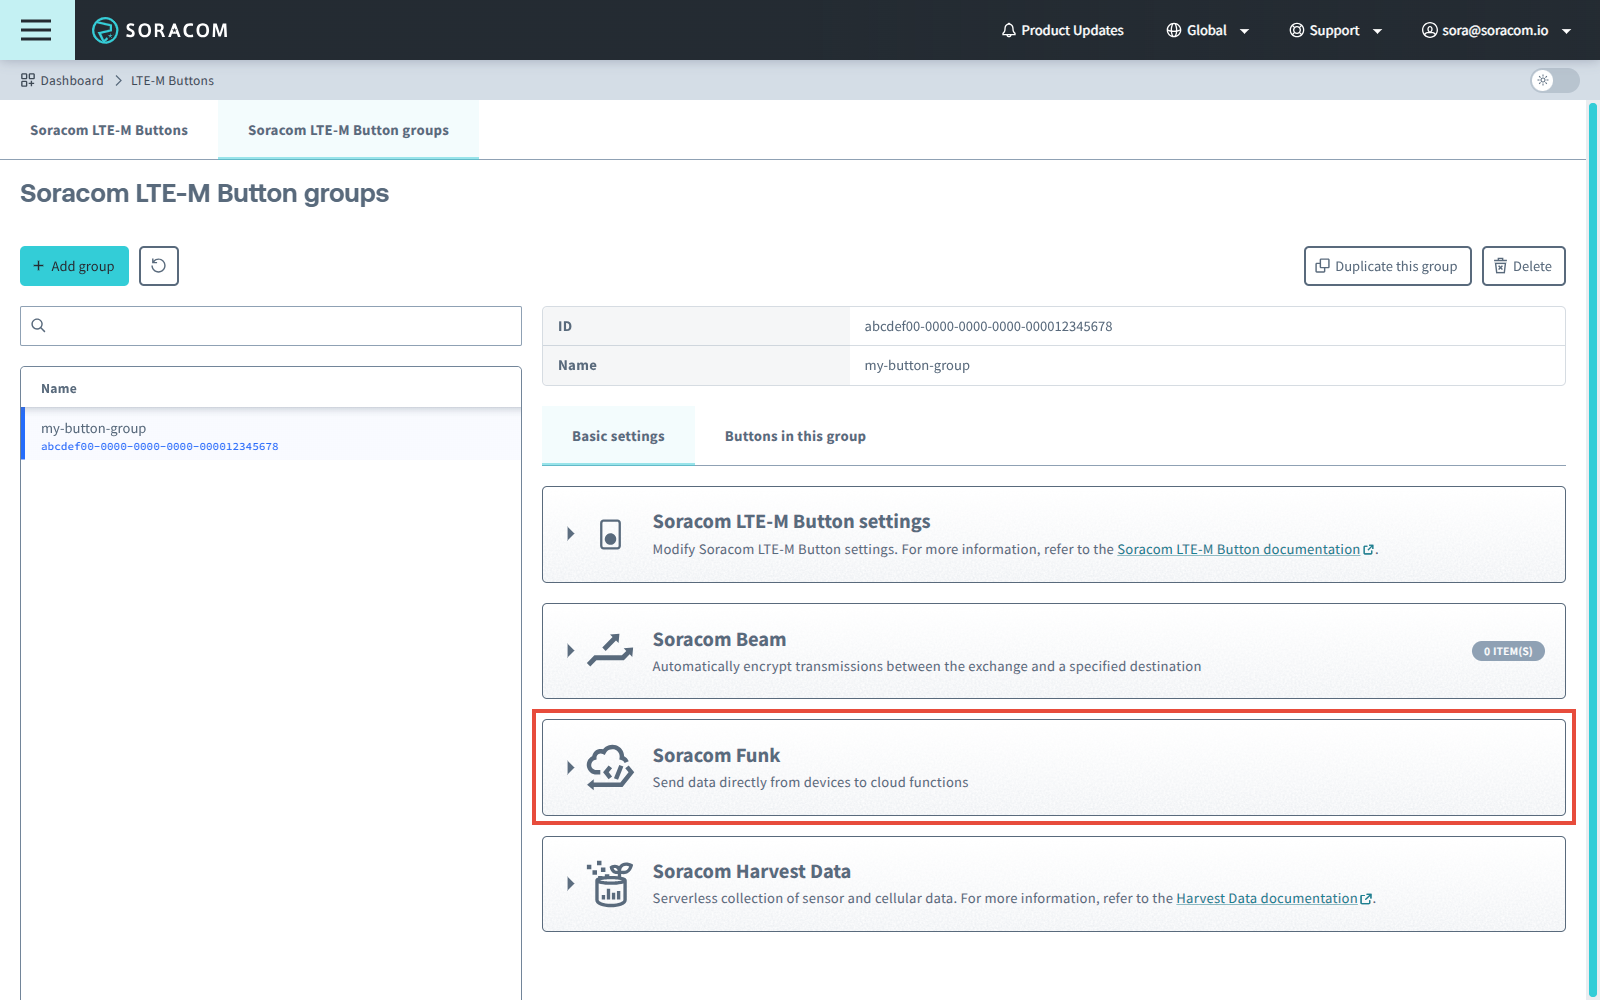
-
Click the toggle switch to enable Soracom Funk, then click enter your AWS Lambda function and AWS IAM credential details.
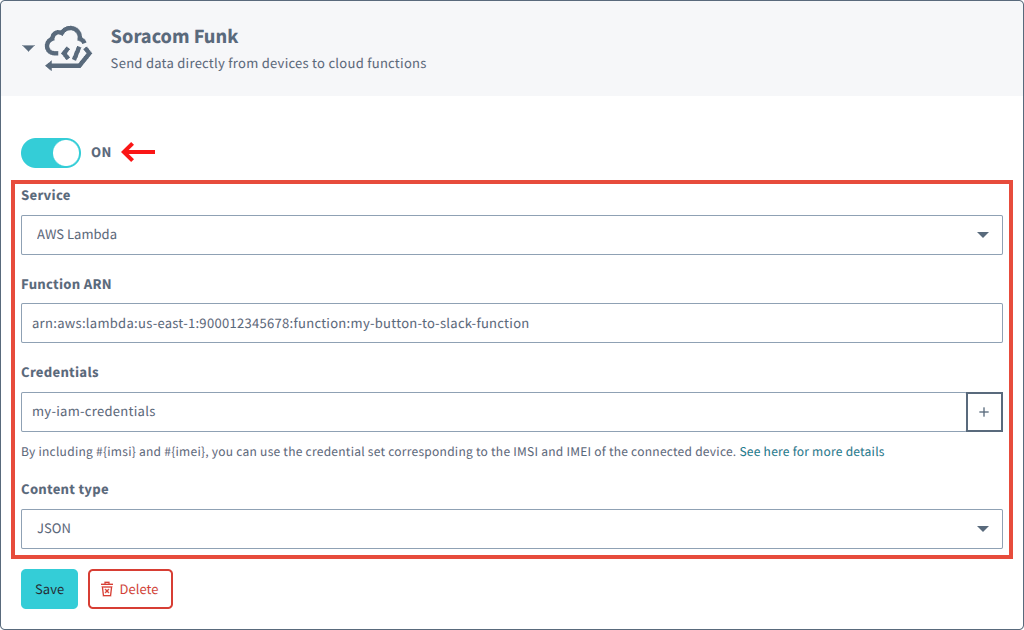
- Service -
AWS Lambda - Function ARN - Your AWS Lambda function ARN
- Credentials - Your AWS IAM credentials
- Content type -
JSON
Then click Save.
- Service -
Click the Button
Now that Soracom Funk is enabled and configured, it's time to test a button click.
-
Click the button once.

After a second, the LED on the button will begin to blink green ☀──☀──☀── (1 blink per second). This indicates that the button is in the process of connecting to a cellular network.
Once the button has connected to the cellular network, it will automatically send a message containing the click details to Unified Endpoint.
If the transmission was successful, the LED will turn solid green for 2 seconds ☀────────, and the button will automatically turn off. We can now go back to the User Console and verify the data that was sent by the button.
If the LED turns red ☀──────── during this process, it indicates that the button was unable to find a suitable network, or that the network connection failed. Refer to the Troubleshooting section for details.
Verify the Data
If everything went well, you should be able to see a Slack notification:
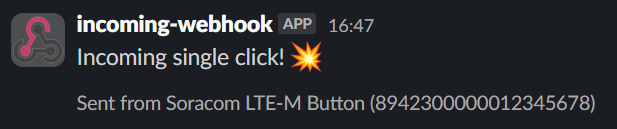
Since our Lambda function removed all of the other data sent by the button, we only see the Incoming single click! message. However, we can modify the function to access the rest of the data in the event variable for additional processing if needed. For more information on the message contents, refer to the Message Examples documentation.
We can also test out the Double short click and Single long click events and check that in the additional Slack notifications, the message reflects the click we performed.
Next Steps
Operation Modes
With the Soracom LTE-M Button up and running, you can now test its different operation modes or attach accessories to the external I/O port in order to trigger messages from other sensors. Check out the Soracom LTE-M Button documentation for more details.
Using Different Groups
Although a Soracom LTE-M Button group can only have one Soracom Funk configuration, you can create multiple groups, each with different Funk configurations, and move your button from one group to another. This allows you to "wirelessly reprogram" your button to switch from one webhook to another without actually changing any settings on the button itself.
Disable Soracom Funk
If you are switching to another Soracom service such as Soracom Beam, or if you want to temporarily stop forwarding button data to the Lambda function, don't forget to disable or delete the Soracom Funk configuration.
-
Open the group configuration screen again, and click the Soracom Funk panel to show its settings.
-
Click the toggle switch to disable the Funk configuration, or click Delete to delete it instead.
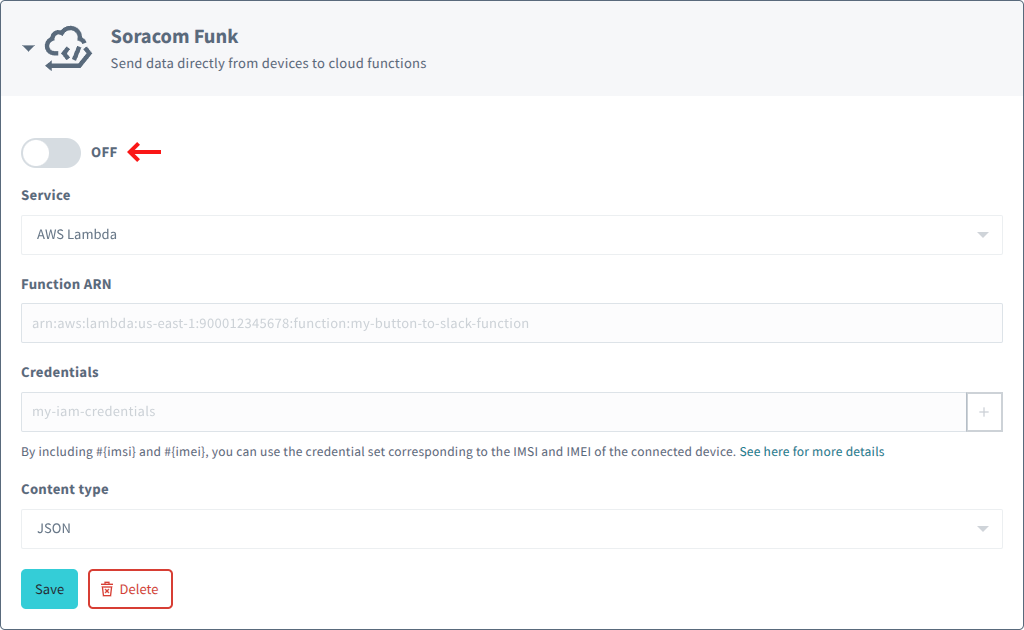
If you disable the Funk configuration, it will still be saved in the group configuration so that you can easily re-enable the setting later if needed.
After disabling or delete the Funk configuration, you may also want to clean up your AWS Lambda function.