Using Funk to Send Data to Slack via AWS Lambda
Introduction
Soracom Funk provides an easy way for a device to send data to a cloud function service for processing and receive the resulting output of the function, all without setting up custom servers or network environments. In this guide, we will set up a simple notification function with AWS Lambda, which will take data sent from our device using Funk, then call a Slack webhook to post the data as a channel notification, and return the result of the webhook call back to the device.
Prerequisites
This guide assumes that you are familiar with the basics of AWS, as well as how to send HTTP requests from your device. In addition, you will need the following:
- An Air SIM device which can send HTTP requests
- An AWS account
Goal
Once we have completed this guide, our application should look something like this:
[Device] → [Soracom Funk] → [AWS Lambda] → [Slack Notification]
We will be using a simple HTTP POST request to send data from our device to the http://funk.soracom.io HTTP entry point. Funk will then call our AWS Lambda function, which will in turn take care of calling a Slack webhook, and return a response to our device based on the result of the Slack webhook.
Configure Slack
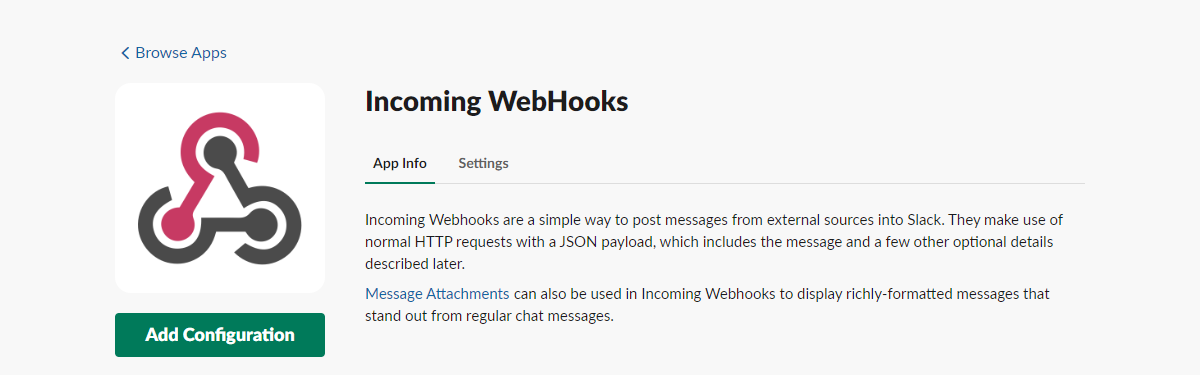
1. Create an Incoming WebHook
-
Login to your Slack workspace using a web browser. Click your workspace menu and select Customize Slack.
-
From the Customize Your Workspace screen, click the Configure apps section.
-
From the Apps screen, click the Custom Integrations section, then click Incoming WebHooks.
-
Click the Add Configuration button.
-
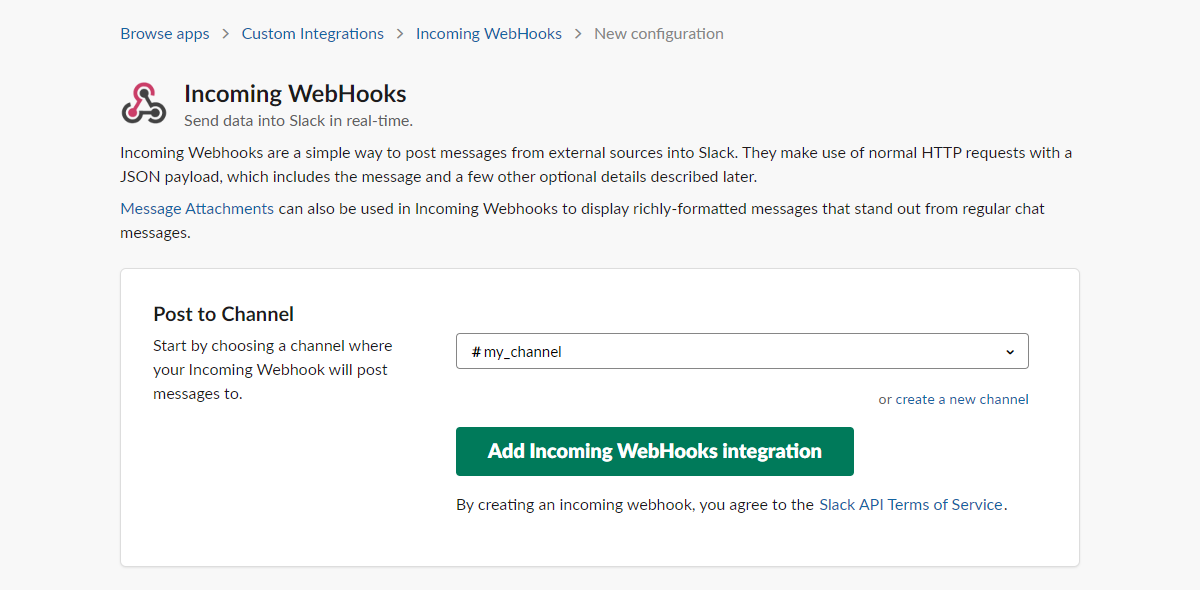
Select the Channel where notifications should be sent, then click the Add Incoming WebHooks integration button.
-
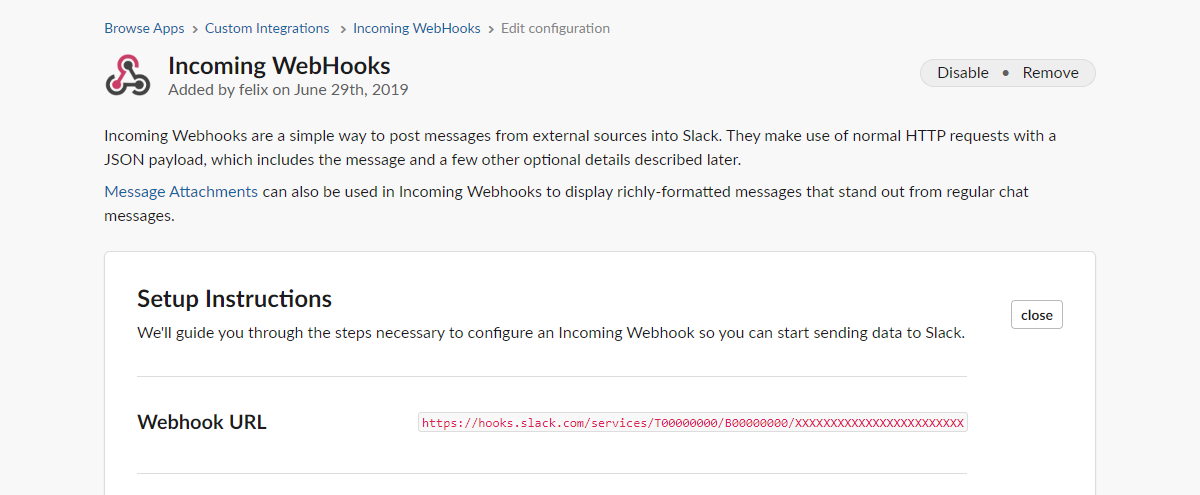
Make a note of the Webhook URL, as we will need this when setting up our Lambda function.
Slack is now ready to receive data, which will be posted to our selected channel.
Configure AWS Lambda
Next, let's set up our AWS integration.
2. Create a Lambda Function
-
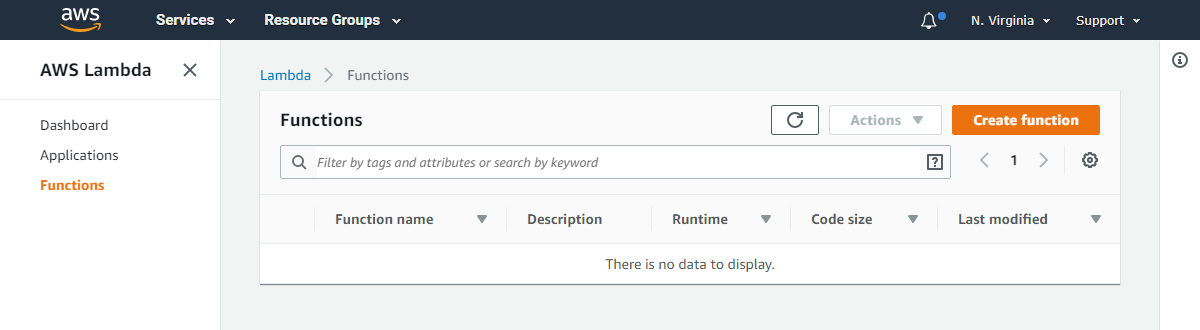
Open the AWS Lambda dashboard. Make sure to switch to the AWS region you want to use for your application. Then click the Create function button.
-
Select the Author from scratch option, and give your AWS Lambda function a recognizable name, such as
soracom-funk-to-slack. Here, we will use a Node.js application, so we will also set Runtime asNode.js 10.x. Then click Create function.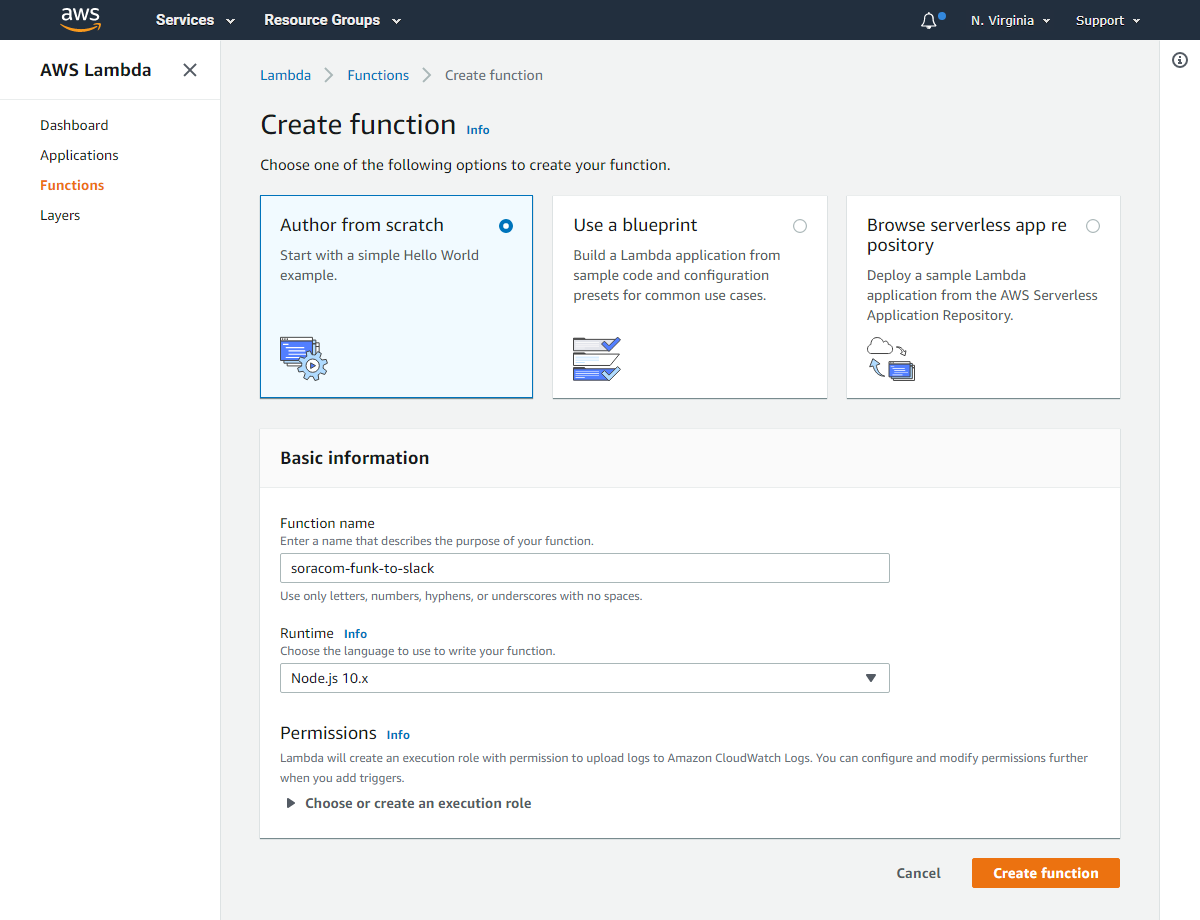
- Copy and paste the following Node.js application into the Function code:
const https = require('https');
const url = require('url');
const slackUrl = process.env.SLACK_URL;

exports.handler = function(event, context, callback) {
  // AWS Lambda output
  console.log('event: %j', event);
  console.log('context: %j', context);

  // The message to post to Slack, using Slack's payload format
  var slackWebhookPayload = {
    "text": "--- *Device called Lambda function with the following parameters* ---",
    "attachments": [
      {
        "title": "clientContext",
        "color": "#34cdd7",
        "text": "```\n" + JSON.stringify(context.clientContext, null, "  ") + "\n```",
        "mrkdwn_in": ["text"]
      },
      {
        "title": "event",
        "color": "#e47911",
        "text": "```\n" + JSON.stringify(event, null, "  ") + "\n```",
        "mrkdwn_in": ["text"]
      }
    ]
  };

  var requestBody = JSON.stringify(slackWebhookPayload);

  var slackWebhookOptions = url.parse(slackUrl);
  slackWebhookOptions.method = 'POST';
  slackWebhookOptions.headers = {
    "Content-Type": "application/json",
    "Content-Length": Buffer.byteLength(requestBody)
  };

  var request = https.request(slackWebhookOptions, function(response) {
    if (response.statusCode === 200) {
      // AWS Lambda Output
      console.log('Slack Incoming WebHook called successfully!');

      // Response returned to device
      callback(null, { "result": "ok" });
    } else {
      // Response returned to device
      callback(false, { "result": "ng", "reason": "Slack Incoming WebHook returned status code " + response.statusCode });
    }
    return response;
  });

  request.write(requestBody);
  request.end();
};-
Our AWS Lambda function needs to know which Slack Incoming WebHook URL it should post to. Rather than embedding the URL in the function code, we will set it as an environment variable.
Add an Environment variable
SLACK_URL, and set its value to the Slack Incoming WebHook URL generated earlier. -
Our function will now look like this:
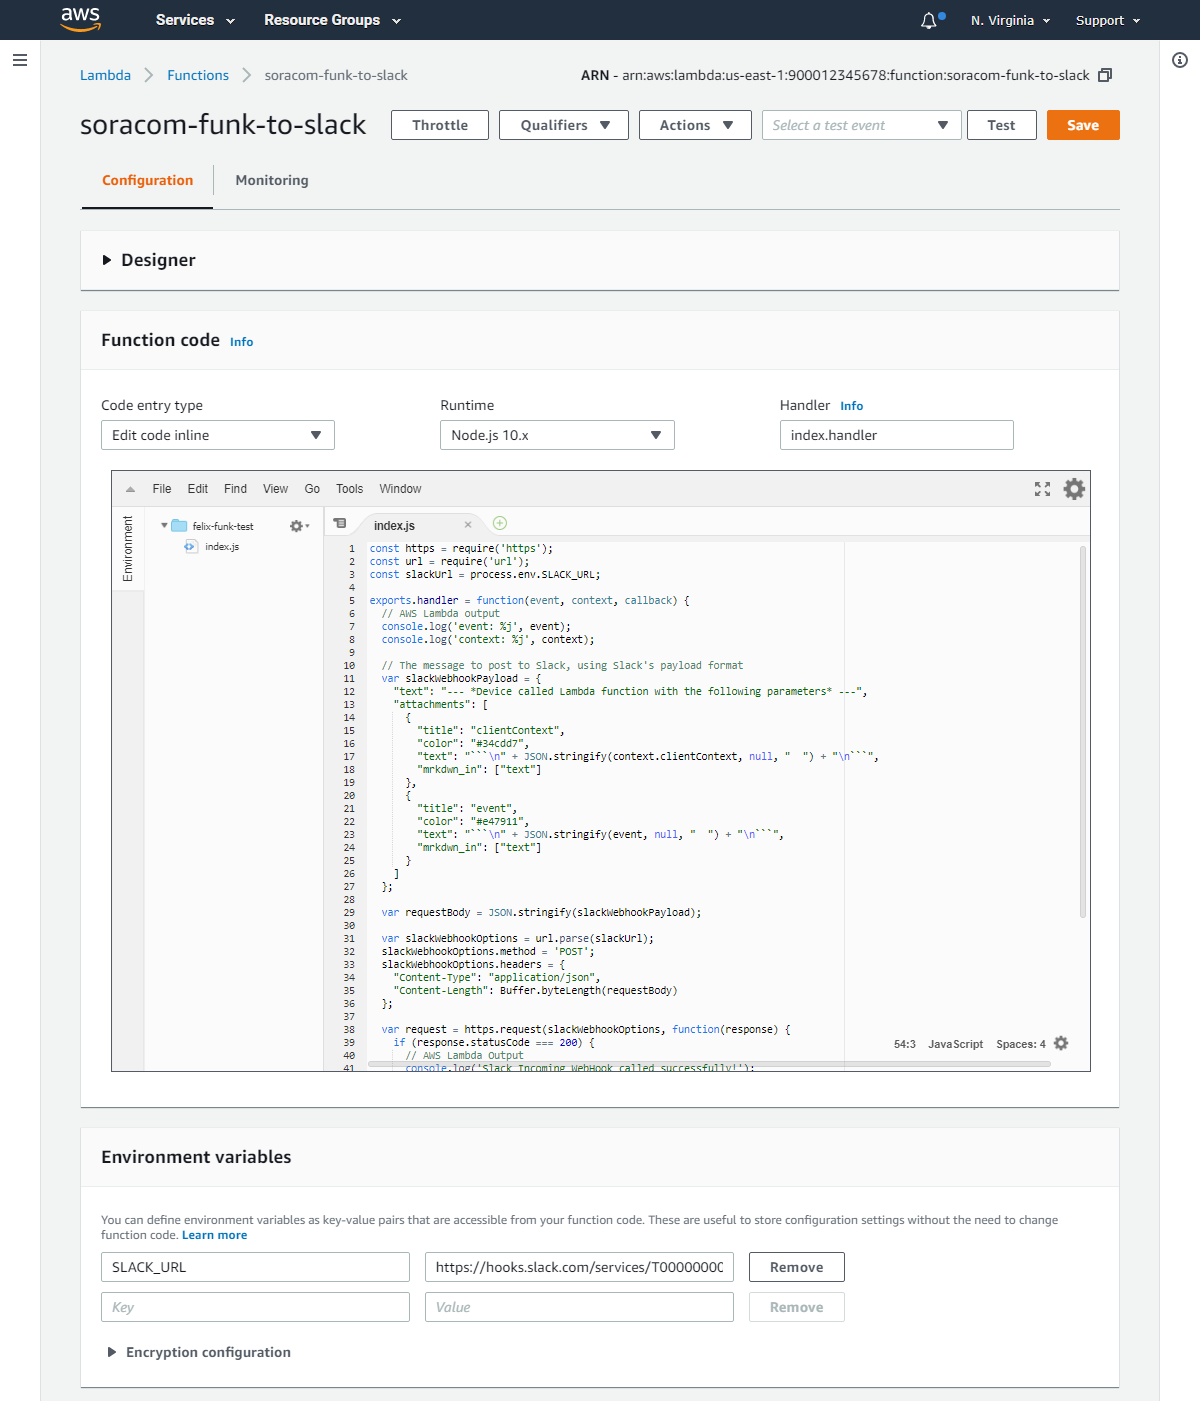
- If everything looks good, click the Save button.
Before we finish our Lambda function, let's make a note of the ARN located at the top right of the function configuration.
3. Create an IAM User
In order for Funk to be able to call the AWS Lambda function we just created, we need to create an AWS IAM user with programmatic access and permissions to access AWS Lambda.
-
Open the AWS IAM dashboard.
-
Click the Users section, then click the Add user button.
-
Enter a name for the user, such as
soracom-funk. Make sure to check Programmatic access. Then click the Next: Permissions button.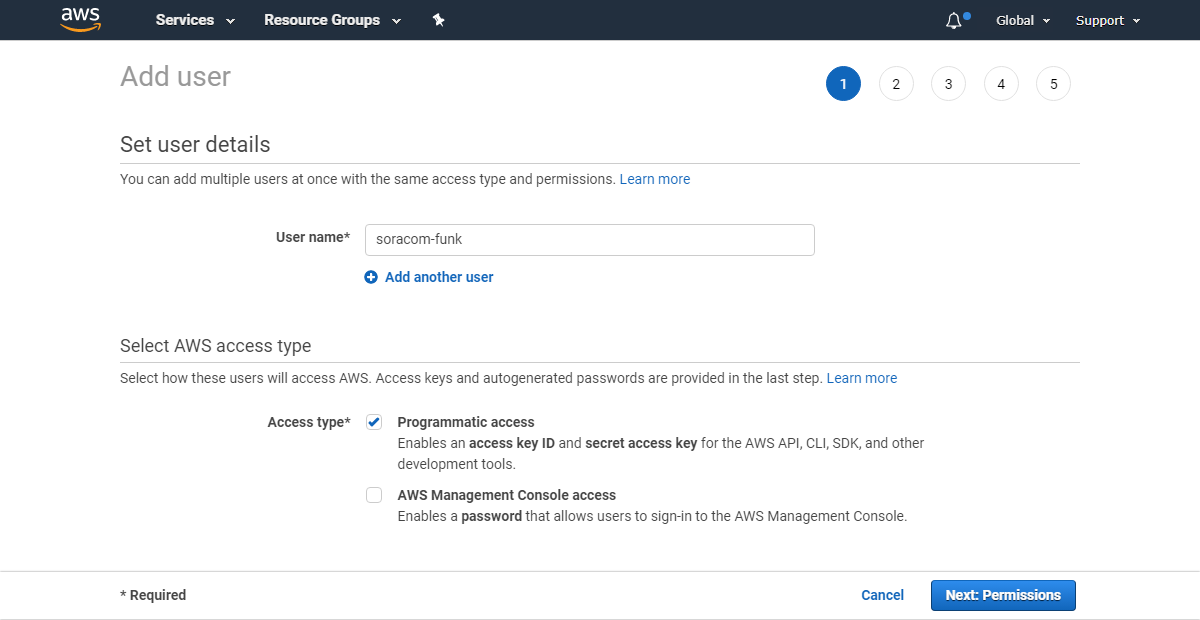
-
Click the Attach existing policies directly option, then click the Create policy button.
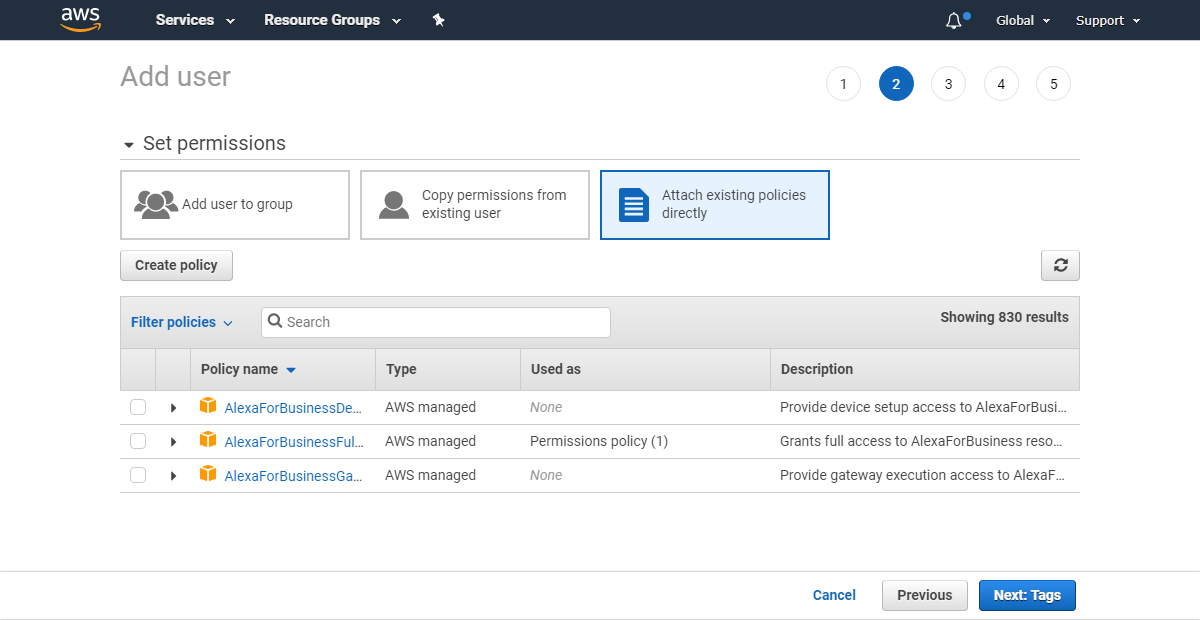
-
In the Create policy screen, click the JSON tab and copy and paste the following policy:
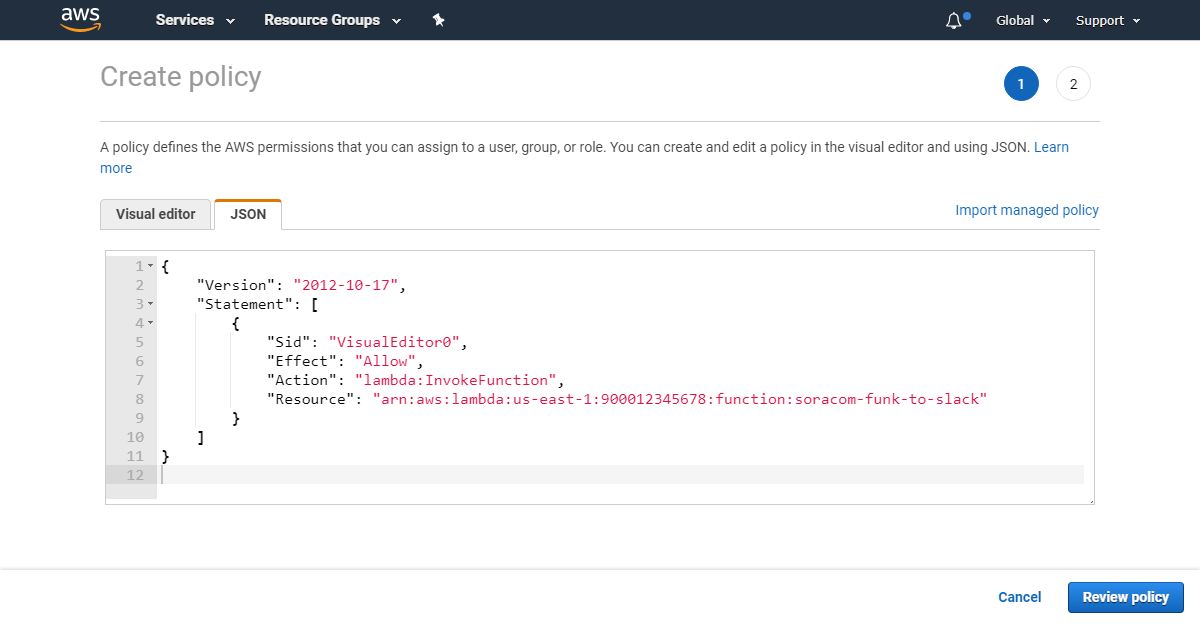
{
  "Version": "2012-10-17",
  "Statement": [
    {
      "Sid": "VisualEditor0",
      "Effect": "Allow",
      "Action": "lambda:InvokeFunction",
      "Resource": "arn:aws:lambda:us-east-1:900012345678:function:soracom-funk-to-slack"
    }
  ]
}
Make sure to change the Resource value to use the ARN of the Lambda function you created. Then click the Review policy button.
-
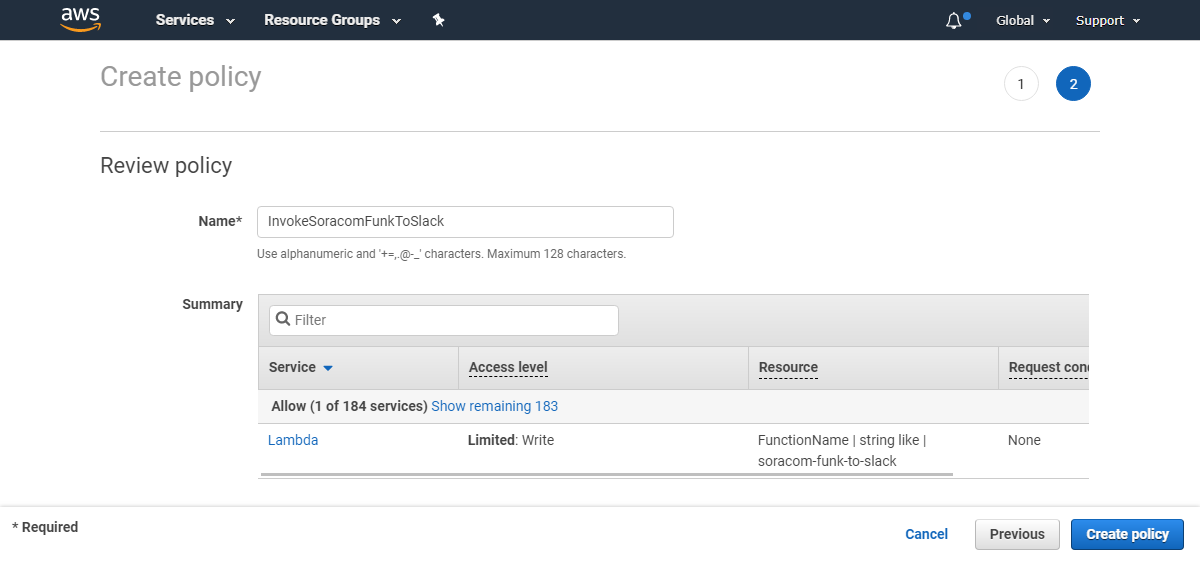
Enter a Name for the policy, then click the Create policy button.
-
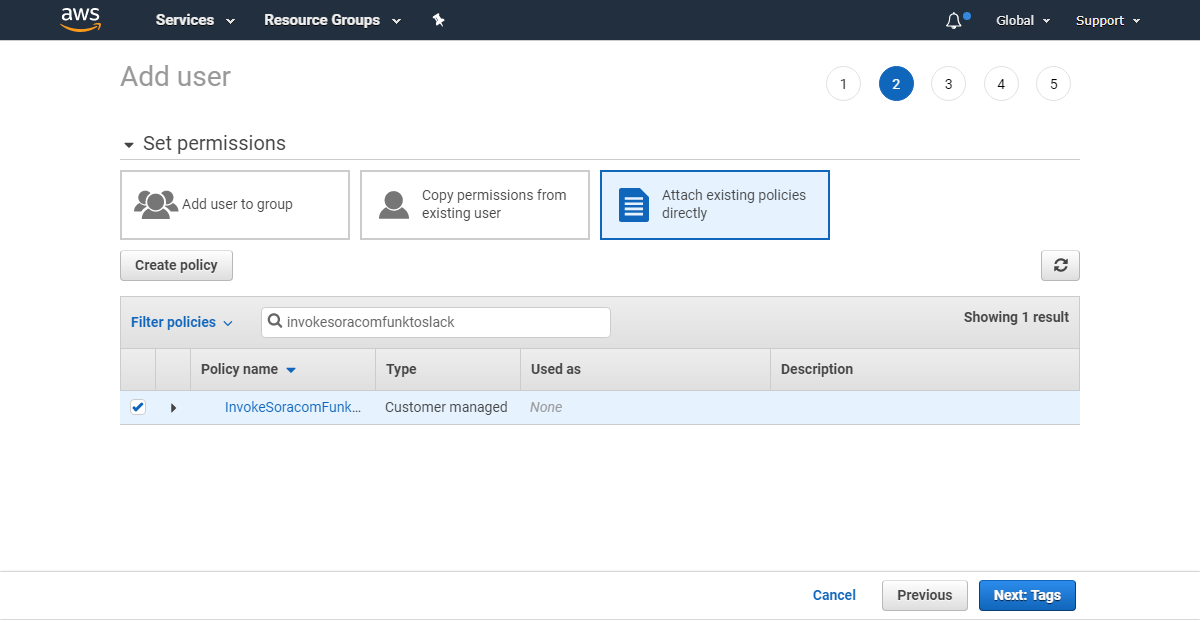
Once the policy has been created, go back to the Add user screen, and search for the policy you just created. Click the next to the policy name to add the policy to the IAM user.
-
Continue clicking the Next buttons until the IAM user has been created. You will be given the IAM user's Access key ID and Secret access key. Make sure to note these, as we will register them next.
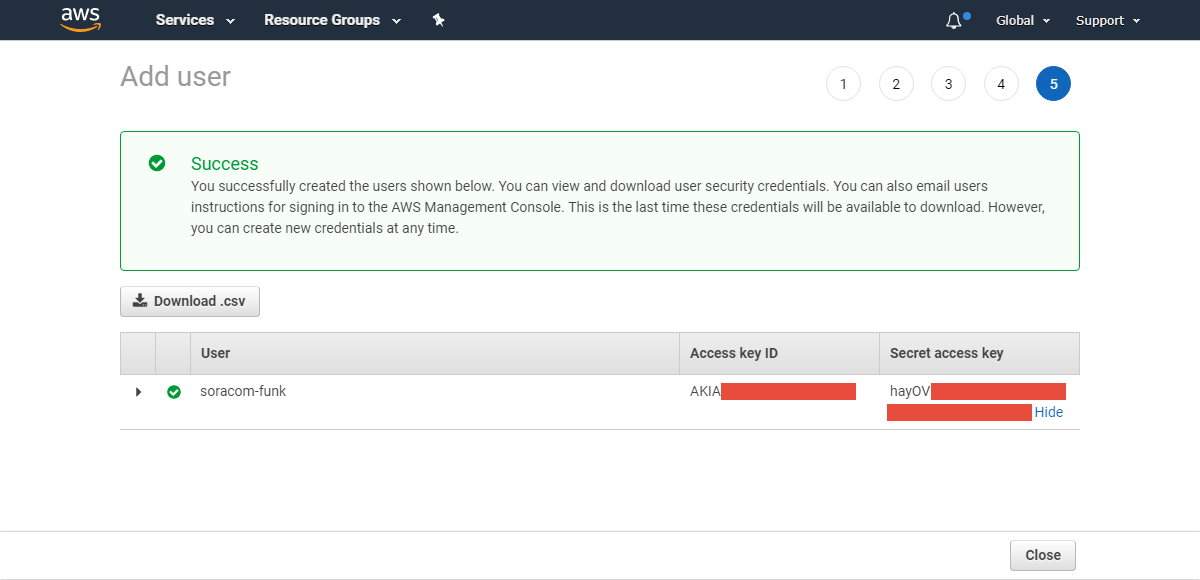
The IAM user Secret access key is only shown once. If you lose the Secret access key, you will have to delete it and create a new one.
Now we have an IAM user which can be used to access our AWS Lambda function.
When attaching the AWSLambdaRole permissions, the IAM user will be able to access all Lambda functions in your AWS account. You can also limit AWS Lambda access to specific functions by indicating which Lambda function ARNs should be allowed, indicating the ARN of the function you created. Refer to AWS IAM user statement documentation for more information.
Configure Soracom Funk
Now we can finish our integration by setting up Funk.
4. Register AWS IAM Credentials
-
Login to the User Console. Click your account menu, then select Security.
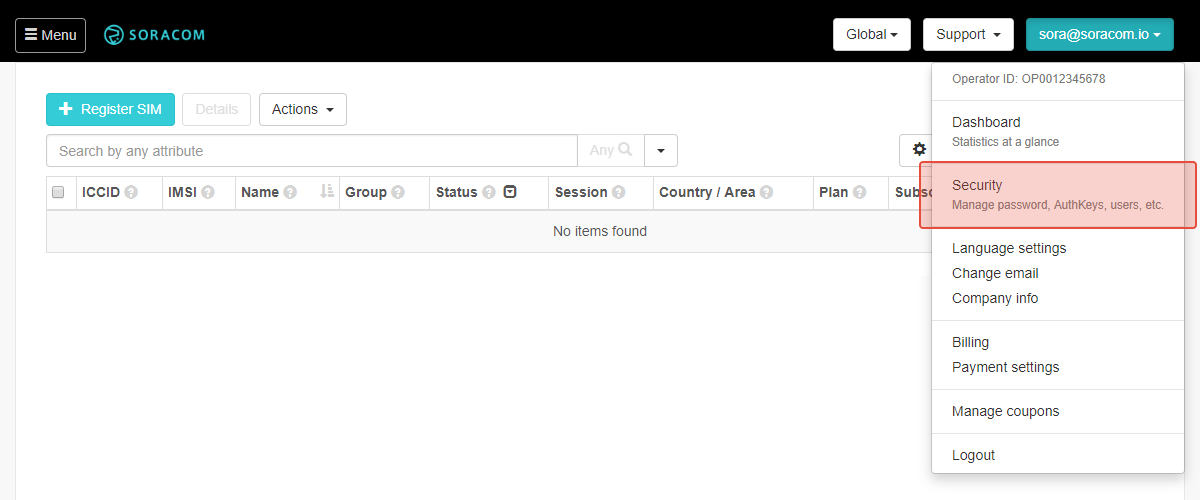
-
Click the Credentials section, then click Register a credential set.
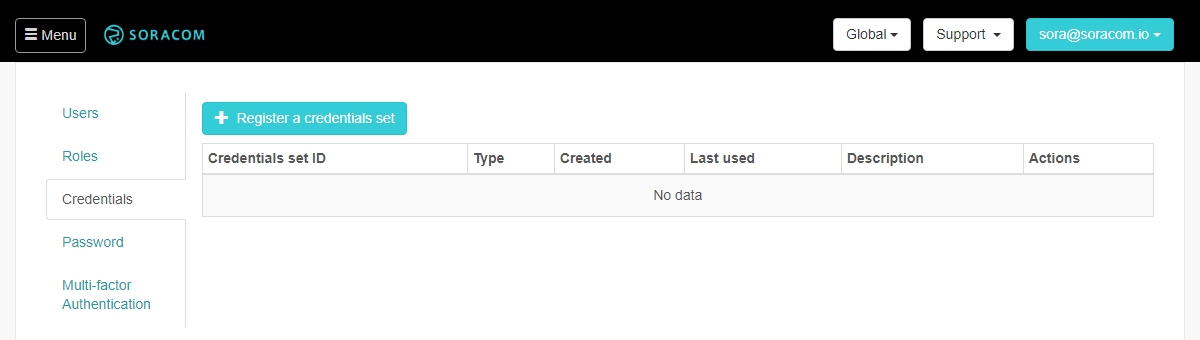
-
Enter a Credential set ID for the credential set, such as
aws-iam-soracom-funk. Then selectAWS Credentialsas the Type, and paste the IAM user Access Key ID and Secret Access Key.
Click the Register button.
5. Enable Soracom Funk
Now all that's left is to enable Funk.
-
From the Menu, open the Groups screen.
-
From the list of groups, click the Name of the group you want to configure to open its settings page. If you don't have a group, simply create a new group, and remember to add your SIM card to that group so that the Funk settings will be applied to the SIM.
-
Underneath the Basic Settings tab, click the SORACOM Funk panel to expand its settings.
-
Enable Funk by switching the option to ON. Then configure Funk using the following parameters:
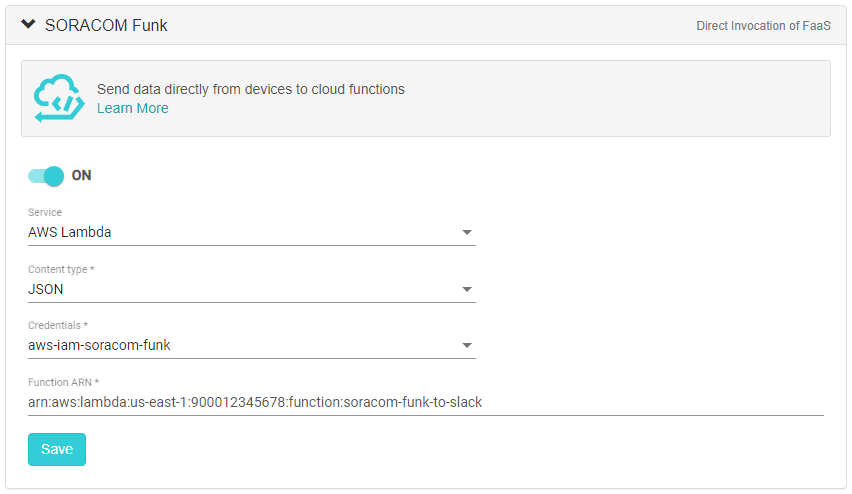
- Service -
AWS Lambda - Content type -
JSON - Credentials - The AWS IAM credentials we registered earlier
- Function ARN - The ARN of our AWS Lambda function
Click the Save button.
- Service -
All done!
Test the connection
Now that everything is set up, let's test using a Raspberry Pi which has a 3G/LTE modem attached, with an Air SIM card inserted.
curl -X POST \
| -H 'Content-Type: application/json' \
| -d '{"hello": "world"}' \
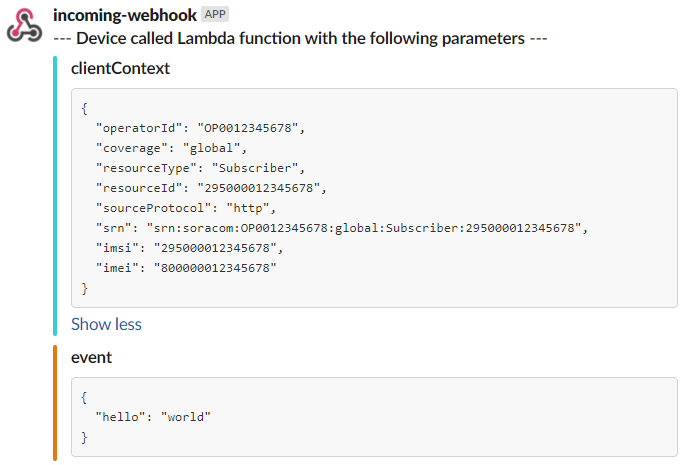
| http://funk.soracom.ioOnce our Lambda function has processed the request, the response is sent back to our device:
>{"result":"ok"}And Slack will post the notification to our channel:
Wrap-up
In this example, we created a relatively simple integration between our device and Slack in order to receive notifications when our device publishes messages.
Of course, as the Slack Incoming WebHook function takes standard HTTP requests, we could have simply programmed our device to call the Slack webhook directly.
However, by sending the data using Soracom Funk and creating an AWS Lambda function to call the Slack webhook, we have greatly simplified the logic required on our device: our device no longer needs to be concerned with the Slack webhook URL, and as the Slack-specific parameters are now controlled in the cloud within AWS Lambda's environment variables, we can easily update our Lambda function settings to switch to a different Slack webhook URL, quickly extend the functionality of our Lambda function, or even reconfigure Funk to call a different Lambda function, all without touching our device.