Soracom Onyx LTE™ USB Modem Setup Guide
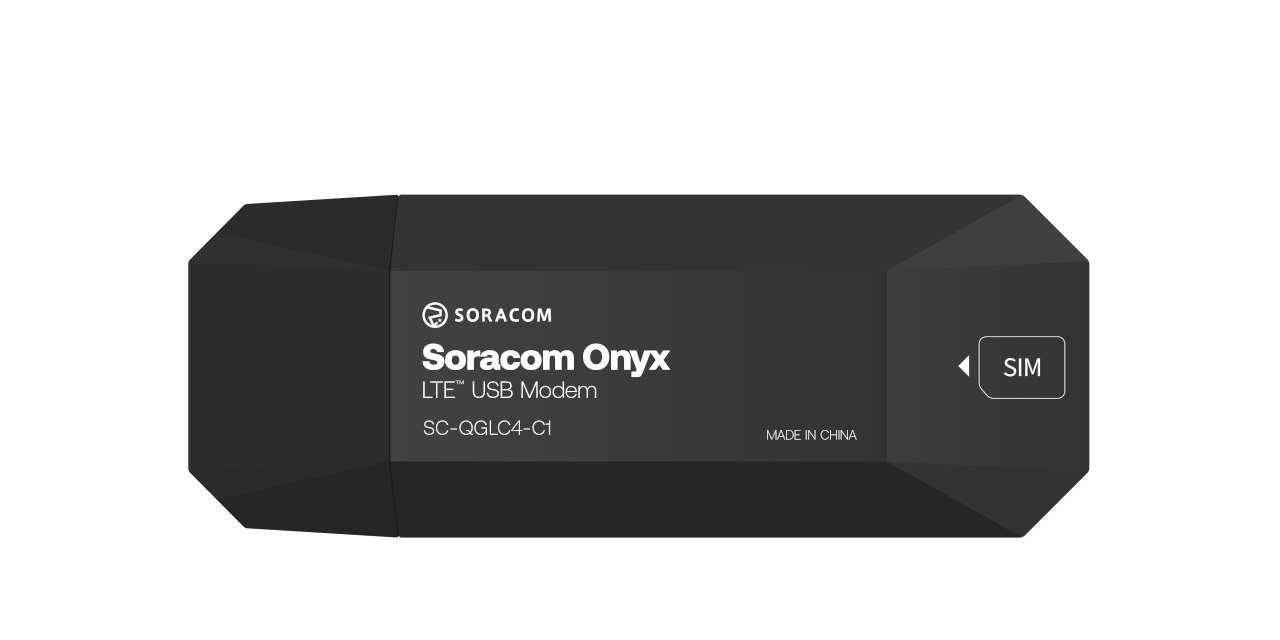
In this guide, we will set up and configure the Soracom Onyx LTE™ USB Modem with a suitable Linux device to connect to the Soracom network.
Requirements
To follow this guide, you will need to meet the following requirements:
- A Soracom account, with a valid Payment Method registered
- A Soracom Onyx LTE™ USB Modem with a Soracom Air for Cellular eSIM, pre-inserted Nano SIM, or a separate Nano SIM
- A Linux device with a USB 2.0 or USB 3.0 (recommended) port, such as a Raspberry Pi or Linux computer
The Onyx modem is not supported on non-Linux operating systems such as Windows, Android, or Mac OS.
SIM Registration
Registering your Soracom Air IoT SIM card to your Soracom account both activates its service and enables you to access Soracom features.
Soracom SIM cards come in a variety of form factors, such as embedded or pre-inserted in a device, or separately as part of a connectivity kit. If you have not already done so, take a moment to follow the instructions in the SIM Registration documentation to see how to register a variety of Soracom SIM cards to your account.
Hardware Setup
If your Soracom Onyx LTE™ USB Modem has an eSIM or a pre-inserted Nano SIM, no additional hardware setup is required. Simply plug the Onyx modem into a USB port on your device and proceed to the Software Setup section.
If your Onyx modem came with a separate Nano SIM, follow the steps below to insert the SIM card:
-
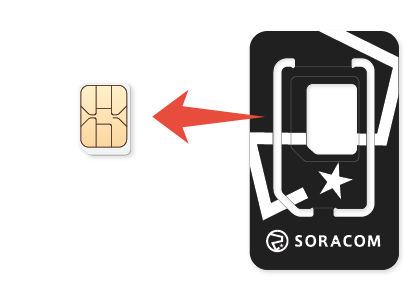
Carefully remove the Soracom SIM card from its outer packaging.
-
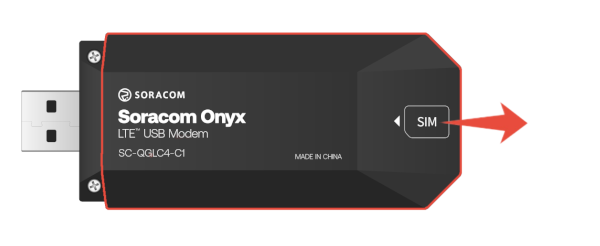
Slide the rear cover open to access the SIM slot.
-
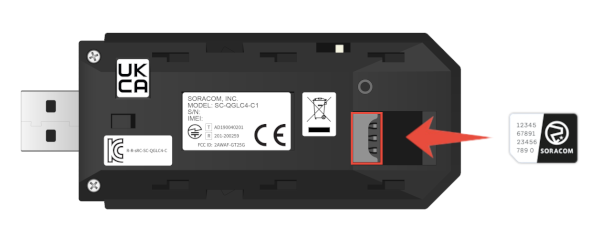
Insert the SIM card into the SIM slot, paying attention to the orientation notch.
- Slide the rear cover back into place.
Your Onyx modem is now ready to be inserted into a USB port on your device for the software configuration.
Software Setup
The Soracom Onyx LTE™ USB Modem uses a Quectel EG25-G modem internally, which is natively supported in Linux kernel versions 2.6 and above. Due to this, no additional driver installation is required; however, you must configure an application to establish and manage the cellular connection.
While many applications can do this, NetworkManager and WvDial are two of the most popular and reliable options. For most devices (such as Raspberry Pi, NVIDIA Jetson, LattePanda, and others), we recommend using NetworkManager as it will take care of detecting and configuring the Onyx modem automatically and can be easily configured for a variety of use cases. If you prefer to use a more traditional PPP connection or if NetworkManager is not available for your specific Linux distribution (such as with embedded gateways or routers), you can use WvDial instead.
Using NetworkManager
When using NetworkManager, the Onyx modem is fully managed, enabling automatic internet connections without manual dialing. It's widely used across Linux distributions for handling network configurations, including mobile broadband.
As of 2024-02-28, Raspberry Pi OS (Legacy) based on Debian 11 (Bullseye) released on 2023-12-05, comes with NetworkManager already installed but disabled. If you'd like to use NetworkManager, before running the automated script or following the manual installation steps, enable and start NetworkManager using the commands sudo systemctl enable NetworkManager; sudo systemctl start NetworkManager.
The latest Raspberry Pi OS based on Debian 12 (Bookworm) and released on 2023-12-11, has NetworkManager installed and enabled, and does not require additional steps.
Automated Installation
For your convenience, we provide a simple shell script that automates the process of installing NetworkManager and configuring it for use with the Onyx modem and the Soracom network and services.
This script has been developed and tested for use on a Raspberry Pi. While it should work with other Debian-based Linux distributions, there may be some compatibility issues. If the script does not run properly, consider reviewing the logs below for warnings or errors:
/var/log/soracom_setup.log/var/log/soracom_status.log
If you continue to experience issues with the automated script, we recommend following the Manual Installation instructions included below instead.
-
SSH into your device and download the setup script:
sudo curl -O https://soracom-files.s3.amazonaws.com/connect/setup_eg25.sh -
Next, modify the file properties so that it can be executed:
sudo chmod +x setup_eg25.sh -
Run the script and follow the prompts:
sudo ./setup_eg25.sh
Once the script finishes installing, your device should automatically connect to an available cellular network using the Onyx modem. You can then control the connection by using sudo nmcli con up soracom and sudo nmcli con down soracom commands.
Manual Installation
If you prefer to install NetworkManager separately, for example, to integrate it into your device provisioning script, you can follow these steps to install NetworkManager and configure it with the Onyx modem. The following instructions assume you are using a Debian-based distribution, but can be adapted for other systems.
-
Install NetworkManager:
sudo apt-get install network-manager -
Insert your Onyx modem and confirm that it is detected by your device:
lsusb
>
>Bus 001 Device 001: ID 2c7c:0125 Quectel Wireless Solutions Co., Ltd. EC25 LTE modem
As the EG25-G module is part of Quectel's Ex25 modules, it will appear as "EC25".
-
Confirm that ModemManager (a part of NetworkManager) has also detected your device:
mmcli -L > >/org/freedesktop/ModemManager1/Modem/0 [QUALCOMM INCORPORATED] QUECTEL Mobile Broadband Module -
Add the Soracom APN settings:
sudo nmcli con add type gsm ifname "*" con-name soracom apn soracom.io user sora password soraAfter a few moments, NetworkManager should establish the cellular connection automatically. You can then control the cellular connection using
sudo nmcli con up soracomandsudo nmcli con down soracomcommands.
By default, NetworkManager will treat cellular connections with lower priority and continue to route network traffic using WiFi, Ethernet, or other network interfaces. To change this behavior, you can modify the soracom connection to create custom routes or change the interface metric:
-
If you want network traffic for Soracom services (such as Beam, Funnel, Funk, or Harvest) to use the Onyx modem but all other traffic on WiFi or ethernet connection, create a custom route:
sudo nmcli con modify soracom +ipv4.routes "100.127.0.0/16 0.0.0.0 0, 54.250.252.67/32 0.0.0.0 0, 54.250.252.99/32 0.0.0.0 0"If you prefer to route all traffic using the Onyx modem instead, modify the connection metric directly:
sudo nmcli con modify soracom ipv4.route-metric 0If you configure your device to use the Onyx modem's network interface by default, please note that all traffic will use the cellular connection even if WiFi, ethernet, or other network connections are available. Take care to disable the cellular connection using
sudo nmcli con down soracomwhen installing additional software, performing upgrades, or other high-bandwidth actions.
Using WvDial
When using WvDial, the Onyx modem's USB serial port will be used to dial the modem, and the resulting connection will be made available as a ppp0 network interface. As the default PPP configuration will not change any routing behavior, you may need to make additional configuration changes to other parts of your Linux system as described below. The following instructions assume you are using a Debian-based distribution, but can be adapted for other systems.
Manual Installation
-
Install WvDial:
sudo apt-get install wvdial -
Edit the default WvDial configuration file:
sudo nano /etc/wvdial.conf
>
>[Dialer Defaults]
>Modem = /dev/ttyUSB2
>Baud = 460800
>Init1 = AT+CFUN=1
>Init2 = ATZ
>Init3 = AT+CGDCONT=1,"IP","soracom.io"
>Phone = *99***1#
>Dial Command = ATD
>Username = sora
>Password = sora
>Auto DNS = 1
>Check Def Route = 1
>Carrier Check = 0
>Stupid Mode = 1
>Dial Attempts = 3
>ISDN = 0
By default, the Onyx modem's USB serial port will be available at
/dev/ttyUSB2. If you are connecting other USB serial devices at the same time, this port may change, and you may need to modify this according to the Setting the Modem Port instructions below. -
Insert your Onyx modem and confirm that it is detected by your device:
lsusb
>
>Bus 001 Device 001: ID 2c7c:0125 Quectel Wireless Solutions Co., Ltd. EC25 LTE modem
As the EG25-G module is part of Quectel's Ex25 modules, it will appear as "EC25".
-
Run WvDial to verify the connection. If connected, you should see output similar to the following:
sudo wvdial
>
>--> WvDial: Internet dialer version 1.61
>--> Initializing modem.
>--> Sending: AT+CFUN=1
>AT+CFUN=1
>OK
>--> Sending: ATZ
>ATZ
>OK
>--> Sending: AT+CGDCONT=1,"IP","soracom.io"
>AT+CGDCONT=1,"IP","soracom.io"
>OK
>--> Modem initialized.
>--> Sending: ATD*99***1#
>--> Waiting for carrier.
>ATD*99***1#
>CONNECT 150000000
>--> Carrier detected.  Starting PPP immediately.
>--> Starting pppd at Fri Mar 1 13:48:20 2024
>--> Pid of pppd: 123
>--> Using interface ppp0
>--> local  IP address 10.123.45.67
>--> remote IP address 10.64.64.64
>--> primary   DNS address 100.127.0.53
>--> secondary DNS address 100.127.1.53
While WvDial is running, you can verify that a ppp0 network interface is now available using the ifconfig command in a separate terminal window.
Routing Traffic
Although WvDial will set up the ppp0 network interface, by default it will not modify any network routing rules. As a result, all network traffic will continue to use WiFi, ethernet, or other network connections. To send data using the cellular connection, you must modify the routes.
-
To change the routing rules, edit the
/etc/ppp/peers/wvdialfile to add the following option:sudo nano /etc/ppp/peers/wvdial > >... >replacedefaultroute
With this option, WvDial will replace the default network route (WiFi, ethernet, or other network interface) with the ppp0 interface whenever it is connected. Now when you run sudo wvdial, all network traffic will use the Onyx modem.
By enabling the replacedefaultroute option, all traffic will use the cellular connection even if WiFi, ethernet, or other network connections are available. Take care to stop WvDial and disable the cellular connection when installing additional software, performing upgrades, or carrying out high-bandwidth actions.
Adding WvDial to ifupdown
As manually running WvDial to start the connection is inconvenient, you can add a network interface definition to the ifupdown system (a standard part of most Linux distributions) to specify that wvdial should be used to configure the interface.
-
Edit the
/etc/network/interfacesfile to add the following definition:sudo nano /etc/network/interfaces > >... >allow-hotplug wwan0 >iface wwan0 inet wvdial
This will add a wwan0 interface which will be used to run WvDial in the background, which in turn will create the ppp0 interface when connected. You can then manage the cellular connection using sudo ifup wwan0 and sudo ifdown wwan0 commands.
Setting the Modem Port
By default, the Onyx modem's USB serial port will be available at /dev/ttyUSB2. However, if you are attaching other USB serial devices, this number may be different, and may also change each time your device is restarted.
To work around this inconsistency, you can use the Udev system within Linux to check if a USB serial device matches the Onyx modem, and then create a symlink that will always point to the correct port.
-
Create a new file in the
/etc/udev/rules.d/directory (such as30-eg25.rules) and add the following rule to the file:sudo nano /etc/udev/rules.d/30-eg25.rules > >KERNEL=="ttyUSB*", ATTRS{../idVendor}=="2c7c", ATTRS{../idProduct}=="0125", ATTRS{bNumEndpoints}=="03", ATTRS{bInterfaceNumber}=="02", SYMLINK+="modem", ENV{SYSTEMD_WANTS}="ifup@wwan0.service" -
Reload the rules:
sudo udevadm control --reload-rules -
Modify your
/etc/wvdial.conffile to use the symlink path instead:sudo nano /etc/wvdial.conf > >[Dialer Defaults] >Modem = /dev/modem >...
With this rule configured when a USB device is attached, Udev will check if it matches specific parameters (vendor ID, product ID, and specific port number), then it will perform two actions:
- Add a symlink
/dev/modemwhich points to the detected port - Run
ifup wwan0as a service
Now whenever you restart your device or plug in other USB devices, the Onyx modem USB serial interface will always be accessible at /dev/modem which will allow WvDial to use the correct interface to establish a network connection.
Testing your Onyx Modem
You can test your Soracom Onyx LTE™ USB Modem by utilizing the Ping Response Service provided by Soracom. This is a simple service that responds to ICMP echo requests (commonly known as "pings") and is only reachable when connected to the Soracom network.
From the terminal of the host device configured with the Onyx modem, run the following command to send a ping request to the Ping Response Service:
ping -c 4 pong.soracom.io
>
>PING pong.soracom.io (100.127.100.127) 56(84) bytes of data.
>64 bytes from 100.127.100.127 (100.127.100.127): icmp_seq=1 ttl=63 time=58.7 ms
>64 bytes from 100.127.100.127 (100.127.100.127): icmp_seq=2 ttl=63 time=54.9 ms
>64 bytes from 100.127.100.127 (100.127.100.127): icmp_seq=3 ttl=63 time=66.5 ms
>64 bytes from 100.127.100.127: icmp_seq=4 ttl=63 time=57.9 ms
>
>--- pong.soracom.io ping statistics ---
>4 packets transmitted, 4 received, 0% packet loss, time 3415ms
>rtt min/avg/max/mdev = 54.926/59.525/66.535/4.288 ms
Congratulations! Your Onyx modem is connected and ready to send data to the Soracom platform. Check out Next Steps for ideas on how to take advantage of all the Onyx modem has to offer.
If you do not receive a response or the ping request times out, review the Troubleshooting section for guidance on how to resolve common issues.
Next Steps
The Soracom Onyx LTE™ USB Modem can be used for a variety of applications, from simple data transmission to advanced IoT projects. We have included some examples of this below.
Using Built-in Protocols
The Quectel EG25-G modem in the Onyx device provides additional functionality. This includes advanced network configuration and various built-in application protocols (TCP, HTTP, MQTT, and more) that can be utilized by simply sending AT commands directly to the modem.
For more information, refer to the AT Command and Application manuals on the Device Drivers page. The Application manuals provide detailed information and examples on how to use the built-in application protocols, while the AT Command manuals provide a comprehensive list of AT commands that can be used to configure the modem.
Data Collection using Soracom Harvest Data
For applications that require simple data storage without further processing, integrating Soracom Harvest Data into your setup is an efficient solution. This service allows you to collect and store data transmitted from your Linux host device through the Onyx modem, facilitating easy access and management.
Soracom Harvest Data has a number of entry points for data collection, including HTTP, TCP, UDP, SMS, and USSD. This makes it highly compatible with many common communication methods with IoT devices. Whether you're monitoring environmental sensors, tracking device locations, or collecting other telemetry data, it can be easily transmitted to Harvest Data using one of the available entry points.
To get started, follow the steps on the
Harvest Data Configuration
page to enable the service and begin using it to collect data right away. To help you get started we also provide steps to
Send Data to Harvest Data
using curl for HTTP, or telnet for TCP and UDP.
Visualize Data with Soracom Lagoon
For applications where you want to visualize and analyze the data collected through your Onyx modem, you can add Soracom Lagoon on top of Soracom Harvest Data.
Lagoon provides powerful dashboarding and data visualization tools that you can use to, for example, track the battery level or the signal quality of the host device over time and create alerts if thresholds are reached.
While Lagoon's data visualization capabilities work best with devices that collect types of variable sensor data (such as temperature, humidity, accelerometer, and so on), you can also use it to build a functional dashboard for keeping track of other metrics. Given that Lagoon integrates directly with Harvest Data, there are no servers to configure or set up. Simply follow the steps on the Lagoon Configuration to enable the service and begin using it to build dashboards right away. We also provide steps to Create a Sample Dashboard to help you get started.
Frequently Asked Questions
This section aims to provide straightforward answers to common questions you may have about the Soracom Onyx LTE™ USB Modem.
What do the LED lights mean?
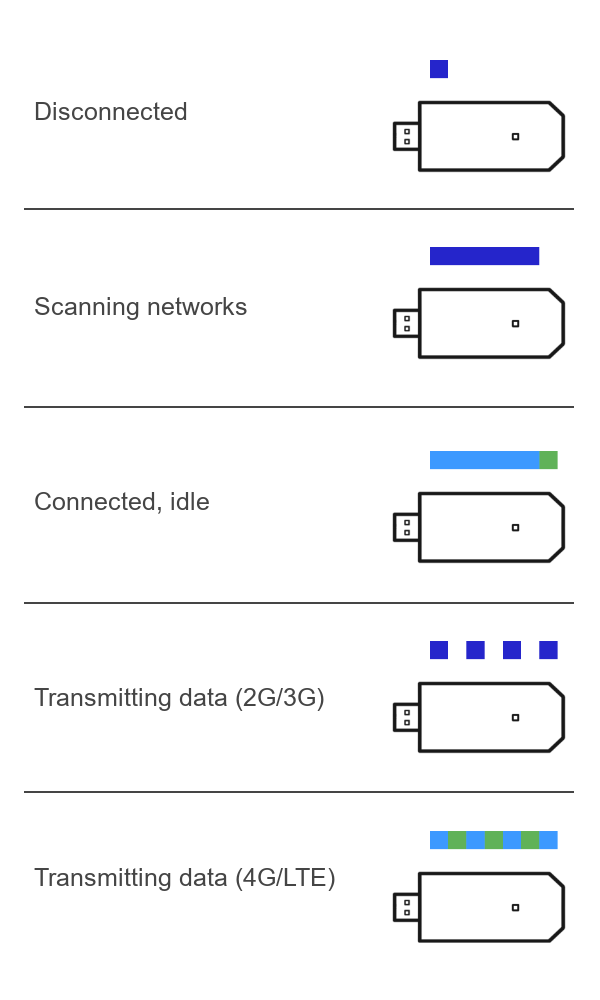
The Onyx modem has two LEDs that combine to create different colors and blink patterns to indicate the modem's status. LED states: Green and blue individually, or cyan when both green and blue LEDs are on at the same time.
The LED status light on the Onyx modem has the following color and blink patterns:
- Short blue blink followed by LED off - Disconnected, not scanning for networks.
- Long blue blink followed by LED off - Scanning for networks.
- Long cyan blink followed by short green blink - Connected, but idle and waiting to transmit data.
- Blinking blue - Transmitting data over 2G or 3G.
- Blinking cyan and green - Transmitting data over 4G/LTE.
How much power does it consume?
The power consumption of the Onyx modem is typically 35mA when idle and can typically reach 600mA while transmitting data. The Onyx modem is designed to be powered by a USB port, but not all devices with a USB port may be able to supply sufficient power.
If your device only has USB 2.0 ports, we recommend using a powered USB hub to ensure the stable operation of the Onyx modem. If your device has USB 3.0 ports, we recommend utilizing these as they can deliver sufficient power without requiring a separate powered USB hub.
What antennas are compatible?
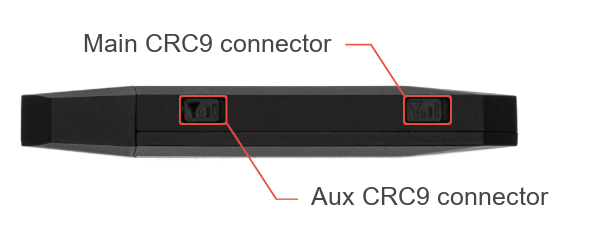
The Onyx modem has two built-in antennas and two CRC9 connectors for attaching external antennas. The built-in antennas are located on the top and bottom of the device and are designed to provide a good signal in most environments.
The two CRC9 connectors allow external antennas to be connected. In a bad radio environment, you may extend cables and place antennas away from the Onyx modem for better connectivity. The connector furthest from the USB plug is the main antenna, with the connector closest to the USB plug being the auxiliary antenna. You can connect a single antenna to both ports or two individual antennas. If connecting only a single antenna to a single port, it is recommended to connect it to the main antenna port.
At this time, Soracom doesn't provide any recommendations on specific antennas, but any antenna that supports the LTE bands used by the Onyx modem should work. Additionally, considering that the Onyx modem supports 2G/3G fallback, choosing antennas that also cover the 3G UMTS and 2G GSM bands listed will ensure the device maintains connectivity across different network environments. A table of supported network bands can be found on the Soracom Onyx LTE™ USB Modem product page.
Does it work with third-party SIM cards?
There are several versions of the Onyx modem available: featuring an eSIM, a pre-inserted Nano SIM, or with a separate SIM included. The eSIM version does not have a physical SIM card slot, making it incompatible with third-party SIM cards. However, versions with a pre-inserted or separate Nano SIM included are not vendor-locked and support standard Nano SIMs (4FF).
What does the reset button do?
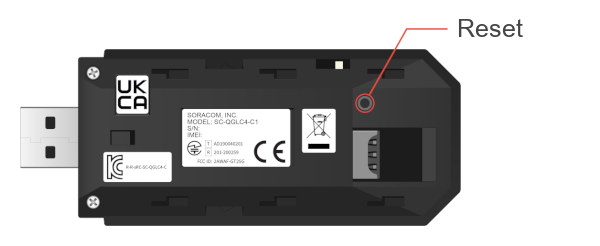
The reset button is located on the inside of the Onyx modem and can be accessed by removing the cover. This offers a hardware-level reset of the modem. It should be used only in cases where the Onyx modem becomes unresponsive or encounters errors that cannot be resolved through interacting with the modem using AT commands. Pressing it triggers a hardware reset, rebooting the modem to a clean state similar to its initial power-up.
What does the white toggle switch do?
When removing the cover from the Onyx modem, a white toggle switch can be found near the main antenna connector. This toggle switch is a design artifact and serves no functional purpose.
How can I disable 2G and 3G fallback?
Disabling 2G and 3G fallback can result in the Onyx modem being unable to connect to a network in areas where 4G/LTE coverage is limited or unavailable. This can result in physical intervention being required to bring the device online again.
To ensure the Onyx modem operates solely on 4G/LTE networks and disables fallback to 2G or 3G networks, you can adjust the network scanning mode via an AT command. The specific command to achieve this is AT+QCFG="nwscanmode",3,1. This command configures the modem to exclusively scan for and connect to 4G/LTE networks, preventing it from switching to 2G or 3G networks in areas where LTE coverage may be limited or unavailable. This setting is particularly useful for maintaining consistency in network performance, especially in regions with strong 4G/LTE infrastructure.
You can use the command AT+QCFG="nwscanmode",0,1 to reset the modem to its default network scanning mode, allowing it to scan for and connect to 2G, 3G, and 4G/LTE networks as required.
Which serial interface can I use to communicate with the modem?
The serial interfaces for communication with the Onyx modem can vary depending on other connected USB devices. With no additional devices connected, the appropriate serial interface to use for AT command communication under Linux is ttyUSB2. This interface is specifically designated for AT command interactions, allowing for direct communication with the modem to configure settings, control its operations, or query its status. You can find more details on this in the WCDMA<E Linux USB Driver User Guide provided by Quectel.
Troubleshooting
If you encounter issues while using the Soracom Onyx LTE™ USB Modem, this section provides guidance on how to troubleshoot common problems. By following these steps, you can quickly identify and resolve issues to maintain a stable connection.
The Onyx modem is connected but no data is being sent
If the Onyx modem is connected but not transmitting data, the problem may be related to the host's network configuration or incorrect or missing APN settings.
- Host Network Configuration: Ensure the host device has the correct network configuration. If you have been following this guide and are using NetworkManager, check your connection settings using the
nmcli con show soracomcommand. If using WvDial, check the/etc/wvdial.conffile to ensure the correct settings are configured as outlined in the Manual Installation sections. - APN Settings: Ensure the APN settings are correctly configured. If you have been following this guide, review the Manual Installation section for the NetworkManager or WvDial for commands to configure the APN. You can also check and set the APN using AT commands for the Quectel EG25-G modem. To check the current APN, use the command
AT+CGDCONT?. To set the APN for use with Soracom SIMs and services, useAT+CGDCONT=1,"IP","soracom.io", replacing"soracom.io"with the appropriate APN if a third-party SIM is being used.
The Onyx modem takes a long time to connect to a network
The time it takes the Onyx modem to connect to the network can be impacted by a variety of factors:
- Initial Network Scan: The Onyx modem may take longer to scan for available networks the first time you connect or if you've moved to a new location. This is normal behavior.
- Signal Quality: Suboptimal signal quality can significantly impact connection times. Check signal quality using the
AT+CSQcommand. The command returns a value indicating the Received Signal Strength Indicator (RSSI) of a cellular connection expressed as an integer from0to31, where0indicates no signal and31indicates the highest possible signal strength. Sometimes, a value of99is also possible, indicating that the signal strength is not known or is undetectable. If the returned RSSI is below14, try moving the Onyx modem to a different location with better signal quality. Additionally, if using external antennas, ensure they are correctly connected and positioned for optimal signal reception.
The Onyx modem is not detected by the host device
If your host device does not detect the Onyx modem, review the following steps:
- USB Connection: Check the USB connection and ensure the Onyx modem is securely plugged into the USB port. If the problem persists, try connecting the Onyx modem to a different USB port.
- Insufficient Power: Some ports may not provide sufficient power or may have connection issues. Plug the Onyx modem into a USB 3.0 port to ensure it receives sufficient power even under high load. If your device only supports USB 2.0, using a powered USB hub can ensure the Onyx modem receives enough power.
- Kernel Messages: For further diagnostics, check the kernel messages for any USB device errors using
dmesg | grep USB. This can provide insights into potential issues or conflicts that might be preventing the Onyx modem from being recognized.
The Onyx modem performs a full network scan on every reboot
A bug exists in older versions of ModemManager (a component of NetworkManager used to detect and control modems) that mistakenly causes some Quectel modems, including the Quectel EG25-G modem found in the Onyx, to unnecessarily perform a full cellular network scan each time the Linux device is rebooted, when a modem is unplugged and reconnected, or when ModemManager itself is restarted, during which time the modem is unable to send or receive data.
Once the modem has finished the network scan, the device and modem will resume normal operation. However, if your Linux device is restarted frequently, or your application requires periodically disabling and re-enabling the modem or restarting ModemManager, the network scan caused by the bug may introduce unacceptable delays in establishing cellular connectivity.
To see if your device is affected, run the mmcli --version command and check if you are running v1.14.0 or later. If you have an older version, you may need to update ModemManager.
In particular, the previous version of Raspberry Pi OS (such as Buster) has not updated its ModemManager package since v1.10.0. However, newer versions of ModemManager are available from the Debian Backports repository. To manually install the latest version of ModemManager, run the following commands to add the Debian Backports repository, update the package list, and install a newer version of ModemManager:
echo "deb http://deb.debian.org/debian buster-backports main" | sudo tee -a /etc/apt/sources.list
wget http://deb.debian.org/debian/pool/main/d/debian-archive-keyring/debian-archive-keyring_2021.1.1_all.deb
sudo dpkg -i debian-archive-keyring_2021.1.1_all.deb
sudo apt-get update
sudo apt-get install -t buster-backports modemmanager
Once installed, repeat the mmcli --version command to check that your ModemManager has been updated. If the version is v1.14.0 or later, the bug should be resolved and the Onyx modem will no longer perform a full network scan on every reboot.
Additional Resources & Support
For further device and advanced troubleshooting steps, please see our Troubleshooting guide.
For additional technical and product information, please visit the Soracom Onyx LTE™ USB Modem page.
For complete information on using the Soracom User Console, SIM management tools and APIs, Soracom platform services, and additional capabilities, documentation is available on the Soracom Developers website.
If you run into trouble, feel free to contact our Support Team.
- Log in to your User Console account.
- Click the Support menu and select Contact us. Doing so will redirect you to the Soracom Support portal.
- At the top of the page, click Submit a request.
- Complete the ticket form and click Submit.