GPS Tracker Setup Guide
For asset tracking applications, pre-built GPS tracker devices provide a cost-effective solution with minimal technical investment needed to set up a small fleet of devices and quickly begin tracking vehicles, containers, personal items, pets, and other mobile assets. GPS trackers are available from dozens of manufactures in a variety of form factors, such as OBD, hardwired, and standalone or battery-operated, making them suitable for a wide range of applications.
Many of these GPS trackers are designed with basic software and firmware in order to simplify device configuration, which is typically done by sending SMS messages with specific commands to set up network connection information, tracking intervals, and other preferences.
Although Soracom platform services are built to give developers full control to build highly-sophisticated IoT applications, the Soracom Air IoT SIM itself can also be paired with these GPS trackers to achieve a near-pre-built solution.
Since many GPS trackers are designed primarily to be used with SIM cards provided directly from a local network operator and configured by SMS from your phone, setting up the device to use a Soracom Air IoT SIM card requires a couple different approaches, explained in this guide.
Requirements
To get set up, you will need the following:
- A Soracom account
- A Soracom SIM card
- Your GPS tracker device, including an appropriate power source
- Your GPS tracker device's user manual, including SMS command reference, provided by the manufacturer
- A computer with access to the Soracom User Console, to send and receive SMS
Important Considerations
While the Soracom platform is hardware-agnostic and therefore compatible with most devices, certain GPS trackers may have specific limitations that prevent them from being used with Soracom. Check with the device manufacturer to ensure the device supports the following:
- The device can be used with roaming SIM cards, and can register to a roaming network.
- The device is capable of performing a network scan and automatically registering to an available network.
- The device can receive SMS from and send SMS to 6-digit phone numbers.
As many GPS trackers are designed to be used with SIM cards provided directly from a local network operator, the user manual or specifications may not always contain the above information. Contact the device manufacturer directly for additional details.
Additionally, many GPS trackers send location data in a proprietary format which is designed to be processed by third-party asset tracking software, such as AVL or fleet tracking platforms, which often require separate subscriptions. While you can use the Soracom Air IoT SIM to send tracking data to these third-party services, Soracom is not affiliated with these providers and cannot provide support for device compatibility, data security, or configuration.
Depending on the format of the proprietary location data, you may be able to process the location data into a format that can be handled directly by Soracom Harvest and Soracom Lagoon in order to build a basic dashboard directly on Soracom. However, Soracom is not a replacement for asset tracking software, and cannot provide support for replicating the features of such platforms, as the functionality depends on the capabilities of the GPS tracker you use. For more information, refer to the Additional Resources section below.
SIM Registration
If you have not already done so, take a moment to follow the instructions in the SIM Registration documentation and register your Soracom SIM card to your account.
Hardware Setup
-
Carefully remove the Soracom SIM card from its packaging.
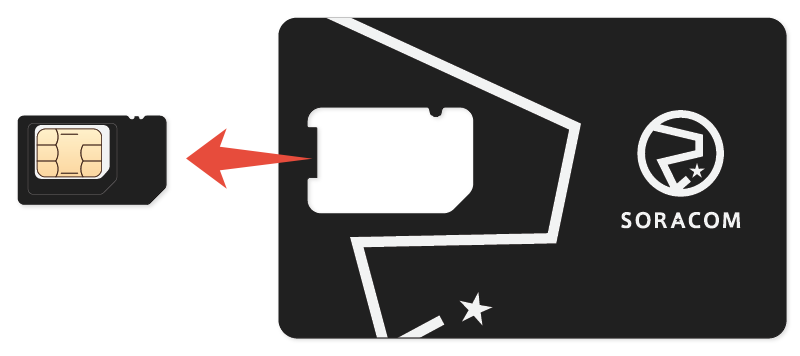
The plan01s SIM is a 3-in-1 design that allows you to conveniently break out the SIM card into standard/mini (2FF), micro (3FF), and nano (4FF) form factors. Refer to your GPS tracker manual to determine which size you need, and carefully remove the SIM from the packaging.
- Follow your GPS tracker's instructions to access the SIM card slot or tray, and carefully insert the SIM, paying attention to the correct orientation.
Before connecting your device to a power source, check whether or not the device is programmed to reply with a confirmation SMS after each configuration SMS is sent, and whether or not you need to receive these SMS responses. If so, follow the next Harvest Configuration section to set up the Soracom Harvest service, which will allow you to capture the SMS responses.
If the device does not send confirmation SMS responses, or if you can safely disregard these messages, proceed to the Device Configuration section.
Harvest Configuration
When you send an SMS to the GPS tracker, the SMS will be sent from a 901001 service code. This code acts as the "phone number" of the Soracom platform. For devices that are programmed to automatically reply to the same number, this means that any confirmation SMS responses sent back from the device will be sent to 901001.
Note that the Soracom SIM does not support sending SMS to external phone numbers, such as to your personal phone. For more information on SMS limitations, refer to the SMS & USSD documentation.
Soracom provides multiple ways for you to handle SMS messages that are sent to the 901001 service code, such as using
Soracom Beam
to forward the SMS as an HTTP request to your web server, using
Soracom Funnel
to send it to a cloud service such as AWS Kinesis or Azure Event Hubs, or using
Soracom Funk
to process it using a cloud function such as AWS Lambda or Google Cloud Functions.
For simplicity, the Soracom Harvest service will let you store and view the SMS directly on Soracom, without setting up other servers or cloud services.
Soracom Harvest is a paid service. A free tier is available which allows you to use Harvest for free with 1 SIM each month, which should be sufficient to allow you to test and verify that you can successfully configure your GPS tracker. Once you have completed setting up your device, we recommend turning off the Harvest service in order to avoid unwanted charges.
Note that sending and receive SMS messages will incur SMS fees, separate from the Harvest service.
Refer to the Pricing & Fee Schedule for more information.
-
Login to the User Console. From the Menu, open the SIM Management screen.
-
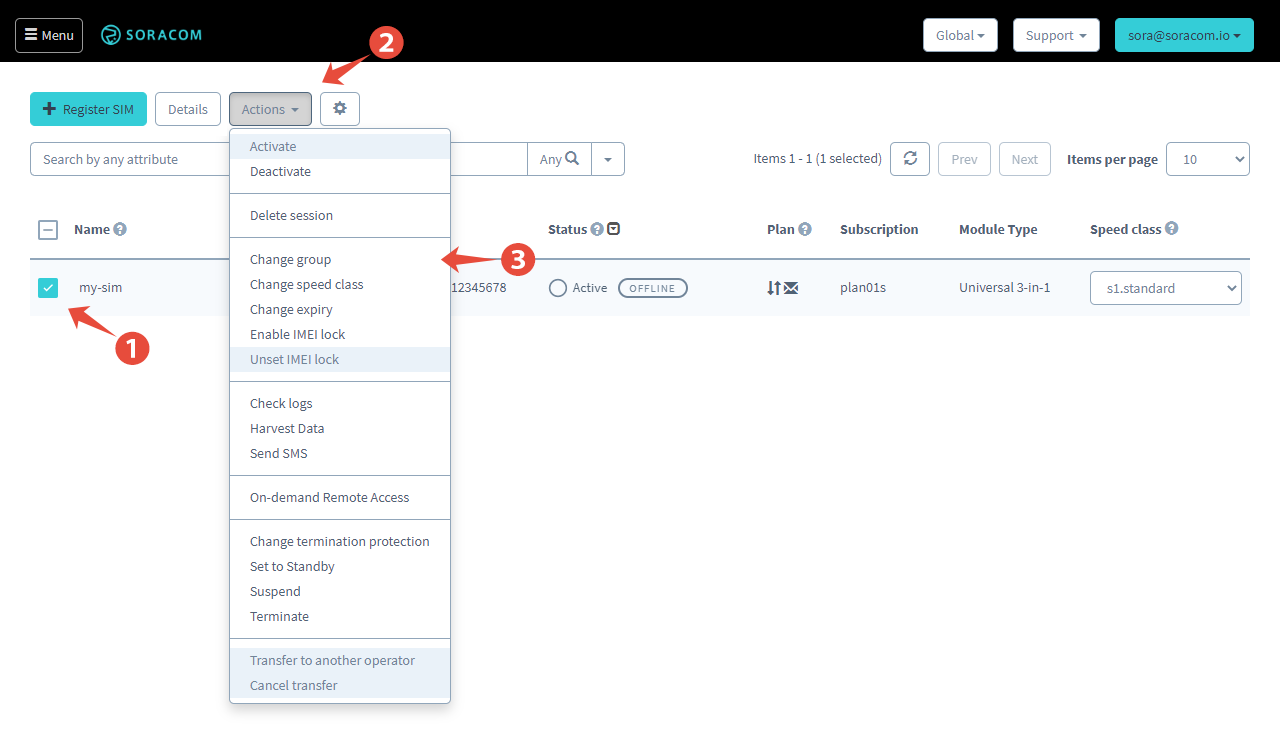
If you have not created a Group for your SIM, click the for the SIM you want to set up, then click the Actions menu and select Change group.
Select the option to create a new group, and enter a name for the group. Then click the Change Group button to assign the SIM to the group.
-
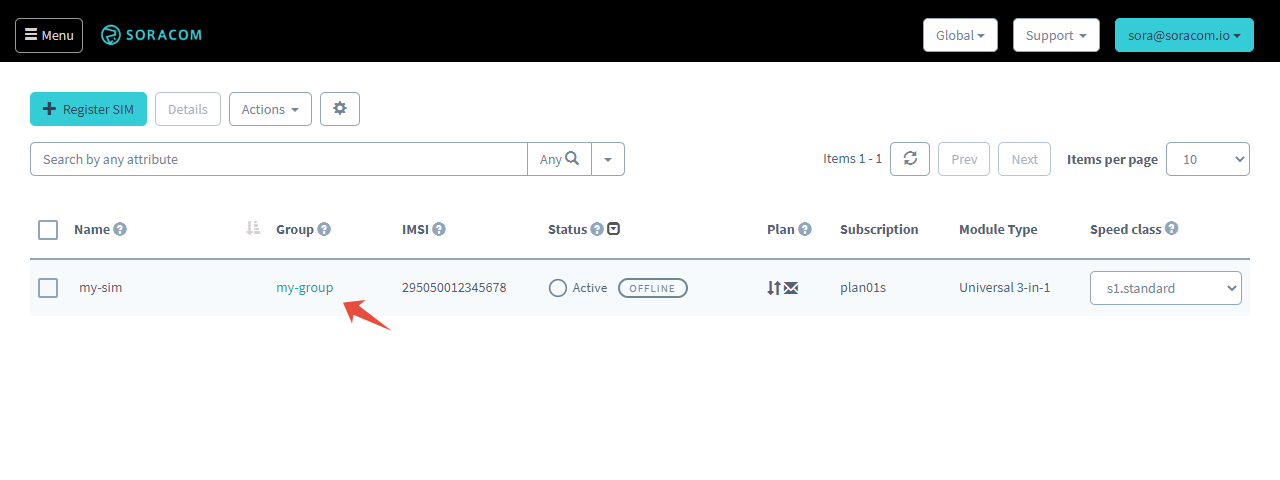
Click the name of the group to open its settings screen.
-
Underneath the Basic Settings tab, click the SORACOM Harvest Data panel to expand its settings.

Enable Harvest Data by switching the option to ON. Then click the Save button.
With the Harvest service enabled, any SMS sent back to Soracom by your device will automatically be captured and stored on Soracom.
To view SMS messages that are sent back to Soracom, click the for the device you want to view. Then click the Actions menu, and select View Harvest Data.

For additional information on using the Harvest service, refer to the Harvest: Configuration and Harvest: Viewing Data documentation.
Device Configuration
Now, connect your GPS tracker to a power source. If necessary, follow any additional instructions in the manual to turn the device on.
Once your device is powered on, it should immediately begin searching for an available cellular network that it can register to. Refer to the device manual to check if a particular status light indicates that the device has found a network and has registered to it.
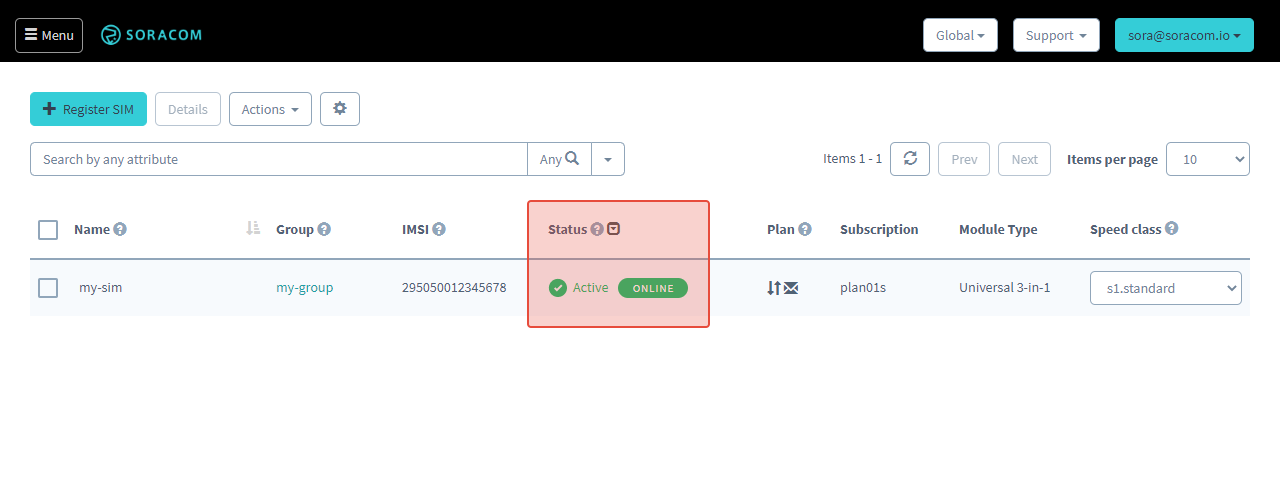
Even though the GPS tracker has registered to a network, it will still appear Offline in the Soracom User Console, and will only appear as Online once the device's GPRS or data connection settings have been configured and the device has connected to the data network.
You can then send an SMS to the device to configure it:
-
Login to the User Console. From the Menu, open the SIM Management screen.
-
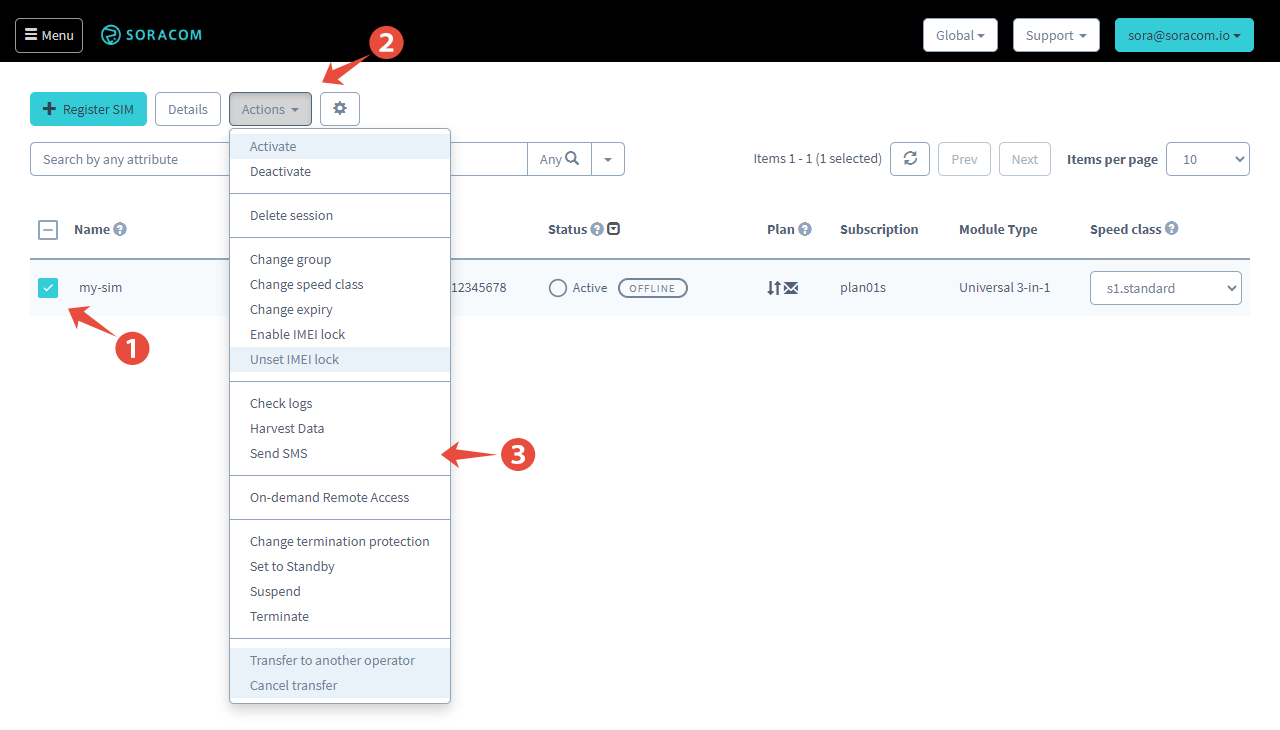
From the list of subscribers, click the for the SIM you want to set up.
-
Click the Actions menu, then select Send SMS.
-
Follow the device manual's instructions for entering the configuration command as the SMS content. Then select the Encoding for the message, and click Send SMS.
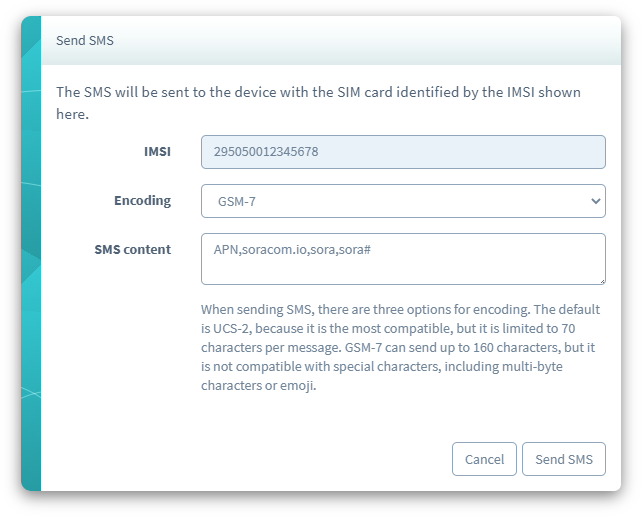
Most GPS trackers require sending SMS to the device using the
GSM-7encoding format. However, if your device manual specifically indicates that you should send usingUnicodeorUCS-2, you can select it instead.When configuring your GPS tracker's GPRS or data connection settings, use the following Access Point Name (APN) settings:
- APN -
soracom.io - Username -
sora - Password -
sora
- APN -
- If you previously enabled the Harvest service, you can check the Harvest Data to see if your device returned a confirmation SMS as a result of successfully receiving the configuration SMS.
Once your device has been successfully configured to connect to a GPRS or data network, it will appear Online as soon as the device starts a data connection:
You can then repeat the steps above for each of the SMS commands needed to configure the device, such as configuring the IP address and port of the AVL or fleet tracking platform that you have prepared in advance for receiving GPS tracking data from the device.
Troubleshooting
Registering to a Network
When using a SIM card provided by a local network operator, the GPS tracker will automatically register to the home network, a process which happens immediately. As soon as the device has registered to the home network, SMS messages can be sent to the device to configure it.
As the Soracom SIM is a roaming SIM, a GPS tracker must perform a network scan in order to determine which networks are currently available, and which networks it is allowed to roam on. When using a Soracom SIM card in a GPS tracker for the first time, this network scan process can take several minutes, and during this time SMS messages cannot be sent to the device.
Since many GPS trackers do not provide a way to control the network scan or manually specify which network the device should register on, you must check with the device manufacturer ensure that the device is capable of performing the network scan automatically, as well as registering to a network once the scan is complete.
Some GPS trackers may provide LED status lights that indicate when the device is searching for a network, and when the device has successfully registered to a network, such as flashing an LED while the device is scanning networks, and turning the LED solid once it has registered to a network. You may need to refer to the device manual or contact the device manufacturer to determine the meaning of any status indicators.
Keep in mind that a data connection is normally established after a device has registered to a network. Therefore, while a "GPRS connected" (or similar) status light implies that network registration was completed successfully, a "GPRS not connected" status light does not necessarily indicate whether or not network registration occurred.
In some cases, you can bypass the network scan by first inserting the Soracom SIM card into your smartphone, and performing the network scan from your smartphone or manually connecting to a network that your GPS tracker also supports. Once your smartphone connects to a network, the network information will be cached on the SIM card. Some GPS trackers can then take this cached network information to immediately connect to the network without performing a network scan.
Error Logs
When sending an SMS from the User Console to your GPS tracker, any errors Soracom encounters when trying to send the SMS will be reported in the Error Logs section of the User Console. To view these errors:
-
Login to the User Console.
- From the Menu, open the Error Logs screen.
From the Error Logs, you might find the following logs:
-
unable to deliver short message: absent subscriber sm- This error occurs when the device has not registered to a network, so Soracom cannot find where to send the SMS. -
unable to deliver short message: subscriber busy for MT SMS- This error occurs when the device has registered to a network, but the network is busy delivering another SMS to the device so Soracom cannot deliver the SMS. -
unable to deliver short message: SM delivery failure- This error occurs when the device has registered to a network and Soracom attempted to deliver an SMS to the device, but the delivery failed. Possible reasons for delivery failure:- The device does not support the SMS format
- The device's SMS memory capacity was exceeded
- The network is congested and cannot handle the SMS
- The device deregistered from the network during delivery
-
unable to deliver short message: system failure- Same as above, but the delivery failed due to a different problem in the network. Subscriber configuration is not found- This error occurs when the device sends an SMS back to Soracom, but your Soracom account has not been configured to handle the SMS, so the SMS was discarded.
As a GPS tracker may behave differently when using Soracom's roaming SIM, there may be an additional delay between powering on the device and the device registering to a network and becoming ready to receive SMS messages. You may need to contact the device manufacturer for additional details regarding any additional delays or specific device behavior when using the device with a roaming SIM.
In some cases, a GPS tracker may also be programmed to automatically turn off or deregister from a network after a specific duration. Refer to the device manual to determine if an SMS delivery error might be related to this behavior.
To troubleshoot SMS delivery issues, you can insert the Soracom SIM into a smartphone in order to test SMS capabilities in a device that allows you to check the SMS behavior directly.
Whitelist and Blacklist
Some GPS trackers include a security feature to block SMS messages from certain numbers while only allowing SMS messages from others. In order to send an SMS from the Soracom User Console to your device, it must be configured to accept SMS messages 901001. Similarly, some devices allow you to configure whether responses should be sent to the same number, or to a separate number. In order to receive responses back from the device, it should be configured to send response SMS messages to 901001 (or automatically reply to the same number).
As 901001 is treated as a service code, ensure that the + symbol is not used before this number.
In some cases, a device may require SMS messages to be received from or sent to phone numbers with a minimum number of digits (such as a 10-digit number). You may need to check with the device manufacturer if the device supports receiving SMS messages from (and sending SMS messages to) service codes with a 6-digit number.
Additional Resources
Storing Raw Data on Soracom
Many GPS trackers will send location data over a GPRS connection using a simple TCP or UDP request. If you do not need to reformat or process the data and simply want a quick way to capture the raw data, you can configure your device to send its data to Soracom Harvest and then download the raw data from Harvest.
For devices that send location data using TCP or UDP, your device should be configured to send data to harvest.soracom.io on port 8514.
If your device supports sending location data using HTTP POST requests, you can also send it to Harvest by configuring your device to send data to harvest.soracom.io on port 80.
To download captured data, refer to the Harvest: Downloading Data documentation.
Sending Raw Data to the Cloud
If you want to capture the raw data on your own server or send it to a cloud service, you can use Soracom Beam or Soracom Funnel.
Refer to each service's documentation for additional details on which hostname and port to use.
Generating Maps on Soracom
If your GPS tracker supports sending location data in a standard JSON format, you can configure your device to send its location data to Soracom Harvest using this format. You can then view the location data stored in Harvest on a map by specifying which attributes of the JSON data correspond to latitude and longitude GPS coordinates.
For more advanced maps, you can also use Soracom Lagoon to combine the GPS coordinate data stored in Harvest with additional data, to build more complex maps.
Processing Raw Data with Soracom Orbit
If your GPS tracker sends location data in a proprietary format, but your application only requires basic location tracking data, you can use Soracom Orbit to convert your device's proprietary data format to a standard JSON format.
Once converted, you can then use any of the above services to send your JSON-formatted data to your server, to a cloud service, or to Harvest and Lagoon.