Soracom Air for Cellular
Remote Command
The pricing for Remote Command is scheduled to be announced in June 2025 (tentative). Until then, these APIs will be available for free.
Overview
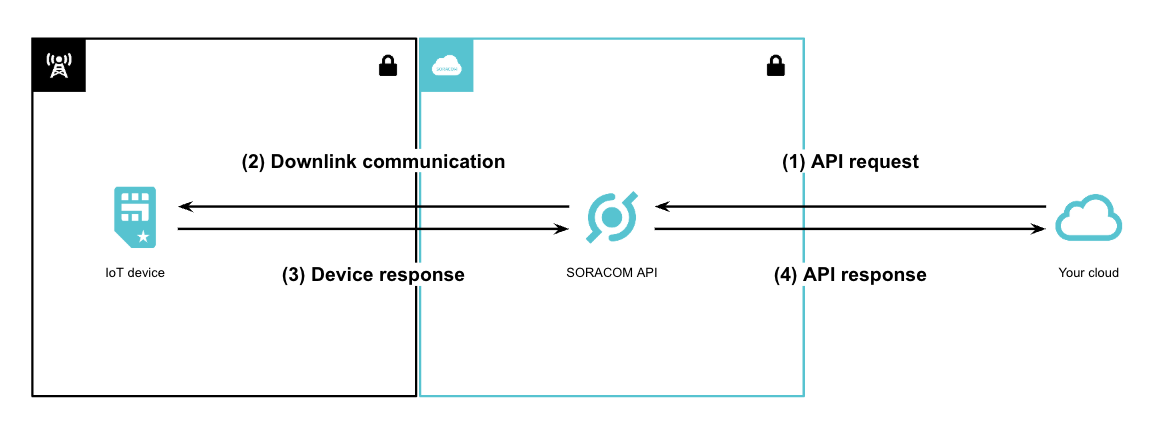
Remote Command enables downlink communications from the cloud to IoT devices.
Traditionally, cloud-to-device downlink communication has been challenging due to security concerns and network configuration complexities. Remote Command addresses these challenges by accepting SSH or HTTP commands and associated data through the Soracom API, and securely transmitting the commands or data to devices via Soracom's secure private network. This architecture ensures a simple and secure communication channel.
With Remote Command, even legacy IoT devices can seamlessly integrate with the cloud as long as they accept communication over HTTP or SSH. Furthermore, when combined with low-code development environments like Soracom Flux, it enables the creation of more sophisticated IoT systems, such as automatically sending commands to devices triggered by sensor data or cloud-based events.
Comparison with Other Features
Soracom offers multiple options for downlink communication. The table below compares Remote Command with other features:
Feature | Remote Command | Send SMS to Device | Soracom Napter | Remote Device Access using Soracom Gate |
---|---|---|---|---|
Description | Sends commands or data to devices and receives execution results | Sends data to devices | Provides on-demand remote access to devices | Allows continuous remote access to devices |
Supported Communication Protocol | SSH, HTTP | SMS | TCP such as SSH, HTTP, VNC | Any |
Max Data Size to Device | 8 KiB (SSH), 5 MiB (HTTP) | 140 B | Unlimited | Unlimited |
Uplink Response to Downlink | - | |||
Connection Duration | Until the API call completes | - | Until the on-demand remote access expires | Persistent |
Remote Command has a 10-second timeout. If the device does not respond in time, the API returns a 422 HTTP error.
Use Cases
Remote Command is intended for the following use cases:
Use Case | Description |
---|---|
Initial Parameter Setting (Provisioning) | Set the necessary configuration for manufacturing and deployment (Wi-Fi settings, authentication credentials, sensor thresholds, etc.) for each device. |
FOTA (Firmware Over-the-Air) Updates | Remotely trigger firmware updates on devices, apply security patches, and add new features. |
ONVIF-Compatible Cameras | Use the ONVIF (Open Network Video Interface Forum) protocol to control pan-tilt-zoom (PTZ) operations on IP cameras. |
Configuration Changes | Modify settings of devices such as PLCs (Programmable Logic Controllers). |
Accessing Device REST APIs | Interact with REST APIs on IoT gateways to retrieve sensor data and control relays. |
Industrial Equipment Control (e.g., Traffic Lights) | Remotely control traffic lights in factories and warehouses (on/off, blinking, etc.). |
IoT Lock/Unlock | Remotely control electronic locks for remote access management. |
Log Collection | Retrieve device operation logs and error logs for monitoring and analysis. |
Accessing Other Devices on a Local Network | Use the target device as a gateway to access other connected devices in the local network. |
Alive Monitoring | Periodically check the operational status of devices and trigger alerts upon detecting anomalies. |
Sending HTTP/S Commands to a Device
You can use the Soracom User Console to send commands via HTTP to devices that use IoT SIMs. You can also verify the results in the console.
Prepare your device:
Set up your device in advance so that it will execute any process triggered by an HTTP request and return the result of that process as an HTTP response.
From the User Console
-
Login to the User Console. From the Menu, open the SIM Management screen.
-
From the list of subscribers, click the for the SIM you want to send an HTTP/S command to.
-
Click the Actions menu, then select Send Command via HTTP/S.
-
Configure the following settings:
Setting Description Protocol Select the protocol that the device accepts requests on. Port Specify the port number that the device accepts requests on. Example: 80, 443 Path Specify the URL path. Do not include the hostname. Example: /path/to/resource Method Select the HTTP method. Headers Add to add multiple HTTP headers. Body If you select POST, PUT, or DELETE in Method, enter the request body to send. -
Click Send.
An HTTP request (command) is sent to the device. When the command execution is complete on the device, the HTTP response (command execution result) is displayed.
From the Soracom API
To access the Soracom API, first use the auth API to obtain an API Key and Token. Refer to the API Usage Guide for instructions on how to use the API Key and Token in API requests.
Then, use the sendDownlinkHttp API to send an HTTP command to an IoT SIM using its SIM ID:
curl -X POST \
| -H 'X-Soracom-API-Key: <MY-API-KEY>' \
| -H 'X-Soracom-Token: <MY-TOKEN>' \
| -H 'Content-Type: application/json' \
| -d '{
| "method": "POST",
| "path": "/command/settings",
| "port": 6443,
| "skipVerify": false,
| "ssl": true,
| "headers": {
| "Content-Type": "application/json"
| },
| "body": "{\"param1\":\"value1\", \"param2\":\"value2\"}",
| }' \
| https://g.api.soracom.io/v1/sims/<SIM_ID>/downlink/http
Sending SSH Commands to a Device
You can use the Soracom User Console to send commands via SSH to devices that use IoT SIMs. You can also verify the results in the console.
You can use this feature with either a password-based setup or a key-pair setup.
From the User Console with Password
-
Login to the User Console. From the Menu, open the SIM Management screen.
-
From the list of subscribers, click the for the SIM you want to send a SSH command to.
-
Click the Actions menu, then select Send Command via SSH.
-
Configure the following settings:
Setting | Description |
---|---|
Username | Enter the username for SSH login to the device. Example: pi |
Port | Enter the port number that the device accepts SSH connections on. Example: 22 |
Authentication Method | If you want to use password authentication to send commands via SSH, select Password authentication. |
Password |
Select the password to use for authentication. - To use a password registered in the Credential Sets, select Use Soracom Credential Sets and choose the password. - To newly register and use a password in the Credential Sets, click Add to register the password. - To enter a password directly, select Enter directly and input the password. |
Command | Enter the command to execute on the device. Example: reboot |
-
Click Send.
The command will be sent to the device. Once the device finishes executing the command, the result will be displayed.
From the User Console with SSH Key Authentication
To use this feature, ensure that you've prepared an SSH key pair.
-
Login to the User Console. From the Menu, open the SIM Management screen.
-
From the list of subscribers, click the for the SIM you want to send a SSH command to.
-
Click the Actions menu, then select Send Command via SSH.
-
Configure the following settings:
Item | Description |
---|---|
Username | Enter the username for SSH login to the device. Example: pi |
Port | Enter the port number that the device accepts SSH connections on. Example: 22 |
Authentication Method | If you want to use public key authentication to send commands via SSH, select Public key authentication. |
Private Key (PEM format) |
Select the private key to use for authentication. - To use a private key registered in the Credential Sets, select Use Soracom Credential Sets and choose the private key. - To newly register and use a private key in the Credential Sets, click Add to register the private key. - To use a private key saved on your local computer, select Enter directly and input the private key. |
Private Key Passphrase | If the private key is protected with a passphrase, enter the passphrase. |
Command | Enter the command to execute on the device. Example: echo 'Hello world!'; ls -l |
-
Click Send.
The command will be sent to the device. Once the device finishes executing the command, the result will be displayed.
From the Soracom API
To access the Soracom API, first use the auth API to obtain an API Key and Token. Refer to the API Usage Guide for instructions on how to use the API Key and Token in API requests.
Then, use the sendDownlinkSsh API to send an SSH command to an IoT SIM using its SIM ID:
curl -X POST \
| -H 'X-Soracom-API-Key: <MY-API-KEY>' \
| -H 'X-Soracom-Token: <MY-TOKEN>' \
| -H 'Content-Type: application/json' \
| -d '{
| "username": "username",
| "port": 22,
| "authentication": {
| "type": "publickey",
| "key": "-----BEGIN OPENSSH PRIVATE KEY-----\nb3BlbnNzaC1rZXktdjEAAAAACmFlczI1Ni1jdHIAAAAGYmNyeXB0AAAAGAAAABCugi/Kbh\nICu7Nwdn....",
| },
| "command": "reboot",
| }' \
| https://g.api.soracom.io/v1/sims/<SIM_ID>/downlink/ssh
Preparing an SSH Key Pair (Public Key Authentication Only)
Before sending SSH commands via Remote Command, you'll need to prepare an SSH key pair:
Here, we will create public and private key pair files to use for SSH login and save them as follows:
- Public key,
id_ed25519.pub
: Save it in a designated location on your target device. - Private key,
id_ed25519
: Save it in the authentication information store of the Soracom User Console.
-
Create a public/private key pair on your PC from a Linux environment.
ssh-keygen >Generating public/private ed25519 key pair... >Enter file in which to save the key (/home/xxxx/.ssh/id_ed25519):
Follow the instructions on the screen to create a public key (
id_ed25519.pub
) and private key (id_ed25519
).If you set a passphrase, specify it when creating a Soracom authentication.
-
Copy the public key,
id_ed25519.pub
, to your target device.Copy the public key using any method you like. From now on, the target device,
user name
will be referred to as${user}
. Example:pi
- If you are copying from an environment where you can use Linux
ssh-copy-id
, etc., to the target device that can be accessed by an IP address (e.g., 192.168.xxx.xxx), run the following command:
ssh-copy-id -i /PATH/TO/PUBLIC_KEY ${user}@192.168.xxx.xxx
- If you are copying from an environment where you can use Linux
ssh-copy-id
to a target device that uses an IoT SIM, you can create an on-demand remote access in Napter even if you are in a remote location by executing the following command. For more information about on-demand remote access in Napter, see Soracom Napter documentation.
Replace
xxxx
andxxx-xxx-xxx-xxx.napter.soracom.io
with the port number and domain issued by Napter's on-demand remote access.ssh-copy-id -i /PATH/TO/PUBLIC_KEY -p xxxx ${user}@xxx-xxx-xxx-xxx.napter.soracom.io
- Similarly, use
scp
if you are copying from an environment where Windows is available, run a command like the following:
scp -P xxxxx /PATH/TO/PUBLIC_KEY ${user}@xxx-xxx-xxx-xxx.napter.soracom.io:/home/${user}/
In this case, you will also need to access the target device via ssh and move the contents of
id_ed25519.pub
to the appropriate location.ssh -p xxxxx xxx-xxx-xxx-xxx.napter.soracom.io -l ${user} |mkdir -p ~/.ssh |cat ~/id_ed25519.pub >> ~/.ssh/authorized_keys |chmod 600 ~/.ssh/authorized_keys |rm ~/id_ed25519.pub
- If you are copying from an environment where you can use Linux
-
Verify that you can log in to the target device using the SSH key pair.
ssh -p xxxxx xxx-xxx-xxx-xxx.napter.soracom.io -l ${user}
If you set a passphrase for your key pair, you can log in by entering the passphrase.
-
Register the private key in the Soracom User Console.
Specifically, register the credentials on the Register credentials screen of the Credentials Store as follows. For information on how to display this screen, see Creating a Credential Set.
- Authentication Information ID: Enter a name to identify the credentials. For example:
Private-Key
. - Type: Select Private Key (PEM).
- Private key (PEM): Copy the contents of the private key (
id_ed25519
).
- Authentication Information ID: Enter a name to identify the credentials. For example: