Soracom Air for Cellular
Transferring Soracom IoT SIMs
Once an IoT SIM has been registered to a Soracom account, all aspects of the SIM, such as configuration and billing, will be associated with that Soracom account. In some cases, you may want to manage a SIM using a different Soracom account, such as maintaining a separate account for a project or department, or giving control of a SIM to an end-user. Although an IoT SIM cannot be registered to more than one Soracom account at a time, its registration can be transferred from one Soracom account to another. Depending on the subscriber status of your SIM, see the table below for the appropriate next steps.
| Subscriber Status | Next Steps |
|---|---|
| Ready | Self-service transfer using the User Console or API. See Transferring Ready Status SIMs. |
| Active ONLINE, Active OFFLINE, Inactive, Standby or Suspended | Support-assisted transfer upon request. See Transferring SIMs in Other Statuses. |
| Terminated | Terminated SIMs cannot be transferred. You can purchase a new SIM through your User Console account or that of the destination Soracom account. |
Once a SIM changes from Ready to another status, it cannot be changed back to Ready. If you are planning to transfer a Ready status SIM, you must ensure that the SIM will not be used to connect to a network prior to completing the transfer. If the SIM is used to connect to a network before or during the transfer process, such as to verify that a device is working properly, its status will automatically change to Active, and you will need to use the steps outlined in Transferring SIMs in Other Statuses to transfer it.
Transferring Ready Status SIMs
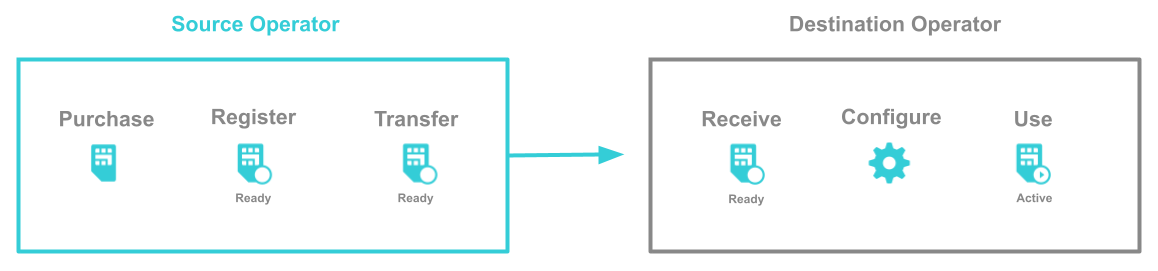
You can transfer Ready status IoT SIMs to another Soracom account directly from the User Console or programmatically using the Soracom API. The basic transfer process is illustrated below.
Conditions and Limitations
When transferring Ready status SIMs, the following conditions and limitations apply:
- Some SIM cards cannot be transferred due to specific terms and conditions, resulting in an error when a transfer is attempted.
- The following SIM settings are not transferred from the source Soracom account:
- Tags (including the name of the IoT SIM)
- Expiration
- Termination Protection
- Group Settings
- Event Handler
If these settings are required for devices to function after their SIMs have been transferred, ensure that the destination Soracom account owner is aware that additional configuration will be required after the transfer.
Initiating a SIM Transfer
Any fees associated with the SIMs being transferred will be billed to the source Soracom account until the transfer has been completed. Once the destination Soracom account has accepted the transfer, any new fees associated with the SIMs will be billed to the destination Soracom account.
To transfer a Ready status SIM, you will need the following:
- Your Soracom account (the source Soracom account)
- One or more SIMs to transfer, each of which is in the Ready status
- The primary Email Address and Operator ID of the Soracom account you want to transfer the SIMs to (the destination Soracom account)
To obtain the destination Soracom account's primary email address or Operator ID, contact the owner of the destination Soracom account. They will be able to obtain these details by logging into the User Console and selecting their account from the drop-down menu in the top right corner.
Before proceeding, ensure that the destination Soracom account will be available to accept the transfer, as the link sent via email expires after 24 hours.
To begin transferring Ready SIMs:
-
Login to the User Console. From the Menu, open the SIM Management screen.
-
From the list of subscribers, click the for the SIM you want to transfer.
-
Click the Actions menu, then select Transfer to another operator.
-
Enter the destination operator Email and ID, then click Transfer.
- Destination Operator Email - The primary email address of the destination Soracom account.
- Destination Operator ID (OP + 10 digits) - The operator ID of the destination Soracom account.
Once you initiate the SIM transfer, the status of each SIM will change to Transferring, and an email will be sent to the destination Soracom account, allowing them to accept and complete the transfer
During this transfer process, ensure that the SIMs will not be used to connect to a network, and that the SIM status is not changed from Transferring. If the SIM status changes, the transfer process will be aborted, and you will no longer be able to use this method to transfer the SIMs to another account.
To complete the transfer, the owner of the destination Soracom account will need to accept the transfer using the steps in the next section.
Accepting a SIM Transfer
A registered payment method is required on the destination Soracom account to accept SIM transfers. Refer to Register a Payment Method for more information.
To accept a SIM transfer request:
-
Login to the User Console.
-
If necessary, change the Coverage Type (Global Coverage or Japan Coverage) to match that of the SIMs being transferred. Refer to Coverage Types for more information.
-
Using the same browser, open the SIM transfer request email that was sent to the primary email address of the destination Soracom account and click the URL included in the email.
Clicking the link in the SIM transfer request email will immediately accept the transfer request upon opening the page. If you are not signed in, you may be prompted to do so first, upon which the transfer request will be completed.
If you are not expecting a SIM transfer or do not wish to accept a transfer request, you may safely ignore the SIM transfer request email.
Once you have accepted the SIM transfer request, the SIMs will appear in your account, and you can begin using the SIMs by installing them in your devices and setting up the Soracom APN information as needed.
If the transferred SIMs require a specific configuration to function with existing devices, reach out to the owner of the source Soracom account to determine the appropriate configuration.
Canceling a SIM Transfer
If you need to cancel the transfer of a SIM:
- Login to the User Console. From the Menu, open the SIM Management screen.
- From the list of subscribers, click the for the SIM you want to cancel.
- Click the Actions menu, then select Cancel Transfer.
Canceling a SIM transfer will cancel the transfer of all SIMs included in the original request. It is not possible to cancel individual SIMs within a multi-SIM transfer request. If you need to remove individual SIMs from a SIM transfer, cancel the original request and restart the transfer process.
SIM transfers cannot be canceled if the destination Soracom account has already accepted the transfer.
Transferring SIMs in Other Statuses
To transfer SIMs that are in the Active, Inactive, Standby, or Suspended status, submit a SIM transfer request to Soracom by following the instructions below. Soracom will handle the process of transferring SIMs on your behalf.
Conditions and Limitations
When transferring Active, Inactive, Standby, or Suspended status SIMs, the following conditions and limitations apply:
- Some SIMs cannot be transferred due to specific terms and conditions. Once you submit a SIM transfer request, you will be notified if any SIMs cannot be transferred.
- SIM transfer requests must always be initiated by the source Soracom account where the SIMs are currently registered.
- The destination Soracom account must have accepted the appropriate regional terms and conditions for Soracom Air usage for the SIMs being transferred (Global or Japan). For example, if plan01s SIM cards are being transferred, the destination account must have accepted the Global terms and conditions for Air usage. You will be prompted to accept the terms and conditions for the relevant region the first time you switch your User Console to that region.
- Both the source and destination Soracom accounts must not have any outstanding charges.
- During the transfer, the following SIM settings will be preserved: Tags, Expiration settings, Subscription Containers, and IMEI Lock settings.
- During the transfer, the following SIM settings will not be preserved: Speed Class settings, Event Handler settings, Group settings, and stored data or files in Soracom Harvest.
- Existing active data sessions for SIMs will be deleted automatically during the transfer operation and cannot be transferred.
- If a Group exists on the destination Soracom account, you may specify its Group ID in your SIM transfer request, and each SIM's Group setting will be set accordingly during the transfer. If no Group is specified, the transferred SIMs will not be assigned to a Group.
-
A valid payment method for the appropriate region must be associated with the destination Soracom account. SIMs cannot be transferred to an account that does not have a valid payment method configured. Note that payment methods are registered separately for Japanese and Global coverages. Refer to the Payment Settings for more information.
-
Any fees associated with the SIMs being transferred will be billed to the source Soracom account until the transfer has been completed. Once the transfer operation has been completed, any new fees associated with the SIMs will be billed to the destination Soracom account.
- Once a SIM transfer request has been confirmed and processed, a SIM transfer fee will be charged to the source Soracom account. Refer to Pricing & Fee Schedule for more information.
If your device is not configured to create a new data session automatically, you may need to power cycle your device after the transfer has occurred.
Initiating a SIM Transfer Request
To submit a SIM transfer request, you will need to provide the following:
- The SIM ID(s) of the SIMs to transfer
- The Email Address and Operator ID of the operator account you want to transfer the SIMs to (the destination Soracom account)
- (Optional) The Group ID to be assigned to each SIM after transfer
-
Log in to the Soracom Support site using the source Soracom account.
-
Access the following link to open the SIM transfer request form, then fill in the required fields and submit the request:
Once you have submitted your request, Soracom will review it and confirm that both the source and destination Soracom accounts meet the required SIM transfer conditions. Soracom will notify you if there are any issues.
Then, Soracom will send a confirmation email to the primary email address of the destination Soracom account.
Accepting a SIM Transfer Request
Soracom’s confirmation email to the destination account will list the source account’s Operator ID along with the SIM IDs being transferred.
To accept a SIM transfer request, the destination operator account must reply to the confirmation email within 5 business days of sending the email.
If Soracom does not receive a reply within 5 business days, the SIM transfer request will be canceled.
Once Soracom receives confirmation, the SIM transfer request will proceed.
Transfer Timing And Confirmation
The timing of the SIM transfer depends on the date that the destination Soracom account replies to the confirmation email:
- If the reply is received by the 25th, the SIM transfer will be processed on the 1st of the following month.
- If the reply is received after the 25th, the SIM transfer will be processed on the 1st of the month after next
Transfer Timing Examples
| Transfer Request Date | Email Sent Date | Reply Date | Transfer Date |
|---|---|---|---|
| May 9, 2025 | May 12, 2025 | May 15, 2025 | June 1, 2025 |
| May 19, 2025 | May 22, 2025 | May 25, 2025 | June 1, 2025 |
| May 19, 2025 | May 22, 2025 | May 27, 2025 | July 1, 2025 |
| May 26, 2025 | May 28, 2025 | May 30, 2025 | July 1, 2025 |
| May 19, 2025 | May 22, 2025 | (no reply) | Canceled |
Programmatic Usage
You can also use the Soracom API and Soracom CLI to transfer Ready status SIMs.
SIMs that are in the Active, Inactive, Standby, or Suspended statuses cannot be transferred using the Soracom API or Soracom CLI. Refer to Transferring SIMs in Other Statuses for further steps on transferring these SIMs.
Soracom API
To access the Soracom API, first use the auth API with the source Soracom account to obtain an API Key and Token. Refer to the API Reference Guide for instructions on how to use the API Key and Token in API requests.
Next, use the issueSubscriberTransferToken API to initiate a SIM transfer:
curl -X POST \
|  -H 'X-Soracom-API-Key: <MY-API-KEY>' \
|  -H 'X-Soracom-Token: <MY-TOKEN>' \
|  -H 'Content-Type: application/json' \
|  -d '{
|        "transferDestinationOperatorEmail": "<DESTINATION-OPERATOR-EMAIL>",
|        "transferDestinationOperatorId": "<DESTINATION-OPERATOR-ID>",
|        "transferImsi": [
|          "<IMSI-TO-TRANSFER-1>",
|          "<IMSI-TO-TRANSFER-2>",
|          "<IMSI-TO-TRANSFER-3>"
|        ]
|      }' \
| https://g.api.soracom.io/v1/subscribers/transfer_token/issueThe status of the SIMs will change to Transferring, and the API will return a JSON response containing a token needed to accept the transfer:
{
  "token": "abcdef00-1111-2222-3333-444444444444-abcdef00-5555-6666-7777-888888888888"
}
During the transfer process, ensure that the SIMs will not be used to connect to a network, and that the SIM status is not changed from Transferring. If the SIM status changes, the transfer process will be aborted, and you will no longer be able to use this method to transfer the SIMs to another account.
If you want to cancel the SIM transfer, use the deleteSubscriberTransferToken API with the transfer token:
curl -X DELETE \
|  -H 'X-Soracom-API-Key: <MY-API-KEY>' \
|  -H 'X-Soracom-Token: <MY-TOKEN>' \
| https://g.api.soracom.io/v1/subscribers/transfer_token/<TRANSFER-TOKEN>Canceling a SIM transfer will cancel the transfer of all SIMs included in the original request. It is not possible to selectively remove individual SIMs. If you need to remove individual SIMs from a SIM transfer, cancel the original token, and generate a new token with a new set of SIMs to transfer.
Next, provide the token to the owner of the transfer destination Soracom account.
Finally, use the auth API with the destination Soracom account to obtain a new API Key and Token, and then use the verifySubscriberTransferToken API to accept the SIM transfer:
Soracom CLI
To use the Soracom CLI, you must first configure it to authenticate with your account information, authorization key, or SAM user credentials.
Note that you will need to first run the CLI using the source Soracom account credentials to initiate the SIM transfer, and then run the CLI again using the destination Soracom account credentials to accept the transfer. If you have credentials for both accounts, you can use the --profile <PROFILE-NAME> flag to switch between accounts with the CLI.
Next, use the following command with the source Soracom account to initiate a SIM transfer:
soracom subscribers issue-transfer-token \
|  --profile "<SOURCE-OPERATOR-PROFILE-NAME>" \
|  --transfer-destination-operator-email "<DESTINATION-OPERATOR-EMAIL>" \
|  --transfer-destination-operator-id "<DESTINATION-OPERATOR-ID>" \
|  --body '{
|    "transferImsi": [
|      "<IMSI-TO-TRANSFER-1>",
|      "<IMSI-TO-TRANSFER-2>",
|      "<IMSI-TO-TRANSFER-3>"
|    ]
|  }' \
| --coverage-type gSimilar to the API above, the status of the SIMs will change to Transferring, and the CLI will return a JSON response containing the token needed to accept the transfer:
{
  "token": "abcdef00-1111-2222-3333-444444444444-abcdef00-5555-6666-7777-888888888888"
}
During the transfer process, ensure that the SIMs will not be used to connect to a network, and that the SIM status is not changed from Transferring. If the SIM status changes, the transfer process will be aborted, and you will no longer be able to use this method to transfer the SIMs to another account.
If you want to cancel the SIM transfer, run the following command with the transfer token:
$ soracom subscribers delete-transfer-token --profile "<SOURCE-OPERATOR-PROFILE-NAME>" --token "<TRANSFER-TOKEN>" --coverage-type gCanceling a SIM transfer will cancel the transfer of all SIMs included in the original request. It is not possible to selectively remove individual SIMs. If you need to remove individual SIMs from a SIM transfer, cancel the original token, and generate a new token with a new set of SIMs to transfer.
Next, provide the token to the owner of the transfer destination Soracom account.
Finally, run the following command with the destination Soracom account to accept the SIM transfer: